2010 HUMMER H3 remove seats
[x] Cancel search: remove seatsPage 46 of 410

3-2 Seats and Restraints
Head Restraints
The front seats have adjustable
head restraints in the outboard
seating positions.
{WARNING
With head restraints that are
not installed and adjusted
properly, there is a greater
chance that occupants will
suffer a neck/spinal injury in a
crash. Do not drive until the head
restraints for all occupants are
installed and adjusted properly.
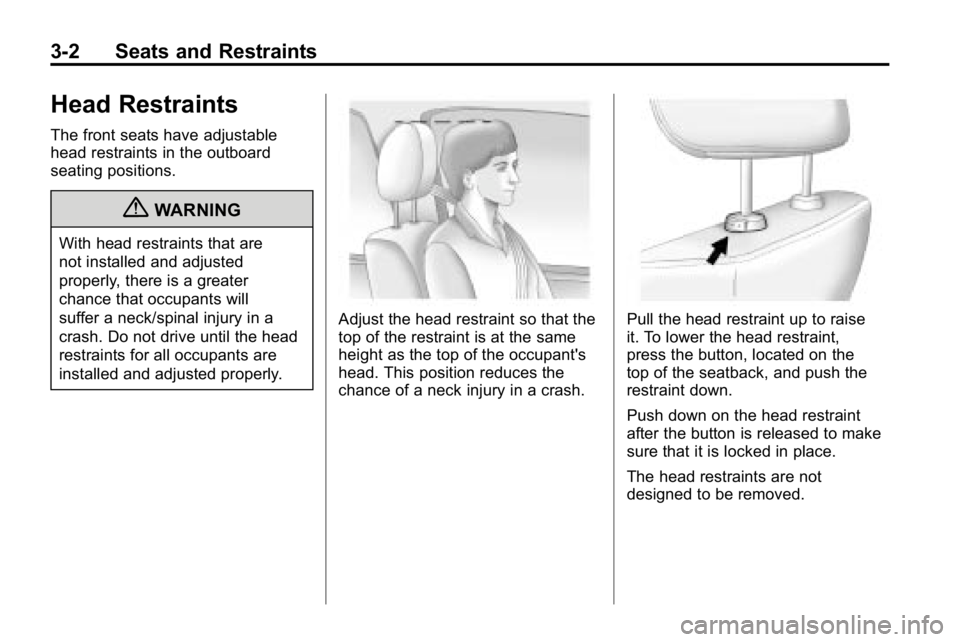
Adjust the head restraint so that the
top of the restraint is at the same
height as the top of the occupant's
head. This position reduces the
chance of a neck injury in a crash.Pull the head restraint up to raise
it. To lower the head restraint,
press the button, located on the
top of the seatback, and push the
restraint down.
Push down on the head restraint
after the button is released to make
sure that it is locked in place.
The head restraints are not
designed to be removed.
Page 53 of 410

Seats and Restraints 3-9
Rear Seats (H3T)
Notice:Folding a rear seat with
the safety belts still fastened may
cause damage to the seat or the
safety belts. Always unbuckle the
safety belts and return them to
their normal stowed position
before folding a rear seat.
To fold the rear seatback(s) forward:
1. Disconnect the rear center safety belt latch from the mini
buckle by inserting the tip of the
safety belt into the slot on the
buckle. Let the belt retract.
2. Pull the loop, located on theoutboard side of the seatback,
forward until you hear a click.
3. Fold the seatback forward slightly so that the headrest can
be removed.4. Remove the headrest bypressing the button on the
headrest post, at the top of the
seatback.
5. Lift the headrest off the seatback and store on the back panel.
Page 68 of 410

3-24 Seats and Restraints
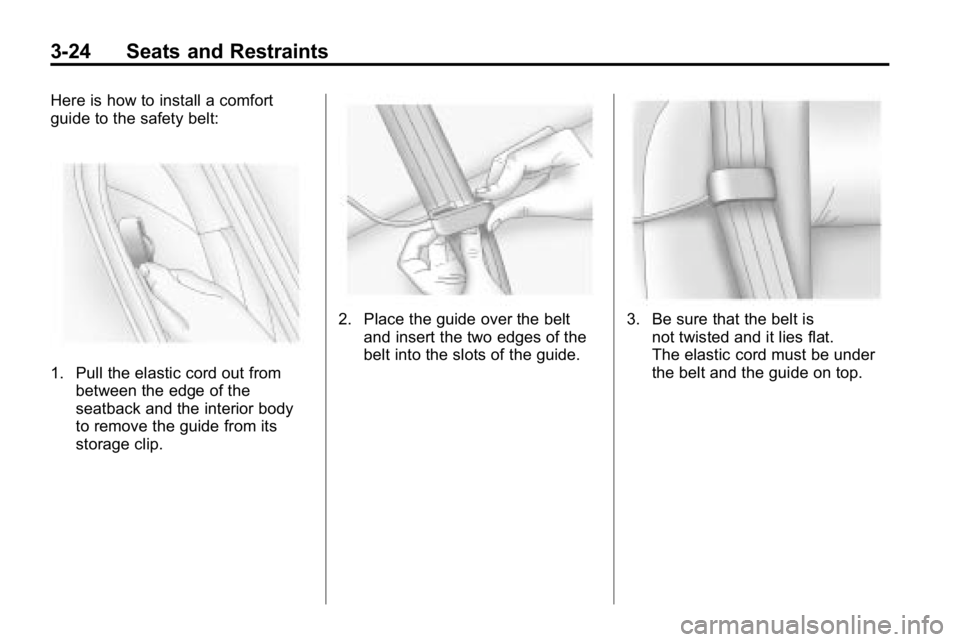
Here is how to install a comfort
guide to the safety belt:
1. Pull the elastic cord out frombetween the edge of the
seatback and the interior body
to remove the guide from its
storage clip.
2. Place the guide over the belt
and insert the two edges of the
belt into the slots of the guide.3. Be sure that the belt isnot twisted and it lies flat.
The elastic cord must be under
the belt and the guide on top.
Page 69 of 410

Seats and Restraints 3-25
{WARNING
A safety belt that is not properly
worn may not provide the
protection needed in a crash.
The person wearing the belt could
be seriously injured. The shoulder
belt should go over the shoulder
and across the chest. These parts
of the body are best able to take
belt restraining forces.
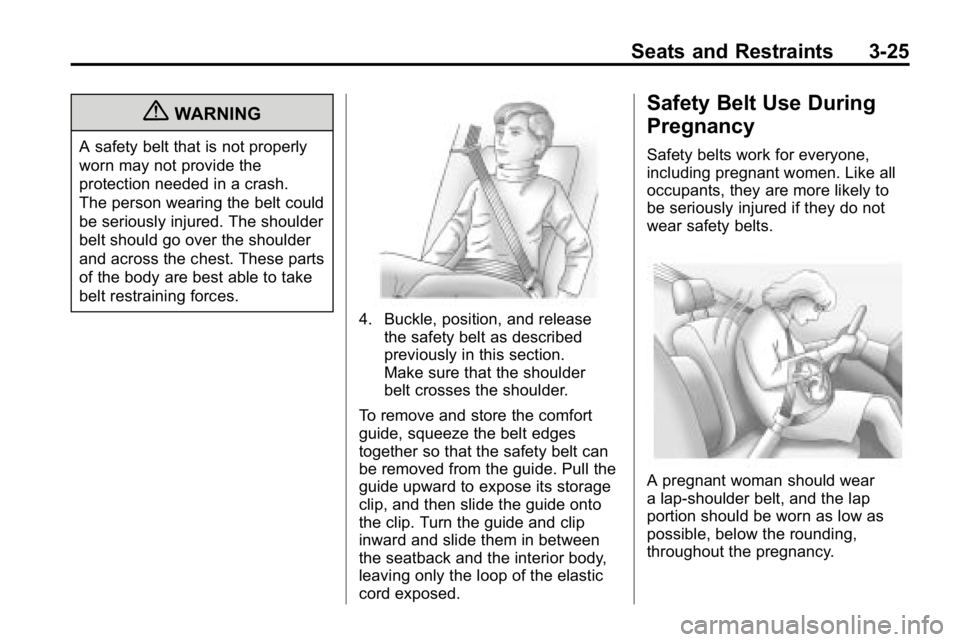
4. Buckle, position, and releasethe safety belt as described
previously in this section.
Make sure that the shoulder
belt crosses the shoulder.
To remove and store the comfort
guide, squeeze the belt edges
together so that the safety belt can
be removed from the guide. Pull the
guide upward to expose its storage
clip, and then slide the guide onto
the clip. Turn the guide and clip
inward and slide them in between
the seatback and the interior body,
leaving only the loop of the elastic
cord exposed.
Safety Belt Use During
Pregnancy
Safety belts work for everyone,
including pregnant women. Like all
occupants, they are more likely to
be seriously injured if they do not
wear safety belts.
A pregnant woman should wear
a lap-shoulder belt, and the lap
portion should be worn as low as
possible, below the rounding,
throughout the pregnancy.
Page 82 of 410

3-38 Seats and Restraints
If the On Indicator is Lit for a
Child Restraint
If a child restraint has been installed
and the on indicator is lit:
1. Turn the vehicle off.
2. Remove the child restraint fromthe vehicle.
3. Remove any additional items from the seat such as blankets,
cushions, seat covers, seat
heaters, or seat massagers.
4. Reinstall the child restraint following the directions
provided by the child restraint
manufacturer and refer to
Securing Child Restraints (Rear
Outboard Seating Position)
on
page 3‑59or Securing Child
Restraints (Rear Center Seating
Position)
on page 3‑61or
Securing Child Restraints (Right
Front Seat Position)
on
page 3‑62. 5. If, after reinstalling the child
restraint and restarting the
vehicle, the on indicator is still
lit, turn the vehicle off. Then
slightly recline the vehicle
seatback and adjust the seat
cushion, if adjustable, to make
sure that the vehicle seatback is
not pushing the child restraint
into the seat cushion.
Also make sure the child
restraint is not trapped under
the vehicle head restraint. If this
happens, adjust the head
restraint. See Head Restraints
on page 3‑2.
6. Restart the vehicle.
If the on indicator is still lit with a
child present in a child restraint,
secure the child restraint in a
rear seat position in the vehicle
and check with your dealer.
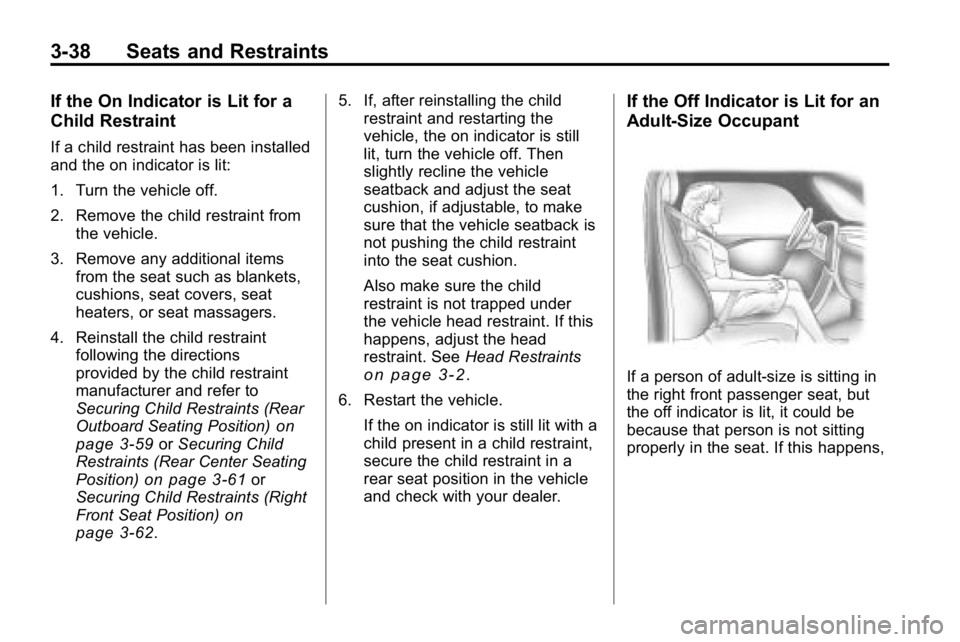
If the Off Indicator is Lit for an
Adult-Size Occupant
If a person of adult-size is sitting in
the right front passenger seat, but
the off indicator is lit, it could be
because that person is not sitting
properly in the seat. If this happens,
Page 83 of 410

Seats and Restraints 3-39
use the following steps to allow the
system to detect that person and
enable the right front passenger
frontal airbag:
1. Turn the vehicle off.
2. Remove any additional materialfrom the seat, such as blankets,
cushions, seat covers, seat
heaters, or seat massagers.
3. Place the seatback in the fully upright position.
4. Have the person sit upright in the seat, centered on the seat
cushion, with legs comfortably
extended.
5. Restart the vehicle and have the person remain in this position for
two to three minutes after the on
indicator is lit.Additional Factors Affecting
System Operation
Safety belts help keep the
passenger in position on the
seat during vehicle maneuvers
and braking, which helps the
passenger sensing system maintain
the passenger airbag status.
See “Safety Belts” and“Child
Restraints” in the Index for
additional information about the
importance of proper restraint use.
If the shoulder portion of the belt is
pulled out all the way, the child
restraint locking feature will be
engaged. This may unintentionally
cause the passenger sensing
system to turn the airbag off for
some adult size occupants. If this
happens, just let the belt go back all
the way and start again. A thick layer of additional material,
such as a blanket or cushion,
or aftermarket equipment such
as seat covers, seat heaters, and
seat massagers can affect how
well the passenger sensing system
operates. We recommend that
you not use seat covers or other
aftermarket equipment except when
approved by Hummer for your
specific vehicle. See
Adding
Equipment to the Airbag-Equipped
Vehicle
on page 3‑40for more
information about modifications that
can affect how the system operates.
{WARNING
Stowing of articles under the
passenger seat or between the
passenger seat cushion and
seatback may interfere with the
proper operation of the passenger
sensing system.
Page 101 of 410

Seats and Restraints 3-57
3. Tighten the top tether.If the headrest interferes with the
installation of the child restraint,
remove the headrest by pressing
the button on the headrest post,
at the top of the seatback, and
lift to remove. Store the headrest
under the outboard side of the
rear seat.
4. Push and pull the child restraint in different directions to be sure
it is secure.
When removing the child
restraint, reinsert the headrest if
it has been removed from the
seatback.
H3 Models
1. Attach and tighten the lower attachments to the lower
anchors. If the child restraint
does not have lower
attachments or the desired seating position does not
have lower anchors, secure
the child restraint with the top
tether and the safety belts.
Refer to the child restraint
manufacturer instructions and
the instructions in this manual.
1.1. Find the lower anchors for
the desired seating
position.
1.2. Put the child restraint on the seat.
1.3. Attach and tighten the lower attachments on the child
restraint to the lower
anchors.
2. If the child restraint manufacturer recommends that the top tether
be attached, attach and tighten
the top tether to the top tether
anchor, if equipped. Refer to the
child restraint instructions and
the following steps:
2.1. Find the top tether anchor. 2.2. Route, attach and tighten
the top tether according
to the child restraint
instructions and the
following instructions:
If the position you are using
does not have a headrest
or head restraint and you
are using a single tether,
route the tether over the
seatback.
Page 105 of 410

Seats and Restraints 3-61
6. To tighten the belt, push downon the child restraint, pull the
shoulder portion of the belt to
tighten the lap portion of the belt
and feed the shoulder belt back
into the retractor. When installing
a forward-facing child restraint,
it may be helpful to use your
knee to push down on the child
restraint as you tighten the belt. 7. If the child restraint has a top
tether, follow the child restraint
manufacturer's instructions
regarding the use of the top
tether. See Lower Anchors and
Tethers for Children (LATCH
System)
on page 3‑51for more
information.
For H3T models, if the headrest
interferes with the installation of
the child restraint, remove the
headrest by pressing the button
on the headrest post, at the
top of the seatback, and lift to
remove. Store the headrest
under the outboard side of the
rear seat.
8. Push and pull the child restraint in different directions to be sure
it is secure.
To remove the child restraint,
unbuckle the vehicle safety belt and
let it return to the stowed position.
If the top tether is attached to a top
tether anchor, disconnect it. If the
headrest has been removed,
reinsert it onto the seatback.
Securing Child Restraints
(Rear Center Seating
Position)
Many child restraints are too wide to
be correctly secured in the center
rear seat, although some of them
will fit there. If the center seat
position is too narrow for the child
restraint, secure it in a rear outside
seat position.
If a child restraint is secured in the
center seat position, follow the
instructions in Securing Child
Restraints (Rear Outboard Seating
Position)
on page 3‑59or Securing
Child Restraints (Rear Center
Seating Position)
on page 3‑61or
Securing Child Restraints (Right
Front Seat Position) on page 3‑62.