2010 HUMMER H3 child lock
[x] Cancel search: child lockPage 67 of 410

Seats and Restraints 3-23
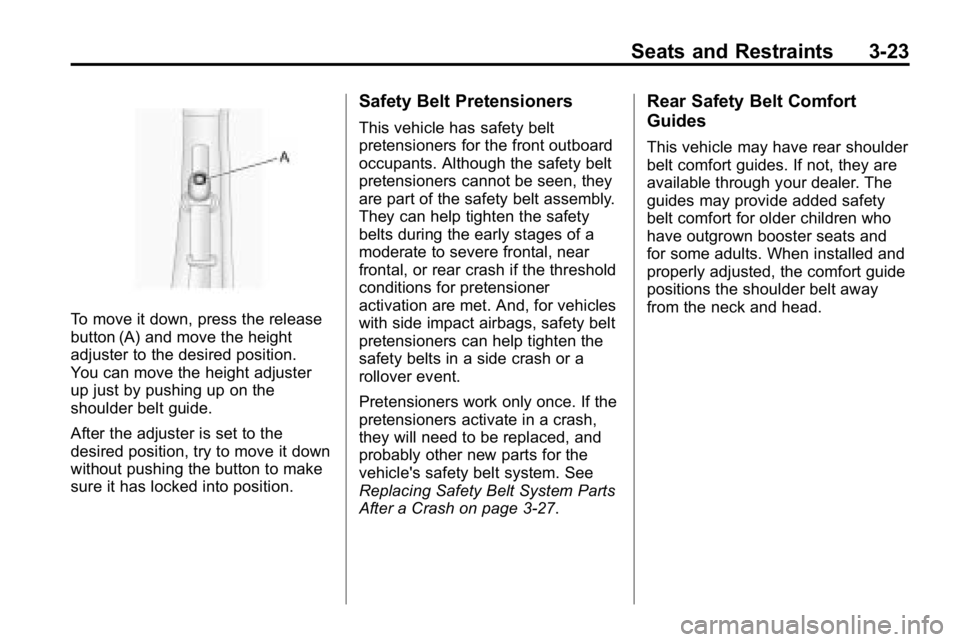
To move it down, press the release
button (A) and move the height
adjuster to the desired position.
You can move the height adjuster
up just by pushing up on the
shoulder belt guide.
After the adjuster is set to the
desired position, try to move it down
without pushing the button to make
sure it has locked into position.
Safety Belt Pretensioners
This vehicle has safety belt
pretensioners for the front outboard
occupants. Although the safety belt
pretensioners cannot be seen, they
are part of the safety belt assembly.
They can help tighten the safety
belts during the early stages of a
moderate to severe frontal, near
frontal, or rear crash if the threshold
conditions for pretensioner
activation are met. And, for vehicles
with side impact airbags, safety belt
pretensioners can help tighten the
safety belts in a side crash or a
rollover event.
Pretensioners work only once. If the
pretensioners activate in a crash,
they will need to be replaced, and
probably other new parts for the
vehicle's safety belt system. See
Replacing Safety Belt System Parts
After a Crash on page 3‑27.
Rear Safety Belt Comfort
Guides
This vehicle may have rear shoulder
belt comfort guides. If not, they are
available through your dealer. The
guides may provide added safety
belt comfort for older children who
have outgrown booster seats and
for some adults. When installed and
properly adjusted, the comfort guide
positions the shoulder belt away
from the neck and head.
Page 83 of 410

Seats and Restraints 3-39
use the following steps to allow the
system to detect that person and
enable the right front passenger
frontal airbag:
1. Turn the vehicle off.
2. Remove any additional materialfrom the seat, such as blankets,
cushions, seat covers, seat
heaters, or seat massagers.
3. Place the seatback in the fully upright position.
4. Have the person sit upright in the seat, centered on the seat
cushion, with legs comfortably
extended.
5. Restart the vehicle and have the person remain in this position for
two to three minutes after the on
indicator is lit.Additional Factors Affecting
System Operation
Safety belts help keep the
passenger in position on the
seat during vehicle maneuvers
and braking, which helps the
passenger sensing system maintain
the passenger airbag status.
See “Safety Belts” and“Child
Restraints” in the Index for
additional information about the
importance of proper restraint use.
If the shoulder portion of the belt is
pulled out all the way, the child
restraint locking feature will be
engaged. This may unintentionally
cause the passenger sensing
system to turn the airbag off for
some adult size occupants. If this
happens, just let the belt go back all
the way and start again. A thick layer of additional material,
such as a blanket or cushion,
or aftermarket equipment such
as seat covers, seat heaters, and
seat massagers can affect how
well the passenger sensing system
operates. We recommend that
you not use seat covers or other
aftermarket equipment except when
approved by Hummer for your
specific vehicle. See
Adding
Equipment to the Airbag-Equipped
Vehicle
on page 3‑40for more
information about modifications that
can affect how the system operates.
{WARNING
Stowing of articles under the
passenger seat or between the
passenger seat cushion and
seatback may interfere with the
proper operation of the passenger
sensing system.
Page 98 of 410

3-54 Seats and Restraints
Securing a Child Restraint
Designed for the LATCH System
{WARNING
If a LATCH-type child restraint is
not attached to anchors, the child
restraint will not be able to protect
the child correctly. In a crash, the
child could be seriously injured
or killed. Install a LATCH-type
child restraint properly using the
anchors, or use the vehicle's
safety belts to secure the
restraint, following the instructions
that came with the child restraint
and the instructions in this
manual.
{WARNING
Do not attach more than one child
restraint to a single anchor.
Attaching more than one child
restraint to a single anchor could
cause the anchor or attachment
to come loose or even break
during a crash. A child or others
could be injured. To reduce the
risk of serious or fatal injuries
during a crash, attach only
one child restraint per anchor.
{WARNING
Children can be seriously injured
or strangled if a shoulder belt is
wrapped around their neck and
the safety belt continues to
tighten. Buckle any unused safety
belts behind the child restraint
so children cannot reach them.(Continued)
WARNING (Continued)
Pull the shoulder belt all the way
out of the retractor to set the lock,
if your vehicle has one, after the
child restraint has been installed.
Notice: Do not let the LATCH
attachments rub against the
vehicle’ s safety belts. This may
damage these parts. If necessary,
move buckled safety belts to
avoid rubbing the LATCH
attachments.
Do not fold the empty rear seat
with a safety belt buckled. This
could damage the safety belt or
the seat. Unbuckle and return the
safety belt to its stowed position,
before folding the seat.
Page 100 of 410

3-56 Seats and Restraints
If the position you are using
has a fixed headrest or
head restraint and you are
using a single tether, route
the tether over the headrest
or head restraint.If the position you are using
has a fixed headrest or
head restraint and you are
using a dual tether, route
the tether around the
headrest or head restraint.
1.4. Attach the top tether to the anchor (A). Make sure that
you secure the top tether to
the top tether anchor and
not to the seatback
latch (B). 1.5. Push rearward on the
seatback until it locks into
its upright position. Push
and pull on the seatback to
make sure it is secured
properly.
2. Attach and tighten the lower attachments to the lower
anchors. If the child restraint
does not have lower
attachments or the desired
seating position does not have
lower anchors, secure the child
restraint with the top tether and
the safety belts. Refer to the
child restraint manufacturer
instructions and the instructions
in this manual.
2.1. Find the lower anchors for the desired seating
position.
2.2. Attach and tighten the lower attachments on the child
restraint to the lower
anchors.
Page 104 of 410

3-60 Seats and Restraints
If more than one child restraint
needs to be installed in the rear
seat, be sure to readWhere to Put
the Restraint on page 3‑49.
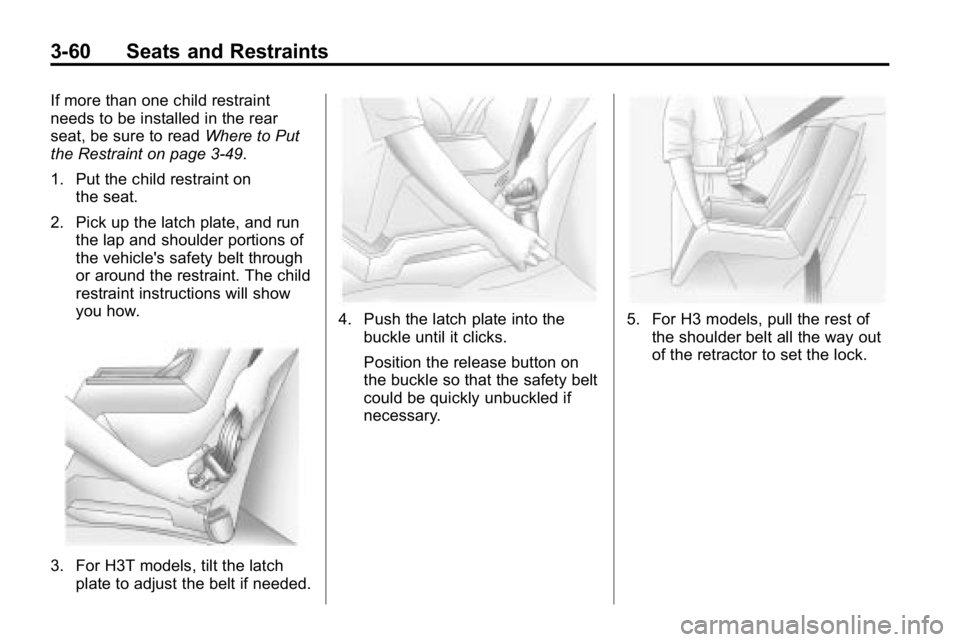
1. Put the child restraint on the seat.
2. Pick up the latch plate, and run the lap and shoulder portions of
the vehicle's safety belt through
or around the restraint. The child
restraint instructions will show
you how.
3. For H3T models, tilt the latchplate to adjust the belt if needed.
4. Push the latch plate into thebuckle until it clicks.
Position the release button on
the buckle so that the safety belt
could be quickly unbuckled if
necessary.5. For H3 models, pull the rest ofthe shoulder belt all the way out
of the retractor to set the lock.
Page 107 of 410

Seats and Restraints 3-63
Do not secure a child seat in a
position without a top tether anchor
if a national or local law requires
that the top tether be anchored, or if
the instructions that come with the
child restraint say that the top strap
must be anchored.
In Canada, the law requires that
forward-facing child restraints have
a top tether, and that the tether be
attached.
You will be using the lap-shoulder
belt to secure the child restraint in
this position. Follow the instructions
that came with the child restraint.
1. Move the seat as far back as itwill go before securing the
forward-facing child restraint.
When the passenger sensing
system has turned off the
right front passenger frontal
airbag, the off indicator on
the passenger airbag status
indicator should light and stay
lit when the vehicle is started.
See Passenger Airbag Status
Indicator on page 5‑11. 2. Put the child restraint on
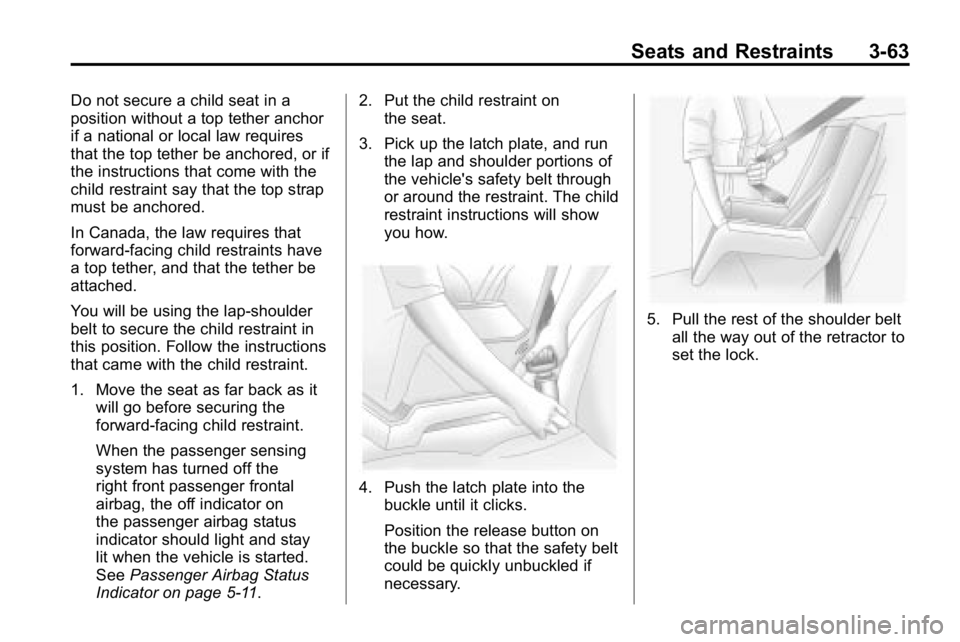
the seat.
3. Pick up the latch plate, and run the lap and shoulder portions of
the vehicle's safety belt through
or around the restraint. The child
restraint instructions will show
you how.
4. Push the latch plate into thebuckle until it clicks.
Position the release button on
the buckle so that the safety belt
could be quickly unbuckled if
necessary.
5. Pull the rest of the shoulder beltall the way out of the retractor to
set the lock.
Page 189 of 410

Driving and Operating 9-5
Steering in Emergencies
There are times when steering can
be more effective than braking. For
example, you come over a hill and
find a truck stopped in your lane,
or a car suddenly pulls out from
nowhere, or a child darts out from
between parked cars and stops right
in front of you. These problems can
be avoided by braking—if you can
stop in time. But sometimes you
cannot stop in time because there
is no room. That is the time for
evasive action —steering around
the problem.
The vehicle can perform very well
in emergencies like these. First
apply the brakes. See Braking
on
page 9‑3. It is better to remove
as much speed as possible from
a collision. Then steer around
the problem, to the left or right
depending on the space available.
An emergency like this requires
close attention and a quick decision.
If holding the steering wheel at the
recommended 9 and 3 o'clock
positions, it can be turned a full
180 degrees very quickly without
removing either hand. But you have
to act fast, steer quickly, and just as
quickly straighten the wheel once
you have avoided the object.
The fact that such emergency
situations are always possible is a
good reason to practice defensive
driving at all times and wear safety
belts properly.
Off-Road Recovery
The vehicle's right wheels can drop
off the edge of a road onto the
shoulder while driving.
If the level of the shoulder is
only slightly below the pavement,
recovery should be fairly easy.
Ease off the accelerator and
then, if there is nothing in the
way, steer so that the vehicle
straddles the edge of the pavement.
Page 252 of 410

9-68 Driving and Operating
Filling the Tank
{WARNING
Fuel vapor burns violently and a
fuel fire can cause bad injuries.
To help avoid injuries to you and
others, read and follow all the
instructions on the fuel pump
island. Turn off the engine when
refueling. Do not smoke near fuel
or when refueling the vehicle. Do
not use cellular phones. Keep
sparks, flames, and smoking
materials away from fuel. Do not
leave the fuel pump unattended
when refueling the vehicle. This is
against the law in some places.
Do not re-enter the vehicle while
pumping fuel. Keep children away
from the fuel pump; never let
children pump fuel.
The fuel cap is located on the driver
side of the vehicle.
To remove the fuel cap, turn it
slowly counterclockwise. While
refueling, let the fuel cap hang by
the tether, if it has one.
When reinstalling the cap, turn
it clockwise until three clicks,
otherwise the Malfunction
Indicator Lamp could turn on.
SeeMalfunction Indicator Lamp
on
page 5‑12.
{WARNING
Fuel can spray out on you if you
open the fuel cap too quickly.
If you spill fuel and then
something ignites it, you could
be badly burned. This spray can
happen if the tank is nearly full,
and is more likely in hot weather.
Open the fuel cap slowly and wait
for any hiss noise to stop. Then
unscrew the cap all the way.
Be careful not to spill fuel. Do not
top off or overfill the tank and wait
a few seconds after you have
finished pumping before removing
the nozzle. Clean fuel from painted
surfaces as soon as possible. See
Exterior Care on page 10‑92.
When replacing the fuel cap,
turn it clockwise until three clicks.
Make sure the cap is fully installed.
The diagnostic system can
determine if the fuel cap has been
left off or improperly installed.