Page 143 of 421

This display shows the estimated
distance you can travel on the fuel
remaining in the tank.
This distance is estimated f rom the
f uel economy you have achieved
over the last f ew miles (kilometers),
so it will vary with changes in speed,
traffic condition, etc.
This display shows the instant f uel
economy you are getting.
It shows the number of mpg (U.S.)
or l/100 km (Canada).
When either of the trip meters (trip
A or B) is displayed, your vehicle’s
average f uel economy since you last
resetthattripmetercanbeshown
on the inf ormation display (mpg on
U.S. models and l/100 km on
Canadian models). This number is
updated once per 10 seconds. To see
the average f uel economy, press and
release the TRIP/RESET button
repeatedly.
The average f uel economy will be
reset when you reset the trip meter,
or if the vehicle’s battery goes dead
or is disconnected.
This indicator is displayed as the
system message on the multi-
inf ormation display (see page ).
The appropriate tire indicator will
come on along with the low tire
pressure indicator if a tire is
signif icantly underinf lated or has
suddenly lost pressure. See
for what to
do if this indicator comes on.
282
On models with navigation system
Gauges
Range (Estimated Distance)
T ire Pressure Monit or
A verage Fuel Economy
Inst ant Fuel Economy
Low
Tire Pressure Indicator
80
TIRE PRESSURE MONITOR
Table of Contents
Page 146 of 421
�Û�Ý
Multi-Inf ormation Display
Inst rument s and Cont rols
83
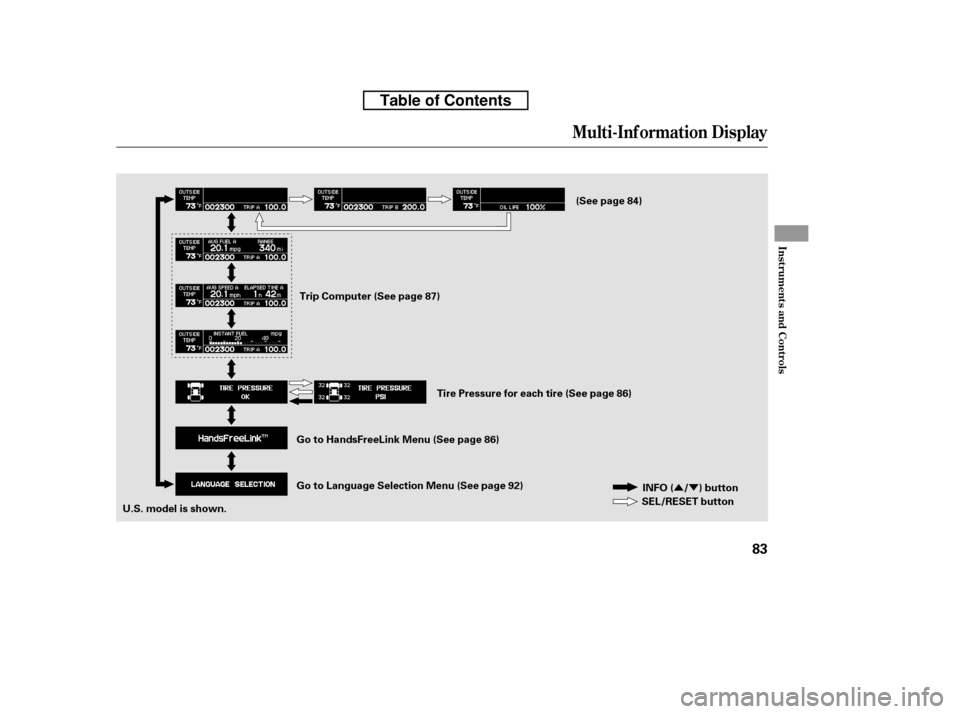
INFO ( / ) button
SEL/RESET button
U.S. model is shown. Trip Computer (See page 87)
(See page 84)
Tire Pressure for each tire (See page 86)
Go to Language Selection Menu (See page 92)
Go to HandsFreeLink Menu (See page 86)
Table of Contents
Page 149 of 421
This shows the remaining lif e of the
engine oil. It shows 100% af ter the
engine oil is replaced and the display
is reset. The engine oil lif e is
calculated based on engine operating
conditions and accumulated engine
revolutions. For more inf ormation,
see page .Whenthetirepressuremonitoris
shown on the multi-inf ormation
display, press the SEL/RESET
button. The display changes as
shown.
You can see the pressure of each tire
in this monitor. If one or more tires
are low, inflate them to the correct
pressure. For more inf ormation, see
page .You can receive or make phone calls
f rom your cell phone through your
vehicle’s
HandsFreeLink
(HFL) system without touching your
cell phone.
313 282
Bluetooth
Engine Oil L if e T ire Pressure MonitorHandsFreeL inkBluet oot h
Multi-Inf ormation Display
86
ENGINE OIL LIFEU.S.
Canada
Table of Contents
Page 320 of 421

Your dealer has Honda accessories
that allow you to personalize your
vehicle. These accessories have
been designed and approved f or your
vehicle, and are covered by warranty.
Modif ying your vehicle, or installing
some non-Honda accessories, can
make it unsaf e. Bef ore you make any
modif ications or add any accessories,
be sure to read the f ollowing
inf ormation.
Although non-Honda accessories
may f it on your vehicle, they may not
meet f actory specif ications, and
could adversely af f ect your vehicle’s
handling and stability.
If you install a truck cap, be sure it is
properly installed and does not
exceed your vehicle’s load limits (see
page ).When properly installed, cellular
phones, alarms, two-way radios, and
low-powered audio systems should
not interf ere with your vehicle’s
computer controlled systems, such
as your airbags, anti-lock brakes, and
tire pressure monitoring system.
Be sure electronic accessories do
not overload electrical circuits
(see page ) or interf ere with
the proper operation of your
vehicle.
Make sure the accessory does not
obscure any lights, or interf ere
with proper vehicle operation or
perf ormance.
Bef ore installing any accessory:
260 378
CONT INUED
A ccessories
Your vehicle should not be used to
carry a slide-in camper.
A ccessories and Modif ications
Bef ore Driving
257
Improper accessories or
modifications can affect your
vehicle’s handling, stability, and
performance, and cause a
crash in which you can be hurt
or killed.
Follow all instructions in this
owner’s manual regarding
accessories and modifications.
Table of Contents
Page 321 of 421

Larger or smaller wheels and tires
can interf ere with the operation of
your vehicle’s anti-lock brakes and
other systems.
Modif ying your steering wheel or
any other part of your vehicle’s
saf ety systems could make the
systems inef f ective.
If you plan to modif y your vehicle,
consult your dealer.
Removing parts f rom your vehicle,
or replacing components with
non-Honda components could
seriously af f ect your vehicle’s
handling, stability, and reliability.
Some examples are:
Lowering the vehicle with a non-
Honda suspension kit that
signif icantly reduces ground
clearance can allow the
undercarriage to hit speed bumps
or other raised objects, which
could cause the airbags to deploy.
Raising your vehicle with a
non-Honda suspension kit can
af f ect the handling and stability.
Bef ore installing any electronic
accessory, have the installer
contact your dealer f or assistance.
If possible, have your dealer
inspect the f inal installation.
Do not install accessories on the
side pillars or across the rear
windows. Accessories installed in
theseareasmayinterferewith
proper operation of the side
curtain airbags.
Non-Honda wheels, because they
are a universal design, can cause
excessive stress on suspension
components and will not be
compatible with the tire pressure
monitoring system (TPMS).
Modif ying Your Vehicle
A ccessories and Modif ications
258
Table of Contents
Page 329 of 421

This section gives you tips on
starting the engine under various
conditions, and how to operate the
automatic transmission. It also
includes important inf ormation on
parking your vehicle, the braking
system, the Variable Torque
Management
4-wheel drive
(VTM-4
) system, the vehicle
stability assist (VSA
), aka
Electronic Stability Control (ESC),
system, the tire pressure monitoring
system (TPMS), and f acts you need
if you are planning to tow a trailer or
drive of f -highway. ........................
Driving Guidelines . 268
........................
Preparing to Drive . 269
.......................
Starting the Engine . 270
..............
Automatic Transmission . 271
Variable Torque Management
...........
4WD (VTM-4) System . 276
Tire Pressure Monitoring System
......................................
(TPMS) . 278
...........................................
Parking . 286
.............................
Braking System . 288
...............
Anti-lock Brakes (ABS) . 289
Vehicle Stability Assist (VSA
),
aka Electronic Stability Control .......................
(ESC), System . 291
.................
Towing Weight Limits . 293
..........
Towing Weight Guidelines . 295
...........................
Towing a Trailer . 296
Of f -Highway Driving
..................................
Guidelines . 306
Driving
Driving
267
Page 331 of 421

Youshoulddothefollowingchecks
and adjustments bef ore you drive
your vehicle.Make sure all windows, mirrors,
and outside lights are clean and
unobstructed. Remove f rost, snow,
or ice.
Check that the hood is f ully closed.
Check that the tailgate is f ully
closed when it is not used as an
extended pickup bed.
Visually check the tires. If a tire
looks low, use a gauge to check its
pressure.
Check that any items you may be
carrying are stored properly or
f astened down securely. Check the adjustment of the
inside and outside mirrors (see
page ).
Check the steering wheel
adjustment (see page ).
Make sure the doors and In-Bed
Trunk are securely closed and
locked.
Fasten your seat belt. Check that
your passengers have f astened
their seat belts (see page ).
Check the seat adjustment (see
pages and ). When you start the engine, check
the gauges and indicators in the
instrument panel, and the
messages on the inf ormation
display or multi-inf ormation
display (depending on models)(
s e e pag es,,, an d
).
1. 2. 3. 4.5.6. 8.
7. 9.
10. 11.
121 133
99
16
61 76 77
90
119
Preparing to Drive
Driving
269
Table of Contents
Page 339 of 421

Press the VTM-4 LOCK button.
The indicator in the button comeson.
To get unstuck, apply light pressure
to the accelerator pedal. Do not spin
the f ront tires f or more than a f ew
seconds. Because of the amount of
torque applied to the rear tires, they
should not spin. This is normal. If
you are not able to move the vehicle,
stop and reverse direction.
If you become stuck, you can
activatetheVTM-4bypressingthe
VTM-4 LOCK button while in f irst
(1), second (2), or reverse (R) gear
below18mph(30km/h).Thismode
overrides the auto system to send
maximum torque to the rear axle.
This mode is only intended f or
intermittent use at low speed to free
your vehicle if it becomes stuck or
when you encounter a steep grade
with one wheel on a slippery surf ace.
Generally, you should f irst allow the
auto mode to operate to adjust for
the available traction conditions.
Turn the ignition switch to the
LOCK (0) position.
Move the shift lever to D.
Press the VTM-4 LOCK button. do
any of the f ollowing:
The VTM-4 Lock will temporarily
disengage when the vehicle speed
exceeds 18 mph (30 km/h). The
indicator in the button will remain on.
The vehicle speed must be below
18 mph (30 km/h).
Move the shift lever to first (1),
second (2), or reverse (R) gear.
1. 2. 3.
VTM-4System
To Engage the VTM-4 Lock:
To Disengage the VTM-4 L ock,
Driving
277
Do not use the VTM-4 LOCK button on
dry, paved roads. Driving on dry,
paved roads with VTM-4 Lock ON may
damage the rear dif f erential when
making a turn. Strange noise and
vibration can also result.
Do not continuously spin the f ront tires
of your vehicle. Continuously spinning
the f ront tires can cause transmission
or rear dif f erential damage.
Table of Contents