Page 107 of 575
�Û
�Ý
�Û�Ý
LANGUAGE SELECTION
ADJUST OUTSIDE TEMP.
DISPLAY
Here are the three custom settings
forthemetersetup:
TRIP A INFO RESET
While ‘‘METER SETUP’’ is shown,
press the SEL/RESET button to
enter the customize mode.
Each time you press the INFO ( /
) button, the screen changes as
shown in the illustration. Press the
INFO ( / ) button until you see
the setting you want to customize,
then press the SEL/RESET button
to enter your selection.
CONT INUED
Meter Setup
Multi-Inf ormation Display
Inst rument s and Cont rols
103
INFO button
SEL/RESET button
�����—�����—�
���y�
�������������y���
�(�/�����
���y���
�����y
2010 Pilot
Page 108 of 575
�Û�Ý
�Û�Ý
Language Selection
There are three language selections
you can make: English, French, and
Spanish. To choose the language you
want, f ollow these instructions:
You can choose this item to
customize f rom ‘‘METER SETUP’’
by pressing the INFO ( / ) button
repeatedly.
Press the SEL/RESET button to see
the selections.
Select the desired language by
pressing the INFO ( / ) button,
then enter your selection by pressing
the SEL/RESET button.
When your selection is successf ully
completed, the display changes as
shown above, and then goes back to
the customize item screen.
If the ‘‘SETTING INCOMPLETE’’
message appears, go back to
‘‘LANGUAGE SELECTION’’ and
repeat the procedure again.
Multi-Inf ormation Display
104
�����—�����—�
���y�
�������������y���
�(�/�����
���y���
�����y
2010 Pilot
Page 109 of 575
�Û�Ý
�Û�Ý
CONT INUED
Adjust Outside Temp. Display
If you sometimes f ind that the
temperature reading is a f ew
degrees above or below the actual
temperature, you can adjust it by
f ollowing these instructions:
You can choose this item to
customize f rom ‘‘METER SETUP’’
by pressing the INFO ( / ) button
repeatedly.
Adjust the outside temperature value
by pressing the INFO ( / ) button
repeatedly. Press the SEL/RESET
button to set the desired value.
When your selection is successf ully
completed, the display changes as
shown above, and then goes back to
the customize item screen.
If the ‘‘SETTING INCOMPLETE’’
message appears, go back to
‘‘ADJUST OUTSIDE TEMP.
DISPLAY’’ and repeat the procedure
again.
Multi-Inf ormation Display
Inst rument s and Cont rols
105
U.S.
Canada
U.S.
Canada
�����—�����—�
���y�
�������������y���
�(�/�����
���y���
�
���y
2010 Pilot
Page 110 of 575
�µ
�µ
�µ
�Û�Ý
�Û�Ý
There are three settings you can
choose f rom:
with REFUEL Trip A Inf o is reset
every time you ref uel your vehicle.
MANUAL ONLY You can reset
Trip A Inf o when you press and hold
the SEL/RESET button until the
number resets.
IGN OFF Trip A Inf o is reset
when you turn the ignition switch to
the LOCK (0) position.
You can choose this item to
customize f rom ‘‘METER SETUP’’
by pressing the INFO ( / ) button
repeatedly.
Press the SEL/RESET button to see
the selections.
Select ON or OFF by pressing the
INFO ( / ) button, then enter
your selection by pressing the SEL/
RESET button.
Trip A Inf o Reset
Multi-Inf ormation Display
106
�����—�����—�
���y�
������
������y���
�(�/�����
���y���
�
�
�y
2010 Pilot
Page 111 of 575
When your selection is successf ully
completed, the display changes as
shown above, and then goes back to
the customize item screen.
If the ‘‘SETTING INCOMPLETE’’
message appears, go back to ‘‘TRIP
A INFO RESET’’ and repeat the
procedure again.
Multi-Inf ormation Display
Inst rument s and Cont rols
107
�����—�����—�
���y�
������
������y���
�(�/�����
���y���
�
���y
2010 Pilot
Page 112 of 575
�Û
�Ý
�Û�Ý
You can customize the MEMORY
POSITION LINK setting in position
setup.
While ‘‘POSITION SETUP’’ is shown,
press the SEL/RESET button to
enter the customize mode.
Each time you press the INFO ( /
) button, the screen changes as
shown in the illustration. Press the
INFO ( / ) button until you see
the setting you want to customize,
then press the SEL/RESET button
to enter your selection.
Position Setup
Multi-Inf ormation Display
108
INFO button
SEL/RESET button
�����—�����—�
���y�
������
������y���
�(�/�����
���y���
�
���y
2010 Pilot
Page 113 of 575
�Û�Ý
�Û
�Ý
Memory Position Link
Press the SEL/RESET button to see
the selections.
Select ON or OFF by pressing the
INFO ( / ) button, then enter
your selection by pressing the SEL/
RESET button.
When your selection is successf ully
completed, the display changes as
shown above, and then goes back to
the customize item screen.
If the ‘‘SETTING INCOMPLETE’’
message appears, go back to
‘‘MEMORY POSITION LINK’’ and
repeat the procedure again.
If ‘‘MEMORY POSITION LINK’’ is
‘‘ON,’’ the driver’s seat and outside
mirrors move to the positions stored
in the memory when you open the
driver’s door, using the remote
transmitter.
You can choose this item to
customize f rom ‘‘POSITION
SETUP’’ by pressing the INFO ( /
) button repeatedly.
Multi-Inf ormation Display
Inst rument s and Cont rols
109
�����—�����—�
���y�
������
��
���y���
�(�/�����
���y���
�
���y
2010 Pilot
Page 114 of 575
�Û
�Ý
�Û�Ý
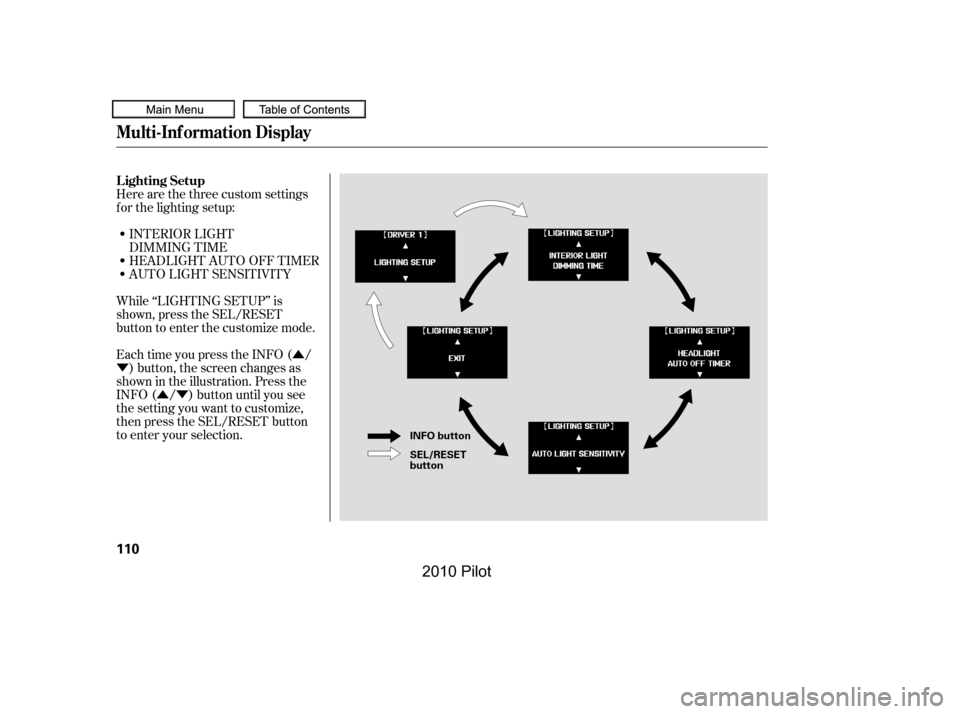
INTERIOR LIGHT
DIMMING TIME
HEADLIGHT AUTO OFF TIMER
AUTO LIGHT SENSITIVITY
While ‘‘LIGHTING SETUP’’ is
shown, press the SEL/RESET
button to enter the customize mode.
Each time you press the INFO ( /
) button, the screen changes as
shown in the illustration. Press the
INFO ( / ) button until you see
the setting you want to customize,
then press the SEL/RESET button
to enter your selection.
Here are the three custom settings
f or the lighting setup:
Lighting Setup
Multi-Inf ormation Display
110
INFO button
SEL/RESET button
�����—�����—�
���y�
������
������y���
�(�/�����
���y���
�
���y
2010 Pilot