Page 301 of 351
6. Take the jack out of the cargo area.Turn the jack's end bracket
counterclockwise to loosen it, then
remove the jack by lifting it
straight up.
7. Unscrew the wing bolt and take the spare tire out of its well.8. On all models except Sport andCanadian LX model with manual
transmission, remove the wheel
cover by carefully prying under its
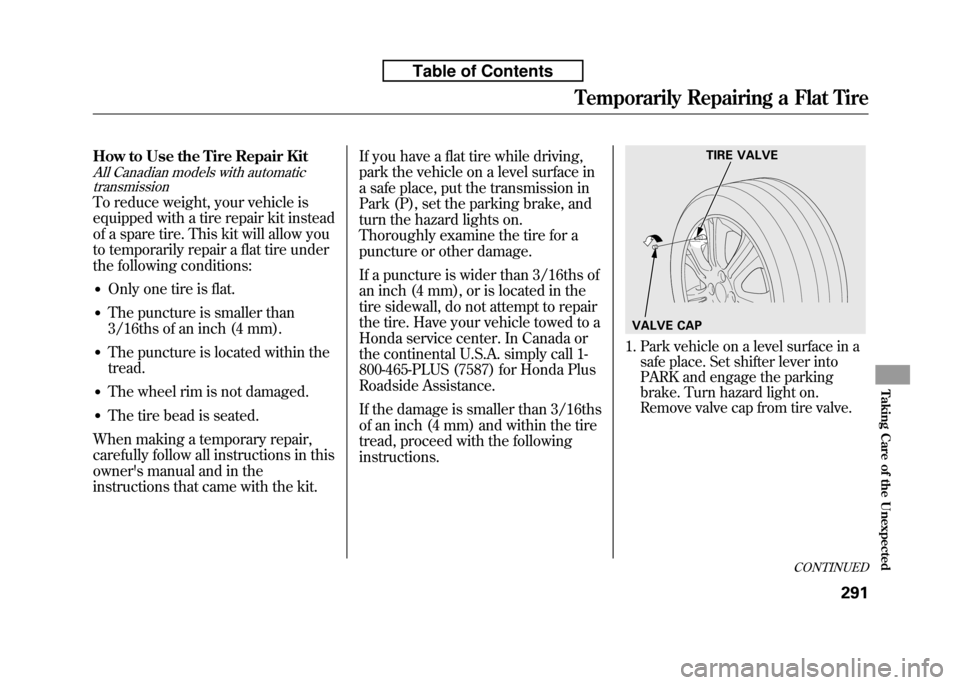
edge with the flat tip of theextension.9. Loosen each wheel nut 1/2 turnwith the wheel nut wrench.
EXTENSION WHEEL NUT
WHEEL COVER
WHEEL NUT WRENCH
Changing a Flat Tire
286
Table of Contents
Page 303 of 351
14. Put on the spare tire. Put thewheel nuts back on finger-tight,
then tighten them in a crisscross
pattern with the wheel nut wrench
until the wheel is firmly against the
hub. Do not try to tighten the
wheel nuts fully.
15. Lower the vehicle to the ground, and remove the jack.
16. Tighten the wheel nuts securely in the same crisscross pattern. Have
the wheel nut torque checked at
the nearest automotive servicefacility.
Tighten the wheel nuts to:
80 lbf·ft (108 N·m, 11 kgf·m)
17.
On Sport model and Canadian LX model with manual transmission:
Remove the center cap before
storing the flat tire.
18. Remove the strap loop from the
legs of the head restraint and
lower the cargo area floor lid.
19. Pull the floor lid toward you and remove the tabs.
20. Pull the floor lid out.
TAB
FLOOR LID
Changing a Flat Tire
288
Table of Contents
Page 305 of 351
Installing a wheel cover
All models except Sport and CanadianLX model with manual transmission
1. Make sure the wire support ring is
hooked into the clips around the
edge of the wheel cover.
2. Align the valve mark on the wheelcover to the tire valve on the
wheel, then install the wheelcover.3. Make sure the wire support ring ison the outer side of the tire valve
as shown.CLIPS CLIPS
WIRE SUPPORT RING
Changing a Flat Tire
290
Table of Contents
Page 306 of 351

How to Use the Tire Repair Kit
All Canadian models with automatictransmission
To reduce weight, your vehicle is
equipped with a tire repair kit instead
of a spare tire. This kit will allow you
to temporarily repair a flat tire under
the following conditions:
● Only one tire is flat.
● The puncture is smaller than
3/16ths of an inch (4 mm).
● The puncture is located within the tread.
● The wheel rim is not damaged.
● The tire bead is seated.
When making a temporary repair,
carefully follow all instructions in this
owner's manual and in the
instructions that came with the kit. If you have a flat tire while driving,
park the vehicle on a level surface in
a safe place, put the transmission in
Park (P), set the parking brake, and
turn the hazard lights on.
Thoroughly examine the tire for a
puncture or other damage.
If a puncture is wider than 3/16ths of
an inch (4 mm), or is located in the
tire sidewall, do not attempt to repair
the tire. Have your vehicle towed to a
Honda service center. In Canada or
the continental U.S.A. simply call 1-
800-465-PLUS (7587) for Honda Plus
Roadside Assistance.
If the damage is smaller than 3/16ths
of an inch (4 mm) and within the tire
tread, proceed with the followinginstructions.
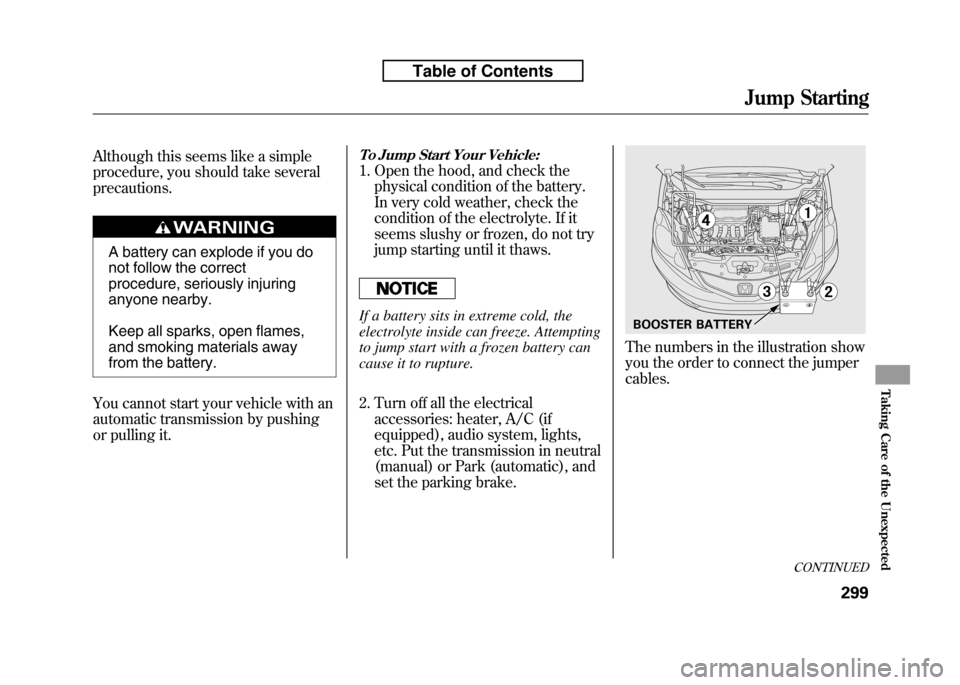
1. Park vehicle on a level surface in a
safe place. Set shifter lever into
PARK and engage the parking
brake. Turn hazard light on.
Remove valve cap from tire valve.
TIRE VALVE
VALVE CAP
CONTINUED
Temporarily Repairing a Flat Tire
291
Taking Care of the Unexpected
Table of Contents
Page 312 of 351

If the pressure is lower than 32 psi
(220 kPa) and higher than 19 psi
(130 kPa), use the air pump to
bring air to the desired level as
described in step 11. Then drive to
the nearest service station at no
more than 50 mph (80 km/h).
If the pressure is below 19 psi, do
not continue. Have the vehicle
towed (see page 311).
In any case, be sure to have the
damaged tire permanently repaired
as soon as possible.
Remember to return the tire sealant
bottle to your Honda service center
for proper disposal. If the Engine Won't Start
Diagnosing why the engine won't
start falls into two areas, depending
on what you hear when you turn the
ignition switch to the START (III)position:
● You hear nothing, or almost
nothing. The engine's starter
motor does not operate at all, or
operates very slowly.
● You can hear the starter motor
operating normally, or the starter
motor sounds like it is spinning
faster than normal, but the engine
does not start up and run. Nothing Happens or the Starter
Motor Operates Very Slowly
When you turn the ignition switch to
the START (III) position, you do not
hear the normal noise of the engine
trying to start. You may hear a
clicking sound, a series of clicks, or
nothing at all.
Check these things:
● Check the transmission interlock.
If you have a manual transmission,
the clutch pedal must be pushed
all the way to the floor or the
starter will not operate. With an
automatic transmission, it must be
in Park or neutral.
● Turn the ignition switch to the ON
(II) position. Turn on the
headlights, and check their
brightness. If the headlights are
very dim or do not come on at all,
the battery is discharged. See
Jump Starting on page 299.
CONTINUED
Temporarily Repairing a Flat Tire, If the Engine Won't Start
297
Taking Care of the Unexpected
Table of Contents
Page 314 of 351

Although this seems like a simple
procedure, you should take severalprecautions.
A battery can explode if you do
not follow the correct
procedure, seriously injuring
anyone nearby.
Keep all sparks, open flames,
and smoking materials away
from the battery.
You cannot start your vehicle with an
automatic transmission by pushing
or pulling it.
To Jump Start Your Vehicle:
1. Open the hood, and check the physical condition of the battery.
In very cold weather, check the
condition of the electrolyte. If it
seems slushy or frozen, do not try
jump starting until it thaws.
If a battery sits in extreme cold, the
electrolyte inside can freeze. Attempting
to jump start with a frozen battery can
cause it to rupture.
2. Turn off all the electricalaccessories: heater, A/C (if
equipped), audio system, lights,
etc. Put the transmission in neutral
(manual) or Park (automatic), and
set the parking brake.
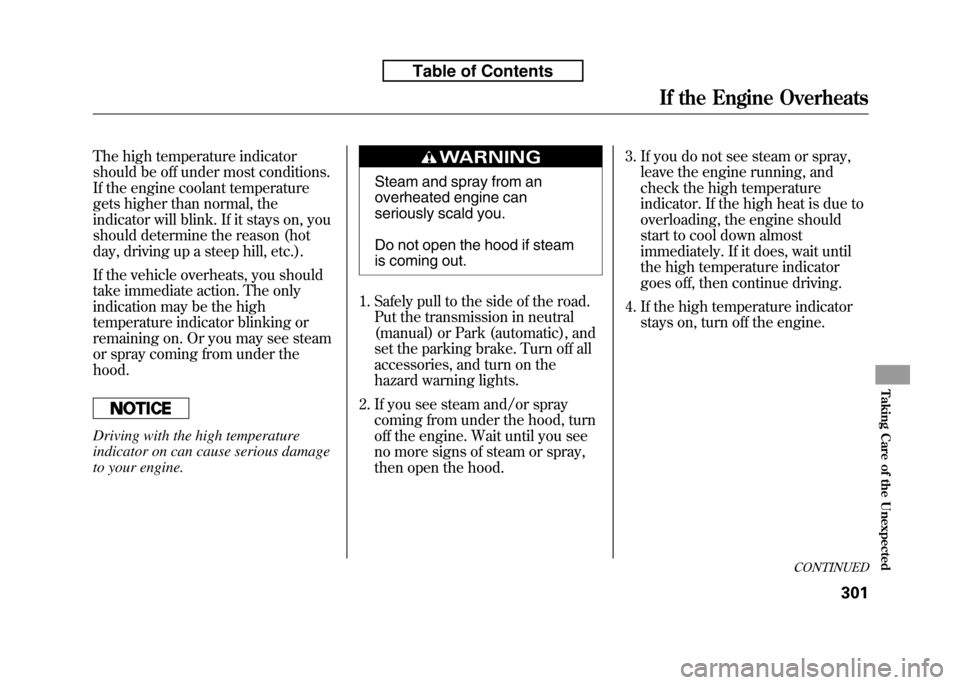
The numbers in the illustration show
you the order to connect the jumpercables.
BOOSTER BATTERY
CONTINUED
Jump Starting
299
Taking Care of the Unexpected
Table of Contents
Page 316 of 351

The high temperature indicator
should be off under most conditions.
If the engine coolant temperature
gets higher than normal, the
indicator will blink. If it stays on, you
should determine the reason (hot
day, driving up a steep hill, etc.).
If the vehicle overheats, you should
take immediate action. The only
indication may be the high
temperature indicator blinking or
remaining on. Or you may see steam
or spray coming from under thehood.
Driving with the high temperature
indicator on can cause serious damage
to your engine.
Steam and spray from an
overheated engine can
seriously scald you.
Do not open the hood if steam
is coming out.
1. Safely pull to the side of the road. Put the transmission in neutral
(manual) or Park (automatic), and
set the parking brake. Turn off all
accessories, and turn on the
hazard warning lights.
2. If you see steam and/or spray coming from under the hood, turn
off the engine. Wait until you see
no more signs of steam or spray,
then open the hood. 3. If you do not see steam or spray,
leave the engine running, and
check the high temperature
indicator. If the high heat is due to
overloading, the engine should
start to cool down almost
immediately. If it does, wait until
the high temperature indicator
goes off, then continue driving.
4. If the high temperature indicator stays on, turn off the engine.
CONTINUED
If the Engine Overheats
301
Taking Care of the Unexpected
Table of Contents
Page 319 of 351

If this indicator comes on
while driving, it means one
of the engine's emissions control
systems may have a problem. Even
though you may feel no difference in
your vehicle's performance, it can
reduce your fuel economy and cause
increased emissions. Continued
operation may cause serious damage.
If you have recently refueled your
vehicle, the indicator coming on
could be due to a loose or missing
fuel fill cap. You will also see a‘‘ CHECK FUEL CAP ’’message on
the information display. Tighten the
cap until it clicks at least once.
Tightening the cap will not turn the
indicator off immediately; it can take
several days of normal driving. If the indicator comes on repeatedly,
even though it may go off as you
continue driving, have your vehicle
checked by a dealer as soon aspossible.
If you keep driving with the malfunction
indicator lamp on, you can damage
your vehicle's emissions controls and
engine. Those repairs may not be
covered by your vehicle's warranties.
If your vehicle has an automatic
transmission, the malfunction
indicator lamp may also come on
with the
‘‘D ’’indicator. Readiness Codes
Your vehicle has certain
‘‘readiness
codes ’’that are part of the on-board
diagnostics for the emissions
systems. In some states, part of the
emissions testing is to make sure
these codes are set. If they are not
set, the test cannot be completed.
If the battery in your vehicle has
been disconnected or gone dead,
these codes are erased. It can take
several days of driving under various
conditions to set the codes again.
To check if they are set, turn the
ignition switch to the ON (II)
position, without starting the engine.
The malfunction indicator lamp will
come on for 20 seconds. If it then
goes off, the readiness codes are set.
If it blinks five times, the readiness
codes are not set. If possible, do not
take your vehicle for an emissions
test until the readiness codes are set.
Refer to Emissions Testing for
more information (see page 329).
Malfunction Indicator Lamp
304
Table of Contents