Page 269 of 351
Synthetic Oil
You may use a synthetic motor oil if
it meets the same requirements
given for a conventional motor oil, it
displays the API Certification Seal,
and it is the proper weight. You must
follow the oil and filter change
intervals shown on the informationdisplay.
Engine Oil Additives
Your vehicle does not require any oil
additives. Additives may adversely
affect the engine or transmission
performance and durability.Changing the Engine Oil andFilter
Always change the oil and filter
according to the maintenance
messages shown on the information
display. The oil and filter collect
contaminants that can damage your
engine if they are not removedregularly.
Changing the oil and filter requires
special tools and access from
underneath the vehicle. The vehicle
should be raised on a service station-
type hydraulic lift for this service.
Unless you have the knowledge and
proper equipment, you should have
this maintenance done by a skilledmechanic.
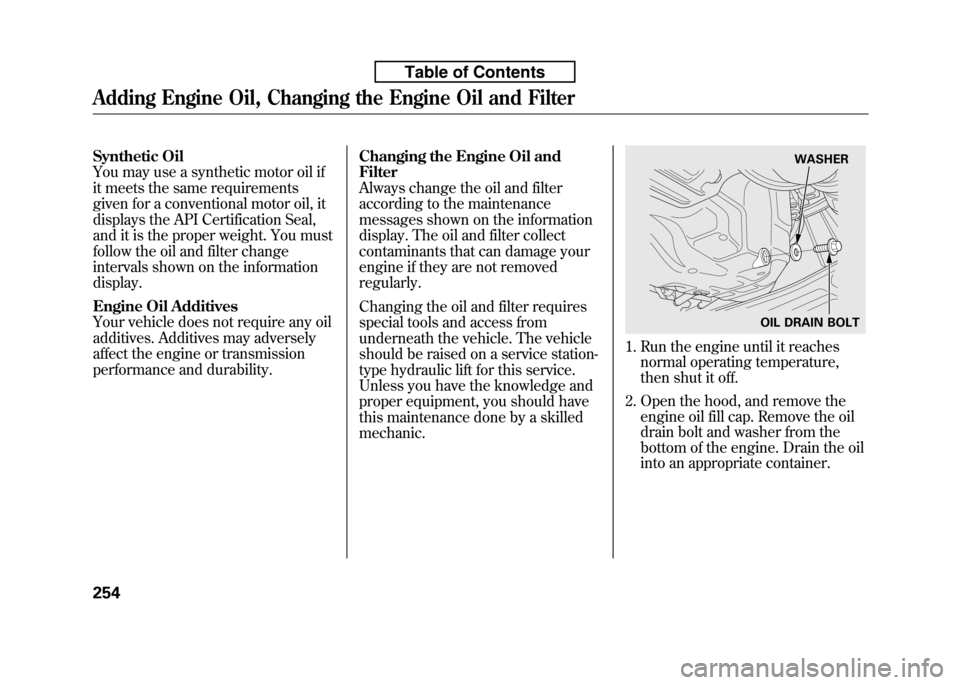
1. Run the engine until it reaches
normal operating temperature,
then shut it off.
2. Open the hood, and remove the engine oil fill cap. Remove the oil
drain bolt and washer from the
bottom of the engine. Drain the oil
into an appropriate container.
WASHER
OIL DRAIN BOLT
Adding Engine Oil, Changing the Engine Oil and Filter
254
Table of Contents
Page 270 of 351
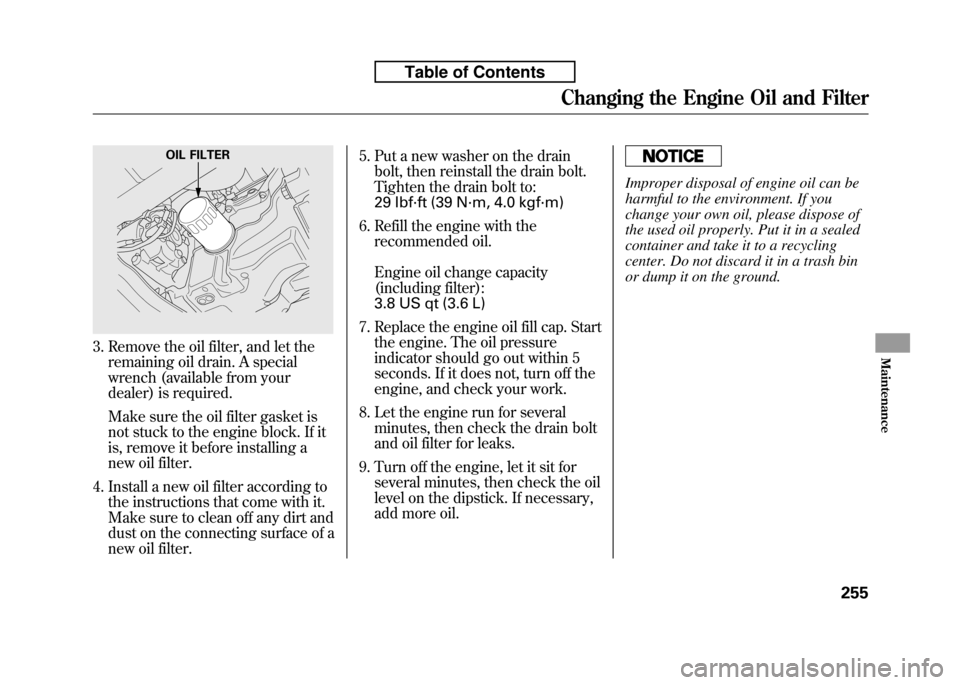
3. Remove the oil filter, and let theremaining oil drain. A special
wrench (available from your
dealer) is required.
Make sure the oil filter gasket is
not stuck to the engine block. If it
is, remove it before installing a
new oil filter.
4. Install a new oil filter according to the instructions that come with it.
Make sure to clean off any dirt and
dust on the connecting surface of a
new oil filter. 5. Put a new washer on the drain
bolt, then reinstall the drain bolt.
Tighten the drain bolt to:
29 lbf·ft (39 N·m, 4.0 kgf·m)
6. Refill the engine with the recommended oil.
Engine oil change capacity
(including filter):
3.8 US qt (3.6 L)
7. Replace the engine oil fill cap. Start the engine. The oil pressure
indicator should go out within 5
seconds. If it does not, turn off the
engine, and check your work.
8. Let the engine run for several minutes, then check the drain bolt
and oil filter for leaks.
9. Turn off the engine, let it sit for several minutes, then check the oil
level on the dipstick. If necessary,
add more oil.
Improper disposal of engine oil can be
harmful to the environment. If you
change your own oil, please dispose of
the used oil properly. Put it in a sealed
container and take it to a recycling
center. Do not discard it in a trash bin
or dump it on the ground.
OIL FILTER
Changing the Engine Oil and Filter
255
Maintenance
Table of Contents
Page 275 of 351
Use only Honda Genuine ATF-Z1
(automatic transmission fluid). Do not
mix with other transmission fluids.
Using transmission fluid other than
Honda Genuine ATF-Z1 may cause
deterioration in transmission operation
and durability, and could result in
damage to the transmission.
Damage resulting from the use of
transmission fluid other than Honda
Genuine ATF-Z1 is not covered by the
Honda new vehicle warranty.
6. Insert the dipstick all the way backinto the transmission securely as
shown in the illustration.
If you are not sure how to add fluid,
contact your dealer. Manual Transmission Fluid
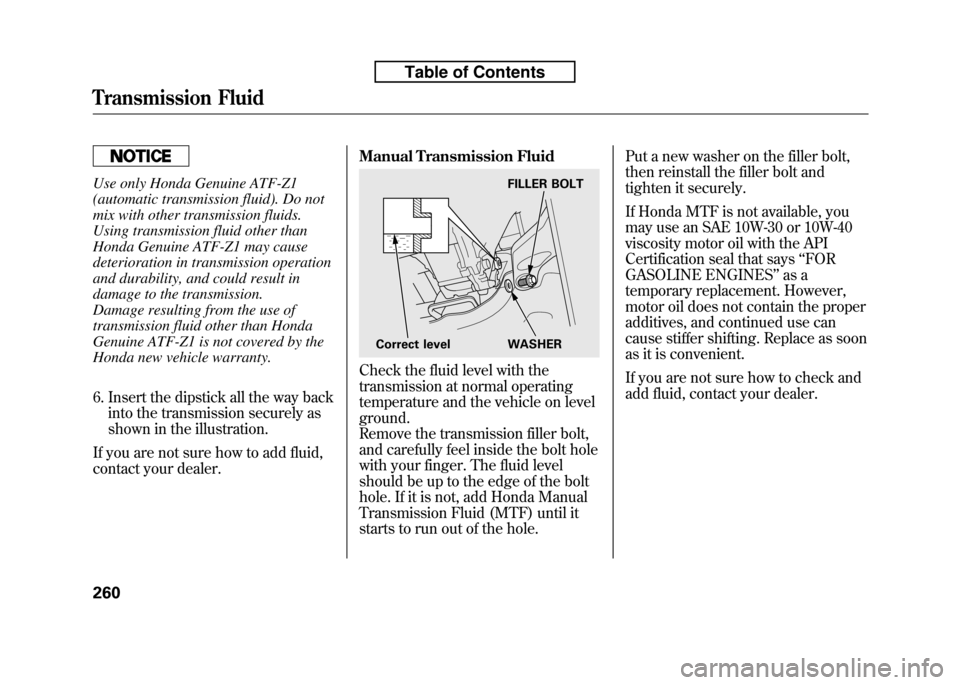
Check the fluid level with the
transmission at normal operating
temperature and the vehicle on levelground.
Remove the transmission filler bolt,
and carefully feel inside the bolt hole
with your finger. The fluid level
should be up to the edge of the bolt
hole. If it is not, add Honda Manual
Transmission Fluid (MTF) until it
starts to run out of the hole.Put a new washer on the filler bolt,
then reinstall the filler bolt and
tighten it securely.
If Honda MTF is not available, you
may use an SAE 10W-30 or 10W-40
viscosity motor oil with the API
Certification seal that says
‘‘FOR
GASOLINE ENGINES ’’as a
temporary replacement. However,
motor oil does not contain the proper
additives, and continued use can
cause stiffer shifting. Replace as soon
as it is convenient.
If you are not sure how to check and
add fluid, contact your dealer.
FILLER BOLT
Correct level WASHER
Transmission Fluid
260
Table of Contents
Page 298 of 351
This section covers the more
common problems that motorists
experience with their vehicles. It
gives you information about how to
safely evaluate the problem and what
to do to correct it. If the problem has
stranded you on the side of the road,
you may be able to get going again. If
not, you will also find instructions on
getting your vehicle towed.Compact Spare Tire....................
284
Changing a Flat Tire ...................
285
Temporarily Repairing a Flat Tire .........................................
291
If the Engine Won't Start .............
297
Jump Starting ..............................
299
If the Engine Overheats ..............
301
Low Oil Pressure Indicator .........
303
Charging System Indicator .........
303
Malfunction Indicator Lamp ........
304
Brake System Indicator ...............
305
Fuses ..........................................
306
Fuse Locations ............................
309
Emergency Towing .....................
311
If Your Vehicle Gets Stuck ..........
312
Taking Care of the Unexpected
283
Taking Care of the Unexpected
Page 318 of 351
Low Oil Pressure Indicator
This indicator should never
come on when the engine is
running. If it starts flashing or stays
on, the oil pressure has dropped very
low or lost pressure. Serious engine
damage is possible, and you should
take immediate action.
Running the engine with low oil
pressure can cause serious mechanical
damage almost immediately. Turn off
the engine as soon as you can safely get
the vehicle stopped. 1. Safely pull off the road, and shut
off the engine. Turn on the hazard
warning lights.
2. Let the vehicle sit for a minute. Open the hood, and check the oil
level (see page 201). An engine
very low on oil can lose pressure
during cornering and other drivingmaneuvers.
3. If necessary, add oil to bring the level back to the full mark on the
dipstick (see page 253).
4. Start the engine, and watch the oil pressure indicator. If it does not go
out within 10 seconds, turn off the
engine. There is a mechanical
problem that needs to be repaired
before you can continue driving(see Emergency Towing on page
311). Charging System Indicator
If the charging system
indicator comes on brightly
when the engine is running, the
battery is not being charged.
Immediately turn off all electrical
accessories. Try not to use other
electrically operated controls such as
the power windows. Keep the engine
running; starting the engine will
discharge the battery rapidly.
Go to a service station or garage
where you can get technicalassistance.
Low Oil Pressure Indicator, Charging System Indicator
303
Taking Care of the Unexpected
Table of Contents
Page 334 of 351

CapacitiesFuel tank Approx.
10.6 US gal (40 L)
Engine oil Change
ꭧ 1
Including filter 3.8 US qt (3.6 L)
Withoutfilter 3.6 US qt (3.4 L)
Total 4.4 US qt (4.2 L)
Engine
coolant Automatic
transmission
Change
ꭧ21.19 US gal (4.5 L)
Total 1.32 US gal (5.0 L)
Manual
transmission
Change
ꭧ21.16 US gal (4.4 L)
Total 1.29 US gal (4.9 L)
Automatic
transmissionfluid Change 2.6 US qt (2.5 L)
Total 6.18 US qt (5.85 L)
Manual
transmissionfluid Change 1.6 US qt (1.5 L)
Total 1.7 US qt (1.6 L)
Windshield
washer
reservoir U.S. Vehicles 2.6 US qt (2.5 L)
Canada Vehicles 4.8 US qt (4.5 L)
ꭧ 1: Excluding the oil remaining in the engine
ꭧ 2: Including the coolant in the reserve tank and that remaining in the
engine
Reserve tank capacity:
0.116 US gal (0.44 L) Air Conditioning
Refrigerant type HFC-134a (R-134a)
Charge quantity 13.1 -14.8 oz
(370 -420 g)
Lubricant type SP-10
Lights Headlights High/Low 12 V -60/55 W (HB2)
Front turn signal lights 12 V -21 W (Amber)
Parking lights/side marker lights 12 V -3.8 W (Amber)
Fog lights
ꭧ12 V -55 W (H11)
Rear turn signal lights 12 V -21 W (Amber)
Stop/Taillights 12 V -21/5 W
Back-up lights 12 V -16 W
License plate lights 12 V -5W
Ceiling light 12 V -8W
Cargo area light 12 V -5W
Map light
ꭧ12 V -8W
High-mount brake light LED
ꭧ : For some types
Specifications
319
Technical Information
Table of Contents
Page 351 of 351
Gasoline:
Unleaded gasoline, pump octane
number of 87 or higher.
Fuel Tank Capacity:
10.6 US gal (40 L)
Recommended Engine Oil:
API Premium grade 5W-20
detergent oil (see page 253).
Oil change capacity (including filter):3.8 US qt (3.6 L)
Automatic Transmission Fluid:
Honda Genuine ATF-Z1
(automatic transmission fluid)
(see page 259). Manual Transmission Fluid:
Honda Manual Transmission Fluid
preferred, or an SAE 10W-30 or
10W-40 motor oil as a temporary
replacement (see page 260).
Capacity (including differential):
1.6 US qt (1.5 L)
Brake Fluid:
Honda Heavy Duty Brake Fluid
DOT 3 preferred, or a DOT 3 or
DOT 4 brake fluid as a temporary
replacement (see page 261).
Tire Pressure (measured cold): Front/Rear:
All models except Sport
32 psi (220 kPa, 2.2 kgf/cm
2)
Sport model 33 psi (230 kPa, 2.3 kgf/cm
2)
Spare Tire Pressure: 60 psi (420 kPa, 4.2 kgf/cm
2)
Service Information Summary