Page 134 of 351

Radio Data System (RDS) Category
On the FM band selected, you can
select the program category provided
by the RDS. Press
orPLAY
button to display and select an RDS
category. The principal RDS
categories are shown as follows; ALL: All RDS category stations
ROCK: Rock, classic rock and soft
rock music
COUNTRY: Country music
SOFT: Adult hits and soft music
TOP 40: Top 40 hits
OLDIES: Nostalgia music and oldies
R & B: Rhythm and blues, and soft
rhythm and blues
RELIGION: Religious music and
religious talk
CLASSIC: Classical music
JAZZ: Jazz
INFO: News, information, sports,
talk, foreign language, personality,
public, college, and weather
TRAFFIC: Traffic information
Press
orPLAY button to
select an RDS category. The display
shows the selected RDS category
name for about 10 seconds. You can
use the search or scan function to
find radio stations in the selected
RDS category. If you do nothing
while the RDS category name is
displayed, the selected category iscanceled.
RDS Program Search
This function searches up and down
a frequency for the strongest signal
from the frequencies that carry the
selected RDS category information.
This can help you to find a station in
your favorite category. To activate it,
press the
orside of the
TUNE/SEEK button. You will see
the selected RDS category name
blinking while searching it. When
the system finds a station, the
selected RDS category name will be
displayed again for about 5 seconds.
RDS CATEGORY
CONTINUED
Playing the FM/AM Radio (Models without navigation system)
119
Features
Table of Contents
Page 144 of 351
ꂺPLAY BUTTON
USB INDICATOR
RANDOM BUTTON
ꀽ
SEEK
(SKIP +)
BUTTON
TITLE BUTTON AUX BUTTON
ꂹꂾ
BUTTON
VOL/SELECT KNOB REPEAT BUTTON
ꀾ SEEK (SKIP
-)
BUTTON iPod INDICATOR
POWER ( ꂻ) BUTTON
On Sport model
CONTINUED
Playing an iPod®(Models without navigation system)
129
Features
Table of Contents
Page 151 of 351
ꂺPLAY BUTTON
USB INDICATOR
RANDOM BUTTON
ꀽSEEK (SKIP +)
BUTTON
TITLE BUTTON AUX BUTTON
ꂹꂾ
BUTTON
VOL/SELECT KNOB REPEAT BUTTON
ꀾ SEEK (SKIP
-)
BUTTON
POWER (
ꂻ) BUTTON
On Sport model
Playing a USB Flash Memory Device (Models without navigation system)
136
Table of Contents
Page 208 of 351

On Sport model
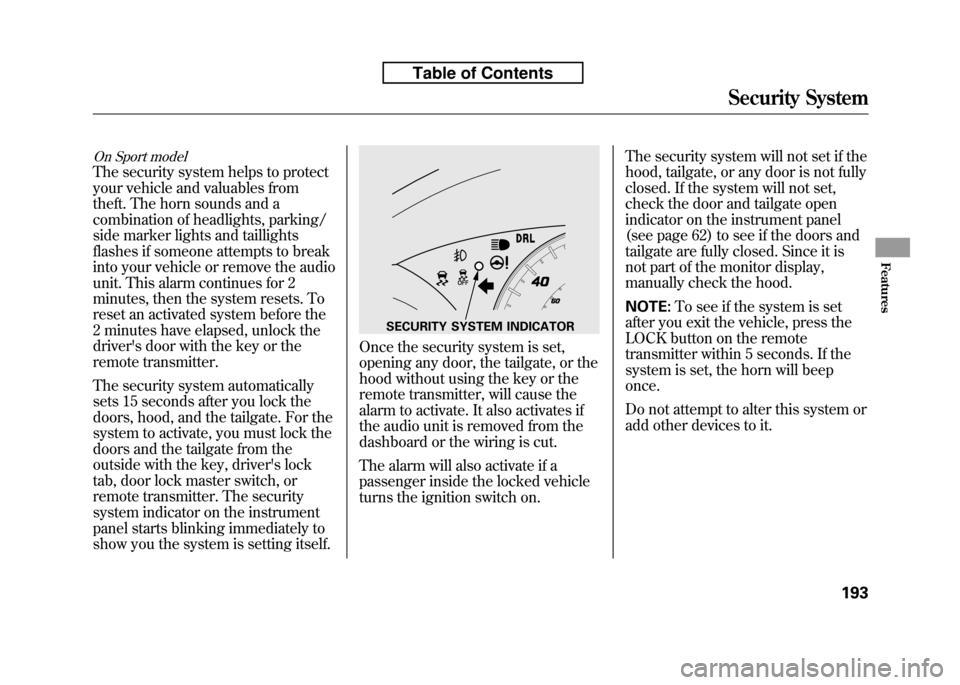
The security system helps to protect
your vehicle and valuables from
theft. The horn sounds and a
combination of headlights, parking/
side marker lights and taillights
flashes if someone attempts to break
into your vehicle or remove the audio
unit. This alarm continues for 2
minutes, then the system resets. To
reset an activated system before the
2 minutes have elapsed, unlock the
driver's door with the key or the
remote transmitter.
The security system automatically
sets 15 seconds after you lock the
doors, hood, and the tailgate. For the
system to activate, you must lock the
doors and the tailgate from the
outside with the key, driver's lock
tab, door lock master switch, or
remote transmitter. The security
system indicator on the instrument
panel starts blinking immediately to
show you the system is setting itself.
Once the security system is set,
opening any door, the tailgate, or the
hood without using the key or the
remote transmitter, will cause the
alarm to activate. It also activates if
the audio unit is removed from the
dashboard or the wiring is cut.
The alarm will also activate if a
passenger inside the locked vehicle
turns the ignition switch on.The security system will not set if the
hood, tailgate, or any door is not fully
closed. If the system will not set,
check the door and tailgate open
indicator on the instrument panel
(see page 62) to see if the doors and
tailgate are fully closed. Since it is
not part of the monitor display,
manually check the hood. NOTE:
To see if the system is set
after you exit the vehicle, press the
LOCK button on the remote
transmitter within 5 seconds. If the
system is set, the horn will beeponce.
Do not attempt to alter this system or
add other devices to it.
SECURITY SYSTEM INDICATOR
Security System
193
Features
Table of Contents
Page 209 of 351

On Sport model and Canadian LX model
Cruise control allows you to maintain
a set speed above 25 mph (40 km/h)
without keeping your foot on the
accelerator pedal. It should be used
for cruising on straight, open
highways. It is not recommended for
city driving, winding roads, slippery
roads, heavy rain, or bad weather.
Improper use of the cruise
control can lead to a crash.
Use the cruise control only
when traveling on open
highways in good weather.Using the Cruise Control
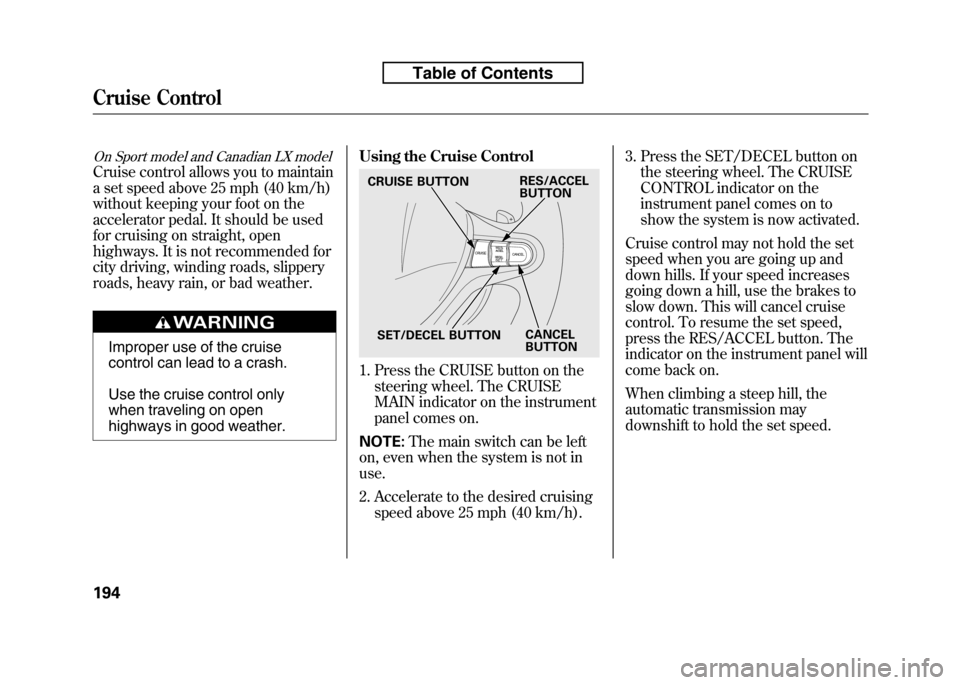
1. Press the CRUISE button on the
steering wheel. The CRUISE
MAIN indicator on the instrument
panel comes on.
NOTE: The main switch can be left
on, even when the system is not inuse.
2. Accelerate to the desired cruising speed above 25 mph (40 km/h). 3. Press the SET/DECEL button on
the steering wheel. The CRUISE
CONTROL indicator on the
instrument panel comes on to
show the system is now activated.
Cruise control may not hold the set
speed when you are going up and
down hills. If your speed increases
going down a hill, use the brakes to
slow down. This will cancel cruise
control. To resume the set speed,
press the RES/ACCEL button. The
indicator on the instrument panel will
come back on.
When climbing a steep hill, the
automatic transmission may
downshift to hold the set speed.
CRUISE BUTTON
SET/DECEL BUTTON CANCEL
BUTTON
RES/ACCEL
BUTTON
Cruise Control
194
Table of Contents
Page 228 of 351

This section gives you tips on
starting the engine under various
conditions, and how to operate the
manual and automatic transmissions.
It also includes important information
on parking your vehicle, the braking
system, the vehicle stability assist(VSA
®), and the tire pressure
monitoring system (TPMS).
Driving Guidelines ......................214
Preparing to Drive ......................
215
Starting the Engine .....................
216
Manual Transmission .................
217
Automatic Transmission .............
219
Driving with the Paddle Shifters
(Sport only) .............................
224
Parking .......................................
229
Braking System ..........................
230
Anti-lock Brakes (ABS) ...............
231
Vehicle Stability Assist (VSA
®),
aka Electronic Stability Control
(ESC), System .....................
233
Tire Pressure Monitoring System (TPMS) ...................................
235
Towing a Trailer ..........................
238
Towing Your Vehicle Behind a
Motorhome .............................
238
Driving
213
Driving
Page 229 of 351
On Sport model
Your vehicle is designed to give you
optimum handling and performance
on well-maintained roads. As part of
this design, your vehicle has
minimum ground clearance.● Use caution if you ever drive your
vehicle on very rough or rutted
roads. You could damage the
suspension and underbody by
bottoming out. Going too fast over
parking lot ‘‘speed bumps ’’can
also cause damage.
● Curbs and steep inclines could
damage the front and rear
bumpers. Low curbs that do not
affect the average vehicle may be
high enough to hit the bumper on
your vehicle. The front or rear
bumper may scrape when trying to
drive onto an incline, such as a
steep driveway or trailer ramps.
Driving Guidelines
214
Table of Contents
Page 234 of 351

Shift Lever Position Indicators
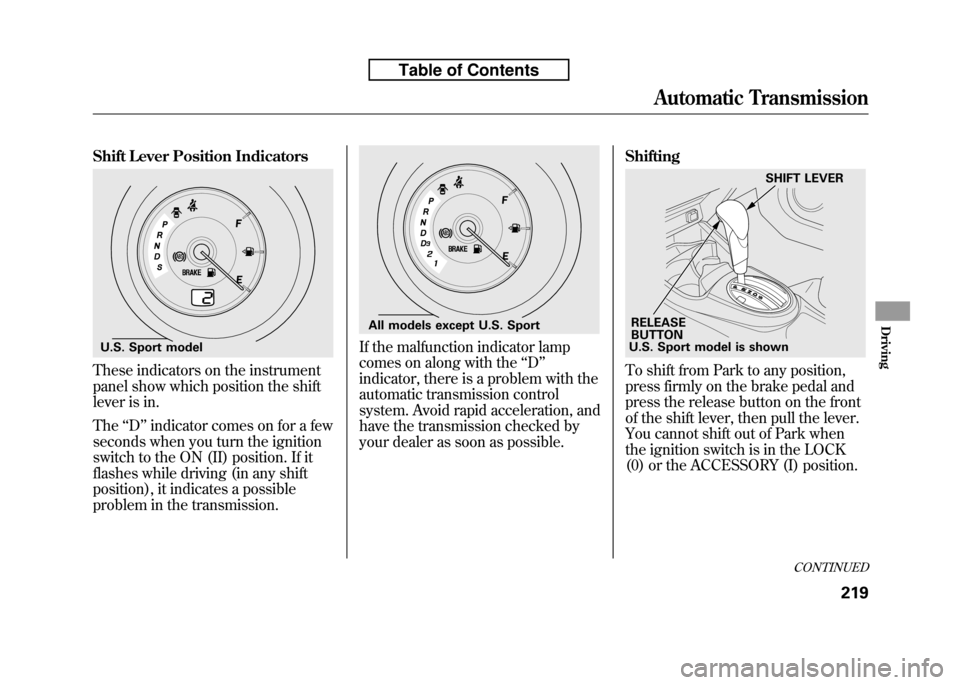
These indicators on the instrument
panel show which position the shift
lever is in. The‘‘D ’’indicator comes on for a few
seconds when you turn the ignition
switch to the ON (II) position. If it
flashes while driving (in any shift
position), it indicates a possible
problem in the transmission.
If the malfunction indicator lamp
comes on along with the ‘‘D ’’
indicator, there is a problem with the
automatic transmission control
system. Avoid rapid acceleration, and
have the transmission checked by
your dealer as soon as possible. Shifting
To shift from Park to any position,
press firmly on the brake pedal and
press the release button on the front
of the shift lever, then pull the lever.
You cannot shift out of Park when
the ignition switch is in the LOCK
(0) or the ACCESSORY (I) position.
U.S. Sport model
All models except U.S. Sport
U.S. Sport model is shown
RELEASE
BUTTON SHIFT LEVER
CONTINUED
Automatic Transmission
219
Driving
Table of Contents