Page 78 of 351

Anti-lock Brake System
(ABS) Indicator
This indicator normally comes on for
a few seconds when you turn the
ignition switch to the ON (II)
position, and when the ignition
switch is turned to the START (III)
position. If it comes on at any other
time, there is a problem with the
ABS. If this happens, have your
vehicle checked at a dealer. With this
indicator on, your vehicle still has
normal braking ability but no anti-
lock function. For more information,
see page 231.Electric Power Steering
(EPS) Indicator
This indicator normally comes on when
you turn the ignition switch to the ON
(II) position and goes off after the
engine starts. If it comes on at any
other time, there is a problem in the
electric power steering system. If this
happens, stop the vehicle in a safe
place and turn off the engine. Reset the
system by restarting the engine. The
indicator will not turn off immediately.
If it does not go off after driving a short
distance, or comes back on again while
driving, take the vehicle to your dealer
to have it checked. With the indicator
on, the EPS may be turned off, making
the vehicle harder to steer.
If you turn the steering wheel to the
full left or right position repeatedly
while stopping or driving at very low
speed, you may feel slightly harder
steering in order to prevent damage to
the steering box caused by overheating.Low Fuel Indicator
This indicator comes on as a
reminder that you must refuel soon.
When the indicator comes on, there
is about 1.64 US gal (6.2 L) of fuel
remaining in the tank before the
needle reaches E. There is a small
reserve of fuel remaining in the tank
when the needle does reach E.
Door and Tailgate Open Indicator
This indicator comes on if any door
or the tailgate is not closed tightly.
Instrument Panel Indicators
62
Table of Contents
Page 88 of 351
ꭧ1: To use the horn, press the center pad of the steering wheel.
ꭧ 2: If equipped.
ꭧ 3: Only on vehicles equipped with navigation system. Refer to the navigation system manual.
PADDLE SHIFTER (DOWNSHIFT)ꭧ2
(P. 224)
HEADLIGHTS/
TURN SIGNAL/
FOG LIGHTS
ꭧ2
(P. 74)
NAVIGATION SYSTEM
VOICE CONTROL BUTTONS
ꭧ3
STEERING WHEEL
ADJUSTMENTS
(P. 77) CRUISE CONTROLBUTTONSꭧ
2
(P. 194) AUXILIARY INPUT JACK
(P. 190)
ACCESSORY POWER SOCKET
(P. 106) PASSENGER AIRBAG OFFINDICATOR
(P. 31)
REAR WINDOW
DEFOGGER/HEATED
MIRROR BUTTON
ꭧ
2
(P. 76/102)
WINDSHIELD
WIPERS/WASHERS
(P. 73)
HAZARD WARNING BUTTON
(P. 76)
PADDLE SHIFTER (UPSHIFT)
ꭧ
2
(P. 224)
INSTRUMENT PANEL
BRIGHTNESS
(P. 76)
REMOTE AUDIO
CONTROL BUTTONS
ꭧ 2
(P. 189)
VEHICLE STABILITY
ASSIST (VSA) SYSTEM
OFF SWITCH
ꭧ 2
(P. 234)
Vehicle with navigation system is shown. HORN
ꭧ
1
Controls Near the Steering Wheel
72
Table of Contents
Page 96 of 351

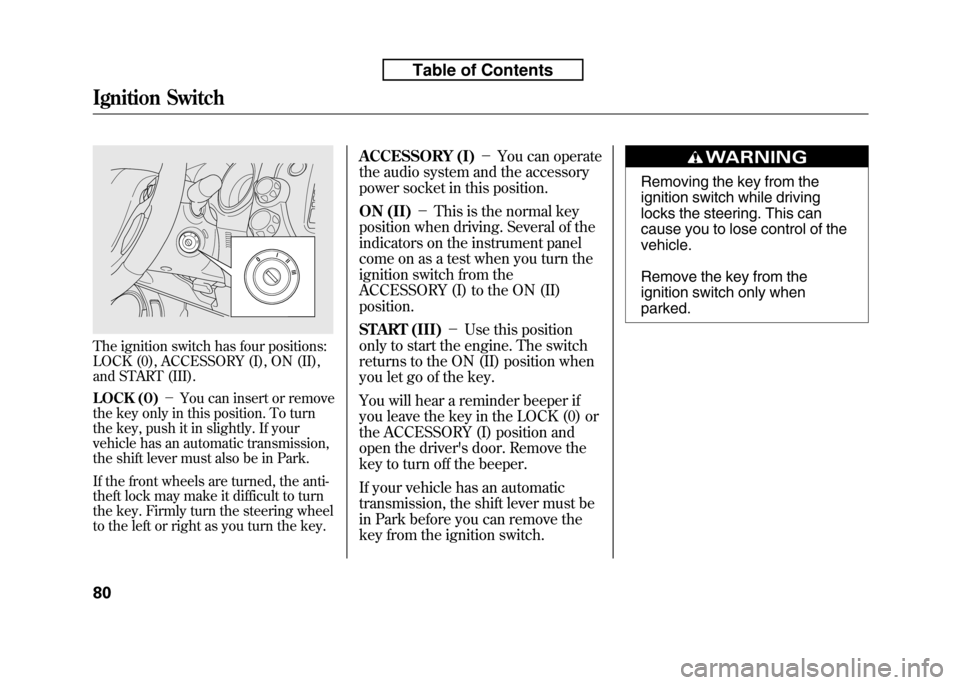
The ignition switch has four positions:
LOCK (0), ACCESSORY (I), ON (II),
and START (III).
LOCK (0)-You can insert or remove
the key only in this position. To turn
the key, push it in slightly. If your
vehicle has an automatic transmission,
the shift lever must also be in Park.
If the front wheels are turned, the anti-
theft lock may make it difficult to turn
the key. Firmly turn the steering wheel
to the left or right as you turn the key. ACCESSORY (I)
-You can operate
the audio system and the accessory
power socket in this position.
ON (II) -This is the normal key
position when driving. Several of the
indicators on the instrument panel
come on as a test when you turn the
ignition switch from the
ACCESSORY (I) to the ON (II)position.
START (III) -Use this position
only to start the engine. The switch
returns to the ON (II) position when
you let go of the key.
You will hear a reminder beeper if
you leave the key in the LOCK (0) or
the ACCESSORY (I) position and
open the driver's door. Remove the
key to turn off the beeper.
If your vehicle has an automatic
transmission, the shift lever must be
in Park before you can remove the
key from the ignition switch.
Removing the key from the
ignition switch while driving
locks the steering. This can
cause you to lose control of thevehicle.
Remove the key from the
ignition switch only whenparked.
Ignition Switch
80
Table of Contents
Page 245 of 351

Your vehicle is equipped with front
disc brakes. The brakes on the rear
wheels are drum. A power assist
helps reduce the effort needed on the
brake pedal. The anti-lock brake
system (ABS) helps you retain
steering control when braking veryhard.
Resting your foot on the pedal keeps
the brakes applied lightly, builds up
heat, and reduces their effectiveness
and reduces brake pad life. In
addition, fuel economy can be
reduced. It also keeps your brake
lights on all the time, confusing
drivers behind you.
Constant application of the brakes
when going down a long hill builds
up heat and reduces their
effectiveness. Use the engine to
assist the brakes by taking your foot
off the accelerator and downshifting
to a lower gear.Check your brakes after driving
through deep water. Apply the
brakes moderately to see if they feel
normal. If not, apply them gently and
frequently until they do. Be extra
cautious and alert in your driving.
Braking System Design
The hydraulic system that operates
the brakes has two separate circuits.
Each circuit works diagonally across
the vehicle (the left-front brake is
connected with the right-rear brake,
etc.). If one circuit should develop a
problem, you will still have braking
at two wheels.
Brake Pad Wear Indicators
If the front brake pads need
replacing, you will hear a distinctive,
metallic screeching sound when you
apply the brake pedal. If you do not
have the brake pads replaced, they
will screech all the time. It is normal
for the brakes to occasionally squeal
or squeak when you apply them.
Braking System
230
Table of Contents
Page 254 of 351

5. Release the parking brake.
Manual transmission:
1. Move the shift lever into theNeutral position.
2. Release the parking brake.
Leave the ignition switch in the
ACCESSORY (I) position so the
steering wheel does not lock. Make
sure the radio and any items plugged
into the accessory power sockets are
turned off so you do not run down
the battery.
When you stop towing your vehicle
and shift out of the neutral position,
you may not be able to move the shift
lever from neutral to reverse or Park.
If this happens, press the brake pedal
and turn the ignition switch to the
ON (II) position, then shift out ofneutral.
Extended Towing
If you tow more than 8 hours in one
day, you should repeat the above
procedure at least every 8 hours
(when you stop for fuel, etc.).Failure to follow the recommended
instructions exactly will result in severe
automatic transmission damage. If you
cannot shift the transmission or start
the engine, your vehicle must be
transported on a flat-bed truck ortrailer.
CONTINUED
Towing Your Vehicle Behind a Motorhome
239
Driving
Table of Contents
Page 266 of 351

Symbol Maintenance Main ItemsA ●
Replace engine oilꭧ1
B ●
Replace engine oil and oil filter
● Inspect front and rear brakes
● Check parking brake adjustment
● Inspect these items:
● Tie rod ends, steering gear box, and boots
● Suspension components
● Driveshaft boots
● Brake hoses and lines (including ABS/VSA)
● All fluid levels and condition of fluids
● Exhaust system
#
●Fuel lines and connections#
●Check expiration date for TRK bottleꭧ2
ꭧ 1: If the message ‘‘SERVICE ’’does not appear more than 12 months after the
display is reset, change the engine oil every year.
ꭧ 2: Canadian A/T models only
# : See information on maintenance and emissions warranty on page 249.
NOTE: ●
Independent of maintenance messages in the information display,
replace the brake fluid every 3 years.
● Inspect idle speed every 160,000 miles (256,000 km).
● Adjust the valves during services A, B, 1, 2, or 3 only if they are noisy. Symbol Maintenance Sub Items
1 ●
Rotate tires
2 ●
Replace air cleaner element
If you drive in dusty conditions, replace every 15,000
miles (24,000 km).
● Replace dust and pollen filter
If you drive primarily in urban areas that have high
concentrations of soot in the air from industry and from
diesel-powered vehicles, replace every 15,000 miles
(24,000 km).
● Inspect drive belt
3 ●
Replace transmission fluid
Driving in mountainous areas at very low vehicle
speeds results in higher transmission temperatures.
This requires transmission fluid changes more
frequently than recommended by the maintenance
minder. If you regularly drive your vehicle under these
conditions, have the transmission fluid changed at
60,000 miles (100,000 km), then every 30,000 miles
(48,000 km). (For A/T only)
If you tow a Fit behind a motorhome, the transmission
fluid must be changed every 2 years or 30,000 miles
(48,000 km), whichever comes first. (For A/T only)
4 ●
Replace spark plugs
● Inspect valve clearance
5 ●
Replace engine coolant
Maintenance Minder
Maintenance Minder
251
Table of Contents