Page 93 of 342

If the system repeatedly does not
recognize the coding of your key,
contact your dealer.
Do not attempt to alter this system or
add other devices to it. Electrical
problems could result that may make
your vehicle inoperable.
If you have lost your key and cannot
start the engine, contact your dealer.
Always take the ignition key with you
whenever you leave the vehicle alone.
As required by the FCC:This device complies with Part 15 of theFCC rules. Operation is subject to the
following two conditions: (1) This devicemay not cause harmful interference, and(2) this device must accept any
interference received, includinginterference that may cause undesiredoperation.
Changes or modifications not expresslyapproved by the party responsible for
compliance could void the user'sauthority to operate the equipment.
This device complies with IndustryCanada Standard RSS-210.
Operation is subject to the following two
conditions: (1) this device may not causeinterference, and (2) this device must
accept any interference that may causeundesired operation of the device.Remote Transmitter
LOCK -Press this button once to
lock both doors and hatch. Some
exterior lights will flash. When you
push LOCK twice within 5 seconds,
you will hear a horn to verify that the
doors are locked. You cannot lock it
if any door is not fully closed or key
is in the ignition switch.
LED UNLOCK BUTTON LOCKBUTTON PANIC BUTTON
CONTINUED
Immobilizer System, Remote Transmitter
77
Instruments and Controls
Table of Contents
Page 94 of 342

UNLOCK-Press this button once
to unlock the driver's door. Push it
twice to unlock the passenger's door
and the hatch. Some exterior lights
will flash twice each time you press
the button. If you do not open either
door or the hatch within 30 seconds,
they will automatically relock. PANIC -Press this button for
about 1 second to attract attention;
the horn will sound and the exterior
lights will flash for about 30 seconds.
To cancel panic mode, press any
other button on the remote
transmitter, or turn the ignition
switch to the ON (II) position.Remote Transmitter Care● Avoid dropping or throwing thetransmitter.
● Protect the transmitter from
extreme temperature.
● Do not immerse the transmitter in
any liquid.
● If you lose a transmitter, the
replacement needs to be
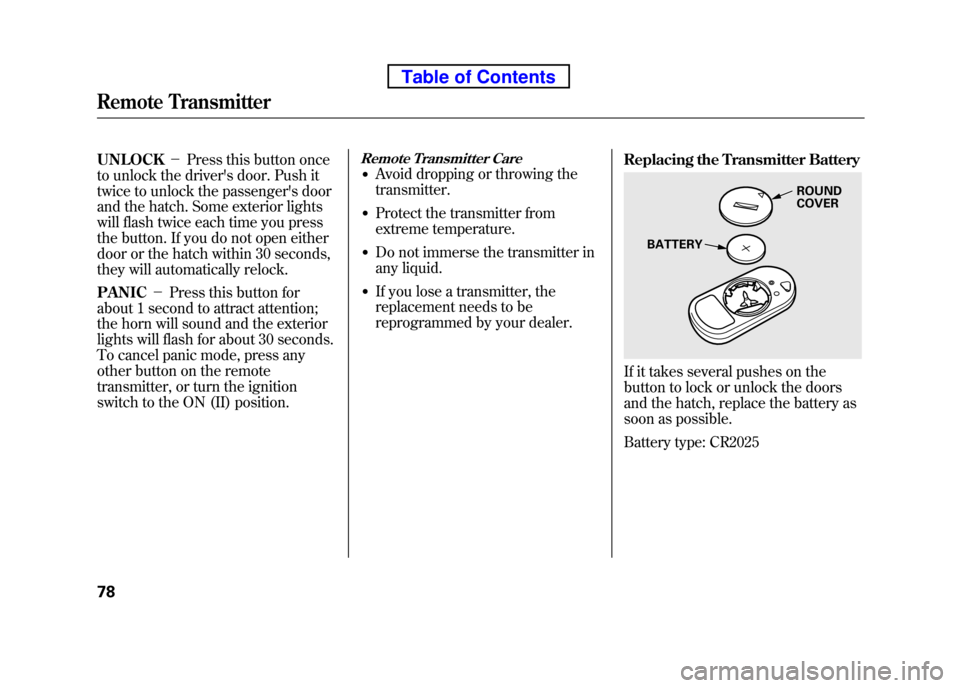
reprogrammed by your dealer. Replacing the Transmitter Battery
If it takes several pushes on the
button to lock or unlock the doors
and the hatch, replace the battery as
soon as possible.
Battery type: CR2025
ROUND COVER
BATTERY
Remote Transmitter
78
Table of Contents
Page 109 of 342
Keep the inside and outside mirrors
clean and adjusted for best visibility.
Be sure to adjust the mirrors before
you start driving.
The inside mirror has day and night
positions. The night position reduces
glare from headlights behind you.
Flip the tab on the bottom edge of
the mirror to select the day or nightposition.Adjusting the Power Mirrors
1. Turn the ignition switch to the ON
(II) position.
2. Move the selector switch to L (driver's side) or R (passenger's side). 3. Push the appropriate edge of the
adjustment switch to move the
mirror right, left, up, or down.
4. When you finish, move the selector switch to the center (off)
position. This turns the adjustment
switch off to keep your settings.
TABSELECTOR SWITCH
ADJUSTMENT SWITCH
Mirrors
93
Instruments and Controls
Table of Contents
Page 111 of 342

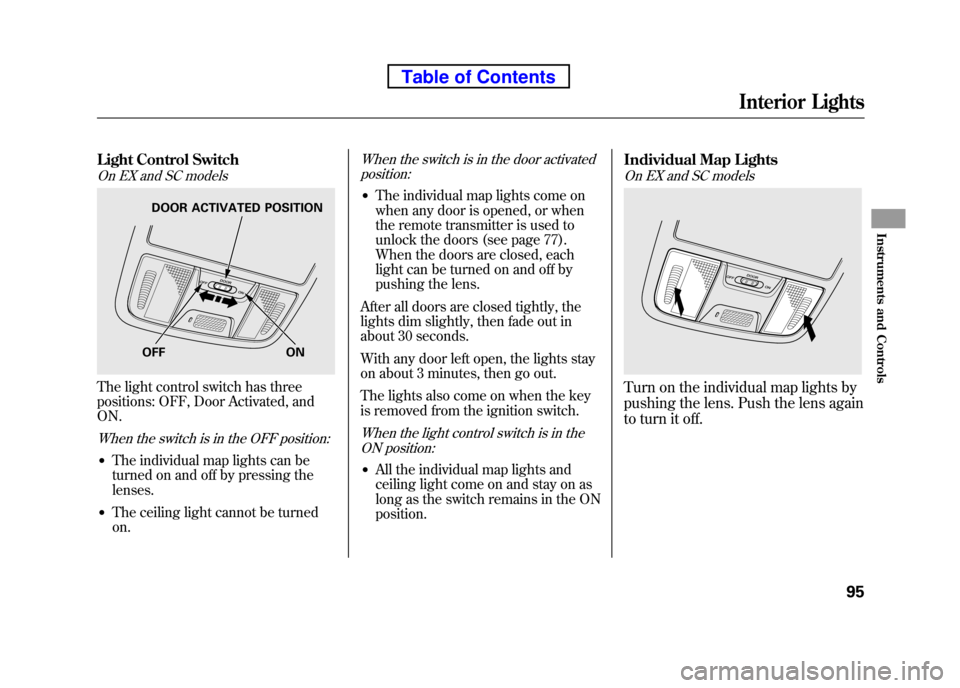
Light Control Switch
On EX and SC models
The light control switch has three
positions: OFF, Door Activated, andON.
When the switch is in the OFF position:
●The individual map lights can be
turned on and off by pressing thelenses.
● The ceiling light cannot be turnedon.
When the switch is in the door activated
position:
● The individual map lights come on
when any door is opened, or when
the remote transmitter is used to
unlock the doors (see page 77).
When the doors are closed, each
light can be turned on and off by
pushing the lens.
After all doors are closed tightly, the
lights dim slightly, then fade out in
about 30 seconds.
With any door left open, the lights stay
on about 3 minutes, then go out.
The lights also come on when the key
is removed from the ignition switch.
When the light control switch is in the ON position:
● All the individual map lights and
ceiling light come on and stay on as
long as the switch remains in the ONposition. Individual Map Lights
On EX and SC models
Turn on the individual map lights by
pushing the lens. Push the lens again
to turn it off.
OFF ON
DOOR ACTIVATED POSITION
Interior Lights
95
Instruments and Controls
Table of Contents
Page 112 of 342
Courtesy Light
On vehicles with navigation system
The courtesy light between the map
lights comes on when you turn the
parking lights on. To adjust its
brightness, turn the select/reset
knob on the instrument panel (see
page 72).Ceiling Light
The ceiling light has a three-position
switch: ON, Door Activated, and OFF.
In the Door Activated (center)
position, the light comes on when you:
● Open any door.
● Remove the key from the ignition.
If you do not open a door, the light
fades out in about 30 seconds.
● Unlock the doors with the key or
remote transmitter. Cargo Area Light
The cargo area light has a three-
position switch. In the center
position, the light comes on when
you open the hatch.
Ignition Switch Light
The ignition switch light comes on
when you unlock the driver's door,
and fades out about 30 seconds after
you close the door.COURTESY LIGHT
ON
OFF DOOR ACTIVATED
Interior Lights
96
Table of Contents
Page 147 of 342

BALANCE-Adjusts the side-to-
side strength of the sound.
To adjust the left/right balance,
touch the L or R icon. SUBWOOFER -Adjusts the
strength of sound from the
subwoofer speaker. To adjust the
sound strength, touch
oron
each side of the adjustment bar.
The right upper display shows you
the current setting of the sound
strength coming from each speaker.
SVC (speed-sensitive volume compensation) -The SVC mode
controls the volume based on vehicle
speed. The faster you go, the louder
the audio volume becomes. As you
slow down, the audio volume
decreases. Touch the appropriate
icon (Low, Mid, Hi, Off) to select the mode. This function is set to Mid as the
default setting when the vehicle
leaves the factory. If you feel the
sound is too loud, choose low. If you
feel the sound is too quiet, choose Hi.
You can also select the icon with the
joystick. Move it up and down to
move the highlighting and scroll
through lists. Select the icon, then
move the joystick left or right to
change the setting.
The system will return to the audio
display about 10 seconds after you
stop adjusting a mode.
Screen Mode
You can select the background
screen to display the sound level.
There are three screen modes: level
(the sound level is shown with the
vertical bars), spectrum analysis (the
sound level appears as ripples of
water), and off. Each time you touch
the background icon, the display changes.
Audio System Lighting
You can use the instrument panel
brightness control knob to adjust the
illumination of the audio system (see
page 72). The audio system
illuminates when the parking lights
are on, even if the radio is off.
Playing the FM/AM Radio (Models with navigation system)
131
Features
Table of Contents
Page 221 of 342

Modifying your vehicle, or installing
some non-Honda accessories, can
make it unsafe. Before you make any
modifications or add any accessories,
be sure to read the following information. Accessories
Your dealer has Honda accessories
that allow you to personalize your
vehicle. These accessories have been
designed and approved for your
vehicle, and are covered by warranty.
Although non-Honda accessories
may fit on your vehicle, they may not
meet factory specifications, and could
adversely affect your vehicle's
handling and stability.
Improper accessories or
modifications can affect your
vehicle's handling, stability, and
performance, and cause a
crash in which you can be hurt
or killed.
Follow all instructions in this
owner's manual regarding
accessories and modifications.
When properly installed, cellular
phones, alarms, two-way radios, and
low-powered audio systems should
not interfere with your vehicle's
computer controlled systems, such
as your airbags, anti-lock brakes, and
tire pressure monitoring system. Before installing any accessory:
● Make sure the accessory does not
obscure any lights, or interfere
with proper vehicle operation or performance.
● Be sure electronic accessories do
not overload electrical circuits (see
page 298) or interfere with the
proper operation of your vehicle.
● Before installing any electronic
accessory, have the installer
contact your dealer for assistance.
If possible, have your dealer
inspect the final installation.
● Do not install accessories on the
side pillars or across the rear
windows. Accessories installed in
these areas may interfere with
proper operation of the side
curtain airbags.
CONTINUED
Accessories and Modifications
205
Before Driving
Table of Contents
Page 231 of 342
You should do the following checks
and adjustments before you drive
your vehicle.1. Make sure all windows, mirrors, and outside lights are clean and
unobstructed. Remove frost, snow,
or ice.
2. Check that the hood is fully closed.
3. Visually check the tires. If a tire looks low, use a gauge to check itspressure.
4. Check that any items you may be carrying are stored properly or
fastened down securely. 5. Check the seat adjustment (see
page 83).
6. Check the adjustment of the inside and outside mirrors (see page 93).
7. Check the steering wheel adjustment (see page 74). 8. Make sure the doors, the hatch,
and the tailgate are securely
closed and locked.
9. Fasten your seat belt. Check that your passengers have fastened
their seat belts (see page 14).
10. When you start the engine, check the gauges and indicators in the
instrument panel (see page 57).
Preparing to Drive
215
Driving
Table of Contents