Page 348 of 441

Crosswinds and air turbulence
caused by passing trucks can disrupt
your steering and cause the trailer to
sway. When being passed by a large
vehicle, keep a constant speed, and
steer straight ahead. Do not try to
make quick steering or braking
corrections.
If youmuststopwhenfacinguphill,
use the f oot brake or parking brake.
Do not try to hold the vehicle in
place by pressing on the accelerator,
as this can cause the automatic
transmission to overheat.
When driving down hills, reduce
your speed and use the D3 position.
Do not ‘‘ride’’ the brakes, and
remember it will take longer to slow
downandstopwhentowingatrailer.
When climbing hills, closely watch
your temperature gauge. If it nears
the red (Hot) mark, turn the air conditioning of f , reduce speed and, if
necessary, pull to the side of the
road to let the engine cool.
Maketurnsmoreslowlyandwider
than normal. The trailer tracks a
smaller arc than your vehicle, and it
canhitorrunoversomethingthe
vehicle misses. Allow more time and
distance f or braking. Do not brake or
turn suddenly as this could cause the
trailer to jackknif e or turn over.
Drive slower than normal in all
driving situations, and obey posted
speed limits f or vehicles with trailers.
Use the D position when towing a
trailer on level roads. D is the
proper shif t lever position to use
when towing a trailer in hilly terrain.
(See ‘‘ ’’ in the
f ollowing column f or additional gear
inf ormation.)
The lights and brakes on your
vehicle and the trailer are working
properly.
Your vehicle tires and spare are
properly inf lated, and the trailer
tires and spare are inf lated as
recommended by the trailer
maker.
The added weight, length, and
height of a trailer will af f ect your
vehicle’s handling and perf ormance,
so driving with a trailer requires
some special driving skills and
techniques.
Foryoursafetyandthesafetyof
others,taketimetopracticedriving
maneuvers bef ore heading f or the
open road, and f ollow the guidelines
in this section.
3
CONT INUED
Towing a Trailer
Handling Crosswinds and Buf f et ing
Driving on Hills
Making T urns and Braking
Driving on Hills
T owing Speeds and Gears
Driving Saf ely With a T railerDriving
333
Table of Contents
Page 354 of 441

This section explains why it is
important to keep your vehicle well
maintained and how to f ollow basic
maintenance saf ety precautions.
If you have the skills and tools to
perf orm more complex maintenance
tasks on your vehicle, you may want
to purchase the service manual. See
page f or inf ormation on how to
obtain a copy, or see your dealer.
This section also includes
instructions on how to read the
maintenance minder messages on
the information display, and
instructions f or simple maintenance
tasks you may want to take care of
yourself .
......................Maintenance Saf ety . 340
....................
Maintenance Minder . 341
..............................
Fluid Locations . 348
........................
Adding Engine Oil . 349
Changing the Engine Oil and
...........................................
Filter . 350
..............................
Engine Coolant . 352
....................
Windshield Washers . 354
....
Automatic Transmission Fluid . 355
.................
Rear Dif f erential Fluid . 357
....................................
Brake Fluid . 357
....................
Power Steering Fluid . 358
.............................................
Lights . 359
................
Cleaning the Seat Belts . 365
.....................................
Floor Mats . 365
..............................
Audio Antenna . 366
..................
Dust and Pollen Filter . 366
.................................
Wiper Blades . 367
...............................................
Tires . 370
...........................................
Wheels . 376
...................
Checking the Battery . 376
.............................
Vehicle Storage . 378
425
Maintenance
Maint enance
339
Page 361 of 441

�µ�µ�µ
�µ
�µ
�Ì
�µ
Engine oil level Check every
time you fill the fuel tank. See
page .
Engine coolant level Check the
radiator reserve tank every time
you f ill the f uel tank. See page .
Automatic transmission Check
the f luid level monthly. See page
.
Brakes Check the f luid level
monthly. See page .
Tires Check the tire pressure
monthly. Examine the tread f or
wear and foreign objects. See page .
Youshouldcheckthefollowing
items at the specif ied intervals. If
you are unsure of how to perf orm
any check, turn to the appropriate
page listed.
U.S. Vehicles:
According to state and federal
regulations, f ailure to perf orm
maintenance on the items marked
with will not void your emissions
warranties. However, all
maintenance services should be
perf ormed in accordance with the
intervals indicated by the
inf ormation display.
Lights Check the operation of
the headlights, parking lights,
taillights, high-mount brake light,
and license plate light monthly.
See page .
We recommend using Honda parts
and fluids whenever you have
maintenance done. These are
manuf actured to the same high
quality standards as the original
components, so you can be conf ident
of their perf ormance and durability.
However, service at a dealer is not
mandatory to keep your warranties
in effect. Maintenance may be done
by any qualif ied service f acility or
person who is skilled in this type of
automotive service. Make sure to
have the service f acility or person
reset the display as previously
described. Keep all receipts as proof
of completion, and have the person
who does the work f ill out your
Honda Service History or Canadian
Maintenance Log. Check your
warranty booklet f or more
inf ormation.
355
357
359
298
298
370
Maintenance Minder
Owner’s Maintenance Checks Maintenance,
replacement, or repair of
emissions control devices and
systems may be done by any
automotive repair establishment
or individual using parts that are
‘‘certif ied’’ to EPA standards.
346
Table of Contents
Page 374 of 441
CONT INUED
Theheadlightswereproperlyaimed
when your vehicle was new. If you
regularly carry heavy items in the
cargo area or pull a trailer,
readjustment may be required.
Adjustmentsshouldbedonebyyour
dealer or another qualif ied
technician.Your vehicle has halogen headlight
bulbs. When replacing a bulb, handle
it by its base, and protect the glass
f rom contact with your skin or hard
objects. If you touch the glass, clean
it with denatured alcohol and a clean
cloth.
Open the hood.
To change the headlight bulb on
the driver’s side, remove the
under-hood f use box f rom its stay
by pulling it out.
1.
Headlight A iming Replacing a Headlight Bulb
Lights
Maint enance
359
Halogen headlight bulbs get very hot
when lit. Oil, perspiration, or a scratch
on the glass can cause the bulb to
overheat and shatter.
Table of Contents
Page 375 of 441
�à
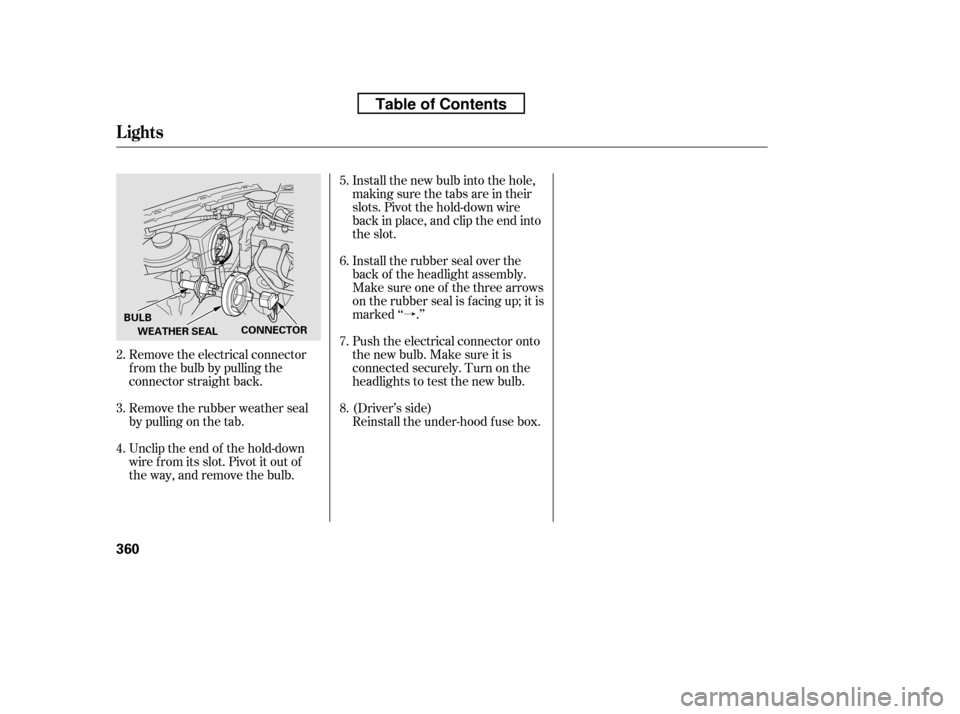
Remove the electrical connector
f rom the bulb by pulling the
connector straight back.
Remove the rubber weather seal
by pulling on the tab.
Unclip the end of the hold-down
wire f rom its slot. Pivot it out of
the way, and remove the bulb. Install the new bulb into the hole,
making sure the tabs are in their
slots. Pivot the hold-down wire
back in place, and clip the end into
the slot.
Install the rubber seal over the
back of the headlight assembly.
Make sure one of the three arrows
on the rubber seal is f acing up; it is
marked ‘‘ .’’
Push the electrical connector onto
the new bulb. Make sure it is
connected securely. Turn on the
headlights to test the new bulb.
(Driver’s side)
Reinstall the under-hood f use box.
4.
2. 3. 5. 6.7. 8.
Lights
360
BULB
WEATHER SEAL CONNECTOR
Table of Contents
Page 376 of 441
Insert the socket back into the
headlight assembly. Turn it
clockwise to lock it in place.
Turn on the lights to make sure
the new bulb is working.
(Driver’s side)
Reinstall the coolant reserve tank.
Open the hood.
To change the turn signal bulb on
the driver’s side, remove the
engine coolant reserve tank by
pulling it out of its holder. Remove the socket from the
headlight assembly by turning it
one-quarter turn counterclockwise.
Pull the bulb straight out of its
socket. Push the new bulb straight
into the socket until it bottoms.
1.
2. 3.4.5. 6.
Lights
Replacing a Front T urn Signal
Light Bulb
Maint enance
361
HOLDER
BULB
SOCKET
Table of Contents
Page 377 of 441
Insert the socket back into the
headlight assembly. Turn it
clockwise to lock it in place.
Turn on the lights to make sure
the new bulb is working.
Reinstall the f use box in place
securely.
(Driver’s side)
Open the hood.
To change the parking light/f ront
side marker on the driver’s side,
removethefuseboxfromitsstay
by pulling out. Remove the socket from the
headlight assembly by turning it
one-quarter turn counterclockwise.
Pull the bulb straight out of its
socket. Push the new bulb straight
into the socket until it bottoms.
1.
2. 3.4.5. 6.
Lights
Replacing a Parking L ight/Front
Side Marker L ight Bulb
362
FUSE BOX
On the passenger’s sideBULB
SOCKET
Table of Contents
Page 378 of 441
Determine which of the f our bulbs
is burned out: stop/taillight, back-
up light, turn signal, or side
marker.
Remove the socket by turning it
one-quarter turn counterclockwise.
Use a Phillips-head screwdriver to
remove the taillight assembly
mounting screw under each cover.
Pull the taillight assembly out of
the rear pillar.
Open the tailgate. Place a cloth on
the edge of the cover to prevent
scratches. Remove the covers by
caref ully prying on the edge with a
small f lat-tip screwdriver.
2. 3. 4. 5.
1.
CONT INUED
Replacing Rear Bulbs
Lights
Maint enance
363
BULBS
COVER
SCREWS
BULBS
Table of Contents


Reinstall the coolant reserve")

