Page 375 of 441
�à
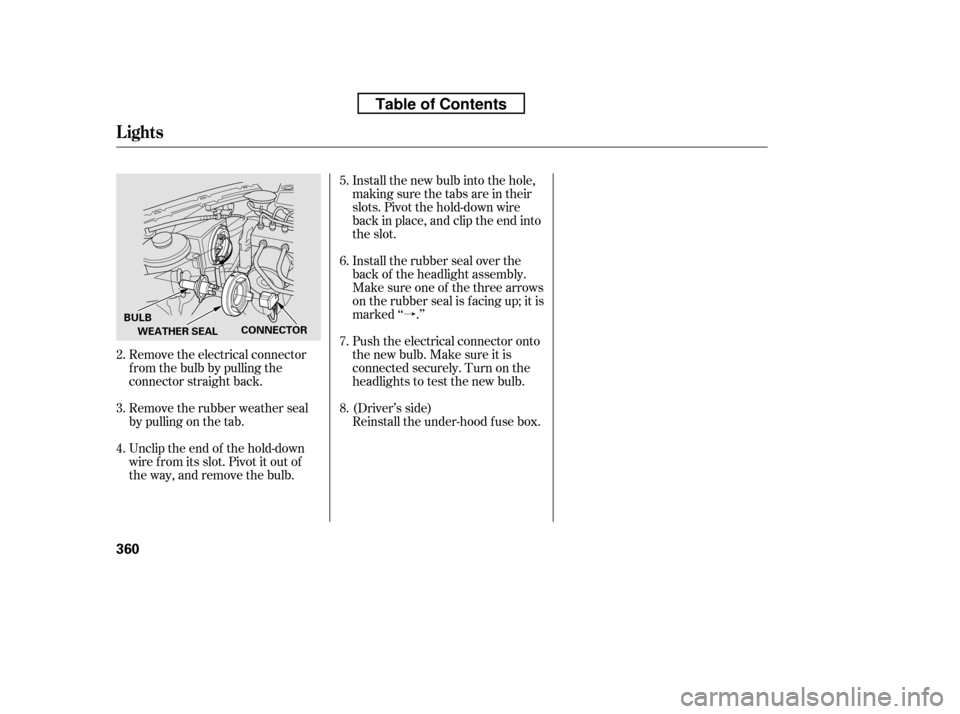
Remove the electrical connector
f rom the bulb by pulling the
connector straight back.
Remove the rubber weather seal
by pulling on the tab.
Unclip the end of the hold-down
wire f rom its slot. Pivot it out of
the way, and remove the bulb. Install the new bulb into the hole,
making sure the tabs are in their
slots. Pivot the hold-down wire
back in place, and clip the end into
the slot.
Install the rubber seal over the
back of the headlight assembly.
Make sure one of the three arrows
on the rubber seal is f acing up; it is
marked ‘‘ .’’
Push the electrical connector onto
the new bulb. Make sure it is
connected securely. Turn on the
headlights to test the new bulb.
(Driver’s side)
Reinstall the under-hood f use box.
4.
2. 3. 5. 6.7. 8.
Lights
360
BULB
WEATHER SEAL CONNECTOR
Table of Contents
Page 382 of 441
Check the condition of the wiper
blades at least every six months.
Replace them if you f ind signs of
cracking in the rubber, areas that are
getting hard, or if they leave streaks
and unwiped areas when used.
To replace a f ront wiper blade:Raise each wiper arm of f the
windshield, lif ting the driver’s side
first, then the passenger’s side. Disconnect the blade assembly
from the wiper arm:
Press and hold the lock tab.
Slidethebladeassemblytoward
the lock tab until it releases f rom
the wiper arm.When replacing a wiper blade,
make sure not to drop the wiper
blade or wiper arm down on the
windshield.
Remove the blade f rom its holder
by grasping the tabbed end of the
blade. Pull f irmly until the tabs
come out of the holder.
1. 2.
3.
CONT INUED
Wiper Blades
Maint enance
367
LOCK TAB
WIPER ARMS
FRONT BLADE
Do not open the hood when the wiper
arms are raised, or you will damage
the hood and the wiper arms.
Table of Contents
Page 383 of 441
Place the top of the wiper blade on
the end of the blade assembly, and
slide the blade onto the assembly
in the direction pointed to by the
arrow.
Make sure the blade is completely
installed.
Examine the new wiper blades. If
they have no plastic or metal
reinf orcement along the back
edge, remove the metal
reinf orcement strips f rom the old
wiper blade, and install them in
the slots along the edge of the new
blade.
Slide the wiper blade assembly
onto the wiper arm. Make sure it
locks in place.
Lower the wiper arm down against
the windshield, the passenger’s
side first, then the driver’s side.
Make sure the three rubber tabs
inside the blade f it to each notch
of the reinf orcement, as shown. 5. 6. 7.
4.
Wiper Blades
368
REINFORCEMENT
BLADE
TOP
Table of Contents
Page 389 of 441
.
Mixing radial and bias-ply tires on
your")
Replace your tires with radial tires of
the same size, load range, speed
rating, and maximum cold tire
pressure rating (as shown on the
tire’s sidewall).
Mixing radial and bias-ply tires on
your vehicle can reduce braking
ability, traction, and steering
accuracy. Using tires of a dif f erent
size or construction can cause the
ABS and vehicle stability assist
system (VSA) to work inconsistently.
The ABS and VSA system work by
comparing the speed of each wheel.
When replacing tires, use the same
size originally supplied with the
vehicle. Tire size and construction
can af f ect wheel speed and may
cause the system to activate.It is best to replace all f our tires at
thesametime.If thatisnotpossible
or necessary, replace the two f ront
tires or two rear tires as a pair.
Replacing just one tire can seriously
af f ect your vehicle’s handling.
If you ever replace a wheel, make
sure that the wheel’s specif ications
match those of the original wheels.
Also be sure you use only TPMS
specif ic wheels. If you do not, the
tire pressure monitoring system will
notworkonthattire.
Replacement wheels are available at
your dealer.
Wheels:
Tires:
See page f or DOT tire quality
grading inf ormation, and page
f or tire size and labeling
inf ormation. 410
412
Tires
Replacing T ires and Wheels
Wheel and T ire Specif ications
374
17x61/2J
225/65R17 102T
Installing improper tires on your
vehicle can affect handling and
stability. This can cause a crash
in which you can be seriously
hurt or killed.
Always use the size and type of
tires recommended in this
owner’s manual.
Table of Contents
Page 398 of 441

If you have a f lat tire while driving,
stop in a saf e place to change it.
Drive slowly along the shoulder until
you get to an exit or an area to stop
that is far away from the traffic lanes.Park the vehicle on f irm, level, and
non-slippery ground. Put the
transmission in Park. Apply the
parking brake.
If you are towing a trailer, unhitch
the trailer. Turn on the hazard warning lights,
and turn the ignition switch to the
LOCK (0) position. Have all
passengers get out of the vehicle
while you change the tire.
Open the tailgate. Raise the cargo
area f loor lid by lif ting up with the
strap, and remove it f rom cargo
area by disengaging the tabs.
When you store the f lat tire in the
spare tire well, do not reinstall the
cargo area f loor lid f orcibly. This
will damage the tabs on the lid.
Take the tool kit out of the spare
tire.
1. 2.
3. 4.
CONT INUED
Changing a Flat T ire
T aking Care of t he Unexpect ed
383
JACK
SPARE TIRE
TOOLSSTRAP
FLOOR LID
The vehicle can easily roll off
the jack, seriously injuring
anyone underneath.
Follow the directions for
changing a tire exactly, and
never get under the vehicle
when it is supported only by thejack.
Table of Contents
Page 402 of 441
Your vehicle’s original tire has a
tire pressure monitoring system
sensor. To replace a tire, ref er to(see
page ).
Store the jack in its holder. Turn
the jack’s end bracket to lock it in
place. Store the tools, and place
thecoverontheflattireof the
cargo area.
Store the center cap in the spare
tire well. Make sure it does not get
scratched or damaged.
Close the tailgate.
To remove the spacer cone, squeeze
the tabs on the wing bolt to
disengage it f rom the center of the
spacer cone, then pull the bolt
downward.
To install the wing bolt to the spacer
cone, reverse this procedure.
Securetheflattirebyscrewing
the wing bolt back into its hole. 22.
19. 20. 21.
18. 328
Changing a Flat T ire
Changing a T ire with T PMS
T aking Care of t he Unexpect ed
387
TAB
SPACER CONE
Loose items can fly around the
interiorinacrashandcould
seriously injure the occupants.
Store the wheel, jack, and tools
securely before driving.
Table of Contents
Page 411 of 441

However, if the brake pedal does not
f eel normal, you should take
immediate action. A problem in one
part of the system’s dual circuit
design will still give you braking at
two wheels. You will f eel the brake
pedal go down much f arther bef ore
the vehicle begins to slow down, and
you will have to press harder on the
pedal.
If you must drive the vehicle a short
distance in this condition, drive
slowly and caref ully.
Slow down by shif ting to a lower
gear, and pull to the side of the road
when it is saf e. Because of the long
distance needed to stop, it is
hazardous to drive the vehicle. You
should have it towed and repaired as
soon as possible (see
on page ). If the ABS indicator and the VSA
system indicator come on with the
brake system indicator, have your
vehicle inspected by your dealer
immediately.
The brake system indicator normally
comes on when you turn the ignition
switch to the ON (II) position, and as
a reminder to check the parking
brake. It will stay on if you do not
f ully release the parking brake.
If the brake system indicator comes
on while driving, the brake f luid level
is probably low. Press lightly on the
brake pedal to see if it f eels normal.
If it does, check the brake f luid level
thenexttimeyoustopataservice
station (see page ).
If the f luid level is low, take your
vehicle to a dealer, and have the
brake system inspected f or leaks or
worn brake pads. 357
403Emergency
Towing
Brake System Indicator
396
Canada
U.S.
Table of Contents
Page 412 of 441
The interior f use box is located
under the dashboard on the driver’s
side. The f use label is attached
under the steering column.The under-hood f use box is on the
driver’s side. To open it, push the
tabs as shown.
The vehicle’s f uses are contained in
threefuseboxes.
The auxiliary f use box is located
next to the interior f use box.
To open the f use box lid, pull the tab
in the direction as shown in the
illustration.
Fuses
T aking Care of t he Unexpect ed
397
TAB
INTERIOR
UNDER-HOOD
FUSE LABEL TAB
FUSELID
FUSES INTERIOR (Auxiliary)
Table of Contents


.
Store the jack in its holder. Turn
the jack’s end bracket to lock it in
place.")
