Page 221 of 387

On models with navigation system
On models without navigation system
The navigation system receives
signals f rom the global positioning
system (GPS), and the displayed
time is updated automatically by the
GPS. Ref er to the navigation system
manual f or how to adjust the time.
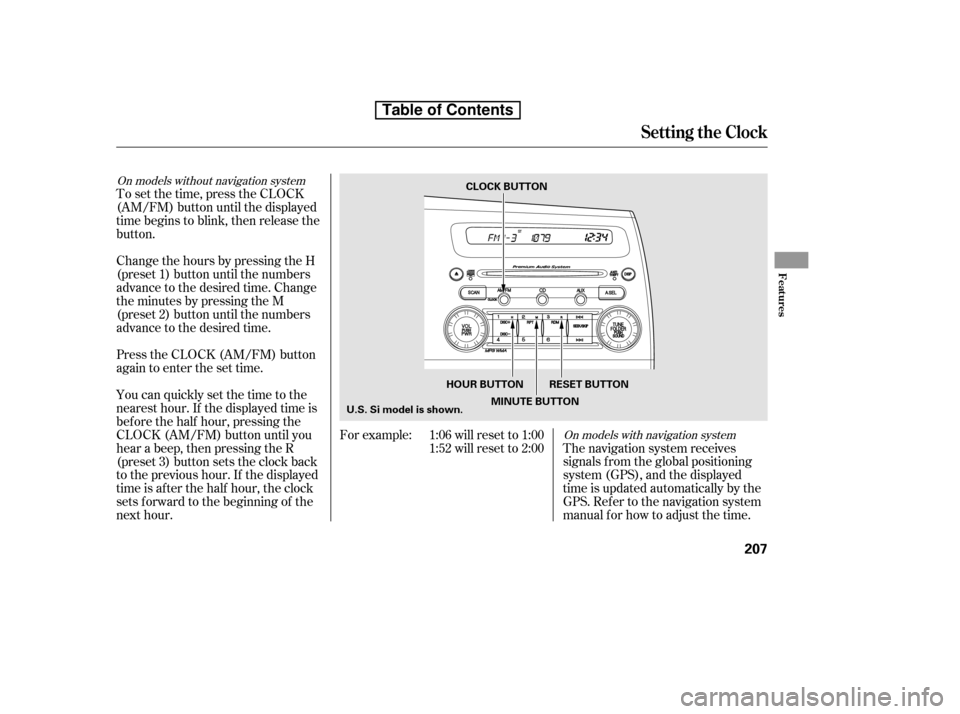
Change the hours by pressing the H
(preset 1) button until the numbers
advance to the desired time. Change
the minutes by pressing the M
(preset 2) button until the numbers
advance to the desired time.
For example: 1:06 will reset to 1:001:52 will reset to 2:00
To set the time, press the CLOCK
(AM/FM) button until the displayed
time begins to blink, then release the
button.
Press the CLOCK (AM/FM) button
again to enter the set time.
You can quickly set the time to the
nearest hour. If the displayed time is
bef ore the half hour, pressing the
CLOCK (AM/FM) button until you
hear a beep, then pressing the R
(preset 3) button sets the clock back
to the previous hour. If the displayed
time is af ter the half hour, the clock
sets f orward to the beginning of the
next hour.
Setting the Clock
Features
207
CLOCK BUTTON
U.S. Si model is shown. RESET BUTTON
MINUTE BUTTON
HOUR BUTTON
Table of Contents
Page 222 of 387

The security system automatically
sets 15 seconds after you lock the
doors, hood, and trunk. For the
system to activate, you must lock the
doors f rom the outside with the key,
driver’s lock tab, door lock master
switch, or remote transmitter. The
security system indicator on the
instrument panel starts blinking
immediately to show you the system
is setting itself .With the system set, you can still
open the trunk with the master key
or the remote transmitter without
triggering the alarm. The alarm will
sound if the trunk lock is f orced, or
the trunk is opened with the trunk
release handle.
The security system will not set if
the hood, trunk, or any door is not
f ully closed. If the system will not set,
check the door and trunk open
indicators on the instrument panel
(see page ) to see if the doors and
trunk are f ully closed. Since it is not
part of the monitor display, manually
check the hood.
Do not attempt to alter this system
or add other devices to it.
To see if the system is set
af ter you exit the vehicle, press the
LOCK button on the remote
transmitter within 5 seconds. If the
system is set, the horn will beep
once.
The security system helps to protect
your vehicle and valuables f rom thef t.
The horn sounds and a combination
of headlights (low beam), parking
lights, side marker lights, and
taillights f lash if someone attempts
to break into your vehicle or remove
the radio. This alarm continues f or 2
minutes, then it stops. To reset an
activated system before the 2
minutes have elapsed, unlock the
driver’s door with the key or the
remote transmitter. Once the security system is set,
opening any door (without using the
key or the remote transmitter), the
hood, or the trunk will cause the
alarm to activate. It will also activate
if the audio unit is removed f rom the
dashboard or the wiring is cut. 61
If equipped
Security System
208
NOTE:
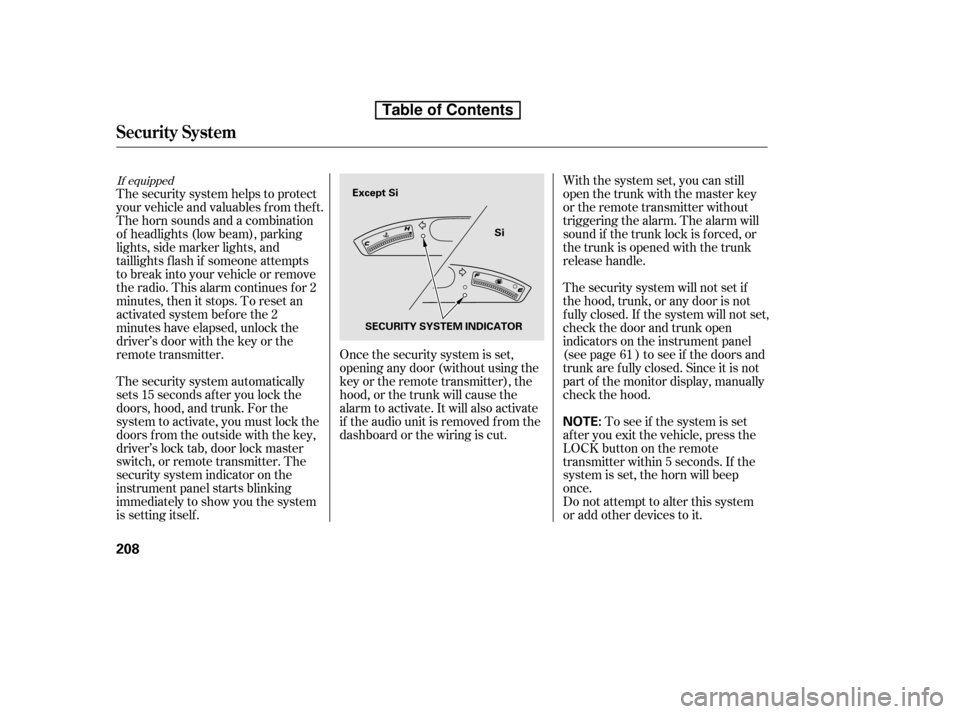
Except Si
Si
SECURITY SYSTEM INDICATOR
Table of Contents
Page 246 of 387
This command group allows you to
change or customize HFL basic
settings.Press and release the HFL Talk
button bef ore a command.
Say ‘‘ .’’ Once a passcode is set, you
will need to enter it to use HFL each
time you start the vehicle. If you
f orget the code, your dealer will have
toresetitforyou,oryouwillhaveto
clear the entire system (see page ).
Follow the HFL prompts to
conf irm the number.
Follow the HFL prompts and say
the 4-digit passcode you want to
set.
Say‘‘ ’’aftertheprompts.
1. 2.3. 4. 234
System Setup
System setup
Security
T o set a 4-digit passcode t o lock t heHFL syst em f or securit y purposes:
BluetoothHandsFreeL ink
232
NOTE:
Table of Contents
Page 261 of 387

Modif ying your vehicle, or installing
some non-Honda accessories, can
make it unsaf e. Bef ore you make any
modif ications or add any accessories,
be sure to read the f ollowing
inf ormation.
Your dealer has Honda accessories
that allow you to personalize your
vehicle, or improve its perf ormance.
These accessories have been
designed and approved f or your
vehicle, and are covered by warranty.
Although non-Honda accessories
may f it on your vehicle, they may not
meet f actory specif ications, and
could adversely af f ect your vehicle’s
handling and stability.When properly installed, cellular
phones, alarms, two-way radios, and
low-powered audio systems should
not interf ere with your vehicle’s
computer controlled systems, such
as your airbags, anti-lock brakes, and
tire pressure monitoring system (if
equipped).Bef ore installing any accessory:
Make sure the accessory does not
obscure any lights, or interf ere
with proper vehicle operation or
perf ormance.
Be sure electronic accessories do
not overload electrical circuits
(see page ) or interf ere with
the proper operation of your
vehicle.
Bef ore installing any electronic
accessory, have the installer
contact your dealer for assistance.
If possible, have your dealer
inspect the f inal installation.
Do not install accessories on the
side pillars or across the rear
windows. Accessories installed in
theseareasmayinterferewith
proper operation of the side
curtain airbags. 342
A ccessories
A ccessories and Modif ications
Bef ore Driving
247
Improper accessories or
modifications can affect your
vehicle’s handling, stability, and
performance, and cause a
crash in which you can be hurt
or killed.
Follow all instructions in this
owner’s manual regarding
accessories and modifications.
Table of Contents
Page 262 of 387

�Î
�Î
Removing parts f rom your vehicle,
or replacing components with
non-Honda components could
seriously af f ect your vehicle’s
handling, stability, and reliability.
Some examples are:
Lowering your vehicle with a
non-Honda suspension kit that
signif icantly reduces ground
clearance can allow the
undercarriage to hit speed bumps
or other raised objects, which
could cause the airbags to deploy.
Raising your vehicle with a
non-Honda suspension kit can
af f ect the handling and stability. Larger or smaller wheels and tires
can interf ere with the operation of
your vehicle’s anti-lock brakes and
other systems.
Modif ying your steering wheel or
any other part of your vehicle’s
safety features can make the
systems inef f ective.
If you plan to modif y your vehicle,
consult your dealer. Non-Honda wheels, because they
are a universal design, can cause
excessive stress on suspension
components and will not be
compatible with the tire pressure
monitoring system (TPMS) .
: If equipped
Modif ying Your Vehicle
A ccessories and Modif ications
248
Table of Contents
Page 266 of 387

Store or secure all items that could
be thrown around and hurt
someone during a crash.Distribute cargo evenly on the
f loor of the trunk, placing the
heaviest items on the bottom and
as far forward as possible.
If you carry large items that
prevent you f rom closing the trunk
lid, exhaust gas can enter the
passenger area. To avoid the
possibility of
, f ollow the instructions
on page .
If youfolddownthebackseat,tie
down items that could be thrown
about the vehicle during a crash or
sudden stop.
Do not put any items on top of the
trunk panel. They can block your
view and be thrown around the
vehicle during a crash.
Be sure items placed on the f loor
behind the f ront seats cannot roll
underneath and interf ere with the
proper operation of the seats, the
sensors under the seats, or the
driver’s ability to operate the
pedals.
Keep the glove box closed while
driving. If it is open, a passenger
could injure their knees during a
crash or sudden stop. 51
Carrying Items in the Passenger
Compartment
Carrying Cargo in the Trunk
carbon monoxide
poisoning
Carrying Cargo
252
Table of Contents
Page 267 of 387

This section gives you tips on
starting the engine under various
conditions, and how to operate the
manual and automatic transmissions.
It also includes important
inf ormation on parking your vehicle,
the braking system, the vehicle
stability assist (VSA
) system, the
tire pressure monitoring system
(TPMS), and f acts you need if you
are planning to tow a trailer. ........................
Driving Guidelines . 254
........................
Preparing to Drive . 255
.......................
Starting the Engine . 256
...................
Manual Transmission . 257
..............
Automatic Transmission . 260
...........................................
Parking . 264
.............................
Braking System . 265
...............
Anti-lock Brakes (ABS) . 266
Vehicle Stability Assist (VSA
),
aka Electronic Stability
........
Control (ESC), System . 268
Tire Pressure Monitoring ........................
System (TPMS) . 270
...........................
Towing a Trailer . 273
Driving
Driving
253
Page 269 of 387
Make sure all windows, mirrors,
and outside lights are clean and
unobstructed. Remove f rost, snow,
or ice.
Check that the hood and trunk are
f ully closed.Check that any items you may be
carrying are stored properly or
f astened down securely.
Check the seat adjustment (see
page ).
Check the adjustment of the
inside and outside mirrors (see
page ).
Check the steering wheel
adjustment (see page ).
Make sure the doors are securely
closed and locked.Fasten your seat belt. Check that
your passengers have f astened
their seat belts (see page ).
Youshoulddothefollowingchecks
and adjustments every day bef ore
you drive your vehicle.
When you start the engine, check
the gauges and indicators in the
instrument panel (see page ).
Visually check the tires. If a tire
looks low, use a gauge to check its
pressure (see page ).
1. 2. 3. 4.
9.
8.
7.
6.
5.
10.14
57
93
77
314 103
Preparing to Drive
Driving
255
Table de matières