Page 170 of 387
�Û�Ý
To scroll through the display, touch
the or icononthesideof the
screen.Togobacktotheprevious
display, touch the Return icon on the
screen.
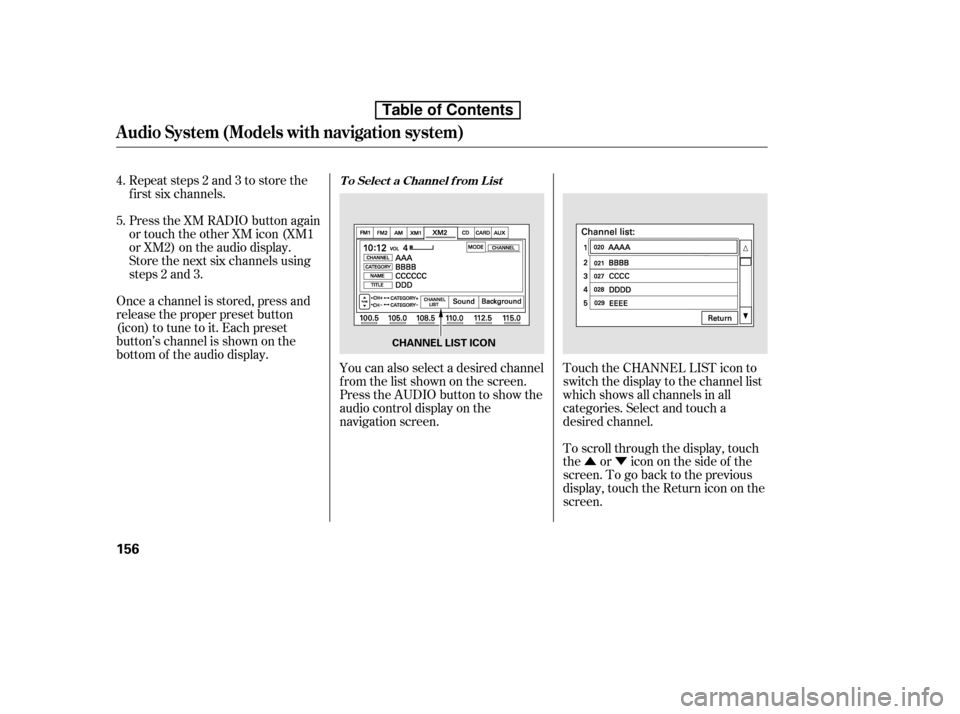
Touch the CHANNEL LIST icon to
switch the display to the channel list
which shows all channels in all
categories. Select and touch a
desired channel.
Repeat steps 2 and 3 to store the
f irst six channels.
Press the XM RADIO button again
or touch the other XM icon (XM1
or XM2) on the audio display.
Store the next six channels using
steps 2 and 3.
Once a channel is stored, press and
release the proper preset button
(icon) to tune to it. Each preset
button’s channel is shown on the
bottom of the audio display. You can also select a desired channel
f rom the list shown on the screen.
Press the AUDIO button to show the
audio control display on the
navigation screen.
4. 5.
Audio System (Models with navigation system)
T o Select a Channel f rom L ist
156
CHANNEL LIST ICON
Table of Contents
Page 171 of 387
�µ
�µ
�µ
�µ
�µ �µ
�µ
CONT INUED
The signal is
currently too weak. Move the vehicle
to an area away from tall buildings,
and with an unobstructed view of the
southern horizon.
The selected channel
number does not exist or is not part
of your subscription.
To select a desired icon with the
joystick, move it in the appropriate
direction, then press ENT.
XM is loading the
audio or program inf ormation.
The channel
currently selected is no longer
broadcasting.
The encryption
code is being updated. Wait until the
encryption code is f ully updated.
Channels 0 and 1 should still work
normally. The selected
channel has no artist or title
inf ormation at this time.
There is a problem
with the XM antenna. Please consult
your dealer.
‘‘NO SIGNA L ’’
XM Radio Display Messages
‘‘----’’
‘‘L OA DING’’
‘‘OFF A IR’’
‘‘UPDA T ING’’
‘‘NO INFO’’
‘‘A NT ENNA ’’
Audio System (Models with navigation system)
Features
157
Table of Contents
Page 173 of 387
Driving in tunnels.
Driving on a road beside a vertical
wall, steep clif f , or hill to the south
of you.
Driving on the lower level of a
multi-tiered road.
Driving on a single lane road
alongside dense trees taller than
50 ft. (15 m) to the south of you.
Large items carried on a roof rack.
There may be other geographic
situations that could af f ect XM Radio
reception. If your XM Radio service has expired
or you purchased your vehicle f rom
a previous owner, you can listen to a
sampling of the broadcasts available
on XM Radio. With the ignition
switch in the ACCESSORY (I) or ON
(II) position, push the power/volume
knob to turn on the audio system and
press the XM RADIO button. A
variety of music types and styles will
play.
If you decide to purchase XM Radio
service, contact XM
Radio at
,orat
1-800-852-9696. You will need to give
them your radio I.D. number and
your credit card number. To get your
radio I.D. number, press the TUNE
bar until ‘‘0’’ appears in the display.
Your I.D. will appear in the display. After you’ve registered with XM
Radio, keep your audio system in the
XM radio mode while you wait f or
activation. This should take about 30
minutes.
While waiting f or activation, make
sure your vehicle remains in an open
area with good reception. Once your
audio system is activated, you’ll be
able to listen to XM Radio broadcasts.
XM Radio will continue to send an
activation signal to your vehicle f or
at least 12 hours from the activation
request. If the service has not been
activated after 36 hours, contactXM
Radio. In Canada, contact XM
Canada
.
As required by the FCC:
Changes or modif ications not expresslyapproved by the party responsible f or
compliance could void the user’sauthority to operate the equipment. www.xmradio.com
Audio System (Models with navigation system)
Receiving XM Radio Service
Features
159
Table of Contents
Page 175 of 387
You can use the instrument panel
brightness control buttons to adjust
the illumination of the audio system
(see page ). The audio system
illuminates when the parking lights
are on, even if the radio is of f .
You can select the background
screen to display the sound level.
There are three screen modes: level
(the sound level is shown with the
vertical bars), spectrum analysis (the
sound level appears as ripples of
water), and off. Each time you touch
the background icon, the display
changes.
The system will return to the audio
display about 5 seconds af ter you
stop adjusting a mode.
You can also select the icon with the
joystick. Move it up and down to
move the highlighting and scroll
through lists. Select the icon, then
move the joystick to lef t or right to
change the setting.
This f unction is set to MID as the
def ault setting when the vehicle
leaves the f actory. If you f eel the
sound is too loud, choose low. If you
f eel the sound is too quiet, choose Hi.
75
A udio System L ighting
Screen Mode
Audio System (Models with navigation system)
Features
161
Table of Contents
Page 177 of 387
�µ �µ �µ �µ�µ�µ�µ�µ
You operate the disc player with the
same controls used f or the radio. To
load or play discs, the ignition switch
must be in the ACCESSORY (I) or
ON (II) position.
Video CDs and DVDs do not work in
this unit.
Compatible with variable bitrate
and multi-session
Maximum layers
(including ROOT): 8 layers
This audio system can also play CD-
RsandCD-RWscompressedinMP3
or WMA f ormats. When playing a
disc in MP3, you will see ‘‘MP3’’ on
the screen. In WMA f ormat, ‘‘WMA’’
will appear on the screen. You can
select up to 99 f olders and play up to
999 tracks. If the disc has a complex
structure, it takes a while to read the
disc bef ore the system begins to play
it. Maximum layers
(including ROOT): 8 layers
Compatible with variable bitrate
and multi-session
The specif ications f or compatible
MP3 f iles are: The specif ications f or compatible
WMA f iles are:
Bitrate:
32/40/48/56/64/80/96/112/128/
160/192/224/256/320 kbps
(MPEG1)
8/16/24/32/40/48/56/64/80/96/
112/128/160 kbps (MPEG2) Sampling f requency:
32/44.1/48 kHz
Bitrate:
48/64/80/96/128/160/192 kbps
Sampling f requency:
32/44.1/48 kHz (MPEG1)
16/22.05/24 kHz (MPEG2)
If a f ile on WMA disc is protected by
digital rights management (DRM),
the audio unit displays CD FORMAT,
andthenskipstothenextfile.
CONT INUED
To Play a Disc
Audio System (Models with navigation system)
Features
163
NOTE:
Do not use discs with adhesive labels.
The label can curl up and cause the
disc to jam in the unit.
Table of Contents
Page 182 of 387

�Û�Ý�Î�Î
�ΠTo remove a disc f rom the audio unit,
f old back the screen by pressing the
OPEN button (see page ). Press
the disc eject button ( ) to
remove the disc. If you eject the disc,
but do not remove it f rom the slot,
the system will automatically reload
it af ter 10 seconds and put it in pause
mode. To begin playing, press the
CD button.
To return the screen to the upright
position, press the CLOSE button.
When playing a CD recorded with
text data, each track name is shown
on the audio display. With a disc
recorded in MP3 or WMA, the f older
number and the location are also
displayed.
You cannot close the screen if a disc
is partially inserted into its slot.
You can also eject the disc when the
ignition switch is of f .
If the disc was not recorded with text
data, only the track number is shown.
To scroll through the display, touch
the or icononthesideof the
screen.Togobacktotheprevious
display, touch the Return icon on the
screen.
Select the desired track/f ile by
touching the icon on the display. The
selected icon will be highlighted in
blue. The system begins to play the
selected track/f ile. With a disc in
MP3 or WMA, touch the f older icon
on the upper lef t of the screen to
move to the parent folder. The
current f older is highlighted in blue. To play the radio when a disc is
playing, press the AM/FM button or
touch the FM1, FM2, AM, XM1 , or
XM2 icon.If aPCcardisinthe
audio unit, touch the CARD icon to
play the PC card. Press the CD
button again or touch the CD icon to
switch back to the disc player.
If you turn the system of f while a
disc is playing, either with the
power/volume knob or by turning
of f the ignition switch, the disc will
stay in the drive. When you turn the
system back on, the disc will begin
playing where it lef t of f .
If equipped
: 164
Removing a DiscTo Stop Playing a Disc
Audio System (Models with navigation system)
168
Table of Contents
Page 183 of 387
�Û�Ý
Load the desired discs in the
magazine, and load the magazine in
the changer according to the
instructions that came with the unit.
If you select an empty slot in the
magazine, the changer will search
f or the next available disc to load and
play. For inf ormation on how to handle
and protect discs, see page .
An optional six or eight disc changer
is available f or your vehicle. This
disc changer uses the same controls
used f or the in-dash disc player or
the radio.
To select the disc changer, press the
CD button. The disc and track
numbers will be displayed. To select
a dif f erent disc, use either side of the
TUNE bar. To select the previous
disc, press the side. To select the
next disc, press the side. 201
Operating the Optional Disc
Changer
Protecting Discs
Audio System (Models with navigation system)
Features
169
Table of Contents
Page 186 of 387

�µ �µ �µ �µ
You operate the PC card player with
the same controls used f or the radio
and the disc player. To load or play a
card, the ignition switch must be in
the ACCESSORY (I) or ON (II)
position.
The PC card player reads and plays
cards in MP3 or WMA f ormats.
Depending on the f ormat, the screen
will indicate ‘‘MP3’’ or ‘‘WMA’’ when
a card is playing. The card limit of
the player is 99 f olders and 999
tracks. If the card has a complex
structure, it takes some time f or the
system to begin playing it.
Based on PCMCIA 2.1/JEIDA 4.2,
the recommended PC cards f or the
PC card reader are: Always use the recommended
memory card with the appropriate
adapter (if an adapter is needed).
Some memory cards will not work in
this unit.
When you insert a PC card into
the slot, make sure you put it in
straight. If you cannot insert it,
remove it, and insert again.
Do not keep PC cards in the
vehicle. Direct sunlight and high
heat will damage them.
To avoid damaging the card
reader, do not insert hard disc
drive cards into the PC card slot.
You cannot close the screen
(move it to the upright position)
until the PC card is inserted all the
way into its slot or removed. Never insert f oreign objects into
the PC card slot.
The specif ications f or compatible
MP3 f iles are:
Compatible with variable bitrate
and multi-session
Maximum layers
(including ROOT): 8 layers
SD memory card
CompactFlash
Flash ATA Bitrate:
32/40/48/56/64/80/96/112/128/
160/192/224/256/320 kbps
(MPEG1)
8/16/24/32/40/48/56/64/80/96/
112/128/160 kbps (MPEG2)
Sampling f requency:
32/44.1/48 kHz (MPEG1)
16/22.05/24 kHz (MPEG2)
To Play a PC Card
Audio System (Models with navigation system)
172
NOTE:
Table of Contents