Page 291 of 387

When preparing to tow, and bef ore
driving away, be sure to check the
f ollowing:Always drive slowly and have
someone guide you when backing up.
Grip the of the steering wheel,
then turn the wheel to the left to get
the trailer to move to the lef t, and
turn the wheel right to move the
trailer to the right.
Follow all normal precautions when
parking, including f irmly setting the
parking brake and putting the
transmission in Park (automatic) or
in 1st or reverse (manual). Also,
place wheel chocks at each of the
trailer’s tires.
Crosswinds and air turbulence
caused by passing trucks can disrupt
your steering and cause the trailer to
sway. When being passed by a large
vehicle, keep a constant speed, and
steer straight ahead. Do not try to
make quick steering or braking
corrections.
The vehicle has been properly
serviced, and the suspension,
cooling system, and lights are in
good operating condition.
All weights and loads are within
limits (see pages and ).
Thehitch,safetychains,andany
other attachments are secure.
All items in or on the trailer are
properly secured and cannot shif t
while you drive.
The lights and brakes on your
vehicle and the trailer are working
properly. Your vehicle tires and spare are
properly inf lated, and the trailer
tires and spare are inf lated as
recommended by the trailer
maker.
273 274
bottom
Pre-T ow ChecklistBacking Up
Parking
Handling Crosswinds and Buf f et ing
Towing a Trailer
Driving
277
Table de matières
Page 293 of 387

This section explains why it is
important to keep your vehicle well
maintained and how to f ollow basic
maintenance saf ety precautions.
If you have the skills and tools to
perf orm more complex maintenance
tasks on your vehicle, you may want
to purchase the service manual. See
page f or inf ormation on how to
obtain a copy, or see your dealer.
This section also includes
instructions on how to read the
maintenance minder messages on
the information display, and
instructions f or simple maintenance
tasks you may want to take care of
yourself .
......................Maintenance Saf ety . 280
....................
Maintenance Minder . 281
..............................
Fluid Locations . 288
........................
Adding Engine Oil . 290
Changing the Engine Oil
....................................
and Filter . 292
..............................
Engine Coolant . 294
....................
Windshield Washers . 297
.......................
Transmission Fluid . 298
..........
Automatic Transmission . 298
..............
Manual Transmission . 299
................
Brake and Clutch Fluid . 300
....................
Power Steering Fluid . 301
.............................................
Lights . 302
................
Cleaning the Seat Belts . 309
.....................................
Floor Mats . 310
..................
Dust and Pollen Filter . 310
.................................
Wiper Blades . 311
...........................................
Wheels . 313
...............................................
Tires . 314
...................
Checking the Battery . 322
.............................
Vehicle Storage . 324
373
Maintenance
Maint enance
279
Page 302 of 387
�Î�Î
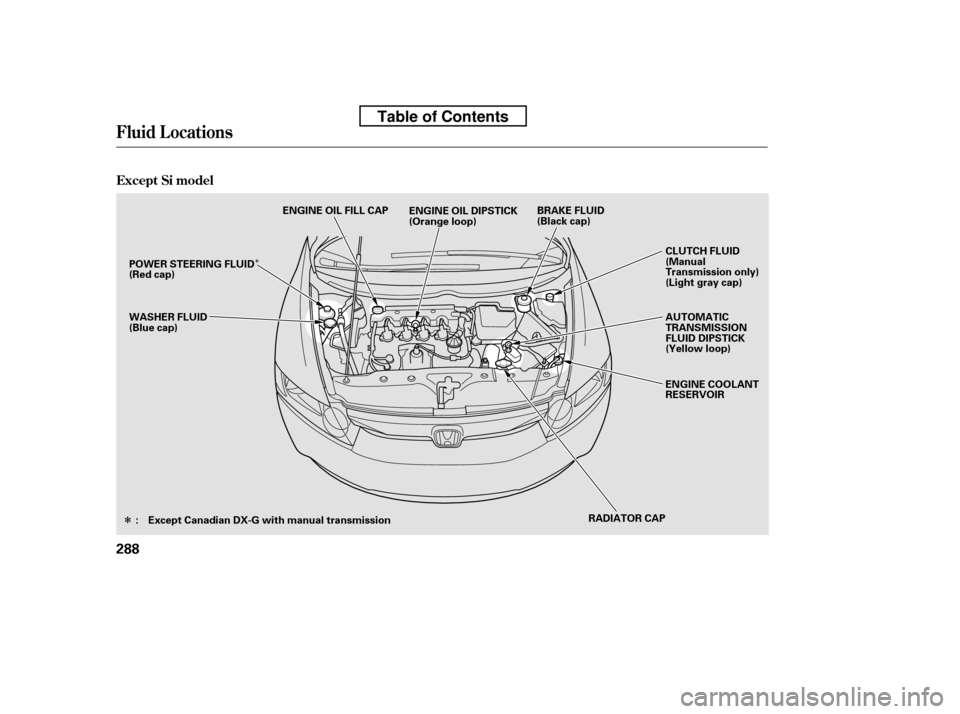
Fluid Locations
Except Si model
288
RADIATOR CAP
AUTOMATIC
TRANSMISSION
FLUID DIPSTICK
(Yellow loop)
ENGINE COOLANT
RESERVOIR
CLUTCH FLUID
(Manual
Transmission only)
(Light gray cap)
WASHER FLUID
(Blue cap) BRAKE FLUID
(Black cap)
ENGINE OIL DIPSTICK
(Orange loop)
ENGINE OIL FILL CAP
: Except Canadian DX-G with manual transmission
POWER STEERING FLUID
(Red cap)
Table of Contents
Page 313 of 387

If Honda MTF is not available, you
may use an SAE 10W-30 or 10W-40
viscosity motor oil with the API
Certif ication Seal that says ‘‘FOR
GASOLINE ENGINES’’ as a
temporary replacement. However,
motor oil does not contain the proper
additives, and continued use can
cause stif f er shif ting. Replace as
soon as it is convenient.
Check the f luid level with the
transmission at normal operating
temperature and the vehicle sitting
on level ground. Remove the
transmission f iller bolt, and caref ully
f eel inside the bolt hole with your
f inger. The f luid level should be up
to the edge of the bolt hole. If it is
not, add Honda Manual
Transmission Fluid (MTF) until it
starts to run out of the hole. Reinstall
the f iller bolt, and tighten it securely.
If you are not sure how to add f luid,
contact your dealer. Insert the dipstick all the way back
into the transmission securely as
shown in the illustration.
The automatic transmission should
be drained and ref illed with new f luid
when this service is indicated by a
maintenance message on the
inf ormation display.
6.
CONT INUED
T ransmission Fluid
Manual Transmission
Maint enance
299
FILLER BOLT
Correct LevelFILLER BOLT
Correct Level
Except Si
SiUse only Honda Genuine ATF-Z1
(automatic transmission f luid). Do not
mix with other transmission f luids.
Using transmission f luid other than
Honda Genuine ATF-Z1 may cause
deterioration in transmission operation
and durability, and could result in
damage to the transmission.
Damage resulting f rom the use of
transmission f luid other than Honda
Genuine ATF-Z1 is not covered by the
Honda new vehicle warranty.
Table of Contents
Page 314 of 387

The f luid level should be between
theMINandMAXmarksontheside
of the reservoir. If the level is at or
below the MIN mark, your brake
system needs attention. Have the
brake system inspected f or leaks or
worn brake pads.
The manual transmission should be
drained and ref illed with new f luid
when this service is indicated by a
maintenance message on the
inf ormation display.
If you are not sure how to check and
add f luid, contact your dealer.
Brake f luid marked DOT 5 is not
compatible with your vehicle’s
braking system and can cause
extensive damage.
Using any non-Honda brake f luid can
cause corrosion and decrease the lif e
of the system. Have the brake
system f lushed and ref illed with
Honda Heavy Duty Brake Fluid
DOT 3 as soon as possible.
Always use Honda Heavy Duty
Brake Fluid DOT 3. If it is not
available, you should use only DOT 3
or DOT 4 f luid, f rom a sealed
container, as a temporary
replacement.
Replace the brake f luid according to
thetimerecommendationsinthe
maintenance minder schedule.
Check the brake f luid level in the
reservoirs monthly.
Brake System
Brake and Clutch Fluid
Transmission Fluid, Brake and Clutch Fluid
300
MAX
MIN
Table of Contents
Page 315 of 387

Manual Transmission only All models except Si and Canadian DX-Gwith manual transmission
The f luid level should be between
theMINandMAXmarksontheside
of the reservoir. If it is not, add
brake f luid to bring it up to that level.
Use the same fluid specified for the
brake system.
A low f luid level can indicate a leak
in the clutch system. Have this
system inspected as soon as possible. Pour the f luid slowly and caref ully so
you do not spill any. Clean up any
spill immediately; it could damage
components in the engine
compartment.
Always use Honda Power Steering
Fluid. You may use another power
steering f luid as an emergency
replacement, but have the power
steering system f lushed and ref illed
with Honda PSF as soon as possible.
A low power steering f luid level can
indicate a leak in the system. Check
the f luid level f requently, and have
the system inspected as soon as
possible.
Check the level on the side of the
reservoir when the engine is cold.
The f luid should be between the
UPPER LEVEL and LOWER LEVEL.
If not add power steering f luid to the
UPPER LEVEL mark.
Brake and Clutch Fluid, Power Steering Fluid
Power Steering Fluid
Clutch Fluid
Maint enance
301
LOWER LEVEL
UPPER LEVEL
MAX
MIN
T urning the steering wheel to f ull lef t
or right lock and holding it there can
damage the power steering pump.
Table of Contents
Page 329 of 387
, you will see
readings 4 to 6 psi (30 to 40 kPa, 0.3
to 0.4 kgf/cm ) higher than the cold
readings.Thisisnorma")
If you check air pressures when the
tires are hot (driven f or several
miles/kilometers), you will see
readings 4 to 6 psi (30 to 40 kPa, 0.3
to 0.4 kgf/cm ) higher than the cold
readings.Thisisnormal.Donotlet
air out to match the recommended
cold air pressure. The tire will be
underinf lated.
Youshouldgetyourowntire
pressure gauge and use it whenever
you check your tire pressures. This
will make it easier f or you to tell if a
pressure loss is due to a tire problem
and not due to a variation between
gauges.
While tubeless tires have some
ability to self -seal if they are
punctured, you should look closely
for punctures if a tire starts losing
pressure.The following charts show the
recommended cold tire pressures f or
most normal driving conditions.
Thecompactsparetirepressureis:
For convenience, the recommended
tire sizes and cold tire pressures are
on a label on the driver’s doorjamb.
For additional inf ormation about
your tires, see page .
(Si)
(DX, Canadian DX-G with automatic
transmission)
(Canadian DX-G with manual
transmission)
(EX-L, U.S. LX, LX-S, EX, Canadian
Sport) 357
Optional f or U.S. Si
Tire Size
Tire Size Cold Tire Pressure
Cold Tire Pressure
Tire Size Cold Tire Pressure
Tire Size Cold Tire Pressure
Tire Size Cold Tire Pressure
Tires
Recommended Tire Pressures
Maint enance
315
60 psi (420 kPa , 4.2 kgf/cm)
215/45ZR17 91W P215/45R17 87V
33 psi (230 kPa ,
2.3 kgf/cm
)
33 psi (230 kPa , 2.3 kgf/cm
)
P195/65R15 89H
30 psi (210 kPa ,
2.1 kgf/cm)
P195/65R15 89S 30 psi (210 kPa ,
2.1 kgf/cm
)
P205/55R16 89H 32 psi (220 kPa ,2.2 kgf/cm
)
Front/Rear:
Front/Rear: Front/Rear:
Front/Rear:
Front/Rear:
Table of Contents
Page 334 of 387
Wheels:See page f or inf ormation about
DOT Tire Quality Grading, and page
f or tire size and labeling
inf ormation.
Tires: (DX, Canadian DX-G)
(Si)
(Si)
(DX, Canadian DX-G with
automatic transmission)
(all season tire)
(EX-L, U.S. LX, LX-S, EX,
Canadian Sport)
(EX-L, U.S. LX, LX-S, EX,
Canadian Sport)
(summer tire)
(Canadian DX-G with manual
transmission) 357
359
Optional f or U.S. Si
Wheel and T ire Specif ications
Tires
320
15x6J
215/45ZR17 91W
P215/45R17 87V
P205/55R16 89H
P195/65R15 89S
P195/65R15 89H
17x7J
16x61/2J
Installing improper tires on your
vehicle can affect handling and
stability. This can cause a crash
in which you can be seriously
hurt or killed.
Always use the size and type of
tires recommended in this
owner’s manual.
Table of Contents

(Si)
(Si)
(DX, Canadian DX-G with
automatic transmis")