Page 293 of 387

This section explains why it is
important to keep your vehicle well
maintained and how to f ollow basic
maintenance saf ety precautions.
If you have the skills and tools to
perf orm more complex maintenance
tasks on your vehicle, you may want
to purchase the service manual. See
page f or inf ormation on how to
obtain a copy, or see your dealer.
This section also includes
instructions on how to read the
maintenance minder messages on
the information display, and
instructions f or simple maintenance
tasks you may want to take care of
yourself .
......................Maintenance Saf ety . 280
....................
Maintenance Minder . 281
..............................
Fluid Locations . 288
........................
Adding Engine Oil . 290
Changing the Engine Oil
....................................
and Filter . 292
..............................
Engine Coolant . 294
....................
Windshield Washers . 297
.......................
Transmission Fluid . 298
..........
Automatic Transmission . 298
..............
Manual Transmission . 299
................
Brake and Clutch Fluid . 300
....................
Power Steering Fluid . 301
.............................................
Lights . 302
................
Cleaning the Seat Belts . 309
.....................................
Floor Mats . 310
..................
Dust and Pollen Filter . 310
.................................
Wiper Blades . 311
...........................................
Wheels . 313
...............................................
Tires . 314
...................
Checking the Battery . 322
.............................
Vehicle Storage . 324
373
Maintenance
Maint enance
279
Page 300 of 387

�µ�µ�µ
�µ
�µ
�µ
�Ì Engine oil level Check every
time you fill the fuel tank. See
page .
Engine coolant level Check the
radiator reserve tank every time
you f ill the f uel tank. See page .
Automatic transmission Check
the f luid level monthly. See page
.
Brakes Check the f luid level
monthly. See page .
Tires Check the tire pressure
monthly. Examine the tread f or
wear and foreign objects. See page .
Lights Check the operation of
the headlights, parking lights,
taillights, high-mount brake light,
and license plate lights monthly.
See page .
U.S. Vehicles:
According to state and federal
regulations, f ailure to perf orm
maintenance on the items marked
with will not void your emissions
warranties. However, all
maintenance services should be
perf ormed in accordance with the
intervals indicated by the
inf ormation display.
Youshouldcheckthefollowing
items at the specif ied intervals. If
you are unsure of how to perf orm
any check, turn to the appropriate
page listed.
However, service at a dealer is not
mandatory to keep your warranties
in effect. Maintenance may be done
by any qualif ied service f acility or
person who is skilled in this type of
automotive service. Make sure to
have the service f acility or person
reset the display as previously
described. Keep all receipts as proof
of completion, and have the person
who does the work f ill out your
Honda Service History or Canadian
Maintenance Log. Check your
warranty booklet f or more
inf ormation.
We recommend using Honda parts
and fluids whenever you have
maintenance done. These are
manuf actured to the same high
quality standards as the original
components, so you can be conf ident
of their perf ormance and durability.
241
243
298 300
314
302
Maintenance Minder
Maintenance,
replacement, or repair of
emissions control devices and
systems may be done by any
automotive repair establishment
or individual using parts that are
‘‘certif ied’’ to EPA standards.
Owner’s Maintenance Checks
286
Table of Contents
Page 302 of 387
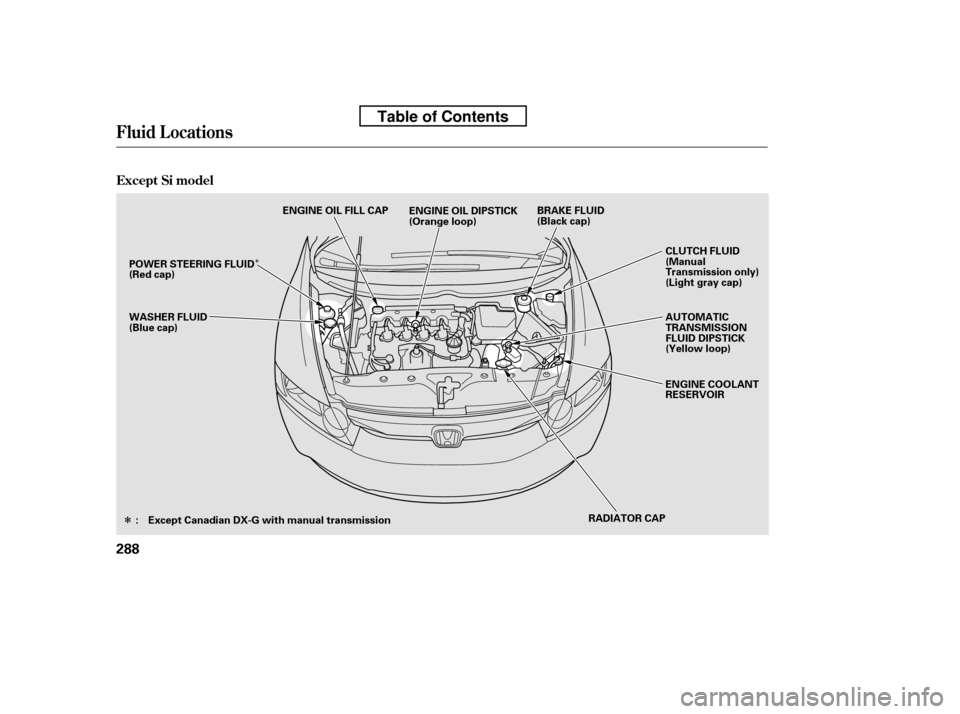
�Î�Î
Fluid Locations
Except Si model
288
RADIATOR CAP
AUTOMATIC
TRANSMISSION
FLUID DIPSTICK
(Yellow loop)
ENGINE COOLANT
RESERVOIR
CLUTCH FLUID
(Manual
Transmission only)
(Light gray cap)
WASHER FLUID
(Blue cap) BRAKE FLUID
(Black cap)
ENGINE OIL DIPSTICK
(Orange loop)
ENGINE OIL FILL CAP
: Except Canadian DX-G with manual transmission
POWER STEERING FLUID
(Red cap)
Table of Contents
Page 303 of 387
Fluid Locations
Maint enance
Si model
289
RADIATOR CAP
WASHER FLUID
(Blue cap)
ENGINE COOLANT
RESERVOIR
CLUTCH FLUID
(Light gray cap)
ENGINE OIL DIPSTICK
(Orange handle)
BRAKE FLUID
(Black cap)
ENGINE OIL FILL CAP
Table of Contents
Page 321 of 387
Remove the socket by turning it
one-quarter turn counterclockwise.Pull the bulb straight out of its
socket. Push the new bulb straight
into the socket until it bottoms.
Insert the socket back into the
light assembly. Turn it clockwise
to lock it in place.
Test the lights to make sure the
new bulb is working.
Put the f asteners into the holes on
the trunk lid trim. Reinstall the
screws.
Push the trunk lid trim back into
position.
Reinstall the socket. Turn it
clockwise until it locks. Make sure
the new bulb is working.
Pull the bulb straight out of its
socket. Push the new bulb straight
into the socket until it bottoms.
Open the trunk, and remove the
socket f rom the light assembly by
turning it one-quarter turn counter-
clockwise.
2.
1. 3.
4. 5.6. 7. 8.
3.Except Si model
OnallEX-L,CanadianSport,andSi
models
Lights
Replacing a High-mount Brake
Light Bulb
Maint enance
307
BULB
SOCKET
BULB
SOCKET
Table of Contents
Page 338 of 387

Fill the f uel tank.Block the rear wheels.
If the vehicle is to be stored f or a
longer period, it should be
supported on jackstands so the
tires are of f the ground.
If you need to park your vehicle f or
an extended period (more than 1
month), there are several things you
should do to prepare it f or storage.
Proper preparation helps prevent
deterioration and makes it easier to
get your vehicle back on the road. If
possible, store your vehicle indoors. Leave one window open slightly (if
the vehicle is being stored
indoors).Cover the vehicle with a
‘‘breathable’’ cover, one made
f rom a porous material such as
cotton. Non-porous materials, such
as plastic sheeting, trap moisture,
which can damage the paint.
To minimize sticking, apply a
silicone spray lubricant to all door
and trunk seals. Also, apply a
vehiclebodywaxtothepainted
surfaces that mate with the door
and trunk seals.
Support the f ront wiper blade
arms with a f olded towel or rag so
they do not touch the windshield.
Disconnect the battery. If possible, periodically run the
engine until it reaches f ull
operating temperature (the
cooling f an cycles twice).
Pref erably, do this once a month.
Wash and dry the exterior
completely.
Cleantheinterior.Makesurethe
carpeting, floor mats, etc., are
completely dry.
Leave the parking brake off. Put
the transmission in reverse
(manual) or Park (automatic).
Vehicle Storage
324
Table of Contents
Page 341 of 387
 position. Have all
passengers get out of the vehicle
while you change the tire.
Park the vehicle on f irm, level, and
n")
Turn on the hazard warning lights,
and turn the ignition switch to the
LOCK (0) position. Have all
passengers get out of the vehicle
while you change the tire.
Park the vehicle on f irm, level, and
non-slippery ground. Put the
transmission in Park (automatic)
or reverse (manual). Apply the
parking brake.
Open the trunk. Raise the trunk
f loor by lif ting up on the back edge.
Take the tool case out of the spare
tire.
Unscrew the wing bolt, and take
the spare tire out of its well.
If you have a f lat tire while driving,
stop in a saf e place to change it.
Drive slowly along the shoulder until
you get to an exit or an area to stop
that is far away from the traffic lanes.
Thecompactsparetireissmaller
than a standard tire, and it will affect
the vehicle’s handling. Drive
cautiously when the spare is
mounted on your vehicle.
Thesizedifferencemayalsocause
damage to the dif f erential, so do not
mount the compact spare on the
f ront. If either f ront tire goes f lat,
removethereartireonthatsame
side, mount the compact spare tire
on the rear, then mount the rear tire
on the f ront.
5.
4.
3.
2.
1.
CONT INUED
On Si model only
Changing a Flat T ire
T aking Care of t he Unexpect ed
327
SPARE TIRE
TRUNK FLOOR JACK TOOL CASE
The vehicle can easily roll off
the jack, seriously injuring
anyone underneath.
Follow the directions for
changing a tire exactly, and
never get under the vehicle
when it is supported only by thejack.
Table of Contents
Page 348 of 387

Although this seems like a simple
procedure, you should take several
precautions.To jump start your vehicle:
The numbers in the illustrations
show you the order to connect the
jumper cables.
Turn of f all the electrical
accessories: heater, A/C, audio
system, lights, etc. Put the
transmission in neutral (manual)
or Park (automatic), and set the
parking brake.
Open the hood, and check the
physical condition of the battery.
In very cold weather, check the
condition of the electrolyte. If it
seems slushy or f rozen, do not try
jump starting until it thaws.
You cannot start a vehicle with an
automatic transmission by pushing
or pulling it. 1. 2.
Jump Starting
334
Except Si
BOOSTER BATTERY
A battery can explode if you do
not follow the correct procedure,
seriously injuring anyonenearby.
Keep all sparks, open flames,
and smoking materials away
from the battery. If a battery sits in extreme cold, the
electrolyte inside can f reeze.
Attempting to jump start with a f rozen
battery can cause it to rupture.
Table of Contents

ENGINE COOLANT
RESERVOIR
CLUTCH FLUID
(Light gray cap)
ENGINE OIL DIPSTICK
(Orange handle)
BRAKE FLUID
(Black cap)
ENGIN")
