Page 281 of 387

on loose or
uneven surf aces, such as gravel or
snow, than a vehicle without anti-
lock.
It only helps with the
steering control during braking.
such as trying to take a
corner too f ast or making a sudden
lane change. Always drive at a safe
speed f or the road and weather
conditions.
Always steer moderately
when you are braking hard. Severe
or sharp steering wheel movement
can still cause your vehicle to veer
into oncoming traffic or off the road.
If the ABS indicator and the brake
system indicator come on together,
and the parking brake is f ully
released, the EBD system may also
be shut down.
Test your brakes as instructed on
page . If the brakes f eel normal,
drive slowly and have your vehicle
repaired by your dealer as soon as
possible. Avoid sudden hard braking
which could cause the rear wheels to
lock up and possibly lead to a loss of
control.
The VSA indicator will come on
alongwiththeABSindicator.
341
On vehicles with VSA system
A vehicle with A BS may require a
longer distance to stop
A BS does not reduce the time or
distance it takes to stop the
vehicle.
Important Saf ety Reminders
A BS will not prevent a skid that
results f rom changing direction
abruptly,
A BS cannot prevent a loss of
stability.
Anti-lock Brakes (ABS)
Driving
267
Table de matières
Page 301 of 387

�Î �Î
�Ì �Ì
�Ì
�Î
Maintenance Minder
287
:
If the message ‘‘SERVICE’’ does not appear more than 12 months after the
display is reset, change the engine oil every year.
Adjust the valves during services A, B, 1, 2, or 3 if they are noisy.
Inspect idle speed every 160,000 miles (256,000 km).
See information on maintenance and emissions warranty in the second
column on page .
Independent of the maintenance minder indicator in the information
display, replace the brake fluid every 3 years.
NOTE: 1:
286
Maintenance Sub Items
Rotate tires
Replace air cleaner element If you drive in dusty conditions, replace
every 15,000 miles (24,000 km).
Replace dust and pollen filter If you drive primarily in urban areas that have high
concentrations of soot in the air from industry and
from diesel-powered vehicles, replace every 15,000
miles (24,000 km).
Inspect drive belt
Replace transmission fluid
Replace spark plugs
Inspect valve clearance
Replace engine coolant
Maintenance Main Items
Replace engine oil
Replace engine oil and oil filter
Inspect front and rear brakes
Check parking brake adjustment
Inspect these items:
Tie rod ends, steering gear box, and boots
Suspension components
Driveshaft boots
Brake hoses and lines (including ABS/VSA)
All fluid levels and condition of fluids
Exhaust system
Fuel lines and connections
AB
Symbol
Symbol
12 3 4 51 1
Maintenance Minder
Table of Contents
Page 323 of 387
Turn on the f og lights to test the
new bulb.
Align the two tabs on the f og light
assembly with the holes in the
bumper, then push the f og light
assembly into place. Tighten the
screw securely.
Remove the bulb by turning it one-
quarter turn counterclockwise.
Install the new bulb, and turn it
one-quarter turn clockwise to lock
it in place.
Push the electrical connector onto
the bulb. Make sure it is on all the
way. If your seat belts get dirty, use a sof t
brush with a mixture of mild soap
and warm water to clean them. Do
not use bleach, dye, or cleaning
solvents. Let the belts air dry bef ore
you use the vehicle.
Dirt build-up in the loops of the seat
belt anchors can cause the belts to
retract slowly. Wipe the insides of
the loops with a clean cloth
dampened in mild soap and warm
water or isopropyl alcohol.
6. 7.
3.4. 5.
Lights, Cleaning the Seat Belts
Cleaning the Seat Belts
Maint enance
309
TAB TAB CONNECTOR
BULB LOOP
Table of Contents
Page 326 of 387
Pivot the blade assembly toward
the wiper arm until it releases
from the wiper arm.
When replacing a wiper blade,
make sure not to drop the wiper
blade or wiper arm down on the
windshield.Examine the new wiper blades. If
they have no plastic or metal
reinf orcement along the back
edge, remove the metal
reinf orcement strips f rom the old
wiper blade, and install them in
the slots along the edge of the new
blade.
Make sure the three rubber tabs
inside the blade f it to each notch of
the reinf orcement, as shown.
Remove the blade f rom its holder
by grabbing the tabbed end of the
blade. Pull f irmly until the tabs
come out of the holder.
3. 4.
Wiper Blades
312
BLADE
BLADE
REINFORCEMENT
WIPER ARM
TOP
Table of Contents
Page 333 of 387

Themileageyoucanexpectfrom
yourvehicletiresisthesameas
comparable mid-and rear-engine
sports cars, and it will vary greatly
with your driving habits.
If you drive moderately, the f ront
tires could last more than 10,000
miles (16,000 km). However, the
mileage will be substantially less if
you tend to drive your vehicle at the
upper limits of its capabilities.
You should caref ully inspect your
vehicle’s tires f or wear, damage, and
proper inf lation every 7,500 miles
(12,000 km).Replace your tires with radial tires of
the same size, load range, speed
rating, and maximum cold tire
pressure rating (as shown on the
tire’s sidewall).
Mixing radial and bias-ply tires on
your vehicle can reduce braking
ability, traction, and steering
accuracy. Using tires of a dif f erent
size or construction can cause the
ABS and vehicle stability assist
system (VSA) to work inconsistently.
It is best to replace all f our tires at
thesametime.If thatisnotpossible
or necessary, replace the two f ront
tires or two rear tires as a pair.
Replacing just one tire can seriously
af f ect your vehicle’s handling.The ABS and VSA system work by
comparing the speed of the wheels.
When replacing tires, use the same
size originally supplied with the
vehicle. Tire size and construction
can af f ect wheel speed and may
cause the ABS or VSA system to
activate.
Replacement wheels are available at
your dealer.
If you ever replace a wheel, make
sure that the wheel’s specif ications
match those of the original wheels.
Also be sure you use only TPMS
specif ic wheels (if equipped). If you
do not, the tire pressure monitoring
system will not work.
CONT INUED
Tires
Replacing T ires and Wheels
Maint enance
319
Table of Contents
Page 355 of 387

However, if the brake pedal does not
f eel normal, you should take
immediate action. A problem in one
part of the system’s dual circuit
design will still give you braking at
two wheels. You will f eel the brake
pedal go down much f arther bef ore
the vehicle begins to slow down, and
you will have to press harder on the
pedal.
Slow down by shif ting to a lower
gear, and pull to the side of the road
when it is saf e. Because of the long
distance needed to stop, it is
hazardous to drive the vehicle. You
should have it towed and repaired as
soon as possible (seeon page ).
If you must drive the vehicle a short
distance in this condition, drive
slowly and caref ully. If the ABS indicator comes on with
the brake system indicator, have
your vehicle inspected by your
dealer immediately.
The brake system
indicator normally
comes on when
you turn the ignition switch to the
ON (II) position and as a reminder to
check the parking brake. It will stay
on if you do not f ully release the
parking brake.
If the brake system indicator comes
on while driving, the brake f luid level
is probably low. Press lightly on the
brake pedal to see if it f eels normal.
If it does, check the brake f luid level
thenexttimeyoustopataservice
station (see page ).
If the f luid level is low, take your
vehicle to a dealer, and have the
brake system inspected f or leaks or
worn brake pads. 300
348Emergency
Towing
Brake System Indicator
T aking Care of t he Unexpect ed
341
Canada
U.S.
Table of Contents
Page 356 of 387
The under-hood f use box is on the
driver’s side, next to the brake f luid
reservoir. To open it, push the tabs
as shown.
Thefusesareintwofuseboxes.The
interior f use box is underneath the
steering column. If something electrical in your
vehicle stops working, the first thing
youshouldcheckforisablownfuse.
Determine f rom the chart on pages
and , or the diagram on the
f use box lid, which f use or f uses
control that device. The diagram f or
the interior driver’s side f use box is
on the kick panel below the f use box.
Check those f uses f irst, but check all
the f uses bef ore deciding that a
blown f use is the cause. Replace any
blown f uses, and check if the device
works. 346 347
Fuses
Checking and Replacing Fuses
342
INTERIOR
UNDER-HOOD
TAB
FUSE LABEL
Table of Contents
Page 360 of 387
�Î�Î
�Î
�µ �µ �µ �µ
�Î �Î
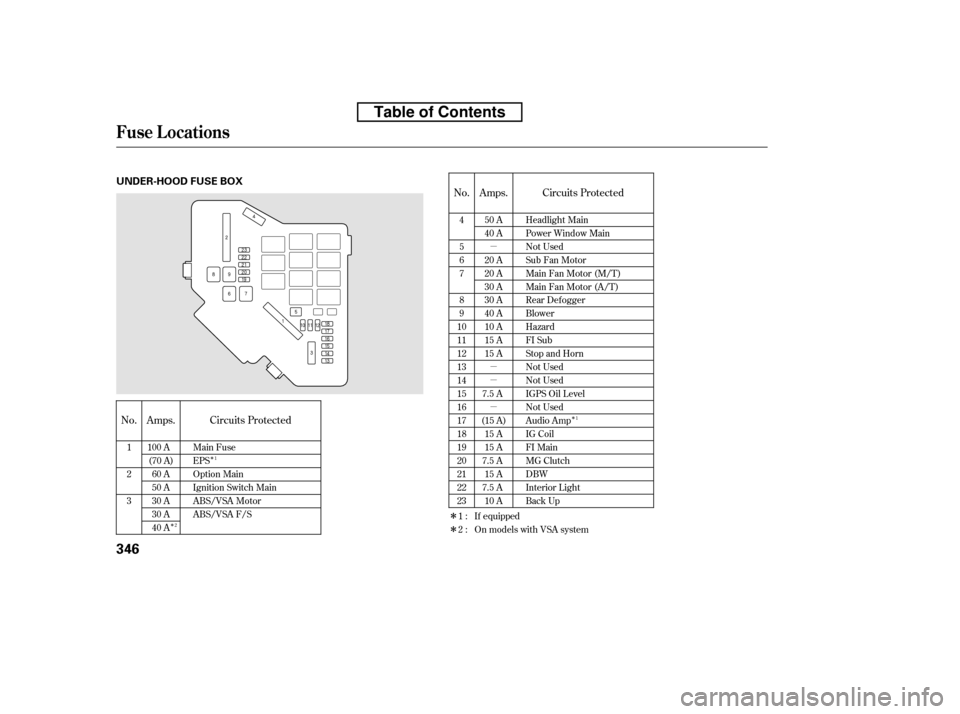
No.
No. Circuits Protected Circuits Protected
Amps. Amps.
4 5 67 8 9
1011121314151617181920212223
1 23 Main Fuse EPS
Option Main
Ignition Switch Main
ABS/VSA Motor
ABS/VSA F/S Headlight Main
Power Window Main
Not Used
Sub Fan Motor
Main Fan Motor (M/T)
Main Fan Motor (A/T)
Rear Defogger
Blower
Hazard
FI Sub
Stop and Horn
Not Used
Not Used
IGPS Oil Level
Not Used
Audio Amp
IG Coil
FI Main
MG Clutch
DBW
Interior Light
Back Up
100 A
(70 A)
60 A
50 A
30 A
30 A
40 A 50 A
40 A
20 A
20 A
30 A
30 A
40 A
10 A
15 A
15 A
7.5 A
(15 A) 15 A
15 A
7.5 A
15 A
7.5 A
10 A
1:2: If equipped
On models with VSA system
1 1
2
Fuse Locations
346
UNDER-HOOD FUSE BOX
Table of Contents