2010 HONDA CIVIC HYBRID clock
[x] Cancel search: clockPage 106 of 368

The climate control system in your
vehicle provides a comfortable
driving environment in all weather
conditions.
The standard audio system has
many f eatures. This section
describes those f eatures and how to
use them. (If you have an optional
audio system, ref er to the operating
instructions that came with it.)
Your vehicle has an anti-theft audio
system that requires a code number
to enable it.
The security system helps to dis-
courage vandalism and thef t of your
vehicle..............................
Climate Control .104
................................
Audio System .110
Audio System (Models without ...................
navigation system) . 112
..........
Playing the AM/FM Radio . 113
.....................
Adjusting the Sound .115
................
Playing the XM
Radio . 116
................................
Playing a Disc .121
.......
Disc Player Error Messages . 128
Optional Disc Changer Error ...................................
Messages .129
............................
PlayinganiPod
. 130
.................
iPod
Error Messages . 138
Playing a USB Flash Memory ........................................
Device .139
USB Flash Memory Device ........................
Error Messages .146
Audio System (Models with ...................
navigation system) . 147
..........
Playing the AM/FM Radio . 148
................
Playing the XM
Radio . 151
.....................
Adjusting the Sound .158
................................
Playing a Disc .160
.......
Disc Player Error Messages . 169
.........................
Playing a PC Card .170
.............
PC Card Error Messages . 182............................
PlayinganiPod
. 183
.................
iPod
Error Messages . 192
Playing a USB Flash Memory ........................................
Device .193
USB Flash Memory Device ........................
Error Messages .203
............
AM/FM Radio Reception . 204
..................
Protecting Your Discs . 206
.................
Radio Thef t Protection . 209
................
Remote Audio Controls . 210
......................
Auxiliary Input Jack .211
..........................
Setting the Clock .212
............................
Security System .213
...............................
Cruise Control .214
........
HandsFreeLink
. 217Bluetooth
Features
Features
103
09/07/15 10:43:30 31SNC640_108
2010 Civic Hybrid
Page 108 of 368

Only on models equipped withNavigation SystemYou can manually select various
f unctions of the climate control
system when it is in f ull automatic
mode. All other f eatures remain
automatically controlled.
Making any manual selection causes
thewordAUTOinthedisplaytogo
out.
Turn this dial to increase or decrease
the fan speed and airflow.
Turning this dial clockwise increases
the temperature of the airflow.
The system automatically selects the
proper mix of conditioned and/or
heated air that will, as quickly as
possible, raise or lower the interior
temperature to your pref erence.
When you set the temperature to its
lower limit ( ) or its upper limit
( ), the system runs at f ull
cooling or heating only. It does not
regulate the interior temperature.
In cold weather, the fan will not
come on automatically until the
heater starts to develop warm air.
In ‘‘AUTO’’ mode, the air conditioner
may not work if the humidity inside
the vehicle is low. To activate the air
conditioner, press A/C button.
The climate control system f or your
vehicle can also be operated using
the voice control system. See the
navigation system manual f or
complete details.
The automatic climate control
system adjusts the f an speed and
airflow levels to maintain the interior
temperature you select.
Press the AUTO button.
Set the desired temperature by
turning the temperature control
dial. You will see AUTO in the
system’s display.
Voice Control System
Semi-automatic Operation
Fan Control Dial
T emperature Control Dial
Using A utomatic Climate Control
Climat e Cont rol
Features
105
09/07/15 10:43:47 31SNC640_110
2010 Civic Hybrid
Page 215 of 368

Change the hours by pressing the H
(preset 1) button until the numbers
advance to the desired time. Change
the minutes by pressing the M
(preset 2) button until the numbers
advance to the desired time. To set the time, press the CLOCK
button until the displayed time
begins to blink, then release the
button.
Press the CLOCK button again to
enter the set time.
You can quickly set the time to the
nearest hour. If the displayed time is
bef ore the half hour, pressing the
CLOCK button until you hear a beep,
then pressing the R (preset 3) button
sets the clock back to the previous
hour. If the displayed time is af ter
the half hour, the clock sets forward
to the beginning of the next hour.The navigation system receives
signals f rom the global positioning
system (GPS), and the displayed
time is updated automatically by the
GPS. Ref er to the navigation system
manual f or how to adjust the time.
For example: 1:06 will reset to 1:00
1:52 will reset to 2:00
On models with navigation system
On models without navigation system
Setting the Clock
212
HOUR BUTTON RESET BUTTON
CLOCK BUTTON
MINUTE BUTTON
09/07/15 10:57:43 31SNC640_217
2010 Civic Hybrid
Page 292 of 368

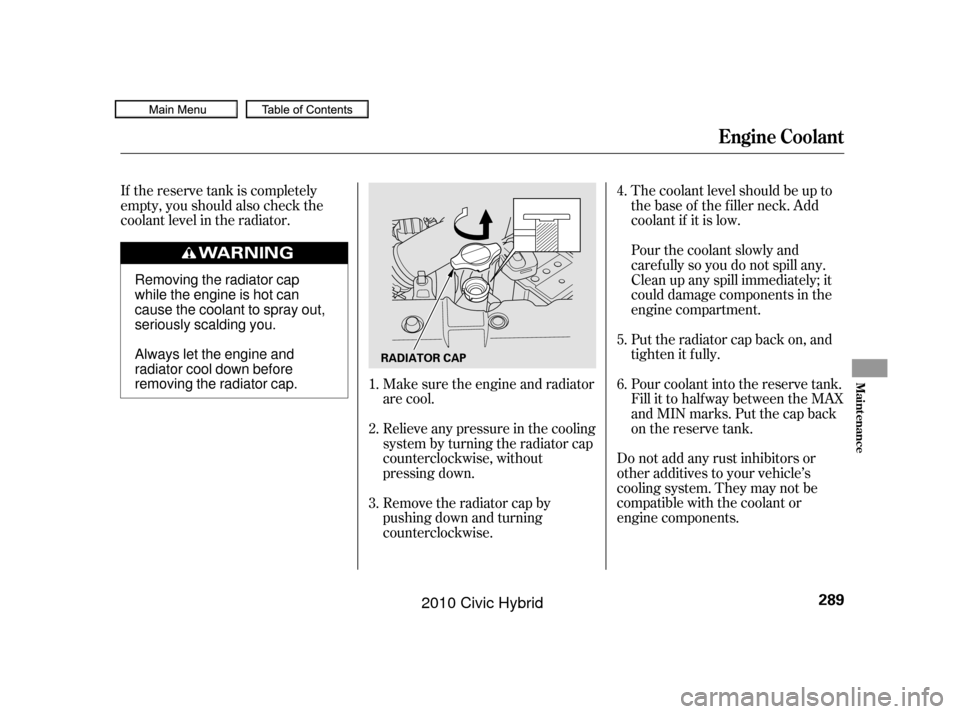
If the reserve tank is completely
empty, you should also check the
coolant level in the radiator.The coolant level should be up to
the base of the f iller neck. Add
coolant if it is low.
Do not add any rust inhibitors or
other additives to your vehicle’s
cooling system. They may not be
compatible with the coolant or
engine components. Pour coolant into the reserve tank.
Fill it to half way between the MAX
and MIN marks. Put the cap back
on the reserve tank. Pourthecoolantslowlyand
caref ully so you do not spill any.
Clean up any spill immediately; it
could damage components in the
engine compartment.
Make sure the engine and radiator
are cool.
Relieve any pressure in the cooling
system by turning the radiator cap
counterclockwise, without
pressing down.
Remove the radiator cap by
pushing down and turning
counterclockwise. Put the radiator cap back on, and
tighten it fully.
1.
2.
3. 4.
5.
6.
Engine Coolant
Maint enance
289
RADIATOR CAP
Removing the radiator cap
while the engine is hot can
cause the coolant to spray out,
seriously scalding you.
Always let the engine and
radiator cool down before
removing the radiator cap.
09/07/15 11:08:51 31SNC640_294
2010 Civic Hybrid
Page 297 of 368

If youreplacedaheadlightbulbon
the driver’s side, reinstall the
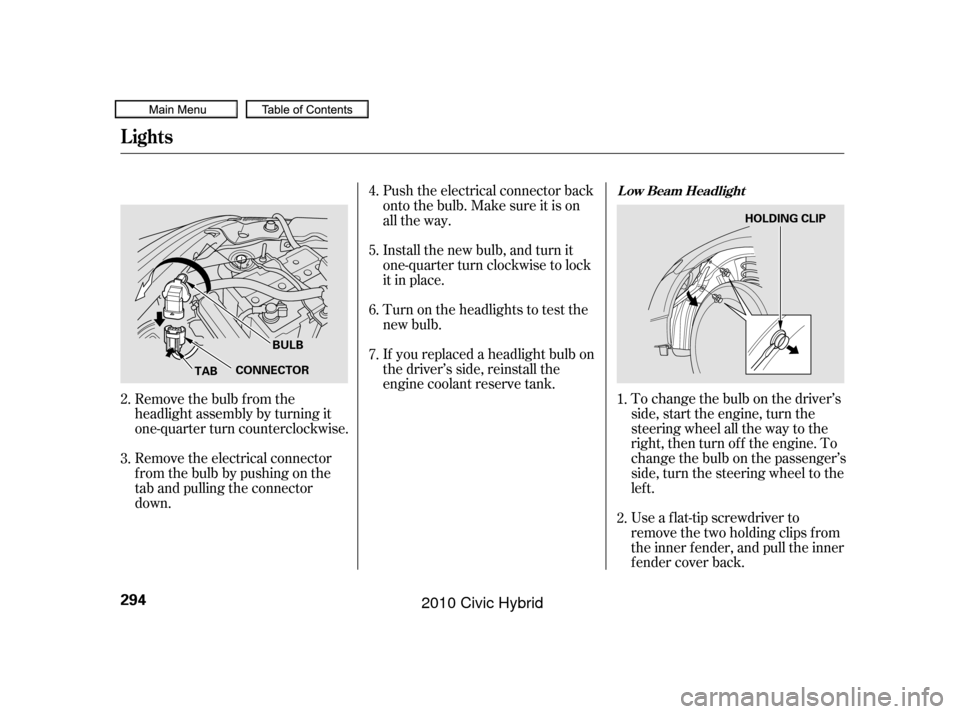
engine coolant reserve tank.To change the bulb on the driver’s
side, start the engine, turn the
steering wheel all the way to the
right, then turn of f the engine. To
change the bulb on the passenger’s
side, turn the steering wheel to the
lef t.
Use a f lat-tip screwdriver to
remove the two holding clips f rom
the inner f ender, and pull the inner
f ender cover back.
Push the electrical connector back
onto the bulb. Make sure it is on
all the way.
Install the new bulb, and turn it
one-quarter turn clockwise to lock
it in place.
Turn on the headlights to test the
new bulb.
Remove the electrical connector
f rom the bulb by pushing on the
tab and pulling the connector
down. Remove the bulb f rom the
headlight assembly by turning it
one-quarter turn counterclockwise.
2.
3.
2.
4.
5.
6.
7.
1.
L ow Beam Headlight
Lights
294
TABCONNECTORBULB HOLDING CLIP
09/07/15 11:09:36 31SNC640_299
2010 Civic Hybrid
Page 298 of 368

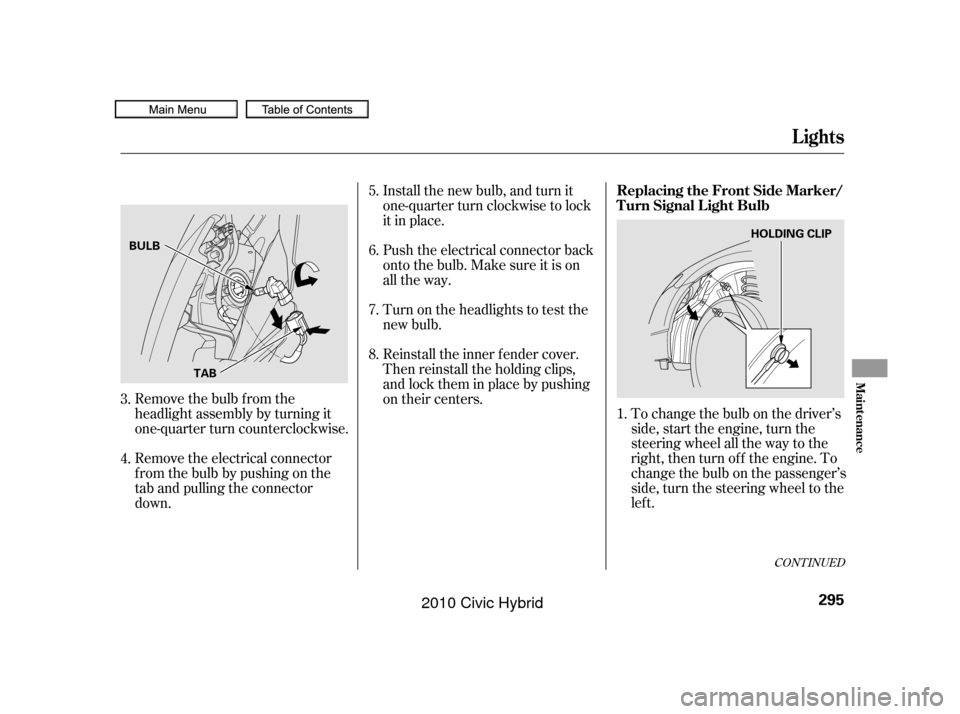
To change the bulb on the driver’s
side, start the engine, turn the
steering wheel all the way to the
right, then turn of f the engine. To
change the bulb on the passenger’s
side, turn the steering wheel to the
lef t.
Remove the bulb f rom the
headlight assembly by turning it
one-quarter turn counterclockwise. Install the new bulb, and turn it
one-quarter turn clockwise to lock
it in place.
Push the electrical connector back
onto the bulb. Make sure it is on
all the way.
Turn on the headlights to test the
new bulb.
Reinstall the inner f ender cover.
Then reinstall the holding clips,
andlocktheminplacebypushing
on their centers.
Remove the electrical connector
f rom the bulb by pushing on the
tab and pulling the connector
down. 5.
6.
1.
7.
8.
3.
4.
CONT INUED
Lights
Replacing the Front Side Marker/
Turn Signal Light Bulb
Maint enance
295
TAB
BULB
HOLDING CLIP
09/07/15 11:09:46 31SNC640_300
2010 Civic Hybrid
Page 299 of 368

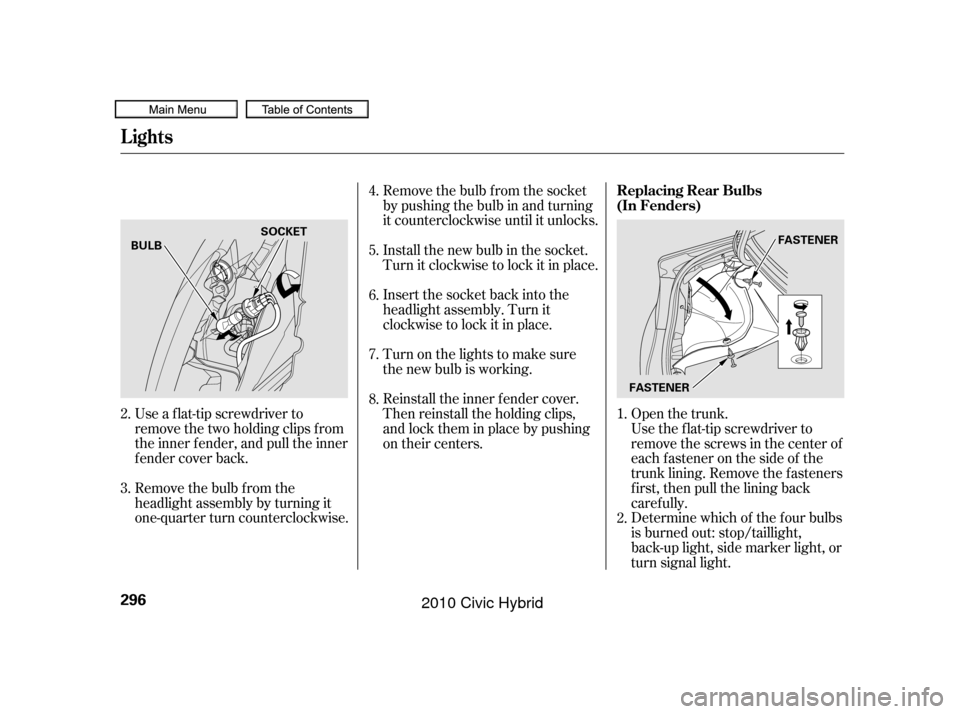
Open the trunk.
Use a f lat-tip screwdriver to
remove the two holding clips f rom
the inner f ender, and pull the inner
f ender cover back. Remove the bulb f rom the socket
by pushing the bulb in and turning
it counterclockwise until it unlocks.
Install the new bulb in the socket.
Turn it clockwise to lock it in place.
Insert the socket back into the
headlight assembly. Turn it
clockwise to lock it in place.
Reinstall the inner f ender cover.
Then reinstall the holding clips,
andlocktheminplacebypushing
on their centers. Turn on the lights to make sure
the new bulb is working.
Remove the bulb f rom the
headlight assembly by turning it
one-quarter turn counterclockwise. Use the f lat-tip screwdriver to
remove the screws in the center of
each f astener on the side of the
trunk lining. Remove the f asteners
first, then pull the lining back
caref ully.
Determine which of the f our bulbs
is burned out: stop/taillight,
back-up light, side marker light, or
turn signal light.
1.
4.
5.
6.
7.
8.
3. 2.
2. Replacing Rear Bulbs
(In Fenders)
Lights
296
FASTENER
BULB
SOCKET
FASTENER
09/07/15 11:09:57 31SNC640_301
2010 Civic Hybrid
Page 300 of 368

Remove the socket by turning it
one-quarter turn counterclockwise.
Pull the bulb straight out of its
socket. Push the new bulb straight
into the socket until it bottoms.
Reinstall the socket into the light
assembly by turning it clockwise
until it locks.Put the f asteners into the holes on
the side of the trunk lining.
Reinstall the screws. Reinstall the trunk lining. Make
sure it is installed under the edge
of the trunk seal. Turn on the lights to make sure
the new bulb is working.
Open the trunk.
Use the Phillips-head screwdriver to
remove the screws in the center of
each f astener on the back of the boot
lid. Remove the f asteners f irst, then
pull the lining back caref ully. 1.
4.
5. 6.
7.
8.
3.
CONT INUED
Replacing Rear Bulbs
(in T runk L id)
Lights
Maint enance
297
BULBS
SOCKETS SOCKETS
BULB
BULB FASTENER
09/07/15 11:10:07 31SNC640_302
2010 Civic Hybrid