Page 152 of 414

Most audio system f unctions can be
controlled by standard buttons, bars,
and knobs. In addition, you can
access some f unctions by using the
selector knob on the audio system.
The knob turns lef t and right. Use it
to scroll through lists, or to make
selections or adjustments to a list or
menu item on the display. When you
make a selection, push the center of
the selector (ENTER) to go to that
selection.
When the audio system is in XM
Radio mode or playing discs, pushing
the selector (ENTER) knob switches
the display between the normal
display and the extended display.
The extended display has three
segments to display the detailed
inf ormation.
To select any setting such as the
clock, sound adjusting, or the
compass (if equipped), press the
MENU button. To use any audio
system f unction, the ignition switch
must be in the ACCESSORY (I) or
ON (II) position. You can select the
item by turning the selector knob.
To go back to the previous display,
press the RETURN button.
Pressing the MENU button again
will also cancel the menu display
mode.
Audio System (EX, EX-L and V6 models without navigation system)
Selector K nobMenu Display
Features
149
SELECTOR KNOBMENUBUTTONRETURNBUTTON
�����—�����—�
���y�
�����������
�y���
�)�����������y���
�����y
2010 Accord Sedan
Page 217 of 414

To set the time, press the CLOCK
button until you hear a beep. The
displayed time begins to blink.
Change the hours by pressing the H
(hour) button until the numbers
advance to the desired time. Change
the minutes by pressing the M
(minute) button until the numbers
advance to the desired time.
Press the CLOCK button again to
enter the set time.
You can quickly set the time to the
nearest hour. If the displayed time is
bef ore the half hour, press and hold
the CLOCK button, then press the R
(reset) button to set the time back to
the previous hour. If the displayed
time is af ter the half hour, the same
procedure sets the time f orward to
the beginning of the next hour.
The navigation system receives
signals f rom the global positioning
system (GPS), and the displayed
time is updated automatically by the
GPS. Ref er to the navigation system
manual f or how to adjust the time.
1:06 would RESET to 1:00.
1:52 would RESET to 2:00.
For example:On models with navigation system
On models without navigation system
Setting the Clock
214
On models without navigation system
MINUTE BUTTON (PRESET 5)
CLOCK BUTTON
RESET BUTTON (PRESET 6)
HOUR BUTTON(PRESET 4)U.S. EX-L is shown.
�����—�����—�
���y�
�������������y���
�)�����������y�����
���y
2010 Accord Sedan
Page 218 of 414
�Ú
You can also adjust the clock and
switch the clock display between 24-
hours and 12-hours in the menu
mode.
To adjust the clock setting:
Press and release the MENU
button. The display shows you the
menu items.
You can adjust the clock setting
with the ignition switch in the
ACCESSORY (I) or ON (II)
position.
Turn the selector knob to select
‘‘CLOCK ADJUST.’’
Press the selector knob (ENTER)
to enter your selection. The
display changes to the clock
adjusting display.
Turn the selector knob to select
the item which you want to adjust.
Turning the selector knob will
change the selected item between
the clock display setting, hours,
minutes, and SET. The selected
item is indicated with in the
display.
1.
2.
3.
4.
CONT INUED
EX, EX-L and V6 models without
navigation system
Adjusting the Clock with MENU
Button
Setting the Clock
Features
215
�����—�����—�
���y�
�������������y���
�)�����������y���������y
2010 Accord Sedan
Page 219 of 414

Turn the selector knob to change
the setting between 12H and 24H.
Press the selector knob (ENTER)
to enter your selection. The
display will return to the clock
adjusting display.
To set the time, turn the selector
knob and select the hours or the
minutes, then press the knob to
enter your selection. The display
changes to the setting display.
Turn the selector knob to count
the numbers up or down.
Press the selector knob (ENTER)
to enter your selection. The
display will return to the clock
adjusting display.
Pressing the MENU button again
will cancel this setting mode.
While setting the clock, pressing
the RETURN button will go back
to the previous display.
To enter the clock setting, turn
the selector knob to select ‘‘SET,’’
then press the knob. The display
will return to the menu item
display.
Press either the RETURN or
MENUbuttontogobacktothe
normal display.
5.
6.
7.
8.
9.
10.
11.
Setting the Clock
216
MINUTE SETTING
�����—�����—�
���y�
���������
���y���
�)�����������y�������
�y
2010 Accord Sedan
Page 320 of 414

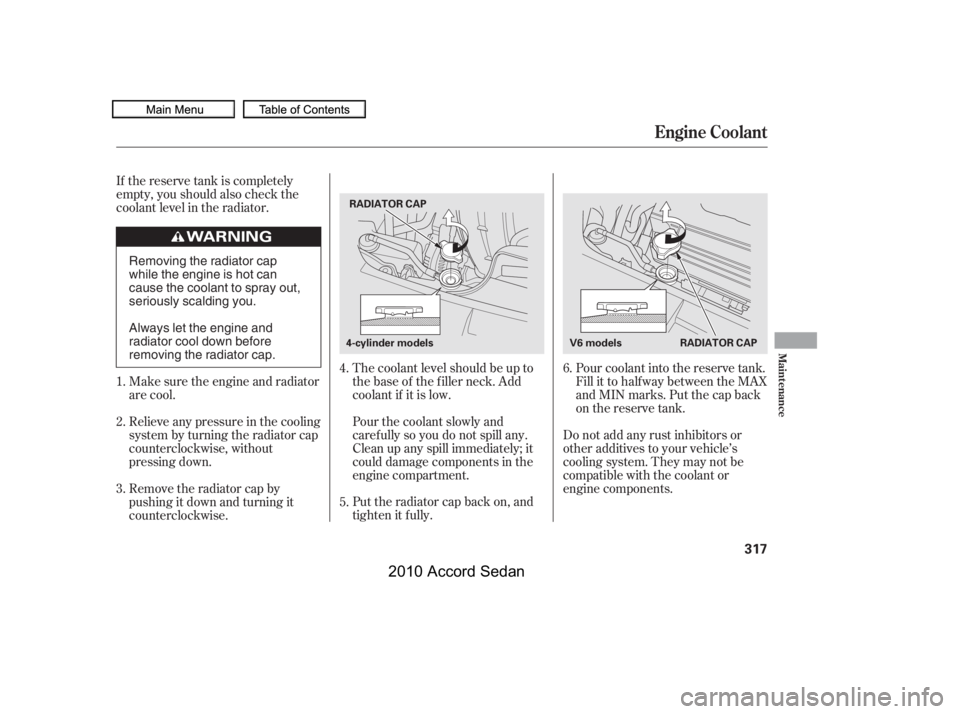
The coolant level should be up to
the base of the f iller neck. Add
coolant if it is low.
Pourthecoolantslowlyand
caref ully so you do not spill any.
Clean up any spill immediately; it
could damage components in the
engine compartment.
Put the radiator cap back on, and
tighten it fully.
Pour coolant into the reserve tank.
Fill it to half way between the MAX
and MIN marks. Put the cap back
on the reserve tank.
Do not add any rust inhibitors or
other additives to your vehicle’s
cooling system. They may not be
compatible with the coolant or
engine components.
If the reserve tank is completely
empty, you should also check the
coolant level in the radiator.
Remove the radiator cap by
pushingitdownandturningit
counterclockwise.
Relieve any pressure in the cooling
system by turning the radiator cap
counterclockwise, without
pressing down.
Make sure the engine and radiator
are cool.
4.
1.
2.
3.
5.
6.
Engine Coolant
Maint enance
317
RADIATOR CAP
RADIATOR CAP
V6 models4-cylinder models
Removing the radiator cap
while the engine is hot can
cause the coolant to spray out,
seriously scalding you.
Always let the engine and
radiator cool down before
removing the radiator cap.
09/07/08 21:41:58 31TA5620_322
2010 Accord Sedan
Page 329 of 414
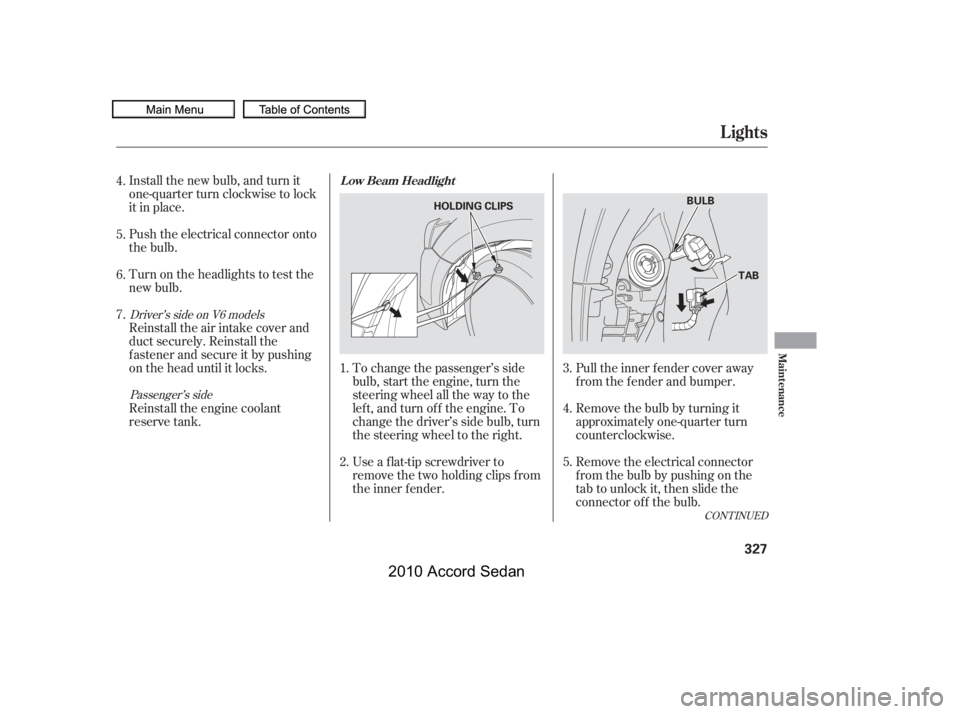
Remove the electrical connector
f rom the bulb by pushing on the
tab to unlock it, then slide the
connector of f the bulb.
Remove the bulb by turning it
approximately one-quarter turn
counterclockwise.
To change a bulb on the driver’s side,
undo the f astener and remove the air
intake cover and duct.
3.
2.V6 models
Lights
326
FASTENERAIR INTAKE COVERBULB
V6 modelsSTAYV6 modelsTABDUCT
�����—�����—�
���y�
�������������y���
�)�����������y�������
�y
2010 Accord Sedan
Page 330 of 414

To change the passenger’s side
bulb, start the engine, turn the
steering wheel all the way to the
lef t, and turn of f the engine. To
change the driver’s side bulb, turn
the steering wheel to the right.
Install the new bulb, and turn it
one-quarter turn clockwise to lock
it in place.
Push the electrical connector onto
the bulb.
Turn on the headlights to test the
new bulb.
Reinstall the engine coolant
reserve tank.
Remove the electrical connector
f rom the bulb by pushing on the
tab to unlock it, then slide the
connector of f the bulb.
Remove the bulb by turning it
approximately one-quarter turn
counterclockwise.
Pull the inner f ender cover away
f rom the f ender and bumper.
Use a f lat-tip screwdriver to
remove the two holding clips f rom
the inner f ender.
Reinstall the air intake cover and
duct securely. Reinstall the
f astener and secure it by pushing
on the head until it locks.
6.
5.
3.
4.
5.
1.
2.
7.
4.
CONT INUED
Passenger’s side
Driver’s side on V6 models
L ow Beam Headlight
Lights
Maint enance
327
HOLDING CLIPSBULB
TAB
�����—�����—�
���y�
�������������y���
�)�����������y���������y
2010 Accord Sedan
Page 331 of 414
Install the new bulb, and turn it
one-quarter turn clockwise to lock
it in place.
Push the electrical connector onto
the bulb.
Put the inner f ender cover in place.
Install the two holding clips. Lock
each one in place by pushing on
the center.
Turn on the headlights to test the
new bulb.
Open the hood.
To change the turn signal bulb on
the passenger’s side, remove the
engine coolant reserve tank by
pulling it out of its stay.
Remove the socket from the
headlight assembly by turning it
one-quarter turn counterclockwise.
To remove the burned out bulb,
push it in and turn it
counterclockwise until it unlocks.
1. 2.
8.
7.
6.
9.
3.
Lights
Replacing a Front T urn Signal/
Parking L ight Bulb
328
BULBSTAYV6 model is shown.
�����—�����—�
���y�
�������������y���
�)�����������y���������y
2010 Accord Sedan