Page 341 of 414
Place the top of the wiper blade on
the end of the blade assembly, and
slide the blade onto the assembly
in the direction pointed to by the
arrow.
Slide the wiper blade assembly
onto the wiper arm. Push down
thelocktab.Makesurethewiper
blade assembly locks in place.
Lower the wiper arm down against
the windshield, the passenger’s
side first, then the driver’s side.
Make sure the tab on the blade
assembly fits in the indent of the
wiper blade and the blade is
completely installed.
5.
6.
7.
Wiper Blades
338
INDENT
TAB
�����—�����—�
���y�
�������������y���
�)�����������y���������y
2010 Accord Sedan
Page 352 of 414

Support the f ront wiper blade
arms with a f olded towel or rag so
they do not touch the windshield.
To minimize sticking, apply a
silicone spray lubricant to all door
and trunk seals. Also, apply a
vehiclebodywaxtothepainted
surfaces that mate with the door
and trunk seals.
Cover the vehicle with a
‘‘breathable’’ cover, one made
f rom a porous material such as
cotton. Non-porous materials, such
as plastic sheeting, trap moisture,
which can damage the paint.
Leave the parking brake off. Put
the transmission in reverse
(manual) or Park (automatic).
If possible, periodically run the
engine until it reaches f ull
operating temperature (the
cooling f ans cycle on and of f
twice). Pref erably, do this once a
month.
Block the rear wheels.
If the vehicle is to be stored f or a
longer period, it should be
supported on jackstands so the
tires are of f the ground.
Leave one window open slightly (if
the vehicle is being stored
indoors).
Disconnect the battery.
Vehicle Storage
Maint enance
349
�����—�����—�
���y�
����
��������y���
�)�����������y���������y
2010 Accord Sedan
Page 356 of 414

CONT INUED
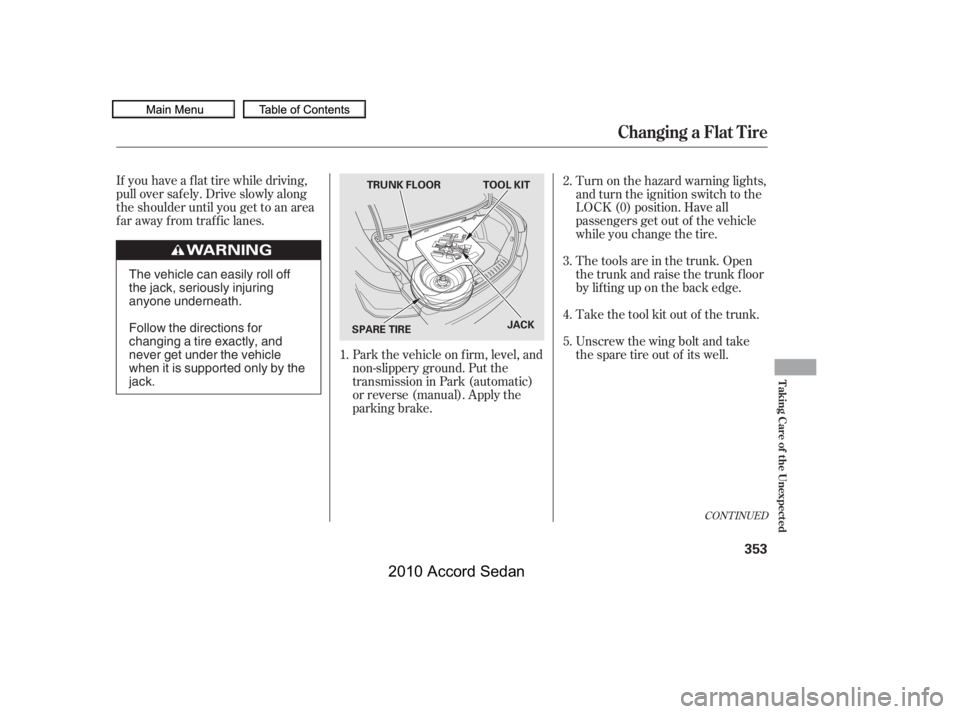
Park the vehicle on f irm, level, and
non-slippery ground. Put the
transmission in Park (automatic)
or reverse (manual). Apply the
parking brake.
If you have a f lat tire while driving,
pull over saf ely. Drive slowly along
the shoulder until you get to an area
far away from traffic lanes.
Turn on the hazard warning lights,
and turn the ignition switch to the
LOCK (0) position. Have all
passengers get out of the vehicle
while you change the tire.
The tools are in the trunk. Open
the trunk and raise the trunk f loor
by lif ting up on the back edge.
Take the tool kit out of the trunk.
Unscrew the wing bolt and take
the spare tire out of its well.
5.
4.
3.
2.
1.
Changing a Flat Tire
T aking Care of t he Unexpect ed
353
TRUNK FLOOR
JACKSPARE TIRE
TOOL KIT
The vehicle can easily roll off
the jack, seriously injuring
anyone underneath.
Follow the directions for
changing a tire exactly, and
never get under the vehicle
when it is supported only by the
jack.
09/07/08 21:43:25 31TA5620_358
2010 Accord Sedan
Page 357 of 414
Take the jack out of the tool kit
case.
Loosen each wheel nut 1/2 turn
with the wheel nut wrench.
Placethejackunderthejacking
point nearest the tire you need to
change. Turn the end bracket
clockwise until the top of the jack
contacts the jacking point. Make
sure the jacking point tab is
restinginthejacknotch.
6.7.8.
Changing a Flat Tire
354
JACKING POINT
JACK WHEEL NUT
�����—�����—�
���y�
����
�
������y���
�)�����������y���������y
2010 Accord Sedan
Page 361 of 414

Diagnosing why the engine won’t
start f alls into two areas, depending
on what you hear when you turn the
ignition switch to the START (III)
position:
You hear nothing, or almost
nothing. The engine’s starter
motor does not operate at all, or
operates very slowly.
You can hear the starter motor
operating normally, or the starter
motor sounds like it is spinning
f aster than normal, but the engine
does not start up and run.
When you turn the ignition switch to
the START (III) position, you do not
hear the normal noise of the engine
trying to start. You may hear a
clicking sound, a series of clicks, or
nothing at all.
Check these things:
Check the transmission interlock.
If you have a manual transmission,
the clutch pedal must be pushed
all the way to the f loor or the
starter will not operate. With an
automatic transmission, it must be
in Park or neutral.
Turn the ignition switch to the ON
(II) position. Turn on the
headlights, and check their
brightness. If the headlights are
very dim or do not come on at all,
the battery is discharged. See
on page .
Turn the ignition switch to the
START (III) position. If the
headlights do not dim, check the
condition of the f uses. If the f uses
areOK,thereisprobably
something wrong with the
electrical circuit f or the ignition
switch or starter motor. You will
need a qualif ied mechanic to
determine the problem (see
on page ).
If the headlights dim noticeably or
go out when you try to start the
engine, either the battery is dis-
charged or the connections are
corroded. Check the condition of
the battery connections (see page
). You can then try jump
starting the vehicle from a booster
battery (see page ).
360
360
347
375
If theEngineWon’tStart
Nothing Happens or the Starter
Motor Operates Very Slowly
Jump Starting
Emergency T owing
358
�����—�����—�
���y�
����
��������y���
�)�����������y���������y
2010 Accord Sedan
Page 367 of 414

Using gloves or a large heavy
cloth, turn the radiator cap
counterclockwise, without pushing
down, to the f irst stop. Af ter the
pressure releases, push down on
the cap, and turn it until it comes
off.
Put the radiator cap back on
tightly. Run the engine, and check
the temperature gauge. If it goes
back to the red mark, the engine
needs repair (see
on page ).
If the temperature stays normal,
check the coolant level in the
radiator reserve tank. If it has
gone down, add coolant to the
MAX mark. Put the cap back on
tightly.
If you do not f ind an obvious leak,
check the coolant level in the
radiator reserve tank. Add coolant
if the level is below the MIN mark.
If there was no coolant in the
reserve tank, you may need to add
coolant to the radiator. Let the
engine cool down until the pointer
reaches the middle of the tempera-
ture gauge, or lower, bef ore check-
ing the radiator.
Start the engine, and set the
temperature to maximum heat
(climate control to AUTO at
‘‘ ’’). Add coolant to the
radiator up to the base of the f iller
neck. If you do not have the
proper coolant mixture available,
you can add plain water.
Remember to have the cooling
system drained and ref illed with
the proper mixture as soon as you
can.
7.
6.8.
9.
10.
11.
375
Emergency
Towing
If theEngineOverheats
364
Removing the radiator cap
while the engine is hot can
cause the coolant to spray out,
seriously scalding you.
Always let the engine and
radiator cool down before
removing the radiator cap.
09/07/08 21:44:01 31TA5620_369
2010 Accord Sedan
Page 372 of 414

Also check the combined f use box in
the under-hood f use box.
If something electrical in your
vehicle stops working, the first thing
youshouldcheckforisablownfuse.
Determine f rom the chart on pages
, and , or the diagram on
thefuseboxlidorthefuselabel,
which f use or f uses control that
component. Check those f uses f irst,
but check all the f uses bef ore
deciding that a blown f use is not the
cause. Replace any blown f uses and
check if the device works.
Check each of the large f uses in
the under-hood f use box by
looking at the wire inside.
Removing these f uses requires a
Phillips-head screwdriver.
Turn the ignition switch to the
LOCK (0) position. Make sure the
headlights and all other
accessories are of f .
On the under-hood and passenger’s
side interior f use boxes, remove
the cover f rom each f use box.
3.
1.
2.
372 373 374
CONT INUED
Fuses
Checking and Replacing Fuses
T aking Care of t he Unexpect ed
369
FUSEBLOWNBLOWN
�����—�����—�
���y�
����
��������y���
�)�����������y���������y
2010 Accord Sedan
Page 376 of 414

�Î
�Î
�Î
�Î
�Î
�Î
�Î
�µ
�µ
�µ
�µ
�Î
No.No.
No.Circuits Protected
Amps.Amps.
Amps.
Circuits ProtectedCircuits Protected
1
2
3
4
5
6
7
8
9
10
11
12
13
14
15
16
17
18
19
20
21
22
23
24
25
26
27
28
29
30
31
If equipped
A/C
Accessory, Key, Lock
Accessory
Driver’s Power Seat Sliding
Moonroof
Driver’s Power Seat Reclining
Rear Left Power Window
Front Accessory Power Socket
Driver’s Power Window
Driver’s Side Door Lock
Lef t Front Fog Light
Lef t Side Small Lights
(Exterior)
Left Headlight High Beam
TPMS
Left Headlight Low Beam
Not Used
15 A
7.5 A
7.5 A
7.5 A
15 A
7.5 A
20 A
(10 A)
10 A
7.5 A
(10 A)
7.5 A
7.5 A
7.5 A
7.5 A
(20 A)
(20 A)
(20 A)
20 A
15 A
20 A
10 A
(10 A)
10 A
10 A
7.5 A
10 AFuel Pump
VB SOL
SRS
ODS (Occupant Detection
System)
Not Used
ACM
Daytime Running Lights
Not Used
Not Used
Washer
Wiper
Meter
ABS/VSA
ACG
STS
:
Fuse Locations
T aking Care of t he Unexpect ed
373
INTERIOR FUSE BOX (Driver’s Side)
�����—�����—�
���y�
����
������
�y���
�)�����������y���������y
2010 Accord Sedan