2010 GMC TERRAIN USB
[x] Cancel search: USBPage 143 of 410

Infotainment System 6-5
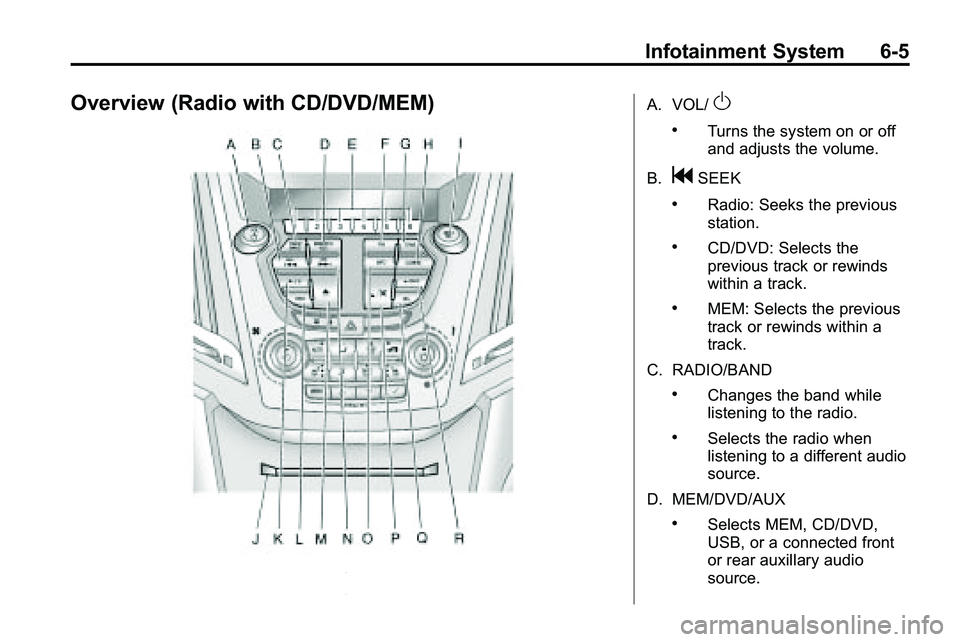
Overview (Radio with CD/DVD/MEM)A. VOL/O
.Turns the system on or off
and adjusts the volume.
B.
gSEEK
.Radio: Seeks the previous
station.
.CD/DVD: Selects the
previous track or rewinds
within a track.
.MEM: Selects the previous
track or rewinds within a
track.
C. RADIO/BAND
.Changes the band while
listening to the radio.
.Selects the radio when
listening to a different audio
source.
D. MEM/DVD/AUX
.Selects MEM, CD/DVD,
USB, or a connected front
or rear auxillary audio
source.
Page 144 of 410

6-6 Infotainment System
E. Buttons 1 to 6
.Radio: Saves and selects
favorite stations.
.MEM: Saves and selects
favorite tracks and playlists.
F. FAV
.Radio: Opens the
favorites list.
.MEM: Opens the
favorites list.
G. TONE
.Opens the tone menu.
H. CONFIG
.Opens the settings menu.
I. MENU/SEL
.Press: Opens menus and
selects menu items.
.Turn: Highlights menu items
or sets values while in a
menu. Manually selects
radio stations while
listening to the radio. J. CD/DVD Slot
.Insert a disc.
K.
k(Play/Pause)
.Radio: Pauses time
shifted content.
.CD/DVD: Pauses
CD/DVD‐A and DVD‐V
playback. Stops DVD‐V
playback.
.MEM: Pauses MEM
playback.
L.
OREC
.CD/DVD: Records content
from audio CDs and
MP3/WMA CDs.
.AUX: Records content from
USB mass storage devices.
M.
ZCD Eject
.Removes a disc from the
CD/DVD slot. N.
lSEEK
.Radio: Seeks the next
station.
.CD/DVD: Selects the next
track or fast forwards within
a track.
.MEM: Selects the next
track or fast forwards within
a track.
O. INFO
.Radio: Shows available
information about the
current station.
.CD/DVD: Shows available
information about the
current track.
.MEM: Shows available
information about the
current track.
Page 162 of 410

6-24 Infotainment System
Navigating the DVD‐V Disc Menu
Use the following actions to
navigate the title menu on a
DVD‐V Disc.
.Select / Enter
.Cursor UP
.Cursor DOWN
.Cursor RIGHT
.Cursor LEFT
.Up Menu
Use the following actions to
navigate the menu on a DVD‐V Disc
while playing chapters.
.Pause (Play)
.Chapter List
.Title List
.DVD/DVD
.DVD/AUX
.AUX/DVD
.AUX/AUX To navigate the menu:
1. Press the MENU/SEL knob.
2. Select the action.
Mass Storage
Media (MEM)
Infotainment systems with MEM
storage are able to record up to
1.1 GB (gigabyte) of music from
Audio CDs, MP3/WMA/AAC discs,
and USB storage devices. The MEM
player can also time shift audio from
AM, FM, and XM™
radio.
Music or content that is stored in
MEM that you did not create,
or have the right to distribute, must
be deleted before the sale or end of
the lease of the vehicle.
Control Buttons
The buttons used to control the
MEM player are:
MEM/DVD/AUX: Press to select
the MEM player.
lSEEK orgSEEK : Press to
select tracks or to fast forward or
rewind within a track.
INFO: Press to display additional
information about the MEM track
that may be available.
k: Press to pause the track
currently playing, press again to
resume playback.
OREC: Press to record music
from a CD, DVD-A, or USB drive.
FAV (Favorites): Press to display
MEM favorites.
1‐6: Press to select a track or a
stored playlist.
MENU/SEL: Turn to select tracks.
Recording From Audio CDs
The infotainment system can record
the current song playing or all songs
from an audio CD to MEM. A status
bar appears on the top of the
display when the recording process
starts and disappears when the
process has ended. Copy protected
CDs cannot be recorded to MEM.
Page 163 of 410

Infotainment System 6-25
Recording to MEM
Press
OREC, then select Record
Current Song or Record All Songs
on Disc. If the track has started
playing, the system will restart the
track and begin recording from the
beginning of the track. When the
song recording is completed, the
message Song Recorded to MEM
displays, and there may be a slight
pause.
Songs recorded to MEM are stored
as the current date, disc and track
number.
Re-recording a Previously
Recorded Disc
If the disc or track has already been
recorded to MEM, the message The
Song(s) is Already Recorded
displays. Stopping the Recording
Press theOREC button while
recording from an audio CD to
display the stop recording option.
Select Stop Recording Song
to MEM.
Renaming Recorded Discs
Discs that have been recorded to
MEM can be renamed.
1. Press the MENU/SEL knob.
2. Select Rename Recorded Discs.
3. Select the disc.
4. Select Album or Artist to rename either one.
5. Use the menu knob to enter the character sequence. See
Operation
on page 6‑7for
more information.
Recording From MP3/WMA
Discs or USB Storage Devices
USB Host Support
The USB connector uses the USB
standards, 1.1 and 2.0. USB Supported Devices
.USB Flash Drives
.Portable USB Hard Drives
Recording to MEM
Press
OREC, then select Record
Current Song or Record Current
Folder.
The information stored by MEM is
titled according to the ID3 tag
associated with it.
Re-recording a Previously
Recorded Disc
If the disc or track has already been
recorded to MEM, the message The
Song(s) is Already Recorded
displays.
Stopping the Recording
Press the
OREC button while
recording from an MP3/WMA CD or
USB storage device to display the
stop recording option. Select Stop
Recording Song to MEM.
Page 165 of 410

Infotainment System 6-27
Saving MEM Tracks as
Favorites
Favorites can be saved by pressing
and holding one of the 1 to 6
buttons. Favorites can be stored
according to the following list:
Playlist:Adds currently playing
track to the playlist selected.
Artist: Saves the artist associated
with the currently playing track in
the indicated favorites position.
Album: Saves the album
associated with the currently playing
track in the indicated favorites
position.
Genre: Saves the genre associated
with the currently playing track in
the indicated favorites position. Creating Playlists
To create a playlist using tracks
stored in MEM:
1. Select Playlist from the MEM
favorites.
2. Select the track to be stored in the playlist.
3. Press and hold one of the 1 to 6 buttons until the track
can be heard again to store the
track.
4. Repeat steps 1 though 3 to store additional tracks in the playlist.
Auxiliary Devices
(Radio with CD)
The auxiliary input allows portable
devices to be connected using the
3.5 mm (1/8 in) input jack or the
optional USB port.
Portable devices are controlled by
using the menu system described in
Operation on page 6‑7.
The auxiliary input is located in the
center console.
Page 166 of 410

6-28 Infotainment System
3.5 mm Auxiliary Input Jack
Playback of an audio device that is
connected to the 3.5 mm auxiliary
input jack can only be controlled
using the controls on the device.
Adjusting the Volume
Turn the VOL/
Oknob to adjust the
volume of the infotainment system
after the volume level has been set
on the portable audio device.
USB Port
For vehicles with a USB port, the
following devices may be connected
and controlled by the infotainment
system.
.iPod's
.PlaysForSure Devices (PFD)
.USB Drives
.Zune's
Not all iPod's, PFD's, USB Drives,
and Zune's are compatible with the
infotainment system.
Connecting and Controlling
an iPod™
Not all iPod's can be controlled by
the Infotainment System.
Connecting an iPod
Connect the iPod to the USB port.
Searching For a Track
Tracks can be searched for by:
.Playlists
.Artists
.Albums
.Song Titles
.Podcasts
.Genres
.Audiobooks
.Composers To search for tracks:
1. Press the MENU/SEL knob.
2. Select Search.
3. Select: Playlists, Artists, Albums,
Song Titles, Podcasts, Genres,
Audiobooks, or Composers.
4. Select the track.
Shuffle
Press the MENU/SEL knob and set
Shuffle Songs (Random) to On or
Off, then press the
0BACK button
to return the main screen.
On: Plays tracks in the current
folder in random order.
Off: Plays tracks in the current
folder in sequential order.
Page 167 of 410

Infotainment System 6-29
Repeat
Press the MENU/SEL knob and set
Repeat to On or Off, then press the
0BACK button to return the main
screen.
On: Repeats the current track.
Off: Playback starts from the
beginning of the current track after
the last track finishes.
Connecting and Controlling a
PlaysForSure Device (PFD)
or Zune™
Connecting a PFD or Zune
Connect the PFD or Zune to the
USB port.
Searching For a Track
Tracks can be searched for by:
.Playlists
.Artists
.Albums
.Song Titles
.Podcasts
.Genres
To search for tracks:
1. Press the MENU/SEL knob.
2. Select Search.
3. Select: Playlists, Artists, Albums, Song Titles, Podcasts,
or Genres.
4. Select the track.
Shuffle Functionality
Press the MENU/SEL knob and set
Shuffle Songs (Random) to On
or Off.
On: Plays current tracks in random
order.
Off: Plays current tracks in
sequential order.
Repeat Functionality
Press the MENU/SEL knob and set
Repeat to On or Off.
Repeat On: Repeats the current
track. Repeat Off:
Playback starts from
the beginning of the current track
after the last track finishes.
Connecting and Controlling a
USB Drive
The infotainment system can only
play back .mp3 and .wma files from
a USB drive.
Only the first 2,500 songs are
recognized on the device.
When a device is not supported, the
message “No supported data found.
You can safely disconnect the
device” appears.
Connecting a USB Drive
Connect the USB drive to the
USB port.
Searching For a Track
It is normal for the search feature to
take some time to display the
information after reading the disc
due to the amount of information
stored on the disc.
Page 168 of 410

6-30 Infotainment System
Files that do not have any meta
data stored in the ID3 tag display as
Unknown.
Tracks can be searched for by:
.Playlists*
.Artists
.Albums
.Song Titles
.Genres
.Folder View
*This only displays if a playlist is
found on the device.
To search for tracks:
1. Press the MENU/SEL knob.
2. Select Search.
3. Select: Playlists, Artists, Albums, Song Titles, Genres,
or Folder View.
4. Select the track. Shuffle Functionality
Press the MENU/SEL knob and set
Shuffle Songs (Random) to On
or Off.
On:
Plays current tracks in random
order.
Off: Plays current tracks in
sequential order.
Repeat Functionality
Press the MENU/SEL knob and set
Repeat to On or Off.
Repeat On: Repeats the current
track.
Repeat Off: Playback starts from
the beginning of the current track
after the last track finishes.
Auxiliary Devices (Radio
with CD/DVD/MEM)
The auxiliary input allows portable
devices to be connected using the
3.5 mm (1/8 in) input jack or the
optional USB port.
Portable devices are controlled by
using the menu system described in
Operation on page 6‑7.
The auxiliary input is located in the
center console.