2010 GMC SIERRA flat tire
[x] Cancel search: flat tirePage 549 of 630

For center caps, place the cap on the wheel and tap it
into place until it seats flush with the wheel. The cap
only goes on one way. Be sure to line up the tab on
the center cap with the indentation on the wheel.
For bolt-on hub caps, align the plastic nut caps with the
wheel nuts and then tighten by hand. Then use the
wheel wrench to tighten.
Secondary Latch System
This vehicle may have an underbody-mounted tire hoist
assembly equipped with a secondary latch system. It is
designed to stop the spare tire from suddenly falling off
your vehicle. For the secondary latch to work, the spare
must be installed with the valve stem pointing down.
SeeStoring a Flat or Spare Tire and Tools
on
page 6‑106.
{WARNING:
Before beginning this procedure read all the
instructions. Failure to read and follow the
instructions could damage the hoist assembly and
you and others could get hurt. Read and follow
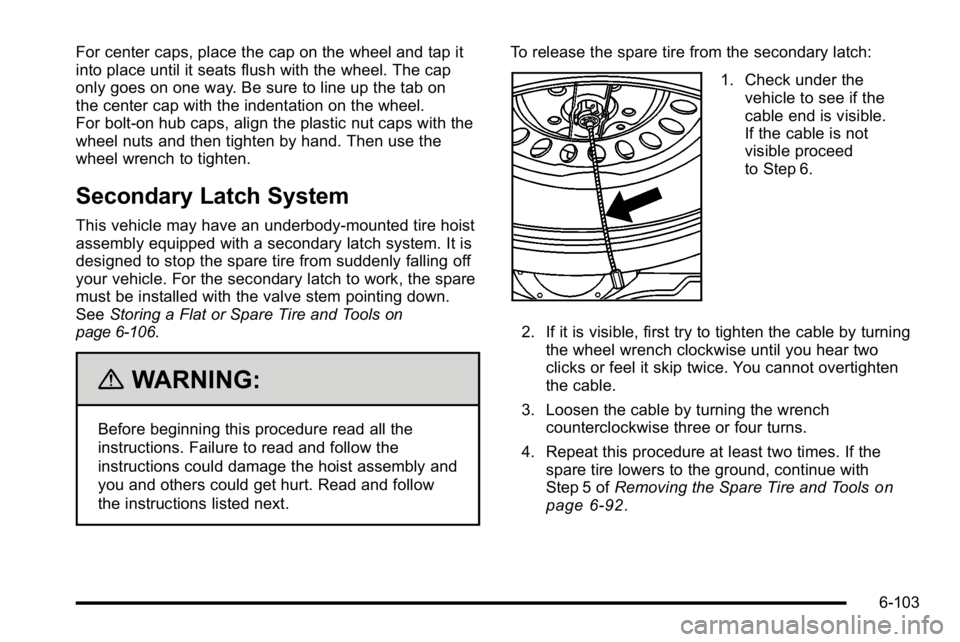
the instructions listed next. To release the spare tire from the secondary latch:
1. Check under the
vehicle to see if the
cable end is visible.
If the cable is not
visible proceed
to Step 6.
2. If it is visible, first try to tighten the cable by turning the wheel wrench clockwise until you hear two
clicks or feel it skip twice. You cannot overtighten
the cable.
3. Loosen the cable by turning the wrench counterclockwise three or four turns.
4. Repeat this procedure at least two times. If the spare tire lowers to the ground, continue with
Step 5 of Removing the Spare Tire and Tools
on
page 6‑92.
6-103
Page 551 of 630

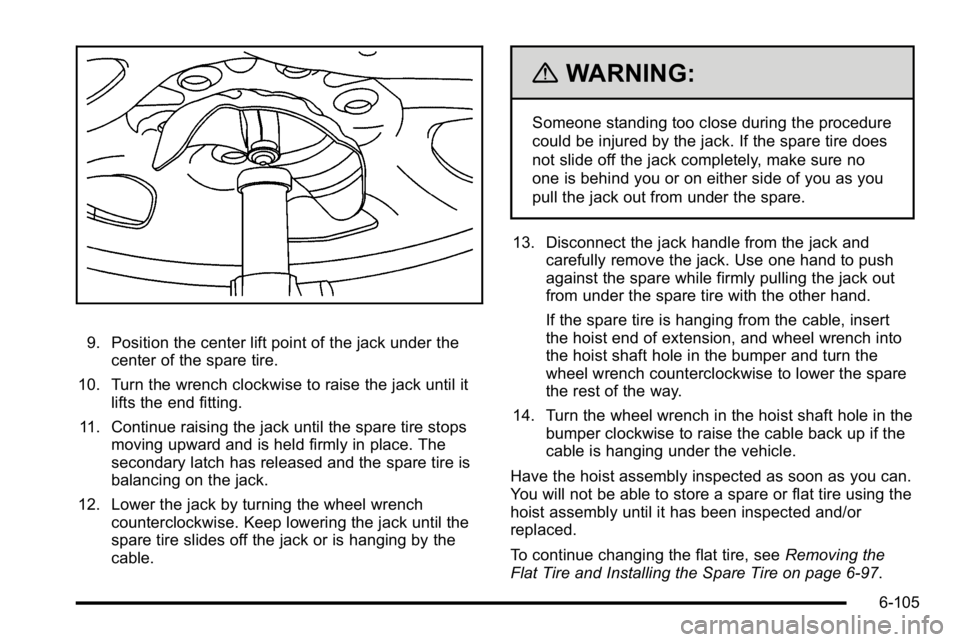
9. Position the center lift point of the jack under thecenter of the spare tire.
10. Turn the wrench clockwise to raise the jack until it lifts the end fitting.
11. Continue raising the jack until the spare tire stops moving upward and is held firmly in place. The
secondary latch has released and the spare tire is
balancing on the jack.
12. Lower the jack by turning the wheel wrench counterclockwise. Keep lowering the jack until the
spare tire slides off the jack or is hanging by the
cable.
{WARNING:
Someone standing too close during the procedure
could be injured by the jack. If the spare tire does
not slide off the jack completely, make sure no
one is behind you or on either side of you as you
pull the jack out from under the spare.
13. Disconnect the jack handle from the jack and carefully remove the jack. Use one hand to push
against the spare while firmly pulling the jack out
from under the spare tire with the other hand.
If the spare tire is hanging from the cable, insert
the hoist end of extension, and wheel wrench into
the hoist shaft hole in the bumper and turn the
wheel wrench counterclockwise to lower the spare
the rest of the way.
14. Turn the wheel wrench in the hoist shaft hole in the bumper clockwise to raise the cable back up if the
cable is hanging under the vehicle.
Have the hoist assembly inspected as soon as you can.
You will not be able to store a spare or flat tire using the
hoist assembly until it has been inspected and/or
replaced.
To continue changing the flat tire, see Removing the
Flat Tire and Installing the Spare Tire on page 6‑97.
6-105
Page 552 of 630

Storing a Flat or Spare Tire and
Tools
{WARNING:
Storing a jack, a tire, or other equipment in the
passenger compartment of the vehicle could
cause injury. In a sudden stop or collision, loose
equipment could strike someone. Store all these
in the proper place.
Notice: Storing an aluminum wheel with a flat tire
under your vehicle for an extended period of time or
with the valve stem pointing up can damage the
wheel. Always stow the wheel with the valve stem
pointing down and have the wheel/tire repaired as
soon as possible.
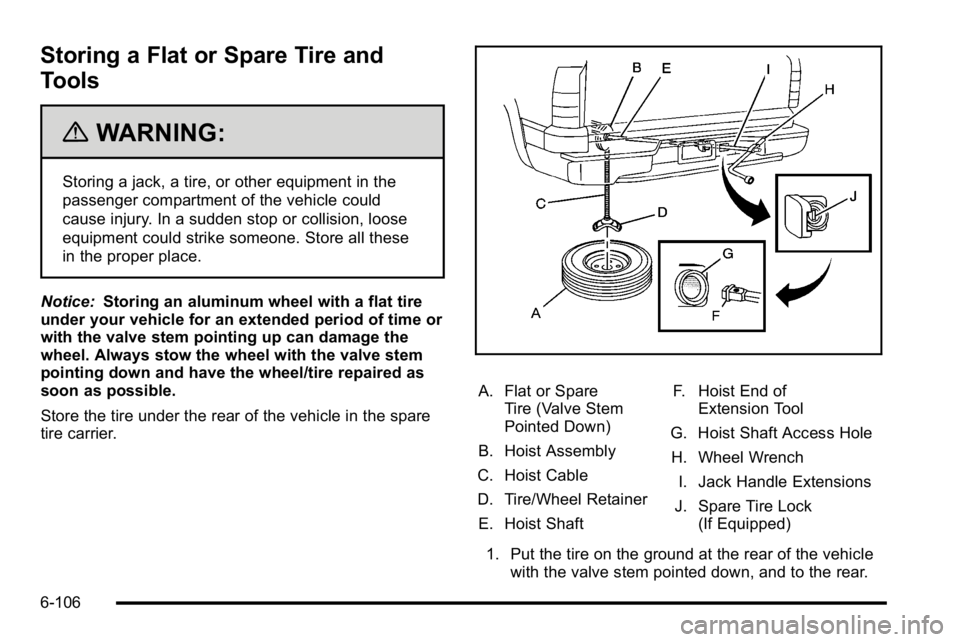
Store the tire under the rear of the vehicle in the spare
tire carrier.
A. Flat or Spare Tire (Valve Stem
Pointed Down)
B. Hoist Assembly
C. Hoist Cable
D. Tire/Wheel Retainer
E. Hoist Shaft F. Hoist End of
Extension Tool
G. Hoist Shaft Access Hole H. Wheel Wrench I. Jack Handle Extensions
J. Spare Tire Lock (If Equipped)
1. Put the tire on the ground at the rear of the vehicle with the valve stem pointed down, and to the rear.
6-106
Page 555 of 630

3. Assemble the wheel blocks (B) and jack (G)together with the wing nut (A) and retaining
bolt (H).
4. Position the jack (G) in the mounting bracket (F). Position the holes in the base of the jack (G) onto
the pin in the mounting bracket (F).
5. Return them to their original location in the vehicle. For more information, refer to Removing the Spare
Tire and Tools
on page 6‑92for more information.
Spare Tire
Your vehicle, when new, had a fully-inflated spare tire.
A spare tire may lose air over time, so check its inflation
pressure regularly. See Inflation - Tire Pressure
on
page 6‑72and Loading the Vehicleon page 5‑30for
information regarding proper tire inflation and loading
your vehicle. For instruction on how to remove, install or
store a spare tire, see Removing the Flat Tire and
Installing the Spare Tire
on page 6‑97and Storing a
Flat or Spare Tire and Tools on page 6‑106. Notice:
If the vehicle has four-wheel drive and the
different size spare tire is installed on the vehicle,
do not drive in four-wheel drive until you can have
your flat tire repaired and/or replaced. You could
damage the vehicle, and the repair costs would not
be covered by your warranty. Never use four-wheel
drive when the different size spare tire is installed
on the vehicle.
Your vehicle may have a different size spare tire than
the road tires originally installed on your vehicle. This
spare tire was developed for use on your vehicle, so it
is all right to drive on it. If your vehicle has four-wheel
drive and the different size spare tire is installed, keep
the vehicle in two-wheel drive.
After installing the spare tire on your vehicle, you should
stop as soon as possible and make sure the spare tire
is correctly inflated. Have the damaged or flat road tire
repaired or replaced as soon as you can and installed
back onto your vehicle. This way, the spare tire will be
available in case you need it again.
Do not mix tires and wheels of different sizes, because
they will not fit. Keep your spare tire and its wheel
together. If your vehicle has a spare tire that does not
match your vehicle's original road tires and wheels
in size and type, do not include the spare in the
tire rotation.
6-109
Page 578 of 630

When the Change Engine Oil Soon message
displays, certain services, checks, and inspections are
required. The services described for MaintenanceI
should be performed at every engine oil change.
The services described for Maintenance IIshould be
performed when:
.Maintenance Iwas performed the last time the
engine oil was changed.
.It has been 10 months or more since the Change
Engine Oil Soon message has displayed or since
the last service.
Maintenance I
.Change engine oil and filter. See Engine Oilon
page 6‑18. An Emission Control Service.
.Engine coolant level check. See Engine Coolanton page 6‑31.
.Windshield washer fluid level check. See
Windshield Washer Fluid on page 6‑38.
.Tire inflation check. SeeInflation - Tire Pressureon page 6‑72.
.Tire wear inspection. See Tire Inspection and
Rotation on page 6‑80.
.Rotate tires. See Tire Inspection and Rotationon
page 6‑80.
.Fluids visual leak check (or every 12 months,
whichever occurs first). A leak in any system
must be repaired and the fluid level checked.
.Engine air cleaner filter inspection (vehicles
driven in dusty conditions only). See Engine Air
Cleaner/Filter on page 6‑21.
.Brake system inspection (or every 12 months,
whichever occurs first).
.For vehicles with Allison Transmission®only:
At the first engine oil change only, replace external
transmission filter.
Maintenance II
.Perform all services described in Maintenance I.
.Steering and suspension inspection. Visual
inspection for damaged, loose, or missing parts or
signs of wear.
.Lubricate the front suspension, steering linkage,
and parking brake cable guides. Control arm
ball joints on 2500/3500 series vehicles require
lubrication but should not be lubricated unless their
temperature is−12°C (10°F) or higher, or they
could be damaged. Control arm ball joints on
1500 series vehicles are maintenance‐free.
Vehicles used under severe commercial operating
conditions require lubrication on a regular basis
every 5 000 km/3,000 miles.
7-4
Page 580 of 630

Once a Month
.Tire inflation check. SeeInflation - Tire Pressureon page 6‑72.
.Tire wear inspection. See Tire Inspection and
Rotation on page 6‑80.
Once a Year
.Starter switch check. See Owner Checks and
Services on page 7‑11.
.Parking brake and automatic transmission P (Park)
mechanism check. See Owner Checks and
Services on page 7‑11.
.Automatic transmission shiftlock control system
check. See Owner Checks and Serviceson
page 7‑11.
.Ignition transmission lock check. See Owner
Checks and Services on page 7‑11.
.Engine cooling system and pressure cap pressure
check. Radiator and air conditioning condenser
outside cleaning. See Cooling System
on
page 6‑30.
.Exhaust system and nearby heat shields
inspection for loose or damaged components.
.Accelerator pedal check for damage, high effort,
or binding. Replace if needed.
First Engine Oil Change After Every
40 000 km/25,000 Miles
.Fuel system inspection for damage or leaks.
.Four‐wheel drive only: Transfer case fluid change
(extreme duty service) for vehicles mainly driven
off‐road in four‐wheel drive. Vehicles used for
farming, mining, forestry, Department of Natural
Resources (DNR), and snow plowing occupations
meet this definition. Check vent hose at transfer
case for kinks and proper installation. Check to be
sure vent hose is unobstructed, clear, and free of
debris. During any maintenance, if a power washer
is used to clean mud and dirt from the underbody,
care should be taken to not directly spray the
transfer case output seals. High pressure water
can overcome the seals and contaminate the
transfer case fluid. Contaminated fluid will
decrease the life of the transfer case and should
be replaced.
7-6
Page 583 of 630

Scheduled Maintenance
ServiceMaintenanceIMaintenance II
Change engine oil and filter. Reset oil life system. ••
Engine coolant level check. ••
Windshield washer fluid level check. ••
Tire inflation pressures check. ••
Tire wear inspection. ••
Rotate tires. ••
Fluids visual leak check. ••
Engine air cleaner filter inspection (vehicles driven in dusty conditions only). ••
Brake system inspection. ••
Allison Transmission
®only: External transmission filter replacement (at the first
maintenance service performed on the vehicle only).
Steering and suspension inspection. •
7-9
Page 603 of 630

Services Provided
.Emergency Fuel Delivery:Delivery of enough
fuel for the vehicle to get to the nearest service
station.
.Lock‐Out Service: Service is provided to unlock
the vehicle if you are locked out. A remote unlock
may be available if you have OnStar
®. For security
reasons, the driver must present identification
before this service is given.
.Emergency Tow From a Public Road or
Highway: Tow to the nearest GMC dealer for
warranty service, or if the vehicle was in a crash
and cannot be driven. Assistance is also given
when the vehicle is stuck in the sand, mud,
or snow.
.Flat Tire Change: Service is provided to change
a flat tire with the spare tire. The spare tire,
if equipped, must be in good condition and
properly inflated. It is the owner's responsibility for
the repair or replacement of the tire if it is not
covered by the warranty.
.Battery Jump Start: Service is provided to jump
start a dead battery.
.Trip Routing Service: Detailed maps of North
America are provided when requested either with
the most direct route or the most scenic route.
Additional travel information is also available.
Allow three weeks for delivery.
.Trip Interruption Benefits and Assistance:
If your trip is interrupted due to a warranty failure,
incidental expenses may be reimbursed during the
5 years/100,000 miles (160 000 km) Powertrain
warranty period. Items considered are hotel,
meals, and rental car.
Services Not Included in Roadside
Assistance
.Impound towing caused by violation of any laws.
.Legal fines.
.Mounting, dismounting or changing of snow tires,
chains, or other traction devices.
.Towing or services for vehicles driven on a
non-public road or highway.
8-9