2010 GMC SIERRA tires
[x] Cancel search: tiresPage 399 of 630
The Tire and Loading Information label also
shows the size of the original equipment tires (C)
and the recommended cold tire inflation
pressures (D). For more information on tires and
inflation seeTires
on page 6‑64andInflation - Tire
Pressure
on page 6‑72.
There is also important loading information on the
vehicle Certification/Tire label. It tells you the
Gross Vehicle Weight Rating (GVWR) and the
Gross Axle Weight Rating (GAWR) for the front
and rear axles. See “Certification/Tire Label” later
in this section.
Steps for Determining Correct Load Limit
1.Locate the statement “The combined weight
of occupants and cargo should never exceed
XXX kg or XXX lbs” on your vehicle's placard.
2.Determine the combined weight of the
driver and passengers that will be riding in
your vehicle.
3.Subtract the combined weight of the driver
and passengers from XXX kg or XXX lbs.
4.The resulting figure equals the available
amount of cargo and luggage load capacity.
For example, if the“XXX”amount equals
1400 lbs and there will be five 150 lb
passengers in your vehicle, the amount of
available cargo and luggage load capacity
is 650 lbs (1400 −750 (5 x 150) = 650 lbs).
5.Determine the combined weight of luggage
and cargo being loaded on the vehicle. That
weight may not safely exceed the available
cargo and luggage load capacity calculated
in Step 4.
6.If your vehicle will be towing a trailer, the load
from your trailer will be transferred to your
vehicle. Consult this manual to determine
how this reduces the available cargo and
luggage load capacity of your vehicle.
SeeTowing a Trailer
on page 5‑50for
important information on towing a trailer,
towing safety rules and trailering tips.
5-31
Page 401 of 630
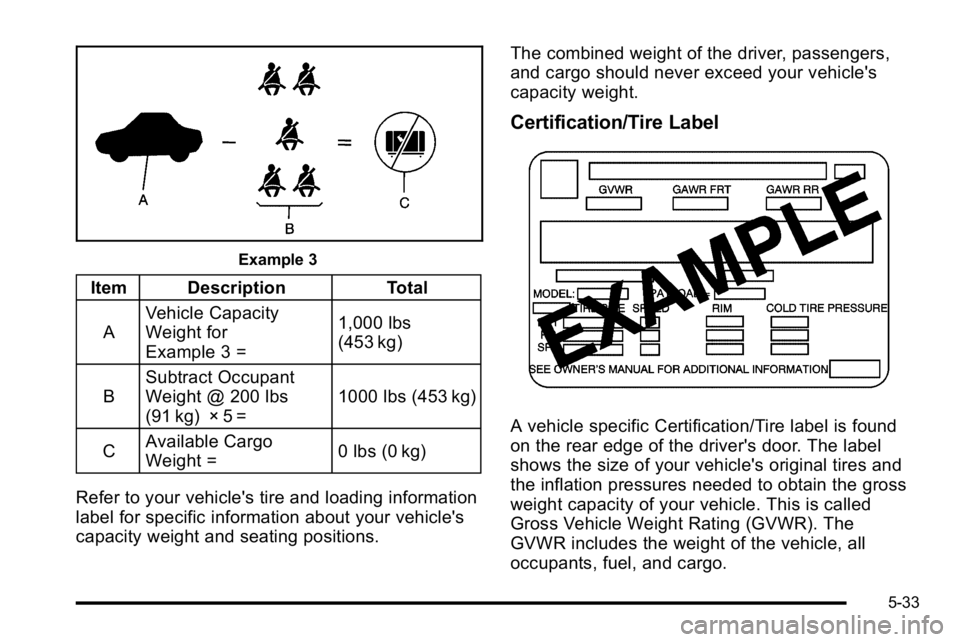
Example 3
Item DescriptionTotal
A Vehicle Capacity
Weight for
Example 3 = 1,000 lbs
(453 kg)
B Subtract Occupant
Weight @ 200 lbs
(91 kg) × 5 = 1000 lbs (453 kg)
C Available Cargo
Weight =
0 lbs (0 kg)
Refer to your vehicle's tire and loading information
label for specific information about your vehicle's
capacity weight and seating positions. The combined weight of the driver, passengers,
and cargo should never exceed your vehicle's
capacity weight.
Certification/Tire Label
A vehicle specific Certification/Tire label is found
on the rear edge of the driver's door. The label
shows the size of your vehicle's original tires and
the inflation pressures needed to obtain the gross
weight capacity of your vehicle. This is called
Gross Vehicle Weight Rating (GVWR). The
GVWR includes the weight of the vehicle, all
occupants, fuel, and cargo.
5-33
Page 419 of 630
Pulling A Trailer
Here are some important points:
.There are many different laws, including speed
limit restrictions, having to do with trailering.
Make sure the rig will be legal, not only where
you live but also where you will be driving.
A good source for this information can be
state or provincial police.
.Consider using a sway control. See“Hitches”later
in this section.
.Do not tow a trailer at all during the first 500 miles
(800 km) the new vehicle is driven. The engine,
axle or other parts could be damaged.
.During the first 500 miles (800 km) that a trailer
is towed, do not drive over 50 mph (80 km/h) and
do not make starts at full throttle. This helps the
engine and other parts of the vehicle wear in
at the heavier loads.
.Vehicles can tow in D (Drive). Shift the
transmission to a lower gear if the transmission
shifts too often under heavy loads and/or hilly
conditions. Important considerations that have to do with weight:
.The weight of the trailer
.The weight of the trailer tongue
.The weight on the vehicle's tires
.And the weight of the trailering combination
Weight of the Trailer
How heavy can a trailer safely be?
It depends on how the rig is used. Speed, altitude, road
grades, outside temperature and how much the vehicle
is used to pull a trailer are all important. It can depend
on any special equipment on the vehicle, and the
amount of tongue weight the vehicle can carry. See
“Weight of the Trailer Tongue”
later in this section for
more information.
Trailer weight rating (TWR) is calculated assuming the
tow vehicle has only the driver but all required trailering
equipment. Weight of additional optional equipment,
passengers and cargo in the tow vehicle must be
subtracted from the trailer weight rating.
Use the following chart to determine how much the
vehicle can weigh, based upon the vehicle model
and options.
Weights listed apply for conventional trailers and
fifth-wheel trailers unless otherwise noted.
5-51
Page 429 of 630
Trailering may be limited by the vehicle's ability to carry
tongue weight. Tongue or kingpin weight cannot cause
the vehicle to exceed the GVWR (Gross Vehicle Weight
Rating) or the RGAWR (Rear Gross Axle Weight
Rating). See“Total Weight on the Vehicle's Tires” later
in this section for more information.
After loading the trailer, weigh the trailer and then the
tongue, separately, to see if the weights are proper.
If they are not, adjustments might be made by moving
some items around in the trailer.
Total Weight on the Vehicle's Tires
Be sure the vehicle's tires are inflated to the inflation
pressures found on the Certification label on the drivers
door or see Loading the Vehicle
on page 5‑30for more
information. Make sure not to exceed the GVWR limit
for the vehicle, or the RGAWR, with the tow vehicle and
trailer fully loaded for the trip including the weight of the
trailer tongue. If using a weight distributing hitch, make
sure not to exceed the RGAWR before applying the
weight distribution spring bars.
Weight of the Trailering Combination
It is important that the combination of the tow
vehicle and trailer does not exceed any of its weight
ratings —GCWR, GVWR, RGAWR, Trailer Weight
Rating or Tongue Weight. The only way to be sure it is
not exceeding any of these ratings is to weigh the tow
vehicle and trailer combination, fully loaded for the trip,
getting individual weights for each of these items.
Hitches
The correct hitch equipment helps maintain combination
control. Most small-to-medium trailers can be towed
with a weight carrying hitch which simply features a
coupler latched to the hitch ball. Larger trailers may
require a weight distributing hitch that uses spring bars
to distribute the trailer tongue weight among the two
vehicle and trailer axles. Fifth wheel and gooseneck
hitches may also be used. See “Weight of the Trailer
Tongue” earlier in this section for rating limits with
various hitch types.
If a step-bumper hitch will be used, the bumper could
be damaged in sharp turns. Make sure there is ample
room when turning to avoid contact between the trailer
and the bumper.
Consider using sway controls with any trailer. Ask a
trailering professional about sway controls or refer to
the trailer manufacturer's recommendations and
instructions.
5-61
Page 439 of 630
WARNING: (Continued)
To maximize safety when towing a trailer:
.Have the exhaust system inspected for leaks
and make necessary repairs before starting
a trip.
.Never drive with the liftgate, trunk/hatch,
or rear-most window open.
.Fully open the air outlets on or under the
instrument panel.
.Adjust the Climate Control system to a setting
that brings in only outside air and set the fan
speed to the highest setting. See Climate
Control System in the Index.
For more information about carbon monoxide, see
Engine Exhaust on page 3‑54.
Towing a trailer requires a certain amount of
experience. The combination you are driving is longer
and not as responsive as the vehicle itself. Get
acquainted with the handling and braking of the rig
before setting out for the open road. Before starting, check all trailer hitch parts and
attachments, safety chains, electrical connectors,
lamps, tires and mirrors. If the trailer has electric
brakes, start the combination moving and then apply the
trailer brake controller by hand to be sure the
brakes work.
During the trip, check occasionally to be sure that the
load is secure and the lamps and any trailer brakes
still work.
Following Distance
Stay at least twice as far behind the vehicle ahead as
you would when driving the vehicle without a trailer.
This can help to avoid heavy braking and sudden turns.
Passing
More passing distance is needed when towing a trailer.
The combination will not accelerate as quickly and is
longer so it is necessary to go much farther beyond the
passed vehicle before returning to the lane.
Backing Up
Hold the bottom of the steering wheel with one hand.
To move the trailer to the left, move that hand to the left.
To move the trailer to the right, move your hand to the
right. Always back up slowly and, if possible, have
someone guide you.
5-71
Page 448 of 630

Section 6 Service and Appearance Care
Rear Axle. . . . . . . . . . . . . . . . . . . . . . . . . . . . . . . . . . . . . . . . . 6-48
Four-Wheel Drive . . . . . . . . . . . . . . . . . . . . . . . . . . . . . . . . . 6-50
Front Axle . . . . . . . . . . . . . . . . . . . . . . . . . . . . . . . . . . . . . . . . . 6-52
Noise Control System . . . . . . . . . . . . . . . . . . . . . . . . . . . . 6-53
Tampering with Noise Control
System Prohibited . . . . . . . . . . . . . . . . . . . . . . . . . . 6-53
Headlamp Aiming . . . . . . . . . . . . . . . . . . . . . . . . . . . . . . . . 6-54
Bulb Replacement . . . . . . . . . . . . . . . . . . . . . . . . . . . . . . . . 6-57
Halogen Bulbs . . . . . . . . . . . . . . . . . . . . . . . . . . . . . . . . . 6-57
Headlamps . . . . . . . . . . . . . . . . . . . . . . . . . . . . . . . . . . . . 6-57
Center High-Mounted Stoplamp (CHMSL) and Cargo Lamp . . . . . . . . . . . . . . . . . . . . . . . . . . . . . 6-58
Pickup Box Identification and Fender Marker Lamps . . . . . . . . . . . . . . . . . . 6-59
Taillamps, Turn Signal, Stoplamps and Back-up Lamps . . . . . . . . . . . . . . . . . . . . . . . . 6-60
License Plate Lamp . . . . . . . . . . . . . . . . . . . . . . . . . . . . 6-62
Replacement Bulbs . . . . . . . . . . . . . . . . . . . . . . . . . . . . 6-62
Windshield Wiper Blade Replacement . . . . . . . . . . .6-63Tires
. . . . . . . . . . . . . . . . . . . . . . . . . . . . . . . . . . . . . . . . . . . . . . . 6-64
Tire Sidewall Labeling . . . . . . . . . . . . . . . . . . . . . . . . . 6-65
Tire Terminology and Definitions . . . . . . . . . . . . . . . 6-70
Inflation - Tire Pressure . . . . . . . . . . . . . . . . . . . . . . . . 6-72
High-Speed Operation . . . . . . . . . . . . . . . . . . . . . . . . . 6-74
Dual Tire Operation . . . . . . . . . . . . . . . . . . . . . . . . . . . . 6-74
Tire Pressure Monitor System . . . . . . . . . . . . . . . . . 6-75
Tire Pressure Monitor Operation . . . . . . . . . . . . . . . 6-76
Tire Inspection and Rotation . . . . . . . . . . . . . . . . . . . 6-80
When It Is Time for New Tires . . . . . . . . . . . . . . . . . 6-82
Buying New Tires . . . . . . . . . . . . . . . . . . . . . . . . . . . . . . 6-83
Different Size Tires and Wheels . . . . . . . . . . . . . . . 6-85
Uniform Tire Quality Grading . . . . . . . . . . . . . . . . . . . 6-85
Wheel Alignment and Tire Balance . . . . . . . . . . . . 6-87
Wheel Replacement . . . . . . . . . . . . . . . . . . . . . . . . . . . 6-87
Tire Chains . . . . . . . . . . . . . . . . . . . . . . . . . . . . . . . . . . . . 6-89
If a Tire Goes Flat . . . . . . . . . . . . . . . . . . . . . . . . . . . . . 6-89
Changing a Flat Tire . . . . . . . . . . . . . . . . . . . . . . . . . . . 6-90
Removing the Spare Tire and Tools . . . . . . . . . . . . 6-92
Removing the Flat Tire and Installing the Spare Tire . . . . . . . . . . . . . . . . . . . . . . . . . . . . . . . . . . . 6-97
Secondary Latch System . . . . . . . . . . . . . . . . . . . . . 6-103
Storing a Flat or Spare Tire and Tools . . . . . . . . 6-106
Spare Tire . . . . . . . . . . . . . . . . . . . . . . . . . . . . . . . . . . . . 6-109
6-2
Page 449 of 630
Section 6 Service and Appearance Care
Appearance Care. . . . . . . . . . . . . . . . . . . . . . . . . . . . . . . . 6-110
Interior Cleaning . . . . . . . . . . . . . . . . . . . . . . . . . . . . . 6-110
Fabric/Carpet . . . . . . . . . . . . . . . . . . . . . . . . . . . . . . . . . 6-111
Leather . . . . . . . . . . . . . . . . . . . . . . . . . . . . . . . . . . . . . . . 6-112
Instrument Panel, Vinyl, and Other Plastic Surfaces . . . . . . . . . . . . . . . . 6-112
Care of Safety Belts . . . . . . . . . . . . . . . . . . . . . . . . . . 6-112
Weatherstrips . . . . . . . . . . . . . . . . . . . . . . . . . . . . . . . . . 6-113
Washing Your Vehicle . . . . . . . . . . . . . . . . . . . . . . . . 6-113
Cleaning Exterior Lamps/Lenses . . . . . . . . . . . . . 6-113
Finish Care . . . . . . . . . . . . . . . . . . . . . . . . . . . . . . . . . . . 6-114
Windshield and Wiper Blades . . . . . . . . . . . . . . . . . 6-114
Aluminum or Chrome-Plated Wheels and Trim . . . . . . . . . . . . . . . . . . . . . . . . . . . . . . . . . . . . 6-115
Tires . . . . . . . . . . . . . . . . . . . . . . . . . . . . . . . . . . . . . . . . . . 6-116
Sheet Metal Damage . . . . . . . . . . . . . . . . . . . . . . . . . 6-116
Finish Damage . . . . . . . . . . . . . . . . . . . . . . . . . . . . . . . 6-116
Underbody Maintenance . . . . . . . . . . . . . . . . . . . . . . 6-116
Chemical Paint Spotting . . . . . . . . . . . . . . . . . . . . . . 6-116 Vehicle Identification
. . . . . . . . . . . . . . . . . . . . . . . . . . . . 6-117
Vehicle Identification Number (VIN) . . . . . . . . . . . 6-117
Service Parts Identification Label . . . . . . . . . . . . . 6-117
Electrical System . . . . . . . . . . . . . . . . . . . . . . . . . . . . . . . . 6-117
Add-On Electrical Equipment . . . . . . . . . . . . . . . . . 6-117
Windshield Wiper Fuses . . . . . . . . . . . . . . . . . . . . . . 6-118
Power Windows and Other Power Options . . . 6-118
Fuses and Circuit Breakers . . . . . . . . . . . . . . . . . . . 6-118
Instrument Panel Fuse Block . . . . . . . . . . . . . . . . . 6-119
Center Instrument Panel Fuse Block . . . . . . . . . 6-121
Underhood Fuse Block . . . . . . . . . . . . . . . . . . . . . . . 6-122
Capacities and Specifications . . . . . . . . . . . . . . . . . .6-126
6-3
Page 488 of 630
Properly torqued wheel nuts are necessary to help
prevent brake pulsation. When tires are rotated, inspect
brake pads for wear and evenly tighten wheel nuts in
the proper sequence to torque specifications in
Capacities and Specifications on page 6‑126.
If the vehicle has rear drum brakes, they do not have
wear indicators, but if a rear brake rubbing noise is
heard, have the rear brake linings inspected
immediately. Rear brake drums should be removed and
inspected each time the tires are removed for rotation or
changing. Drum brakes have an inspection hole to
inspect lining wear during scheduled maintenance.
When the front brake pads are replaced, have the rear
brakes inspected, too.
Brake linings should always be replaced as complete
axle sets.
Brake Pedal Travel
See your dealer/retailer if the brake pedal does not
return to normal height, or if there is a rapid increase in
pedal travel. This could be a sign that brake service
might be required.
Brake Adjustment
Every brake stop, the brakes adjust for wear.
Replacing Brake System Parts
The braking system on a vehicle is complex. Its many
parts have to be of top quality and work well together if
the vehicle is to have really good braking. The vehicle
was designed and tested with top-quality brake parts.
When parts of the braking system are replaced—for
example, when the brake linings wear down and new
ones are installed —be sure to get new approved
replacement parts. If this is not done, the brakes might
not work properly. For example, if someone puts in
brake linings that are wrong for the vehicle, the balance
between the front and rear brakes can change —for the
worse. The braking performance expected can change
in many other ways if the wrong replacement brake
parts are installed.
6-42