2010 GMC SIERRA light
[x] Cancel search: lightPage 24 of 630

Reading Lamps
For vehicles with reading lamps in the overhead
console, press the button located next to the lamp to
turn it on or off.
The vehicle may also have reading lamps in other
locations. The lamps cannot be adjusted.
For more information about interior lamps, see:
.Dome Lamps on page 4‑14.
.Reading Lamps on page 4‑15.
.Instrument Panel Brightness on page 4‑14.
Exterior Lighting
The exterior lamps control
is located on the
instrument panel to the
left of the steering wheel.
O:Turns off the automatic headlamps and Daytime
Running Lamps (DRL). Turn the headlamp control to
the off position again to turn the automatic headlamps
or DRL back on. For vehicles first sold in Canada, the off position will
only work when the vehicle is shifted into P (Park).
AUTO :
Automatically turns on the headlamps, parking
lamps, taillamps, instrument panel lights, and license
plate lamps.
; :Turns on the parking lamps, taillamps, instrument
panel lights, and license plate lamps.
2 :Turns on the headlamps, parking lamps, taillamps,
instrument panel lights, and license plate lamps.
For more information, see:
.Exterior Lamps on page 4‑10.
.Daytime Running Lamps (DRL) on page 4‑12.
.Fog Lamps on page 4‑13.
1-18
Page 34 of 630

Vehicle Customization
Some vehicle features can be programmed by
using the DIC buttons next to the steering wheel.
These features include:
.Language
.Door Lock and Unlock Settings
.RKE Lock and Unlock Feedback
.Lighting
.Chime Volume
.Memory Features
.Remote Start
.Digital Speedometer Display
See DIC Vehicle Customization (With DIC Buttons)
on
page 4‑75.
Cruise Control
The cruise control buttons
are located on left side of
the steering wheel.
T: Turns the system on or off. The indicator light is
on when cruise control is on and turns off when cruise
control is off.
+ RES : Press to make the vehicle accelerate or
resume to a previously set speed.
SET −:Press to set the speed or make the vehicle
decelerate.
[: Press to cancel cruise control without erasing the
set speed from memory.
See Cruise Control on page 4‑7.
1-28
Page 35 of 630

Rear Vision Camera (RVC)
The rear vision camera displays a view of the area
behind the vehicle when the vehicle is shifted into
R (Reverse) on the inside rear view mirror or the
navigation screen, if equipped.
To clean the camera lens, located in the bezel for the
tailgate handle, rinse it with water and wipe it with a
soft cloth.
For more information, seeRear Vision Camera (RVC)
on page 3‑63.
Ultrasonic Parking Assist
This feature uses sensors on the rear bumper to detect
objects while parking the vehicle. URPA comes on
automatically when the shift lever is moved into
R (Reverse) and operates at speeds less than 8 km/h
(5 mph). URPA uses audio beeps to provide distance
and system information.
Keep the sensors on the vehicle's rear bumper clean to
ensure proper operation.
The system can be disabled by pressing the rear park
aid disable button located next to the radio.
SeeUltrasonic Rear Parking Assist (URPA)
on
page 3‑60for more information.
Power Outlets
Accessory power outlets can be used to connect
auxiliary electrical equipment, such as a cellular
telephone.
The vehicle may have two accessory power outlets
located below the climate control system, or may have
one accessory power outlet and one cigarette lighter.
The cigarette lighter is designed to fit only in the
receptacle closest to the driver.
There may be another accessory power outlet in the
rear cargo area. If the vehicle has a floor console, there
is an accessory power outlet inside the storage bin and
one on the rear of the floor console.
The accessory power outlets are powered, even when
the ignition is in LOCK/OFF. Continuing to use power
outlets while the ignition is in LOCK/OFF may cause the
vehicle's battery to run down.
See Accessory Power Outlet(s) on page 4‑17.
1-29
Page 38 of 630

Tire Pressure Monitor
This vehicle may have a Tire Pressure Monitor
System (TPMS).
The Tire Pressure Monitor
alerts you when a
significant reduction in
pressure occurs in one or
more of the vehicle’s tires
by illuminating the low tire
pressure warning light on
the instrument cluster.
The warning light will remain on until the tire pressure is
corrected. The proper tire pressures for your vehicle are
listed on the Tire and Loading Information label located
on the driver side center pillar (B pillar). See Loading
the Vehicle
on page 5‑30.
You may notice during cooler conditions that the low tire
pressure warning light will appear when the vehicle is
first started and then turn off as you drive. This may be
an early indicator that your tire pressures are getting
low and the tires need to be inflated to the proper
pressure. Note:
The Tire Pressure Monitor can alert you about
low tire pressure, but it does not replace normal monthly
tire maintenance. It is the driver ’s responsibility to
maintain correct tire pressures.
See Tire Pressure Monitor System
on page 6‑75and
Tire Pressure Monitor Operation on page 6‑76.
Engine Oil Life System
The engine oil life system calculates engine oil life
based on vehicle use and, on most vehicles, displays a
DIC message when it is necessary to change the
engine oil and filter. The oil life system should be reset
to 100% only following an oil change.
Resetting the Oil Life System
To reset the Engine Oil Life System on most vehicles:
1. Display the OIL LIFE REMAINING on the DIC. If the vehicle does not have DIC buttons, the
vehicle must be in P (Park) to access this display.
2. Press and hold the SET/RESET button on the DIC, or the trip odometer reset stem if the vehicle does
not have DIC buttons, for more than five seconds.
The oil life will change to 100%.
1-32
Page 42 of 630

OnStar Steering Wheel Controls
This vehicle may have a Talk/Mute button that can
be used to interact with OnStar hands-free calling.
SeeAudio Steering Wheel Controls
on page 4‑145for
more information.
On some vehicles, the mute button can be used to
dial numbers into voice mail systems, or to dial phone
extensions. See the OnStar Owner's Guide for more
information.
Your Responsibility
Increase the volume of the radio if the OnStar advisor
cannot be heard.
If the light next to the OnStar buttons is red, the system
may not be functioning properly. Press
Qand request a
vehicle diagnostic. If the light appears clear (no light is
appearing), your OnStar subscription has expired and
all services have been deactivated. Press
Qto confirm
that the OnStar equipment is active.
1-36
Page 50 of 630

Heated Seats
On vehicles with heated front seats, the controls are
located on the driver and passenger doors.
I(Heated Seatback) : Press to turn on the heated
seatback.
J (Heated Seat and Seatback) : Press to turn on the
heated seat and seatback.
The light on the button will come on to indicate that the
feature is working. Press the button to cycle through the
temperature settings of high, medium, and low and to
turn the heat to the seat off. Indicator lights will show
the level of heat selected: three for high, two for
medium, and one for low.
The heated seats will be canceled 10 seconds after the
ignition is turned off. To use the heated seat feature
after restarting the vehicle, press the heated seat or
seatback button again.
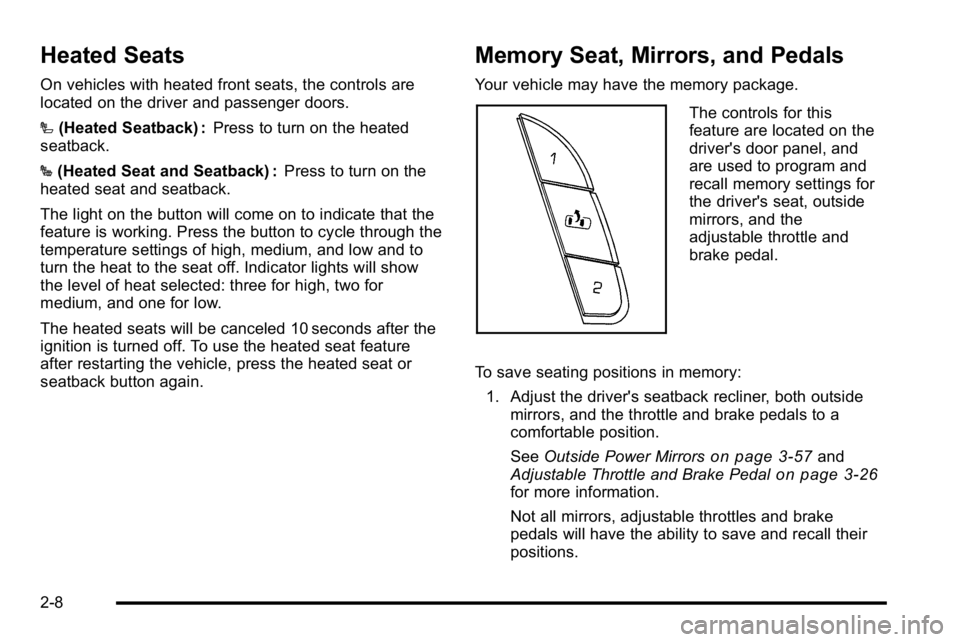
Memory Seat, Mirrors, and Pedals
Your vehicle may have the memory package.
The controls for this
feature are located on the
driver's door panel, and
are used to program and
recall memory settings for
the driver's seat, outside
mirrors, and the
adjustable throttle and
brake pedal.
To save seating positions in memory: 1. Adjust the driver's seatback recliner, both outside mirrors, and the throttle and brake pedals to a
comfortable position.
See Outside Power Mirrors
on page 3‑57and
Adjustable Throttle and Brake Pedalon page 3‑26for more information.
Not all mirrors, adjustable throttles and brake
pedals will have the ability to save and recall their
positions.
2-8
Page 72 of 630

Lap-Shoulder Belt
If the vehicle is a regular cab, then all seating positions
in the vehicle have a lap-shoulder belt. If the vehicle is
a crew or extended cab, then all seating positions in the
vehicle have a lap-shoulder belt except for the center
front passenger position (if equipped), which has a lap
belt. SeeLap Belt (Crew and Extended Cab)
on
page 2‑37for more information.
The following instructions explain how to wear a
lap-shoulder belt properly. 1. Adjust the seat, if the seat is adjustable, so you can sit up straight. To see how, see “Seats”in the
Index.
2. Pick up the latch plate and pull the belt across you. Do not let it get twisted. The lap-shoulder belt may lock if you pull the belt
across you very quickly. If this happens, let the belt
go back slightly to unlock it. Then pull the belt
across you more slowly.
If the shoulder portion of a passenger belt is pulled
out all the way, the child restraint locking feature
may be engaged. If this happens, let the belt go
back all the way and start again.
Engaging the child restraint locking feature may
affect the passenger sensing system, if equipped.
See
Passenger Sensing System
on page 2‑85for
more information.
2-30
Page 105 of 630

WARNING: (Continued)
Secure rear-facing child restraints in a rear seat,
even if the airbag is off. If you secure a
forward-facing child restraint in the right front seat,
always move the front passenger seat as far back
as it will go. It is better to secure the child restraint
in a rear seat.
SeePassenger Sensing System
on page 2‑85
for additional information.
If the vehicle does not have a rear seat that will
accommodate a rear-facing child restraint, a rear-facing
child restraint should not be installed in the vehicle,
even if the airbag is off.
If your child restraint has the LATCH system, see Lower
Anchors and Tethers for Children (LATCH)
on
page 2‑50for how and where to install your child
restraint using LATCH. If you secure a child restraint
using a safety belt and it uses a top tether, see Lower
Anchors and Tethers for Children (LATCH)
on
page 2‑50for top tether anchor locations. Do not secure a child seat in a position without a top
tether anchor if a national or local law requires that the
top tether be anchored, or if the instructions that come
with the child restraint say that the top strap must be
anchored.
In Canada, the law requires that forward-facing child
restraints have a top tether, and that the tether be
attached.
You will be using the lap-shoulder belt to secure the
child restraint in this position. Follow the instructions
that came with the child restraint.
1. Move the seat as far back as it will go before securing the forward-facing child restraint.
When the passenger sensing system, if equipped,
has turned off the right front passenger frontal
airbag, the off indicator in the passenger airbag
status indicator should light and stay lit when you
start the vehicle. See Passenger Airbag Status
Indicator on page 4‑36.
2. Put the child restraint on the seat.
3. Pick up the latch plate, and run the lap and shoulder portions of the vehicle's safety belt
through or around the restraint. The child restraint
instructions will show you how.
2-63