2010 GMC SIERRA automatic transmission
[x] Cancel search: automatic transmissionPage 170 of 630
Tow/Haul Mode
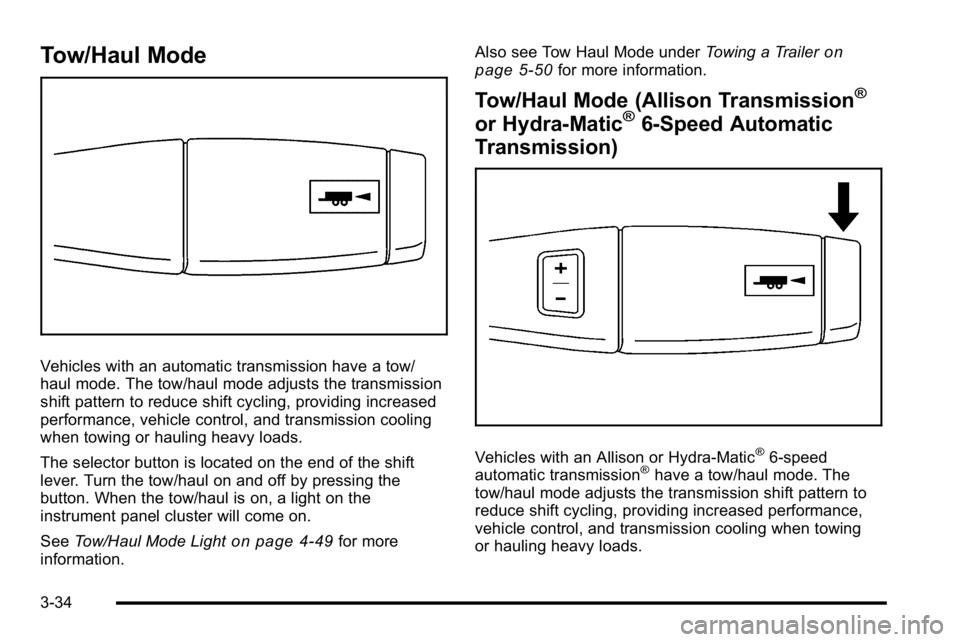
Vehicles with an automatic transmission have a tow/
haul mode. The tow/haul mode adjusts the transmission
shift pattern to reduce shift cycling, providing increased
performance, vehicle control, and transmission cooling
when towing or hauling heavy loads.
The selector button is located on the end of the shift
lever. Turn the tow/haul on and off by pressing the
button. When the tow/haul is on, a light on the
instrument panel cluster will come on.
SeeTow/Haul Mode Light
on page 4‑49for more
information. Also see Tow Haul Mode under
Towing a Trailer
on
page 5‑50for more information.
Tow/Haul Mode (Allison Transmission®
or Hydra-Matic®6-Speed Automatic
Transmission)
Vehicles with an Allison or Hydra-Matic®6-speed
automatic transmission®have a tow/haul mode. The
tow/haul mode adjusts the transmission shift pattern to
reduce shift cycling, providing increased performance,
vehicle control, and transmission cooling when towing
or hauling heavy loads.
3-34
Page 171 of 630
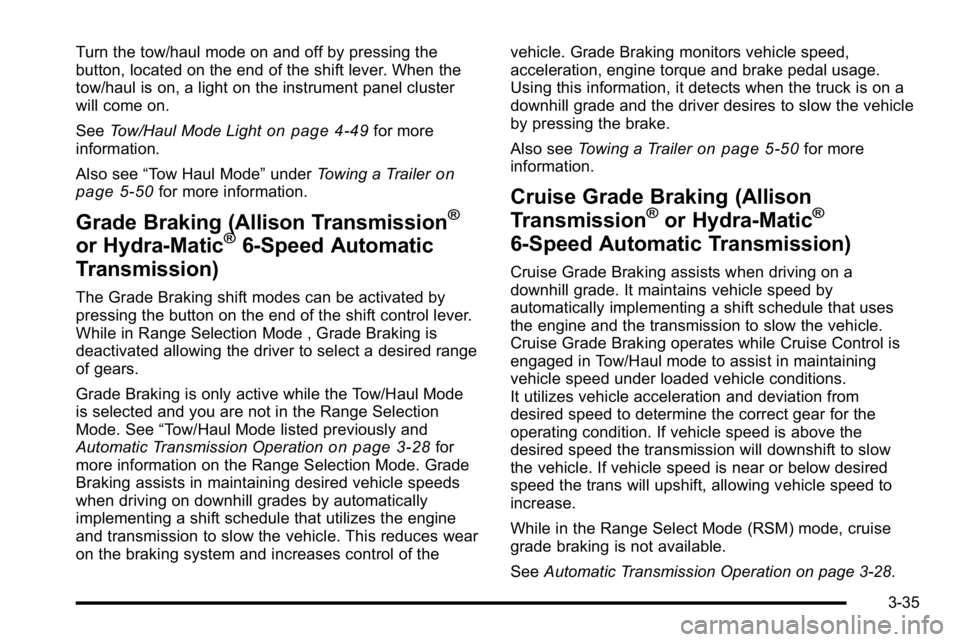
Turn the tow/haul mode on and off by pressing the
button, located on the end of the shift lever. When the
tow/haul is on, a light on the instrument panel cluster
will come on.
SeeTow/Haul Mode Light
on page 4‑49for more
information.
Also see “Tow Haul Mode” underTowing a Trailer
on
page 5‑50for more information.
Grade Braking (Allison Transmission®
or Hydra-Matic®6-Speed Automatic
Transmission)
The Grade Braking shift modes can be activated by
pressing the button on the end of the shift control lever.
While in Range Selection Mode , Grade Braking is
deactivated allowing the driver to select a desired range
of gears.
Grade Braking is only active while the Tow/Haul Mode
is selected and you are not in the Range Selection
Mode. See “Tow/Haul Mode listed previously and
Automatic Transmission Operation
on page 3‑28for
more information on the Range Selection Mode. Grade
Braking assists in maintaining desired vehicle speeds
when driving on downhill grades by automatically
implementing a shift schedule that utilizes the engine
and transmission to slow the vehicle. This reduces wear
on the braking system and increases control of the vehicle. Grade Braking monitors vehicle speed,
acceleration, engine torque and brake pedal usage.
Using this information, it detects when the truck is on a
downhill grade and the driver desires to slow the vehicle
by pressing the brake.
Also see
Towing a Trailer
on page 5‑50for more
information.
Cruise Grade Braking (Allison
Transmission®or Hydra-Matic®
6-Speed Automatic Transmission)
Cruise Grade Braking assists when driving on a
downhill grade. It maintains vehicle speed by
automatically implementing a shift schedule that uses
the engine and the transmission to slow the vehicle.
Cruise Grade Braking operates while Cruise Control is
engaged in Tow/Haul mode to assist in maintaining
vehicle speed under loaded vehicle conditions.
It utilizes vehicle acceleration and deviation from
desired speed to determine the correct gear for the
operating condition. If vehicle speed is above the
desired speed the transmission will downshift to slow
the vehicle. If vehicle speed is near or below desired
speed the trans will upshift, allowing vehicle speed to
increase.
While in the Range Select Mode (RSM) mode, cruise
grade braking is not available.
See Automatic Transmission Operation on page 3‑28.
3-35
Page 183 of 630

If the vehicle has StabiliTrak®, shifting into
Four-Wheel-Drive Low will turn Traction Control and
StabiliTrak
®off. See StabiliTrak®System on page 5‑6.
{WARNING:
Shifting the transfer case to N (Neutral) can cause
the vehicle to roll even if the transmission is in
P (Park). You or someone else could be seriously
injured. Be sure to set the parking brake before
placing the transfer case in N (Neutral). See
Parking Brake on page 3‑50.
N (Neutral) : Shift the vehicle's transfer case to
N (Neutral) only when towing the vehicle. See
Recreational Vehicle Towing
on page 5‑43or Towing
Your Vehicleon page 5‑43for more information.
If the SERVICE 4–Wheel Drive message stays on,
you should take the vehicle to your dealer/retailer for
service. See “Service 4–Wheel Drive message” under
DIC Warnings and Messages on page 4‑65.
Shifting Into Four-Wheel-Drive High or
AUTO (Automatic Four-Wheel Drive)
Turn the knob to the Four-Wheel-Drive High or AUTO
position. This can be done at any speed, except when
shifting from Four-Wheel-Drive Low. The indicator light
will flash while shifting. It will remain on when the shift is
completed.
Shifting Into Two-Wheel-Drive High
Turn the knob to the Two-Wheel-Drive High position.
This can be done at any speed, except when shifting
from Four-Wheel-Drive Low. The indicator light will
flash while shifting. It will remain on when the shift is
completed.
Shifting Into Four-Wheel-Drive Low
When Four-Wheel-Drive Low is engaged, vehicle speed
should be kept below 45 mph. Extended high-speed
operation in Four-Wheel-Drive Low may damage or
shorten the life of the drivetrain.
To shift to the Four-Wheel-Drive Low position, the
ignition must be in ON/RUN and the vehicle must be
stopped or moving less than 3 mph (5 km/h) with the
transmission in N (Neutral). The preferred method for
shifting into Four-Wheel-Drive Low is to have the
vehicle moving 1 to 2 mph (1.6 to 3.2 km/h). Turn the
knob to the Four-Wheel-Drive Low position.
3-47
Page 191 of 630
Running the Vehicle While Parked
It is better not to park with the engine running. But if you
ever have to, here are some things to know.
{WARNING:
Idling a vehicle in an enclosed area with poor
ventilation is dangerous. Engine exhaust may
enter the vehicle. Engine exhaust contains
Carbon Monoxide (CO) which cannot be seen or
smelled. It can cause unconsciousness and even
death. Never run the engine in an enclosed area
that has no fresh air ventilation. For more
information, seeEngine Exhaust on page 3‑54.
{WARNING:
It can be dangerous to get out of the vehicle if the
automatic transmission shift lever is not fully in
P (Park) with the parking brake firmly set. The
vehicle can roll. Do not leave the vehicle when the
engine is running unless you have to. If you have
(Continued)
WARNING: (Continued)
left the engine running, the vehicle can move
suddenly. You or others could be injured. To be
sure the vehicle will not move, even when you are
on fairly level ground, always set the parking
brake and move the shift lever to P (Park).
{WARNING:
Four-wheel drive vehicles with the transfer case in
N (Neutral) will allow the vehicle to roll, even if the
automatic transmission shift lever is in P (Park).
So, be sure the transfer case is in a drive
gear—not in N (Neutral). Always set the
parking brake.
Follow the proper steps to be sure the vehicle will not
move. See Shifting Into Park on page 3‑51.
If pulling a trailer, see Towing a Trailer on page 5‑50.
3-55
Page 225 of 630
Cruise Control
{WARNING:
Cruise control can be dangerous where you
cannot drive safely at a steady speed. So, do not
use the cruise control on winding roads or in
heavy traffic.
Cruise control can be dangerous on slippery
roads. On such roads, fast changes in tire traction
can cause excessive wheel slip, and you could
lose control. Do not use cruise control on slippery
roads.
For vehicles with cruise control, a speed of about
40 km/h (25 mph) or more can be maintained without
keeping your foot on the accelerator. Cruise control
does not work at speeds below about 40 km/h (25 mph). When the brakes are applied, cruise control is
turned off.
For vehicles with an Allison
®or Hydra‐Matic 6‐speed
automatic transmission, see “Grade Braking and Cruise
Grade Braking (Allison Transmission) under Tow/Haul
Mode
on page 3‑34for an explanation of how cruise
control interacts with the Range Selection Mode,
tow/haul and grade braking systems.
For vehicles with the StabiliTrak
®system that begins
to limit wheel spin while you are using cruise control,
the cruise control will automatically disengage.
See StabiliTrak
®Systemon page 5‑6. When road
conditions allow the cruise control to be safely used
again, it can be turned back on.
4-7
Page 230 of 630

Daytime Running Lamps (DRL)
Daytime Running Lamps (DRL) can make it easier for
others to see the front of your vehicle during the day.
Fully functional daytime running lamps are required on
all vehicles first sold in Canada.
The DRL system comes on when the following
conditions are met:
.The ignition is on.
.The exterior lamps control is in AUTO.
.The engine is running.
.The light sensor determines it is daytime.
When the DRL system is on, only the DRL lamps are
on. The taillamps, sidemarker, instrument panel lights,
and other lamps will not be on.
When it begins to get dark, the automatic headlamp
system switches from DRL to the headlamps.
To turn off the DRL lamps, turn the exterior lamps
control to the OFF position and then release.
For vehicles first sold in Canada, the transmission
must be in the P (Park) position, before the DRL lamps
can be turned off.
Automatic Headlamp System
When it is dark enough outside, the automatic
headlamp system turns on the headlamps at the normal
brightness, along with the taillamps, sidemarker, parking
lamps, and the instrument panel lights. The radio lights
will also be dim.
To turn off the automatic headlamp system, turn the
exterior lamps switch to the off position and then
release it. For vehicles first sold in Canada, the
transmission must be in the P (Park) position, before
the automatic headlamp system can be turned off.
The vehicle has a light sensor located on the top of the
instrument panel in the defroster grille that regulates
when the automatic headlamps turn on. Do not cover
the sensor or the headlamps will come on whenever the
ignition is on.
The system may also turn on the headlamps when
driving through a parking garage or heavy overcast
weather. This is normal.
There is a delay in the transition between the daytime
and nighttime operation of the Daytime Running Lamps
(DRL) and the automatic headlamp systems so that
driving under bridges or bright overhead street lights
does not affect the system. The DRL and automatic
headlamp system is only affected when the light sensor
detects a change in lighting lasting longer than the
delay.
4-12
Page 272 of 630

Fuel Used
Press the trip/fuel button until FUEL USED displays.
This display shows the number of gallons (gal) or
liters (L) of fuel used since the last reset of this menu
item. To reset the fuel used information, press and hold
the set/reset button while FUEL USED is displayed.
Timer
Press the trip/fuel button until TIMER displays.
This display can be used as a timer.
To start the timer, press the set/reset button while
TIMER is displayed. The display will show the amount
of time that has passed since the timer was last reset,
not including time the ignition is off. Time will continue
to be counted as long as the ignition is on, even if
another display is being shown on the DIC.
The timer will record up to 99 hours, 59 minutes
and 59 seconds (99:59:59) after which the display
will return to zero.
To stop the timer, press the set/reset button briefly
while TIMER is displayed.
To reset the timer to zero, press and hold the set/reset
button while TIMER is displayed.
Transmission Temperature
Press the trip/fuel button until TRANS TEMP displays.
This display shows the temperature of the automatic
transmission fluid in either degrees Fahrenheit (°F) or
degrees Celsius (°C).
Instantaneous Economy and Active Fuel
Management™Indicator
If your vehicle has this display, press the trip/fuel button
until INST ECON V8 displays. This display shows the
current fuel economy at a particular moment and will
change frequently as driving conditions change. This
display shows the instantaneous fuel economy in miles
per gallon (mpg) or liters per 100 kilometers (L/100 km).
Unlike average economy, this screen cannot be reset.
An Active Fuel Management indicator will display on the
right side of the DIC, while INST ECON displays on the
left side. Active Fuel Management allows the engine to
operate on either four or eight cylinders, depending on
your driving demands. When Active Fuel Management
is active, V4 will display on the DIC. When Active Fuel
Management is inactive, V8 will display. See Active
Fuel Management™
on page 3‑27for more
information.
Blank Display
This display shows no information.
4-54
Page 278 of 630
Transmission Temperature
Press the trip odometer reset stem until TRANS TEMP
displays. This display shows the temperature of the
automatic transmission fluid in either degrees
Fahrenheit (°F) or degrees Celsius (°C).
Trailer Gain and Output
On vehicles with the Integrated Trailer Brake
Control (ITBC) system, the trailer brake display
appears in the DIC. Press the trip odometer reset
stem until TRAILER GAIN and OUTPUT display.
TRAILER GAIN shows the trailer gain setting. This
setting can be adjusted from 0.0 to 10.0 with either a
trailer connected or disconnected. To adjust this setting,
see“Integrated Trailer Brake Control System” under
Towing a Trailer
on page 5‑50for more information.
OUTPUT shows the power output to the trailer anytime
a trailer with electric brakes is connected. Output is
displayed in 0 to 10 bars. Dashes may appear in the
OUTPUT display. See “Integrated Trailer Brake Control
System” underTowing a Trailer
on page 5‑50for
more information.
Compass Zone Setting
This display allows for setting the compass zone.
See DIC Compasson page 4‑62for more information.
Compass Recalibration
This display allows for calibrating the compass.
SeeDIC Compasson page 4‑62for more information.
Oil Life
To access this display, the vehicle must be in P (Park).
Press the trip odometer reset stem until OIL LIFE
REMAINING displays. This display shows an estimate
of the oil's remaining useful life. If you see 99% OIL
LIFE REMAINING on the display, that means 99% of
the current oil life remains. The engine oil life system
will alert you to change the oil on a schedule consistent
with your driving conditions.
When the remaining oil life is low, the CHANGE
ENGINE OIL SOON message will appear on the
display. See “CHANGE ENGINE OIL SOON” underDIC
Warnings and Messages
on page 4‑65. You should
change the oil as soon as you can. See Engine Oilon
page 6‑18. In addition to the engine oil life system
monitoring the oil life, additional maintenance is
recommended in the Maintenance Schedule in this
manual. See Scheduled Maintenance
on page 7‑3for more information.
4-60