2010 GMC SIERRA trailer
[x] Cancel search: trailerPage 9 of 630

A.Outlet Adjustment on page 4‑29.
B. Turn Signal/Multifunction Lever on page 4‑4.
C. Driver Information Center (DIC) Buttons. See Driver Information Center (DIC) on page 4‑51.
D. Hazard Warning Flashers on page 4‑3.
E. Instrument Panel Cluster on page 4‑30.
F. Shift Lever. See Automatic Transmission Operation
on page 3‑28. Tow/Haul Selector Button
(If Equipped). See Tow/Haul Modeon page 3‑34.
Range Selection Mode (Allison Transmission and
Hydra-Matic
®6‐Speed Button (If Equipped). See
Automatic Transmission Operation on page 3‑28.
G. Audio System(s) on page 4‑84.
H. Instrument Panel Storage on page 3‑76.
I. Integrated Trailer Brake Controller (If Equipped). See Towing a Trailer on page 5‑50.
J. Exterior Lamps on page 4‑10.
K. Hood Release on page 6‑15.
L. Parking Brake on page 3‑50.
M. Dome Lamp Override
on page 4‑15.Dome Lampson page 4‑14.Fog Lampson page 4‑13(If Equipped).
N. Cruise Control on page 4‑7.
O. Tilt Wheel on page 4‑3. P.
Horn on page 4‑3.
Q. Audio Steering Wheel Controls
on page 4‑145(If Equipped).
R. Automatic Transfer Case Control (If Equipped). See Four-Wheel Drive on page 3‑36.
S. Ashtray (If Equipped). See Ashtray(s) and
Cigarette Lighter on page 4‑18.
T. StabiliTrak
®Systemon page 5‑6(If Equipped).
Ultrasonic Rear Parking Assist (URPA)on
page 3‑60(If Equipped). Pedal Adjust Button
(If Equipped). See Adjustable Throttle and Brake
Pedal
on page 3‑26. Heated Windshield Washer
Fluid Button (If Equipped). Windshield Washeron
page 4‑6.
U. Accessory Power Outlet(s) on page 4‑17.
V. Climate Control System (With Heater Only)
on
page 4‑18or Climate Control System (With Air
Conditioning)on page 4‑20and Dual Automatic
Climate Control System on page 4‑22.
W. Power Take Off (PTO) Control (If Equipped). See Power Take Off (PTO) in the Duramax Diesel
Supplement Index.
X. Passenger Airbag Off Control (If Equipped). See Airbag Off Switch on page 2‑82.
Y. Glove Box on page 3‑75.
1-3
Page 11 of 630

A.Outlet Adjustment on page 4‑29.
B. Turn Signal/Multifunction Lever on page 4‑4.
C. Instrument Panel Cluster on page 4‑30.
D. Hazard Warning Flashers
on page 4‑3.
E. Shift Lever. See Automatic Transmission Operation
on page 3‑28.
F. Tow/Haul Mode
on page 3‑34(If Equipped).
G. Driver Information Center (DIC) Buttons. See Driver Information Center (DIC) on page 4‑51.
H. Audio System(s) on page 4‑84.
I. Exterior Lamps on page 4‑10.
J. Integrated Trailer Brake Controller (If Equipped). See Towing a Trailer on page 5‑50.
K. Dome Lamp Override
on page 4‑15.Dome Lampson page 4‑14.
L. Automatic Transfer Case Control. (If Equipped). See Four-Wheel Drive on page 3‑36.
M. Hood Release on page 6‑15.
N. Parking Brake on page 3‑50. O.
Cruise Control on page 4‑7.
P. Tilt Wheel on page 4‑3.
Q. Horn on page 4‑3.
R. Audio Steering Wheel Controls on page 4‑145.
S. Climate Control System (With Heater Only)
on
page 4‑18or Climate Control System (With Air
Conditioning)on page 4‑20or Dual Automatic
Climate Control Systemon page 4‑22(If Equipped).
T. Accessory Power Outlet(s)
on page 4‑17.
Cigarette Lighter (If Equipped). See Ashtray(s) and
Cigarette Lighter
on page 4‑18.
U. StabiliTrak®Systemon page 5‑6(If Equipped).
Pedal Adjust Button (If Equipped). See Adjustable
Throttle and Brake Pedal
on page 3‑26. Ultrasonic
Rear Parking Assist (URPA)on page 3‑60(If Equipped). Heated Windshield Washer Fluid
Button (If Equipped). See Windshield Washeron
page 4‑6.
V. Passenger Airbag Off Control (If Equipped). See Airbag Off Switch on page 2‑82.
W. Glove Box on page 3‑75.
1-5
Page 21 of 630
Mirror Adjustment
Exterior Mirrors
Vehicles with outside
power mirrors and
foldaway mirrors have
controls located on the
driver door.
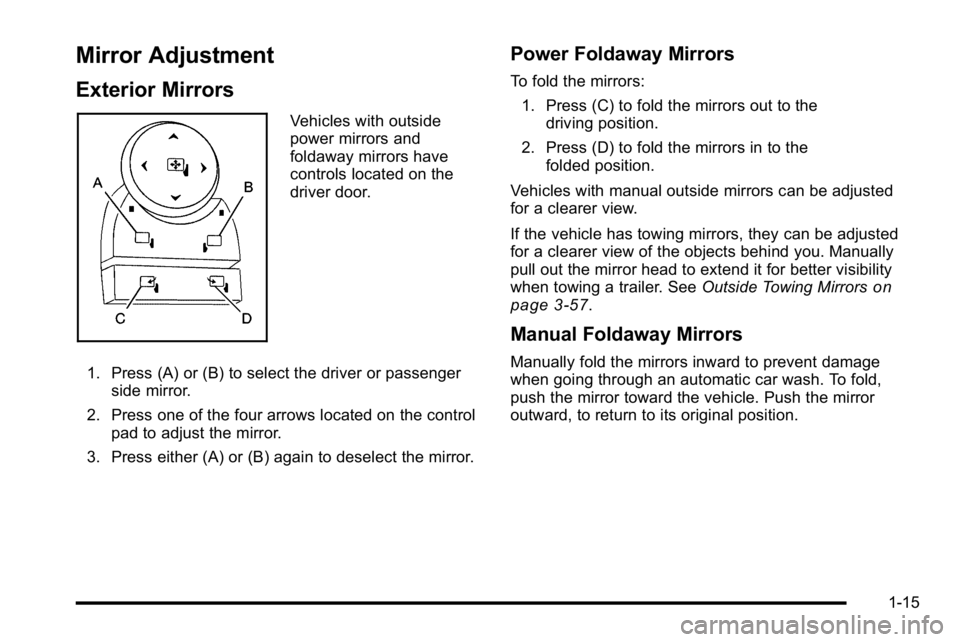
1. Press (A) or (B) to select the driver or passenger side mirror.
2. Press one of the four arrows located on the control pad to adjust the mirror.
3. Press either (A) or (B) again to deselect the mirror.
Power Foldaway Mirrors
To fold the mirrors:
1. Press (C) to fold the mirrors out to the driving position.
2. Press (D) to fold the mirrors in to the folded position.
Vehicles with manual outside mirrors can be adjusted
for a clearer view.
If the vehicle has towing mirrors, they can be adjusted
for a clearer view of the objects behind you. Manually
pull out the mirror head to extend it for better visibility
when towing a trailer. See Outside Towing Mirrors
on
page 3‑57.
Manual Foldaway Mirrors
Manually fold the mirrors inward to prevent damage
when going through an automatic car wash. To fold,
push the mirror toward the vehicle. Push the mirror
outward, to return to its original position.
1-15
Page 29 of 630
Automatic Transfer Case
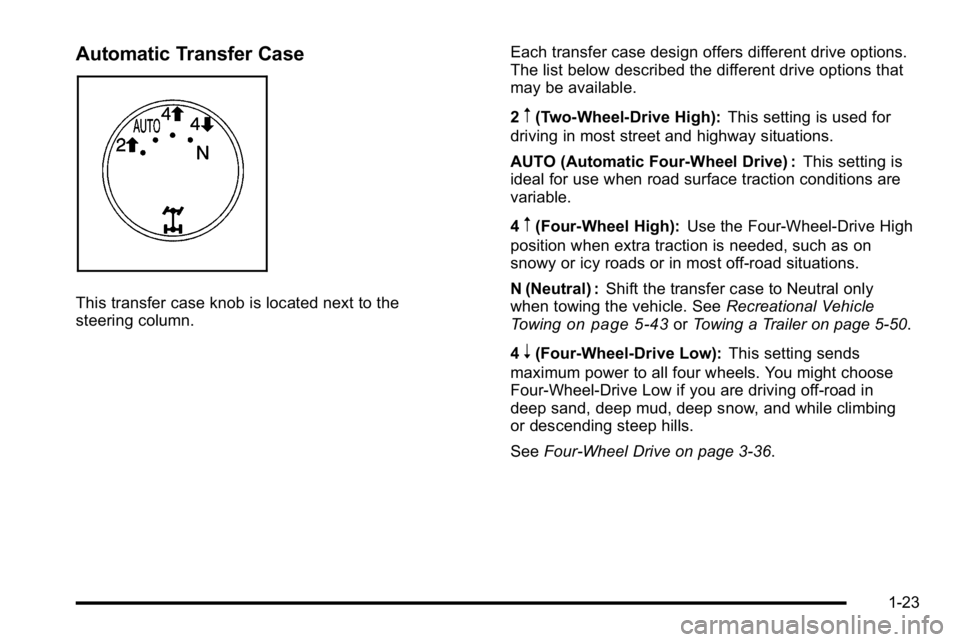
This transfer case knob is located next to the
steering column.Each transfer case design offers different drive options.
The list below described the different drive options that
may be available.
2
m(Two-Wheel-Drive High):
This setting is used for
driving in most street and highway situations.
AUTO (Automatic Four-Wheel Drive) : This setting is
ideal for use when road surface traction conditions are
variable.
4
m(Four-Wheel High): Use the Four-Wheel-Drive High
position when extra traction is needed, such as on
snowy or icy roads or in most off-road situations.
N (Neutral) : Shift the transfer case to Neutral only
when towing the vehicle. See Recreational Vehicle
Towing
on page 5‑43or Towing a Trailer on page 5‑50.
4
n(Four-Wheel-Drive Low): This setting sends
maximum power to all four wheels. You might choose
Four-Wheel-Drive Low if you are driving off-road in
deep sand, deep mud, deep snow, and while climbing
or descending steep hills.
See Four-Wheel Drive on page 3‑36.
1-23
Page 33 of 630

Driver Information Center (DIC)
The DIC display is located at the bottom of the
instrument panel cluster. It shows the status of many
vehicle systems and enables access to the
personalization menu.
The DIC buttons are
located on the instrument
panel, next to the steering
wheel.
Some vehicles do not
have the buttons shown,
however some of the
menus can be viewed by
using the trip odometer
reset stem.
3:Press this button to display the odometer, trip
odometer, fuel range, average economy, fuel used,
timer, and transmission temperature. The compass
and outside air temperature will also be shown in the
display. The temperature will be shown in °F or °C
depending on the units selected.
T: Press this button to display the oil life, units, tire
pressure readings for vehicles with the Tire Pressure
Monitor System (TPMS), trailer brake gain and output
information for vehicles with the Integrated Trailer Brake
Control (ITBC) system, engine hours, Remote Keyless
Entry (RKE) transmitter programming, compass zone
setting, and compass recalibration.
U: Press this button to customize the feature settings
on your vehicle. See DIC Vehicle Customization (With
DIC Buttons)
on page 4‑75for more information.
V: Press this button to set or reset certain functions
and to turn off or acknowledge messages on the DIC.
For more information, see Driver Information Center
(DIC) on page 4‑51.
1-27
Page 157 of 630
Starting and Operating Your
Vehicle
New Vehicle Break-In
Notice:The vehicle does not need an elaborate
break-in. But it will perform better in the long run if
you follow these guidelines:
.Keep your speed at 55 mph (88 km/h) or less
for the first 500 miles (805 km).
.Do not drive at any one constant speed,
fast or slow, for the first 500 miles (805 km).
Do not make full-throttle starts. Avoid
downshifting to brake or slow the vehicle.
.Avoid making hard stops for the first
200 miles (322 km) or so. During this time
the new brake linings are not yet broken in.
Hard stops with new linings can mean
premature wear and earlier replacement.
Follow this breaking-in guideline every time
you get new brake linings.
.Do not tow a trailer during break-in. See
Towing a Trailer
on page 5‑50for the trailer
towing capabilities of the vehicle and more
information.
Following break‐in, engine speed and load can be
gradually increased.
3-21
Page 165 of 630
{WARNING:
It is dangerous to get out of the vehicle if the shift
lever is not fully in P (Park) with the parking brake
firmly set. The vehicle can roll.
Do not leave the vehicle when the engine is
running unless you have to. If you have left the
engine running, the vehicle can move suddenly.
You or others could be injured. To be sure the
vehicle will not move, even when you are on fairly
level ground, always set the parking brake and
move the shift lever to P (Park). SeeShifting Into
Park
on page 3‑51. If you are pulling a trailer,
see Towing a Trailer on page 5‑50.
{WARNING:
If you have Four-Wheel Drive, the vehicle
will be free to roll —even if the shift lever is in
P (Park) —if the transfer case is in Neutral.
So, be sure the transfer case is in a drive gear,
Two-Wheel Drive High or Four-Wheel Drive High
or Four-Wheel Drive Low —not in Neutral.
See Shifting Into Park on page 3‑51.
R (Reverse) : Use this gear to back up.
Notice: Shifting to R (Reverse) while the vehicle is
moving forward could damage the transmission.
The repairs would not be covered by the vehicle
warranty. Shift to R (Reverse) only after the vehicle
is stopped.
To rock the vehicle back and forth to get out of snow,
ice, or sand without damaging the transmission, see If
Your Vehicle is Stuck in Sand, Mud, Ice, or Snow
on
page 5‑28.
3-29
Page 166 of 630
N (Neutral) :In this position, the engine does not
connect with the wheels. To restart when you are
already moving, use N (Neutral) only. Also, use
N (Neutral) when the vehicle is being towed.
{WARNING:
Shifting into a drive gear while the engine is
running at high speed is dangerous. Unless your
foot is firmly on the brake pedal, the vehicle could
move very rapidly. You could lose control and hit
people or objects. Do not shift into a drive gear
while the engine is running at high speed.
Notice: Shifting out of P (Park) or N (Neutral) with
the engine running at high speed may damage the
transmission. The repairs would not be covered by
the vehicle warranty. Be sure the engine is not
running at high speed when shifting the vehicle. D (Drive) :
This position is for normal driving. It provides
the best fuel economy. If you need more power for
passing, and you are:
.Going less than about 35 mph (55 km/h), push the
accelerator pedal about halfway down.
.Going about 35 mph (55 km/h) or more, push the
accelerator all the way down.
By doing this, the vehicle shifts down to the next
gear and has more power.
D (Drive) can be used when towing a trailer, carrying a
heavy load, driving on steep hills, or for off-road driving.
You might want to shift the transmission to a lower gear
selection if the transmission shifts too often.
Downshifting the transmission in slippery road
conditions could result in skidding. See Skidding under
Loss of Control on page 5‑10.
The vehicle has a shift stabilization feature that
adjusts the transmission shifting to the current driving
conditions in order to reduce rapid upshifts and
downshifts. This shift stabilization feature is designed to
determine, before making an upshift, if the engine is
able to maintain vehicle speed by analyzing things such
as vehicle speed, throttle position, and vehicle load.
3-30