2010 GMC CANYON lights
[x] Cancel search: lightsPage 1 of 448

In Brief........................................................... 1-1
Instrument Panel
........................................ 1-2
Initial Drive Information
............................... 1-3
Vehicle Features
......................................1-15
Performance and Maintenance
...................1-17
Seats and Restraint System............................. 2-1
Front Seats
............................................... 2-2
Rear Seats
..............................................2-10
Safety Belts
.............................................2-13
Child Restraints
.......................................2-35
Airbag System
.........................................2-64
Restraint System Check
............................2-81
Features and Controls..................................... 3-1
Keys
........................................................ 3-2
Doors and Locks
....................................... 3-5
Windows
.................................................3-10
Theft-Deterrent Systems
............................3-13
Starting and Operating Your Vehicle
...........3-16
Mirrors
....................................................3-36
Storage Areas
.........................................3-40
Sunroof
..................................................3-42Instrument Panel............................................. 4-1
Instrument Panel Overview
.......................... 4-3
Climate Controls
......................................4-16
Warning Lights, Gages, and Indicators
........4-18
Driver Information Center (DIC)
..................4-33
Audio System(s)
.......................................4-42
Driving Your Vehicle....................................... 5-1
Your Driving, the Road, and the Vehicle
....... 5-2
Towing
...................................................5-41
Service and Appearance Care.......................... 6-1
Service
..................................................... 6-3
Fuel
......................................................... 6-5
Checking Things Under the Hood
...............6-10
Rear Axle
...............................................6-47
Four-Wheel Drive
.....................................6-48
Front Axle
...............................................6-49
Headlamp Aiming
.....................................6-50
Bulb Replacement
....................................
6-50
Windshield Wiper Blade Replacement
.........6-55
Tires
......................................................6-57
2010 GMC Canyon Owner ManualM
Page 17 of 448

Mirror Adjustment
Exterior Mirrors
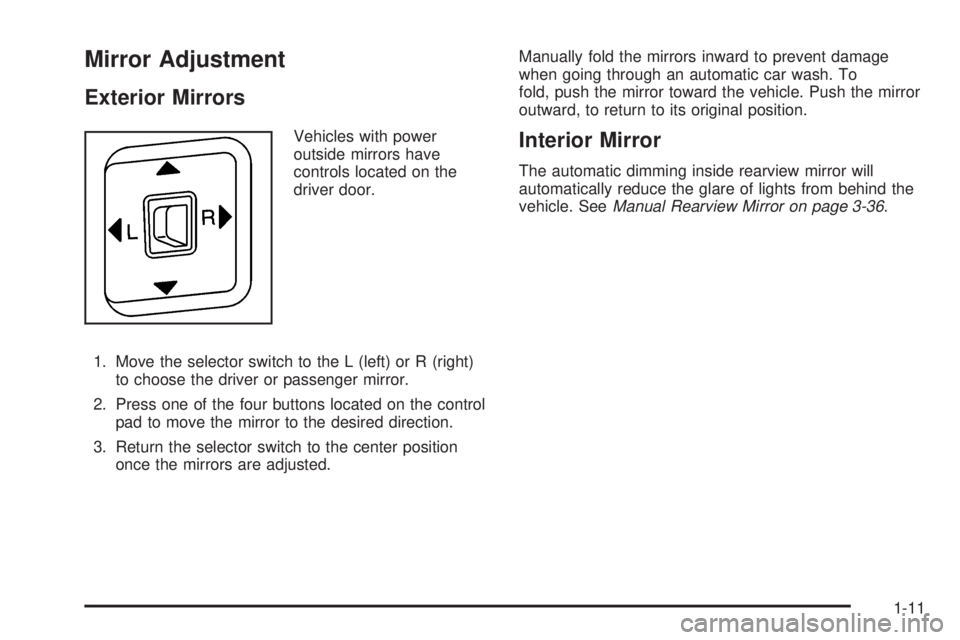
Vehicles with power
outside mirrors have
controls located on the
driver door.
1. Move the selector switch to the L (left) or R (right)
to choose the driver or passenger mirror.
2. Press one of the four buttons located on the control
pad to move the mirror to the desired direction.
3. Return the selector switch to the center position
once the mirrors are adjusted.Manually fold the mirrors inward to prevent damage
when going through an automatic car wash. To
fold, push the mirror toward the vehicle. Push the mirror
outward, to return to its original position.Interior Mirror
The automatic dimming inside rearview mirror will
automatically reduce the glare of lights from behind the
vehicle. SeeManual Rearview Mirror on page 3-36.
1-11
Page 124 of 448

Testing the Alarm
To test the alarm:
1. From inside the vehicle, activate the system by
locking the doors with the RKE transmitter.
2. Unlock the door with the manual door lock and
open the door. This should set off the alarm.
3. To turn the alarm off, press the unlock button on
the RKE transmitter or start the engine.
If the alarm does not sound when it should but the lights
flash, check to see if the horn works. The horn fuse
may be blown. To replace the fuse, seeFuses and
Circuit Breakers on page 6-111.
If the alarm does not sound or the front turn
signal lamps do not flash, see your dealer/retailer
for service.
Passlock®(U.S. Only)
Passlock®is a passive theft-deterrent system that
enables fuel if the vehicle is started with a valid key.
If an incorrect key is used or the ignition lock cylinder is
tampered with, the fuel system is disabled and the
vehicle does not start.
The security light turns off approximately five seconds
after the engine is started. SeeSecurity Light on
page 4-32.
If the engine stalls and the security light flashes, wait
about 10 minutes until the light stops flashing before
trying to restart the engine. Release the key from
START as soon as the engine starts.
If the engine does not start after three tries, the vehicle
needs service.
If the engine is running and the security light comes on,
the engine restarts if you turn the engine off. However,
the Passlock
®system is not working properly and
must be serviced by your dealer/retailer. The vehicle is
not protected by Passlock
®at this time. See your
dealer/retailer for service.
In an emergency, call the Roadside Assistance Center.
SeeRoadside Assistance Program on page 8-7.
Do not leave the key or device that disarms or
deactivates the theft deterrent system in the vehicle.
3-14
Page 127 of 448

Ignition Positions
The ignition switch has
four different positions.
To shift out of P (Park), turn the ignition to ON/RUN and
apply the regular brake pedal.
Notice:Using a tool to force the key to turn in the
ignition could cause damage to the switch or break
the key. Use the correct key, make sure it is all the
way in, and turn it only with your hand. If the key
cannot be turned by hand, see your dealer/retailer.
(A) LOCK/OFF:This position locks the ignition. It also
locks the transmission on automatic transmission
vehicles. It locks the steering wheel on manual
transmission vehicles. The key can on be removed
in LOCK/OFF.On vehicles with an automatic transmission, the shift
lever must be in P (Park) to turn the ignition switch
to LOCK/OFF.
The steering can bind with the wheels turned off center.
If this happens, move the steering wheel from right to
left while turning the key to ACC/ACCESSORY.
If this doesn’t work, then the vehicle needs service.
(B) ACC/ACCESSORY:This is the position in which
you can operate the electrical accessories or items
plugged into the accessory power outlets. On automatic
transmission vehicles, this position unlocks the
ignition. On manual transmission vehicles, it unlocks the
ignition and steering wheel. Use this position if the
vehicle must be pushed or towed.
(C) ON/RUN:This position can be used to operate
the electrical accessories and to display some
instrument panel cluster warning and indicator lights.
The switch stays in this position when the engine
is running. The transmission is also unlocked in this
position on automatic transmission vehicles.
If you leave the key in the ACC/ACCESSORY or
ON/RUN position with the engine off, the battery could
be drained. You may not be able to start your vehicle
if the battery is allowed to drain for an extended period
of time.
3-17
Page 137 of 448

4n(Four-Wheel Low):This setting also engages the
front axle to give you extra traction. It sends the maximum
power to all four wheels. You might choose four-wheel
low if you were driving off-road in sand, mud, or deep
snow and while climbing or descending steep hills.
Shifting into Four-Wheel Low will turn Traction Control
and StabiliTrak
®off. SeeTraction Control System (TCS)
on page 5-8andStabiliTrak®System on page 5-6for
more information.
Indicator lights in the buttons show you which setting you
are in. The indicator lights will come on briefly when you
turn on the ignition and one will stay on the selected
setting. If the lights do not come on, you should take the
vehicle in for service. An indicator light will flash while
shifting. It will stay on when the shift is completed.
If the transfer case does not shift, it will return to the last
chosen setting.
Shifting from Two-Wheel High to
Four-Wheel High
Press and release the Four-Wheel High button.
This can be done at any speed, and the front axle will
lock automatically.
Shifting from Four-Wheel High to
Two-Wheel High
Press and release the Two-Wheel High button.
This can be done at any speed, and the front axle will
unlock automatically.
It is normal to hear and feel the vehicle’s transfer
case shift into Four-Wheel High. If you shift with the
vehicle stopped, the indicator light may still flash slowly.
It may be necessary to shift the transmission
momentarily into R (Reverse) and D (Drive), for an
automatic transmission, or R (Reverse) and 1 (First) for
a manual transmission to have the light stop flashing.
3-27
Page 146 of 448

Mirrors
Manual Rearview Mirror
Hold the inside rearview mirror in the center to move it
for a clearer view of behind your vehicle. Adjust the
mirror to avoid glare from the headlamps behind you.
Push the tab forward for daytime use and pull it for
nighttime use.
Vehicles with OnStar
®have three additional control
buttons located at the bottom of the mirror. See
your dealer/retailer for more information on the system
and how to subscribe to OnStar. See the OnStar
®
owners guide for more information about the services
OnStar provides.
Adjust this type of mirror to avoid glare from the
headlamps behind you by turning the knob
counterclockwise for nighttime driving and clockwise for
daytime driving.
Cleaning the Mirror
Do not spray glass cleaner directly on the mirror. Use a
soft towel dampened with water.
Automatic Dimming Rearview Mirror
The vehicle may have an automatic dimming inside
rearview mirror. Automatic dimming reduces the glare of
lights from behind the vehicle.
The mirror may also have OnStar
®and/or a compass
and outside temperature display.
Control buttons for the OnStar
®system are at the
bottom of the mirror. See the OnStar®owners guide for
more information about the services OnStar®provides.
SeeCompass on page 3-37for more information
about the compass display. See “Temperature Display”
after, for more information about the outside
temperature display.
AUTO/
(/O(On/Off):Press and hold AUTO /(for
about three seconds or depending on the mirror,
press
Oto turn automatic dimming on or off.
The automatic dimming feature comes on and the
indicator light illuminates each time the vehicle is
started.
3-36
Page 153 of 448

Instrument Panel Overview...............................4-3
Hazard Warning Flashers................................4-3
Horn .............................................................4-3
Tilt Wheel.....................................................4-3
Turn Signal/Multifunction Lever.........................4-4
Turn and Lane-Change Signals........................4-4
Headlamp High/Low-Beam Changer..................4-5
Flash-to-Pass.................................................4-5
Windshield Wipers..........................................4-5
Windshield Washer.........................................4-6
Cruise Control................................................4-7
Exterior Lamps.............................................4-10
Headlamps on Reminder................................4-11
Daytime Running Lamps (DRL).......................4-11
Automatic Headlamp System..........................4-12
Fog Lamps ..................................................4-12
Exterior Cargo Lamps....................................4-13
Instrument Panel Brightness...........................4-13
Dome Lamp .................................................4-13
Dome Lamp Override....................................4-14
Exit Lighting.................................................4-14
Electric Power Management...........................4-14
Battery Run-Down Protection..........................4-15
Accessory Power Outlet(s).............................4-15
Ashtray(s) and Cigarette Lighter......................4-16Climate Controls............................................4-16
Climate Control System.................................4-16
Outlet Adjustment.........................................4-18
Warning Lights, Gages, and Indicators............4-18
Instrument Panel Cluster................................4-19
Speedometer and Odometer...........................4-20
Trip Odometer..............................................4-20
Tachometer.................................................4-20
Safety Belt Reminders...................................4-21
Airbag Readiness Light.................................
.4-22
Passenger Airbag Status Indicator...................4-23
Charging System Light..................................4-24
Up-Shift Light...............................................4-24
Brake System Warning Light..........................4-25
Antilock Brake System (ABS) Warning Light.....4-26
StabiliTrak
®/Traction Control System (TCS)
Warning Light...........................................4-26
Engine Coolant Temperature Gage..................4-27
Tire Pressure Light.......................................4-28
Malfunction Indicator Lamp.............................4-28
Oil Pressure Light.........................................4-31
Security Light...............................................4-32
Cruise Control Light......................................4-32
Highbeam On Light.......................................4-32
Fuel Gage...................................................4-32
Section 4 Instrument Panel
4-1
Page 162 of 448

Exterior Lamps
The exterior lamp control is located on the instrument
panel on the left side of the steering wheel.
O(Exterior Lamps):Turn the knob, located to the
right of this symbol, to choose one of the four exterior
lamp positions.
O(Off):Turns off all exterior lamps including the
Daytime Running Lamps (DRL).AUTO:Turns the headlamps on automatically at
normal brightness, together with the following:
•Sidemarker Lamps
•Taillamps
•Parking Lamps
•Instrument Panel Lights
SeeAutomatic Headlamp System on page 4-12for more
information.
;(Parking Lamps):Turns on the parking lamps,
together with the following:
•Sidemarker Lamps
•Taillamps
•License Plate Lamps
•Instrument Panel Lights
2(Headlamps):Turns on the headlamps, together
with the previously listed lamps and lights.
4-10