Page 1 of 258
Introduction 4
Instrument Cluster 12
Warning lights and chimes 12
Gauges 17
Entertainment Systems 20
AM/FM stereo 20
AM/FM stereo with CD 21
Auxiliary input jack (Line in) 24
Bluetooth system 25
Climate Controls 36
Manual heating and air conditioning 36
Rear window defroster 38
Lights 39
Headlamps 39
Turn signal control 42
Bulb replacement 43
Driver Controls 51
Windshield wiper/washer control 51
Steering wheel adjustment 52
Power windows 54
Mirrors 55
Speed control 56
Locks and Security 62
Keys 62
Anti-theft system 67
Table of Contents
1
2010 Transit Connect(tst)
Owners Guide, 3rd Printing
USA(fus)
Page 10 of 258
These are some of the symbols you may see on your vehicle.
Vehicle Symbol Glossary
Safety Alert
See Owner’s Guide
Fasten Safety BeltAirbag - Front
Airbag - SideChild Seat Lower
Anchor
Child Seat Tether
AnchorBrake System
Anti-Lock Brake SystemParking Brake System
Brake Fluid -
Non-Petroleum BasedParking Aid System
Stability Control SystemSpeed Control
Master Lighting SwitchHazard Warning Flasher
Fog Lamps-FrontFuse Compartment
Fuel Pump ResetWindshield Wash/Wipe
Windshield
Defrost/DemistRear Window
Defrost/Demist
Introduction
10
2010 Transit Connect(tst)
Owners Guide, 3rd Printing
USA(fus)
Page 11 of 258
Vehicle Symbol Glossary
Power Windows
Front/Rear
Power Window Lockout
Child Safety Door
Lock/UnlockInterior Luggage
Compartment Release
Panic AlarmEngine Oil
Engine CoolantEngine Coolant
Temperature
Do Not Open When HotBattery
Avoid Smoking, Flames,
or SparksBattery Acid
Explosive GasFan Warning
Power Steering FluidMaintain Correct Fluid
LevelMAX
MIN
Service Engine SoonEngine Air Filter
Passenger Compartment
Air FilterJack
Check Fuel CapLow Tire Pressure
Warning
Introduction
11
2010 Transit Connect(tst)
Owners Guide, 3rd Printing
USA(fus)
Page 13 of 258

WARNING:Under engine misfire conditions, excessive exhaust
temperatures could damage the catalytic converter, the fuel
system, interior floor coverings or other vehicle components, possibly
causing a fire.
Brake system warning light:To
confirm the brake system warning
light is functional, it will
momentarily illuminate when the
ignition is turned to the on position
when the engine is not running, or in a position between on and start, or
by applying the parking brake when the ignition is turned to the on
position. If the brake system warning light does not illuminate at this
time, seek service immediately from your authorized dealer. Illumination
after releasing the parking brake indicates low brake fluid level and the
brake system should be inspected immediately by your authorized dealer.
WARNING:Driving a vehicle with the brake system warning
light on is dangerous. A significant decrease in braking
performance may occur. It will take you longer to stop the vehicle.
Have the vehicle checked by your authorized dealer. Driving extended
distances with the parking brake engaged can cause brake failure and
the risk of personal injury.
Anti-lock brake system:If the
ABS light stays illuminated or
continues to flash, a malfunction has
been detected, have the system
serviced immediately by your
authorized dealer. Normal braking is still functional unless the brake
warning light also is illuminated.
Airbag readiness:If this light fails
to illuminate when the ignition is
turned to on, continues to flash or
remains on, have the system
serviced immediately by your authorized dealer. A chime will sound
when there is a malfunction in the indicator light.
P!
BRAKE
ABS
Instrument Cluster
13
2010 Transit Connect(tst)
Owners Guide, 3rd Printing
USA(fus)
Page 14 of 258

Safety belt:Reminds you to fasten
your front driver and passenger
safety belt. A Belt-Minder�chime
will also sound to remind you to
fasten your safety belt. Refer to the
Seating and Safety Restraintschapter to activate/deactivate the
Belt-Minder�chime feature.
Charging system:Illuminates when
the battery is not charging properly.
If it stays on while the engine is
running, there may be a malfunction
with the charging system. Contact your authorized dealer as soon as
possible. This indicates a problem with the electrical system or a related
component.
Engine oil pressure:Illuminates
when the oil pressure falls below the
normal range, refer toEngine oilin
theMaintenance and
Specificationschapter.
Anti-theft system:Flashes when
the SecuriLock�Passive Anti-theft
system has been activated.
Overdrive off (if equipped):
Illuminates when the overdrive
function of the transaxle has been
turned off, refer to theDriving
chapter. If the light flashes steadily or does not illuminate, have the
transmission serviced soon, or damage may occur.
Speed control (if equipped):
Illuminates when the speed control
is activated. Turns off when the
speed control system is deactivated,
refer to theDriver Controls
chapter for more information.
O/D
OFF
Instrument Cluster
14
2010 Transit Connect(tst)
Owners Guide, 3rd Printing
USA(fus)
Page 19 of 258

Information display
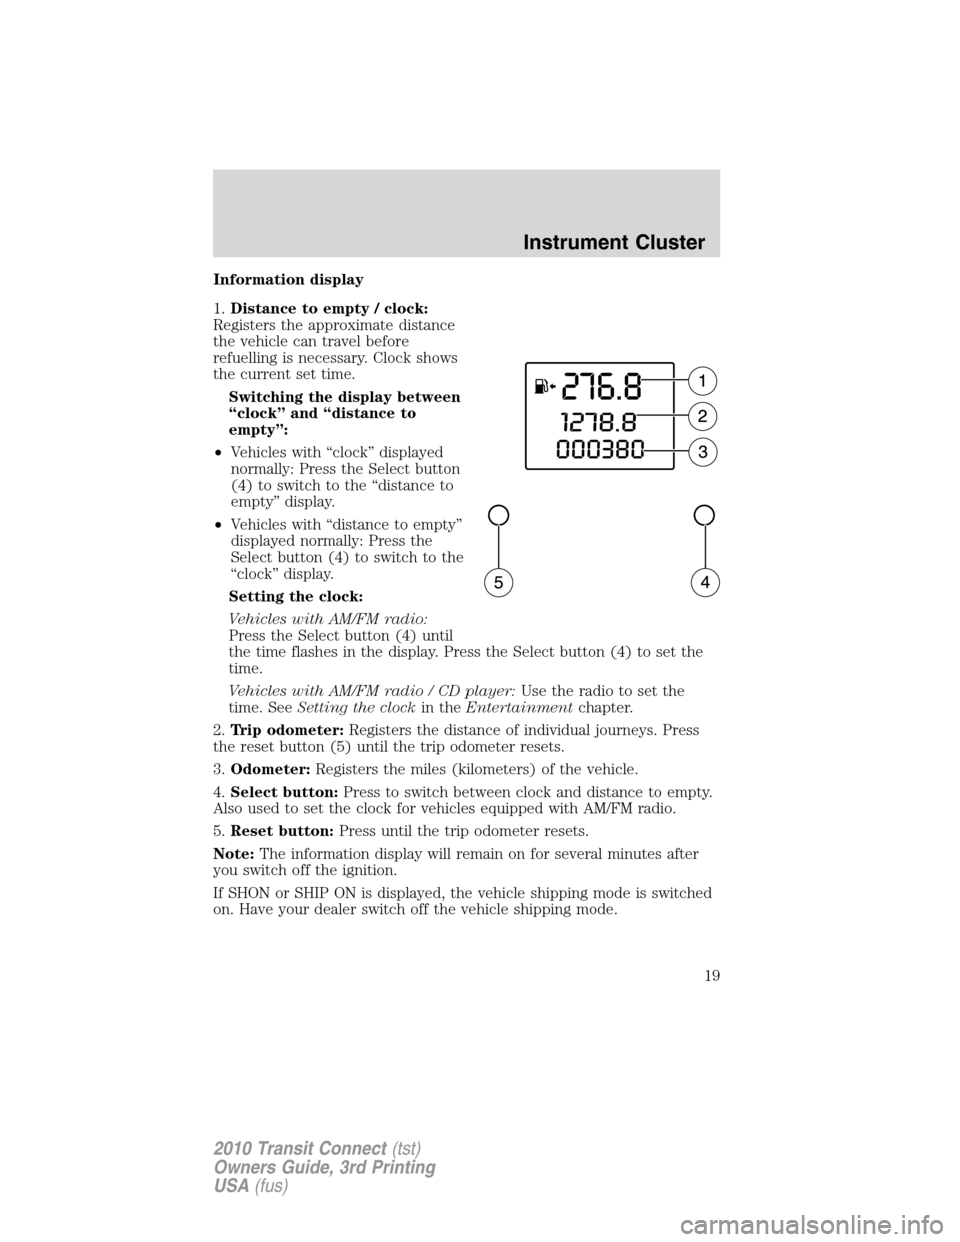
1.Distance to empty / clock:
Registers the approximate distance
the vehicle can travel before
refuelling is necessary. Clock shows
the current set time.
Switching the display between
“clock” and “distance to
empty”:
•Vehicles with “clock” displayed
normally: Press the Select button
(4) to switch to the “distance to
empty” display.
•Vehicles with “distance to empty”
displayed normally: Press the
Select button (4) to switch to the
“clock” display.
Setting the clock:
Vehicles with AM/FM radio:
Press the Select button (4) until
the time flashes in the display. Press the Select button (4) to set the
time.
Vehicles with AM/FM radio / CD player:Use the radio to set the
time. SeeSetting the clockin theEntertainmentchapter.
2.Trip odometer:Registers the distance of individual journeys. Press
the reset button (5) until the trip odometer resets.
3.Odometer:Registers the miles (kilometers) of the vehicle.
4.Select button:Press to switch between clock and distance to empty.
Also used to set the clock for vehicles equipped with AM/FM radio.
5.Reset button:Press until the trip odometer resets.
Note:The information display will remain on for several minutes after
you switch off the ignition.
If SHON or SHIP ON is displayed, the vehicle shipping mode is switched
on. Have your dealer switch off the vehicle shipping mode.
Instrument Cluster
19
2010 Transit Connect(tst)
Owners Guide, 3rd Printing
USA(fus)
Page 22 of 258

Setting the clock
To set the time or date, turn the radio on and press CLOCK until the
time begins to flash. Press
orto access the desired selection
(date or time). Once the desired selection is flashing, turn the VOL
(Volume) control to adjust the time or date forward/backward. Press
CLOCK again.
AM/FM radio
AM/FM:Press repeatedly to select AM/FM1/FM2 frequency bands.
(Seek): Press to access the next strong station on the frequency
band.
SCAN:Press for a brief sampling of all strong radio stations.
(1–6):(Memory Presets): When tuned to any station, press and hold a
preset button until sound returns.
Note:If TP appears in the display, it is an indicator that RDS is active.
Autostore feature:The autostore feature allows you to store the six
strongest stations available from the FM frequency band. To use, press
and hold the AM/FM button. The sound will mute and AST will appear in
the display indicating the feature is active. When the search is complete,
the sound will return and the six strongest stations will be stored in the
memory presets (and overwrite any stations previously stored in the AST
band).
Note:You can also manually store stations in the AST band. When the
AST band is active, simply tune to the desired station and press and hold
a memory preset. The new station will be saved and will override the
previously saved station.
CD player
To load a CD, simply insert the disc, label side up, into the CD slot.
(Eject): Press to eject the CD.
(Seek): Pressto access the previous/next track.
SCAN:Press for a brief sampling of all tracks on the current disc.
Sound Adjustments
BASS/TRE:Press to toggle between bass and treble adjustments. Once
the desired selection appears in the display, press
to adjust the
levels.
Entertainment Systems
22
2010 Transit Connect(tst)
Owners Guide, 3rd Printing
USA(fus)
Page 23 of 258

FADE/BAL:Press to toggle between fade and balance adjustments.
Once the desired selection appears in the display, press
to adjust
the audio between front (F) and back (B) and left (L) and right (R)
speakers.
Extra Features
AUX:Press to access auxiliary input jack mode and play music from a
portable player over the vehicle speakers.
(Phone): If your vehicle is equipped with theBluetooth�system,
refer toBluetooth hands free systemlater in this chapter for more
information. If your vehicle is not equipped withBluetooth, this control
will not be operational.
MENU:Press repeatedly to access the following features:
MAN:Press
oror to manually advance down or up the chosen
frequency band.
SCAN:Press
orfor a brief sampling of radio stations or CD
tracks.
SHUFFLE CD:Select to shuffle the tracks on the current CD.
REPEAT CD:Select to repeat the current CD.
COMP(Compression): Select to bring soft and loud CD passages
together for a more consistent listening level.
CLOCK 24H:Press
to toggle between a 12 and 24 hour clock
display.
AVC:Press
orto decrease/increase the level of automatic volume
control.
ADV MENU:When ADV MENU (Advanced menu) appears in the
display, press and hold MENU to access the following features:
•NEWS ON/OFF:News features are not available in the U.S. and
Canada markets.
•CLIP ON/OFF:Press to turn nominal volume levels on/off.
•VEHICLE ID:Press to view the vehicle’s VIN number.
•BT ON/OFF:Press to turn Bluetooth ON/OFF (if equipped). Refer to
Bluetooth hands free systemlater in this chapter for more
information
Entertainment Systems
23
2010 Transit Connect(tst)
Owners Guide, 3rd Printing
USA(fus)