2010 FORD TAURUS maintenance schedule
[x] Cancel search: maintenance schedulePage 21 of 378

System check and vehicle feature customization
Press the SETUP button repeatedly
to cycle the message center through
the following features:
RESET FOR SYSTEM CHECK
When this message appears, press RESET and the message center will
begin to cycle through the following systems and provide a status of the
item if needed.
Note:Some systems show a message only if a condition is present.
1. OIL LIFE
2. WASHER FLUID LEVEL
3. DOOR AJAR STATUS
4. TRUNK AJAR/CLOSED
5. BRAKE SYSTEM
6. TIRE PRESSURE
7. BLIND SPOT SYSTEM (if equipped)
8. CROSS TRAFFIC SYSTEM (if equipped)
9. FUEL LEVEL
10. MYKEY DISTANCE (If MyKey™ is programmed)
11. MYKEY(S) PROGRAMMED
12. ADMIN KEYS PROGRAMMED
OIL LIFE
This displays the remaining oil life.
An oil change is required whenever indicated by the message center and
according to the recommended maintenance schedule. USE ONLY
RECOMMENDED ENGINE OILS.
To reset the oil monitoring system to 100% after each oil change
(approximately 7,500 miles [12,000 km] or 12 months) perform the
following:
1. Press and release SETUP to display “OIL LIFE XXX% HOLD RESET =
NEW”.
2. Press and hold RESET for two seconds and release to reset the oil life
to 100%.
Note:To change oil life 100% miles value from 7,500 miles (12,000 km)
or 12 months to another value, proceed to Step 3.
Instrument Cluster
21
2010 Taurus(500)
Owners Guide(own2002), 1st Printing
USA(fus)
Page 58 of 378
CABIN AIR FILTER
The cabin air filter element is designed to reduce the concentration of
airborne particles such as dust, spores and pollen in the air being
supplied to the interior of the vehicle. The presence of a particulate filter
element provides the following benefits:
•Improves your driving comfort by reducing particle concentration.
•Improves the interior compartment cleanliness.
•Protects the climate control components from particle deposits.
Note:A cabin air filter must be installed at all times to prevent foreign
objects from entering the system. Running the system without a filter in
place could result in degradation or damage to the system.
The access door for the filter is located behind the glove box. For
replacement intervals regarding the cabin air filter, see thescheduled
maintenance information. For more information regarding your filter,
see your authorized dealer.
Climate Controls
58
2010 Taurus(500)
Owners Guide(own2002), 1st Printing
USA(fus)
Page 149 of 378
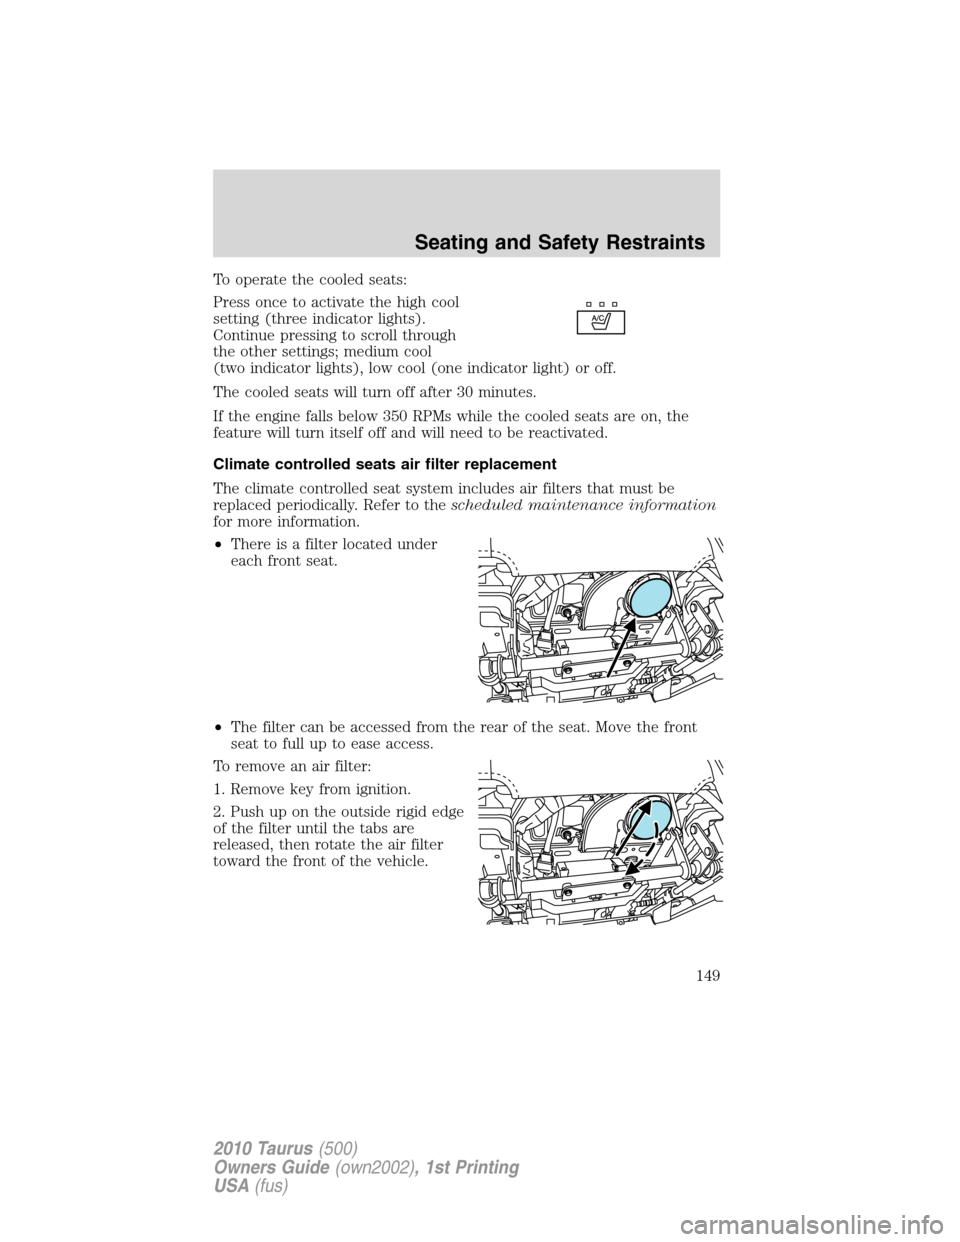
To operate the cooled seats:
Press once to activate the high cool
setting (three indicator lights).
Continue pressing to scroll through
the other settings; medium cool
(two indicator lights), low cool (one indicator light) or off.
The cooled seats will turn off after 30 minutes.
If the engine falls below 350 RPMs while the cooled seats are on, the
feature will turn itself off and will need to be reactivated.
Climate controlled seats air filter replacement
The climate controlled seat system includes air filters that must be
replaced periodically. Refer to thescheduled maintenance information
for more information.
•There is a filter located under
each front seat.
•The filter can be accessed from the rear of the seat. Move the front
seat to full up to ease access.
To remove an air filter:
1. Remove key from ignition.
2. Push up on the outside rigid edge
of the filter until the tabs are
released, then rotate the air filter
toward the front of the vehicle.
Seating and Safety Restraints
149
2010 Taurus(500)
Owners Guide(own2002), 1st Printing
USA(fus)
Page 211 of 378
•Do not run over curbs or hit the tire against a curb when parking
WARNING:If your vehicle is stuck in snow, mud, sand, etc.,do
notrapidly spin the tires; spinning the tires can tear the tire and
cause an explosion. A tire can explode in as little as three to five
seconds.
WARNING:Do not spin the wheels at over 35 mph (56 km/h).
The tires may fail and injure a passenger or bystander.
Highway hazards
No matter how carefully you drive there’s always the possibility that you
may eventually have a flat tire on the highway. Drive slowly to the
closest safe area out of traffic. This may further damage the flat tire, but
your safety is more important.
If you feel a sudden vibration or ride disturbance while driving, or you
suspect your tire or vehicle has been damaged, immediately reduce your
speed. Drive with caution until you can safely pull off the road. Stop and
inspect the tires for damage. If a tire is under-inflated or damaged,
deflate it, remove wheel and replace it with your spare tire and wheel. If
you cannot detect a cause, have the vehicle towed to the nearest repair
facility or tire dealer to have the vehicle inspected.
Tire and wheel alignment
A bad jolt from hitting a curb or pothole can cause the front end of your
vehicle to become misaligned or cause damage to your tires. If your
vehicle seems to pull to one side when you’re driving, the wheels may be
out of alignment. Have an authorized dealer check the wheel alignment
periodically.
Wheel misalignment in the front or the rear can cause uneven and rapid
treadwear of your tires and should be corrected by an authorized dealer.
Front wheel drive (FWD) vehicles and those with an independent rear
suspension (if equipped) may require alignment of all four wheels.
The tires should also be balanced periodically. An unbalanced tire and
wheel assembly may result in irregular tire wear.
Tire rotation
Rotating your tires at the recommended interval (as indicated in the
scheduled maintenance informationthat comes with your vehicle) will
help your tires wear more evenly, providing better tire performance and
longer tire life.
Tires, Wheels and Loading
211
2010 Taurus(500)
Owners Guide(own2002), 1st Printing
USA(fus)
Page 232 of 378
•It is recommended to select the L (Low) gear position when additional
engine braking is needed. In situations such as prolonged downhill
driving on steep grades (i.e., driving in mountainous areas), additional
engine braking is needed to reduce the load on the vehicle’s regular
brake system to prevent them from overheating.
•Anticipate stops and brake gradually.
Servicing after towing
If you tow a trailer for long distances, your vehicle will require more
frequent service intervals. Refer to yourscheduled maintenance
informationfor more information.
Trailer towing tips
•Practice turning, stopping and backing up before starting on a trip to
get the feel of the vehicle trailer combination. When turning, make
wider turns so the trailer wheels will clear curbs and other obstacles.
•Allow more distance for stopping with a trailer attached.
•If you are driving down a long or steep hill, shift to a lower gear. Do
not apply the brakes continuously, as they may overheat and become
less effective.
•The trailer tongue weight should be 10–15% of the loaded trailer
weight.
•After you have traveled 50 miles (80 km), thoroughly check your
hitch, electrical connections and trailer wheel lug nuts.
•To aid in engine/transmission cooling and A/C efficiency during hot
weather while stopped in traffic, place the gearshift lever in P (Park).
•Vehicles with trailers should not be parked on a grade. If you must
park on a grade, place wheel chocks under the trailer’s wheels.
RECREATIONAL TOWING
Follow these guidelines for your specific powertrain combination to tow
your vehicle for personal travel (such as behind a motor home or a
truck).
Note:Put your climate control system in recirculated air mode to
prevent exhaust fumes from entering the vehicle. Refer to theClimate
Controlschapter for more information.
In case of roadside emergency with a disabled vehicle, please refer to
Wrecker towingin theRoadside Emergencieschapter.
These guidelines are designed to prevent damage to your vehicle.
Tires, Wheels and Loading
232
2010 Taurus(500)
Owners Guide(own2002), 1st Printing
USA(fus)
Page 311 of 378
GETTING THE SERVICES YOU NEED
Warranty repairs to your vehicle must be performed by an authorized
Ford, Lincoln, or Mercury dealer. While any authorized dealer handling
your vehicle line will provide warranty service, we recommend you
return to your selling authorized dealer who wants to ensure your
continued satisfaction.
Please note that certain warranty repairs require special training and/or
equipment, so not all authorized dealers are authorized to perform all
warranty repairs. This means that, depending on the warranty repair
needed, you may have to take your vehicle to another authorized dealer.
A reasonable time must be allowed to perform a repair after taking your
vehicle to the authorized dealer. Repairs will be made using Ford or
Motorcraft parts, or remanufactured or other parts that are authorized by
Ford.
Away from home
If you are away from home when your vehicle needs service, contact the
Ford Customer Relationship Center or use the online resources listed
below to find the nearest authorized dealer.
In the United States:
Mailing address
Ford Motor Company
Customer Relationship Center
P.O. Box 6248
Dearborn, MI 48121
Telephone
1-800-392-3673 (FORD)
(TDD for the hearing impaired: 1-800-232-5952)
Online
Additional information and resources are available online at
www.genuineservice.com.
•U.S. dealer locator by Dealer Name, City/State, or Zip Code
•Owner Guides
•Maintenance Schedules
•Recalls
•Ford Extended Service Plans
•Ford Genuine Accessories
•Service specials and promotions.
Customer Assistance
311
2010 Taurus(500)
Owners Guide(own2002), 1st Printing
USA(fus)
Page 326 of 378
SERVICE RECOMMENDATIONS
To help you service your vehicle, we providescheduled maintenance
informationwhich makes tracking routine service easy.
If your vehicle requires professional service, your authorized dealer can
provide the necessary parts and service. Check yourWarranty
Guide/Customer Information Guideto find out which parts and
services are covered.
Use only recommended fuels, lubricants, fluids and service parts
conforming to specifications. Motorcraft parts are designed and built to
provide the best performance in your vehicle.
PRECAUTIONS WHEN SERVICING YOUR VEHICLE
•Do not work on a hot engine.
•Make sure that nothing gets caught in moving parts.
•Do not work on a vehicle with the engine running in an enclosed
space, unless you are sure you have enough ventilation.
•Keep all open flames and other burning material (such as cigarettes)
away from the battery and all fuel related parts.
Working with the engine off
1. Set the parking brake and shift to P (Park).
2. Turn off the engine and remove the key.
3. Block the wheels.
Working with the engine on
1. Set the parking brake and shift to P (Park).
2. Block the wheels.
WARNING:To reduce the risk of vehicle damage and/or
personal burn injuries, do not start your engine with the air
cleaner removed and do not remove it while the engine is running.
Maintenance and Specifications
326
2010 Taurus(500)
Owners Guide(own2002), 1st Printing
USA(fus)
Page 331 of 378
CHANGING THE WIPER BLADES
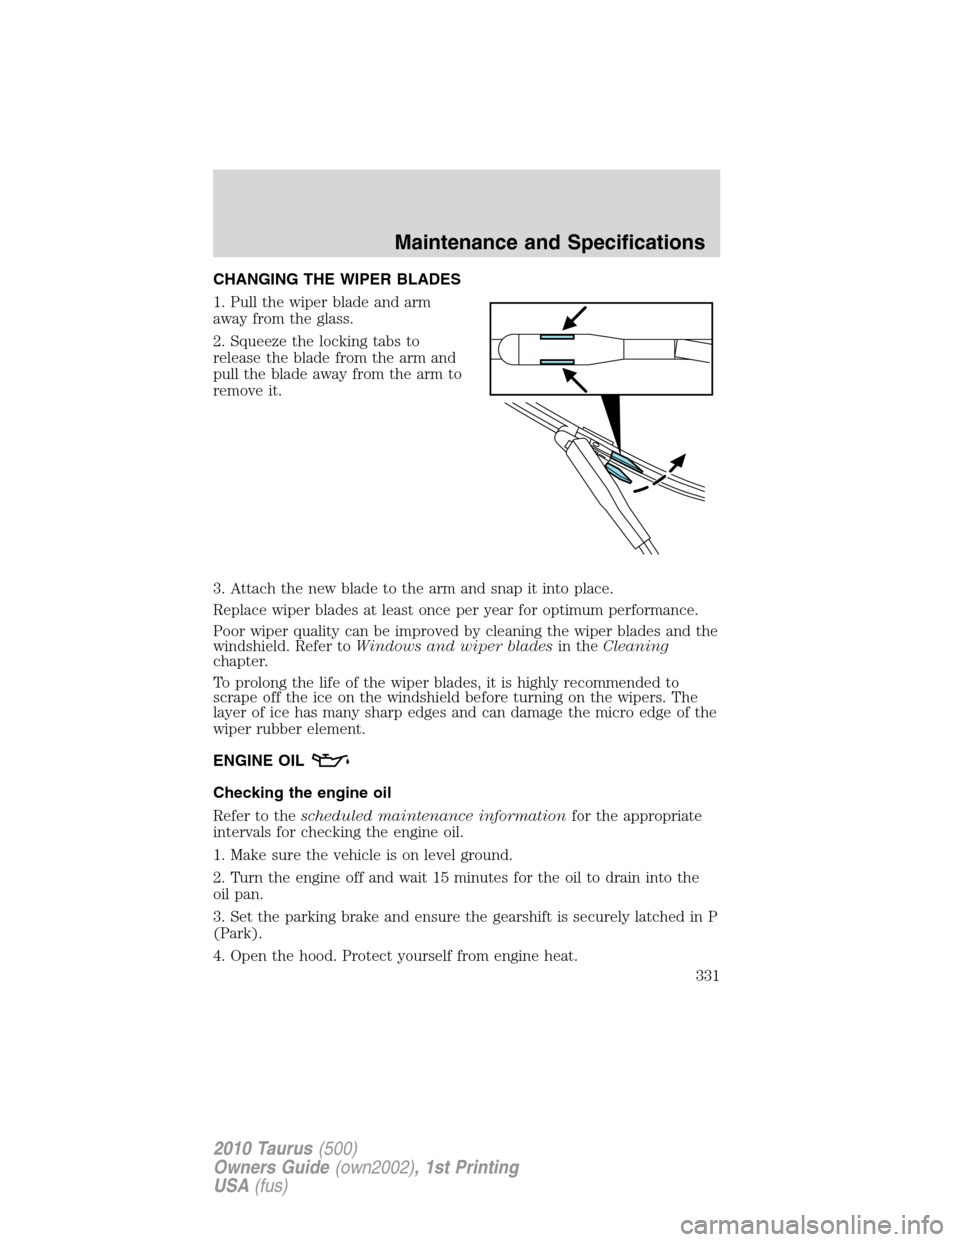
1. Pull the wiper blade and arm
away from the glass.
2. Squeeze the locking tabs to
release the blade from the arm and
pull the blade away from the arm to
remove it.
3. Attach the new blade to the arm and snap it into place.
Replace wiper blades at least once per year for optimum performance.
Poor wiper quality can be improved by cleaning the wiper blades and the
windshield. Refer toWindows and wiper bladesin theCleaning
chapter.
To prolong the life of the wiper blades, it is highly recommended to
scrape off the ice on the windshield before turning on the wipers. The
layer of ice has many sharp edges and can damage the micro edge of the
wiper rubber element.
ENGINE OIL
Checking the engine oil
Refer to thescheduled maintenance informationfor the appropriate
intervals for checking the engine oil.
1. Make sure the vehicle is on level ground.
2. Turn the engine off and wait 15 minutes for the oil to drain into the
oil pan.
3. Set the parking brake and ensure the gearshift is securely latched in P
(Park).
4. Open the hood. Protect yourself from engine heat.
Maintenance and Specifications
331
2010 Taurus(500)
Owners Guide(own2002), 1st Printing
USA(fus)