Page 31 of 378

Setting the clock
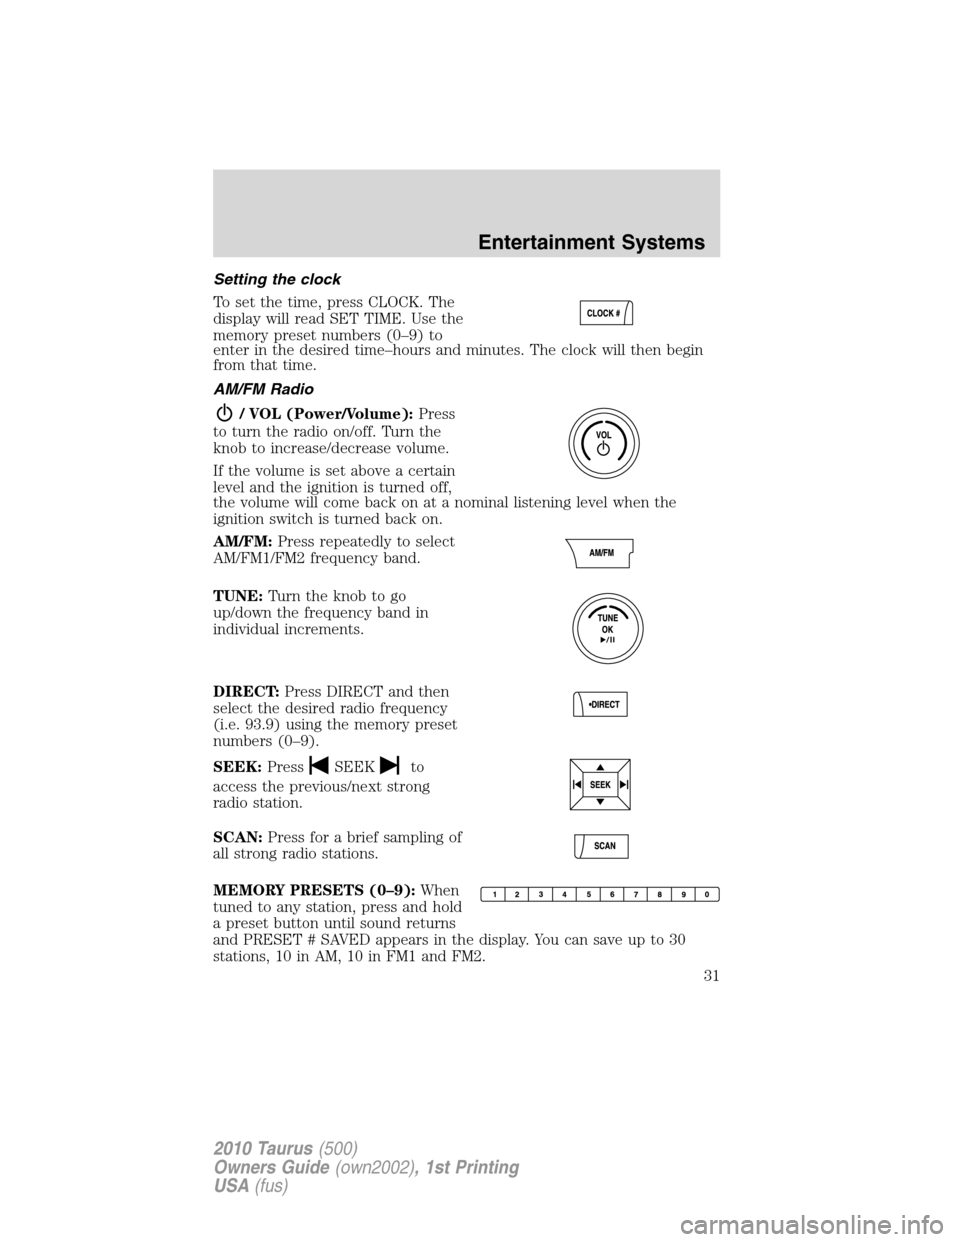
To set the time, press CLOCK. The
display will read SET TIME. Use the
memory preset numbers (0–9) to
enter in the desired time–hours and minutes. The clock will then begin
from that time.
AM/FM Radio
/ VOL (Power/Volume):Press
to turn the radio on/off. Turn the
knob to increase/decrease volume.
If the volume is set above a certain
level and the ignition is turned off,
the volume will come back on at a nominal listening level when the
ignition switch is turned back on.
AM/FM:Press repeatedly to select
AM/FM1/FM2 frequency band.
TUNE:Turn the knob to go
up/down the frequency band in
individual increments.
DIRECT:Press DIRECT and then
select the desired radio frequency
(i.e. 93.9) using the memory preset
numbers (0–9).
SEEK:Press
SEEKto
access the previous/next strong
radio station.
SCAN:Press for a brief sampling of
all strong radio stations.
MEMORY PRESETS (0–9):When
tuned to any station, press and hold
a preset button until sound returns
and PRESET # SAVED appears in the display. You can save up to 30
stations, 10 in AM, 10 in FM1 and FM2.
Entertainment Systems
31
2010 Taurus(500)
Owners Guide(own2002), 1st Printing
USA(fus)
Page 65 of 378
3. Turn on the low beam headlamps to illuminate the wall or screen and
open the hood.
To see a clearer light pattern for adjusting, you may want to block the
light from one headlamp while adjusting the other.
4. On the wall or screen you will
observe an area of high intensity
light. The top of the high intensity
area should touch the horizontal
reference line, if not, the beam will
need to be adjusted using the next
step.
5. Locate the vertical adjuster on
each headlamp. Using a Phillips #2
screwdriver, turn the adjuster either
clockwise (to adjust down) or
counterclockwise (to adjust up).
The horizontal edge of the brighter
light should touch the horizontal
reference line.
6. Close the hood and turn off the
lamps.
HORIZONTAL AIM IS NOT REQUIRED FOR THIS VEHICLE AND IS
NON-ADJUSTABLE.
TURN SIGNAL CONTROL
•Push down to activate the left
turn signal.
•Push up to activate the right turn
signal.
Lights
65
2010 Taurus(500)
Owners Guide(own2002), 1st Printing
USA(fus)
Page 69 of 378

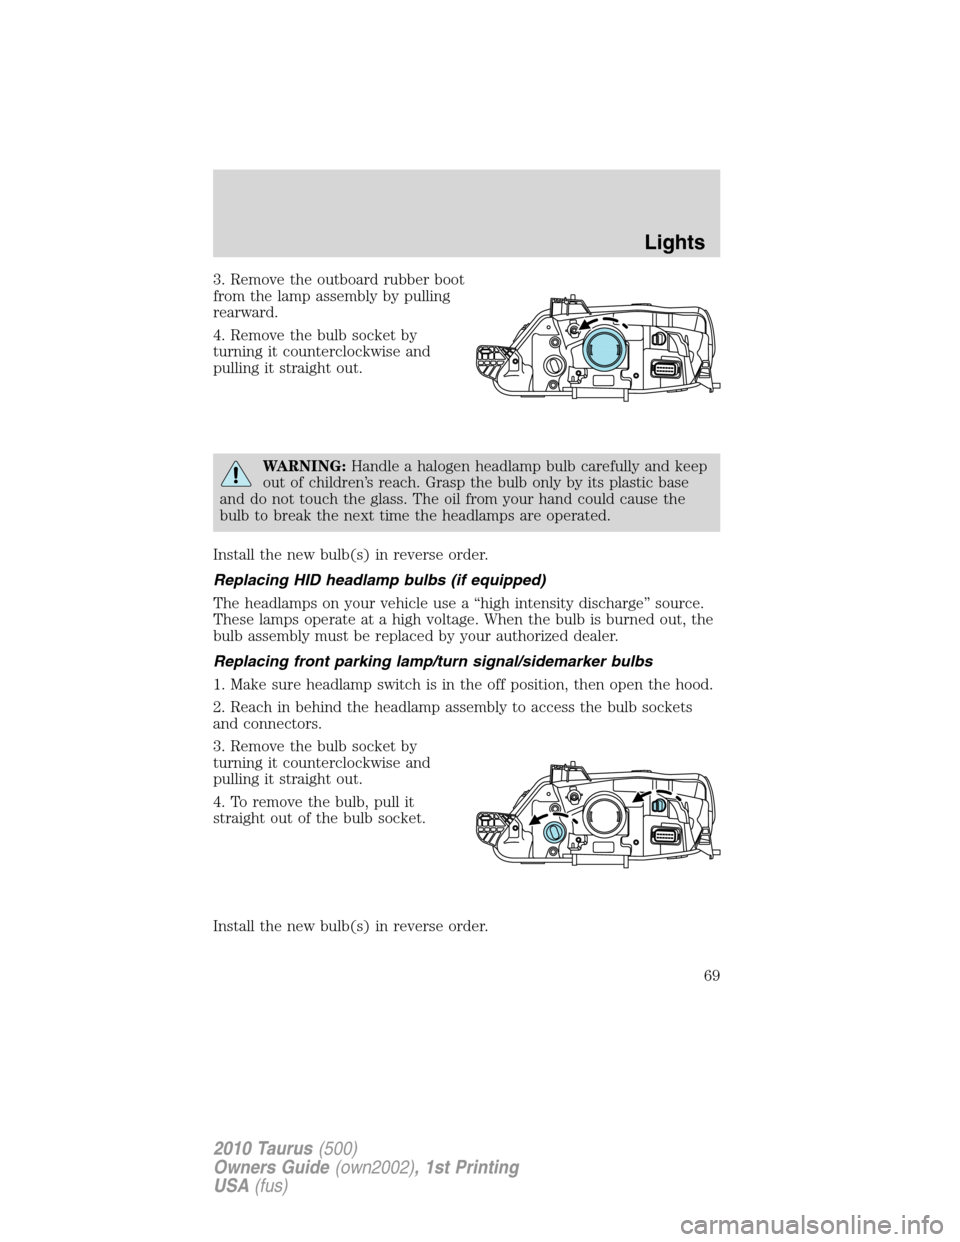
3. Remove the outboard rubber boot
from the lamp assembly by pulling
rearward.
4. Remove the bulb socket by
turning it counterclockwise and
pulling it straight out.
WARNING:Handle a halogen headlamp bulb carefully and keep
out of children’s reach. Grasp the bulb only by its plastic base
and do not touch the glass. The oil from your hand could cause the
bulb to break the next time the headlamps are operated.
Install the new bulb(s) in reverse order.
Replacing HID headlamp bulbs (if equipped)
The headlamps on your vehicle use a “high intensity discharge” source.
These lamps operate at a high voltage. When the bulb is burned out, the
bulb assembly must be replaced by your authorized dealer.
Replacing front parking lamp/turn signal/sidemarker bulbs
1. Make sure headlamp switch is in the off position, then open the hood.
2. Reach in behind the headlamp assembly to access the bulb sockets
and connectors.
3. Remove the bulb socket by
turning it counterclockwise and
pulling it straight out.
4. To remove the bulb, pull it
straight out of the bulb socket.
Install the new bulb(s) in reverse order.
Lights
69
2010 Taurus(500)
Owners Guide(own2002), 1st Printing
USA(fus)
Page 70 of 378
Replacing rear brake/tail/turn and side marker lamp bulbs
The brake/tail/turn and side marker lamp bulbs are located in the tail
lamp assembly. Follow the same steps to replace either bulb.
•(1)Tail/side marker lamp
•(2)Brake/tail lamp
•(3)Turn signal lamp
1. Make sure the headlamp switch is in the off position and open the
trunk.
2. Remove the press pin and cargo
net fastener (if equipped) and
carefully pull the carpet away to
expose the backside of the tail lamp
assembly.
3. Remove the nut and washer
assemblies, then pull the lamp
assembly away from the vehicle.
4. Remove the bulb socket by
rotating it counterclockwise, then
pulling it out of the lamp assembly.
5. Pull the bulb straight from the
socket.
Install new bulb(s) in reverse order.
Lights
70
2010 Taurus(500)
Owners Guide(own2002), 1st Printing
USA(fus)
Page 71 of 378
Replacing backup lamp bulbs
The backup lamp bulbs are located in the deck lid assembly.
1. Make sure the headlamp switch is in the off position.
2. Remove the deck lid trim panel
press pins and carefully pull the
panel away to expose the backside
of the backup lamp assembly.
3. Remove bulb socket by rotating it
counterclockwise, then pull it out of
the lamp assembly.
4. Disconnect the wire harness connector from the bulb/socket.
5. Install the new bulb in reverse order.
Lights
71
2010 Taurus(500)
Owners Guide(own2002), 1st Printing
USA(fus)
Page 83 of 378

Automatic dimming interior rear view mirror (if equipped)
Your vehicle may be equipped with an interior rear view mirror that has
an auto-dimming function. The electronic day/night mirror will change
from the normal (high reflective) state to the non-glare (darkened) state
when bright lights (glare) reach the mirror. When the mirror detects
bright light from behind the vehicle, it will automatically adjust (darken)
to minimize glare.
The mirror will automatically return to the normal state whenever the
vehicle is placed in R (Reverse) to ensure a bright clear view when
backing up.
Do not block the sensors on the front and back of the interior
rear view mirror since this may impair proper mirror
performance.
Do not clean the housing or glass of any mirror with harsh
abrasives, fuel or other petroleum-based cleaning products.
Note:If equipped with a rear view camera system, a video image will be
displayed in the mirror or the navigation system display (if equipped)
when the vehicle is put in R (Reverse). Refer toRearview camera
systemin theDrivingchapter.
EXTERIOR MIRRORS
Power side view mirrors
WARNING:Do not adjust the mirror while the vehicle is in
motion.
To adjust your mirrors:
1. Rotate the control clockwise to
adjust the right mirror and rotate
the control counterclockwise to
adjust the left mirror.
2. Move the control in the direction
you wish to tilt the mirror.
3. Return to the center position to lock mirrors in place.
Heated mirrors (if equipped)
Both mirrors are heated automatically to remove ice, mist and fog when
the rear window defrost is activated.
Do not remove ice from the mirrors with a scraper or attempt to
readjust the mirror glass if it is frozen in place. These actions
could cause damage to the glass and mirrors.
Driver Controls
83
2010 Taurus(500)
Owners Guide(own2002), 1st Printing
USA(fus)
Page 143 of 378
WARNING:To minimize the risk of neck injury in the event of a
crash, head restraints must be installed properly.
Using the manual lumbar support (if equipped)
The lumbar support control is
located on the outboard side shield.
Rotate the knob clockwise or
counter clockwise to adjust lumbar
support.
Adjusting the front manual seat (if equipped)
WARNING:Never adjust the driver’s seat or seatback when the
vehicle is moving.
WARNING:Always drive and ride with your seatback upright
and the lap belt snug and low across the hips.
Lift handle to move seat forward or
backward.
Pull lever up to adjust seatback.
Seating and Safety Restraints
143
2010 Taurus(500)
Owners Guide(own2002), 1st Printing
USA(fus)
Page 290 of 378
Stopping and securing the vehicle
1. Park on a level surface, set the
parking brake and activate hazard
flashers.
2. Place gearshift lever in P (Park)
and turn engine off.
Removing the spare tire and jack
1. Lift the trunk cargo cover, and
remove the wing nut that secures
the spare tire by turning it
counterclockwise.
2. Lift and remove the spare tire
from the trunk.
3. Remove the second wing nut that
secures the jack retention bracket
by turning it counterclockwise,
remove the jack kit from the
vehicle.
4. Remove the jack and the wrench
from the felt bag. Fold down the
wrench socket to use to loosen the
lug nuts and to operate the jack.
Tire change procedure
WARNING:When one of the front wheels is off the ground, the
transmission alone will not prevent the vehicle from moving or
slipping off the jack, even if the vehicle is in P (Park).
Roadside Emergencies
290
2010 Taurus(500)
Owners Guide(own2002), 1st Printing
USA(fus)