Page 290 of 378
Stopping and securing the vehicle
1. Park on a level surface, set the
parking brake and activate hazard
flashers.
2. Place gearshift lever in P (Park)
and turn engine off.
Removing the spare tire and jack
1. Lift the trunk cargo cover, and
remove the wing nut that secures
the spare tire by turning it
counterclockwise.
2. Lift and remove the spare tire
from the trunk.
3. Remove the second wing nut that
secures the jack retention bracket
by turning it counterclockwise,
remove the jack kit from the
vehicle.
4. Remove the jack and the wrench
from the felt bag. Fold down the
wrench socket to use to loosen the
lug nuts and to operate the jack.
Tire change procedure
WARNING:When one of the front wheels is off the ground, the
transmission alone will not prevent the vehicle from moving or
slipping off the jack, even if the vehicle is in P (Park).
Roadside Emergencies
290
2010 Taurus(500)
Owners Guide(own2002), 1st Printing
USA(fus)
Page 291 of 378

WARNING:To help prevent the vehicle from moving when you
change a tire, be sure to place the transmission in P (Park), set
the parking brake and block (in both directions) the wheel that is
diagonally opposite (other side and end of the vehicle) to the tire
being changed.
WARNING:If the vehicle slips off the jack, you or someone else
could be seriously injured.
WARNING:Do not attempt to change a tire on the side of the
vehicle close to moving traffic. Pull far enough off the road to
avoid the danger of being hit when operating the jack or changing the
wheel.
Note:Passengers should not remain in the vehicle when the vehicle is
being jacked.
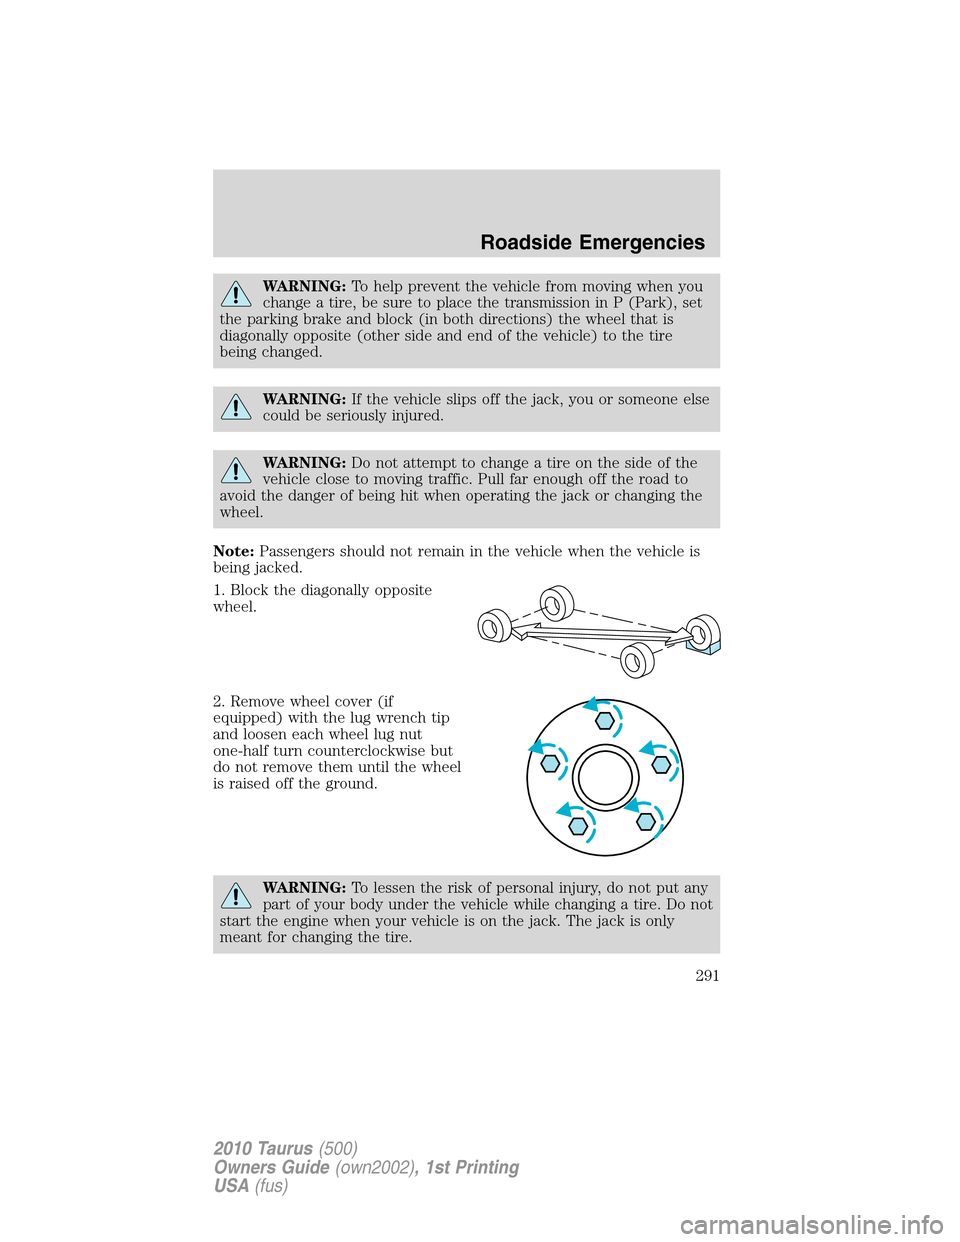
1. Block the diagonally opposite
wheel.
2. Remove wheel cover (if
equipped) with the lug wrench tip
and loosen each wheel lug nut
one-half turn counterclockwise but
do not remove them until the wheel
is raised off the ground.
WARNING:To lessen the risk of personal injury, do not put any
part of your body under the vehicle while changing a tire. Do not
start the engine when your vehicle is on the jack. The jack is only
meant for changing the tire.
Roadside Emergencies
291
2010 Taurus(500)
Owners Guide(own2002), 1st Printing
USA(fus)
Page 296 of 378

•Read the information in theTips for use of the temporary mobility
kitsection to ensure safe operation of the temporary mobility kit and
your vehicle.
Tips for use of the temporary mobility kit
Read the following list of tips to ensure safe operation of the temporary
mobility kit:
•Before operating the temporary mobility kit, make sure your vehicle is
safely off the road and away from moving traffic. Turn on the hazard
lights.
•Always set the parking brake to ensure the vehicle doesn’t move
unexpectedly.
•Do not remove any foreign objects, such as nails or screws, from the
tire.
•When using the temporary mobility kit, leave the engine running
(only if the vehicle is outdoors or in a well-ventilated area)so
the compressor doesn’t drain the vehicle’s battery.
•Do not allow the compressor to operate continuously for more than
15 minutes; this will help prevent the compressor from overheating.
•Never leave the temporary mobility kit unattended when it is
operating.
•Sealant compound contains latex. Make sure that you use the
non-latex gloves provided to avoid an allergic reaction.
•Keep the temporary mobility kit away from children.
•Only use the temporary mobility kit when the ambient temperature is
between -40°F (-40°C) and 158°F (70°C).
•Only use the sealing compound before the use by date. The use by
date is on the lower right hand corner of the label located on the
sealant canister (bottle).Check the use by date regularly and
replace the canister after four years.
•Do not store the temporary mobility kit unsecured inside the
passenger compartment of the vehicle as it may cause injury during a
sudden stop or collision. Always store the kit in its original location.
•After sealant use, the TPMS sensor and valve stem on the wheel must
be replaced by an authorized Ford dealer.
•When inflating a tire or other objects, use the black air hose only. Do
not use the transparent hose which is designed for sealant application
only.
Roadside Emergencies
296
2010 Taurus(500)
Owners Guide(own2002), 1st Printing
USA(fus)
Page 297 of 378

•Operating the temporary mobility kit could cause an electrical
disturbance in radio and DVD player operation.
What to do when a tire is punctured
A tire puncture within the tire’s tread area can be repaired in two stages
with the temporary mobility kit:
•In the first stage, the tire will be reinflated with a sealing compound
and air. After the tire has been reinflated, you will need to drive the
vehicle a short distance (approximately 4 miles [6 km]) to distribute
the sealant in the tire.
•In the second stage, you will need to check the tire pressure and
adjust, if necessary, to the vehicle’s tire inflation pressure.
First stage: Reinflating the tire with sealing compound and air
Preparation
Park the vehicle in a safe, level and secure area, away from moving
traffic. Turn the hazard lights on. Apply the parking brake and turn the
engine off. Inspect the flat tire for visible damage.
Sealant compound contains latex. To avoid any allergic reactions, use the
non-latex gloves located in the accessory box on the underside of the
temporary mobility kit housing.
Do not remove any foreign object that has pierced the tire. If a puncture
is located in the tire sidewall, stop and call roadside assistance.
1. Remove the valve cap from the tire valve.
2. Unwrap the clear tube from the compressor housing.
3. Remove the tube cap and fasten the metal connector of the tube to
the tire valve, turning clockwise. Make sure the connection is tightly
fastened.
Roadside Emergencies
297
2010 Taurus(500)
Owners Guide(own2002), 1st Printing
USA(fus)
Page 298 of 378
4. Plug the power cable into the 12V
power point in the vehicle.
5. Remove the warning sticker found on the canister and place it on the
top of the instrument panel or the center of the dash.
6. Start the engine(only if the vehicle is outdoors or in a
well-ventilated area).
7. Turn dial (1) counterclockwise to
the sealant position. Turn on the kit
by pressing the on/off button (2).
8. Inflate the tire to the pressure
listed on the tire label located on
the driver’s door or the door jam
area.
Note: When the sealing compound is first added into the tire, the
air pressure gauge reading on the compressor unit may indicate a
higher value; this is normal and should be no reason for concern.
The pressure will drop after about 30 seconds of operation. The
(2)
(1)
Roadside Emergencies
298
2010 Taurus(500)
Owners Guide(own2002), 1st Printing
USA(fus)
Page 304 of 378

WARNING:Do not insert the nozzle of portable fuel containers
or aftermarket funnels into the Easy Fuel™ system. This could
damage the fuel system and its seal, and may cause fuel to run onto
the ground instead of filling the tank, all of which could result in
serious personal injury.
JUMP STARTING
WARNING:The gases around the battery can explode if
exposed to flames, sparks, or lit cigarettes. An explosion could
result in injury or vehicle damage.
WARNING:Batteries contain sulfuric acid which can burn skin,
eyes and clothing, if contacted.
Do not attempt to push-start your automatic transmission
vehicle. Automatic transmissions do not have push-start
capability. Attempting to push-start a vehicle with an automatic
transmission may cause transmission damage.
Preparing your vehicle
When the battery is disconnected or a new battery is installed, the
automatic transmission must relearn its shift strategy. As a result, the
transmission may have firm and/or soft shifts. This operation is
considered normal and will not affect function or durability of the
transmission. Over time, the adaptive learning process will fully update
transmission operation.
1.Use only a 12–volt supply to start your vehicle.
2. Do not disconnect the battery of the disabled vehicle as this could
damage the vehicle’s electrical system.
3. Park the booster vehicle close to the hood of the disabled vehicle
making sure the two vehiclesdo nottouch. Set the parking brake on
both vehicles and stay clear of the engine cooling fan and other moving
parts.
4. Check all battery terminals and remove any excessive corrosion before
you attach the battery cables. Ensure that vent caps are tight and level.
5. Turn the heater fan on in both vehicles to protect from any electrical
surges. Turn all other accessories off.
Roadside Emergencies
304
2010 Taurus(500)
Owners Guide(own2002), 1st Printing
USA(fus)
Page 306 of 378
3. Connect the negative (-) cable to the negative (-) terminal of the
assisting battery.
4. Make the final connection of the negative (-) cable to an exposed
metal part of the stalled vehicle’s engine, away from the battery and the
carburetor/fuel injection system.
Note:Do not attach the negative (-) cable to fuel lines, engine rocker
covers, the intake manifold or electrical components asgrounding
points.
WARNING:Do not connect the end of the second cable to the
negative (-) terminal of the battery to be jumped. A spark may
cause an explosion of the gases that surround the battery.
5. Ensure that the cables are clear of fan blades, belts, moving parts of
both engines, or any fuel delivery system parts.
Jump starting
1. Start the engine of the booster vehicle and run the engine at
moderately increased speed.
+–+–
+–+–
Roadside Emergencies
306
2010 Taurus(500)
Owners Guide(own2002), 1st Printing
USA(fus)
Page 307 of 378
2. Start the engine of the disabled vehicle.
3. Once the disabled vehicle has been started, run both engines for an
additional three minutes before disconnecting the jumper cables.
Removing the jumper cables
Remove the jumper cables in the reverse order that they were
connected.
1. Remove the jumper cable from thegroundmetal surface.
Note:In the illustrations,lightning boltsare used to designate the
assisting (boosting) battery.
2. Remove the jumper cable on the negative (-) connection of the
booster vehicle’s battery.
+–+–
+–+–
Roadside Emergencies
307
2010 Taurus(500)
Owners Guide(own2002), 1st Printing
USA(fus)