2010 FORD TAURUS display
[x] Cancel search: displayPage 53 of 378

12.Power/Driver temperature:Press to activate/deactivate the
climate control system. When the system is off, outside air is prevented
from entering the vehicle. Turn to increase/decrease the air temperature
on the driver side of the vehicle. The control also adjusts the passenger
side temperature when PASS TEMP is disengaged. The recommended
initial setting is between 72°F (22°C) and 75°F (24°C), then adjust for
comfort. The driver side temperature setting will appear in the upper left
corner of the display.
13.
Driver heated seat (if equipped):Press to control the driver
heated seat. Refer toSeatingin theSeating and Safety Restraints
chapter for more information.
14.
RRear defroster:Press to activate/deactivate the rear window
defroster. Refer toRear window defrosterlater in this chapter for more
information. If your vehicle is equipped with both rear defroster and
heated mirrors, the same button will activate both.
15.
–Fan speed control:Press to decrease the fan speed.
DUAL ZONE AUTOMATIC TEMPERATURE CONTROL
(NAVIGATION BASED – IF EQUIPPED)
Climate Controls
53
2010 Taurus(500)
Owners Guide(own2002), 1st Printing
USA(fus)
Page 54 of 378
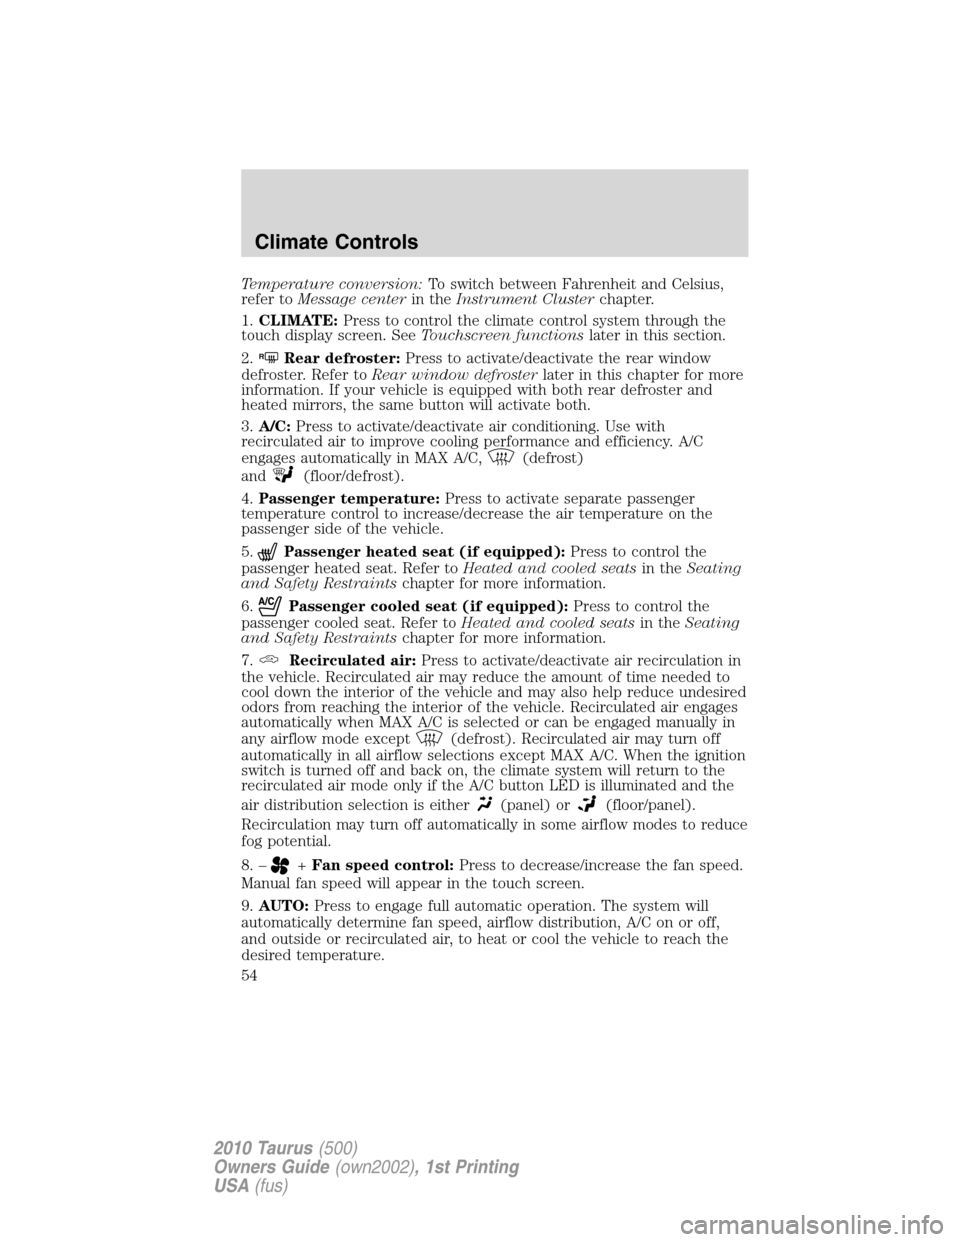
Temperature conversion:To switch between Fahrenheit and Celsius,
refer toMessage centerin theInstrument Clusterchapter.
1.CLIMATE:Press to control the climate control system through the
touch display screen. SeeTouchscreen functionslater in this section.
2.
RRear defroster:Press to activate/deactivate the rear window
defroster. Refer toRear window defrosterlater in this chapter for more
information. If your vehicle is equipped with both rear defroster and
heated mirrors, the same button will activate both.
3.A/C:Press to activate/deactivate air conditioning. Use with
recirculated air to improve cooling performance and efficiency. A/C
engages automatically in MAX A/C,
(defrost)
and
(floor/defrost).
4.Passenger temperature:Press to activate separate passenger
temperature control to increase/decrease the air temperature on the
passenger side of the vehicle.
5.
Passenger heated seat (if equipped):Press to control the
passenger heated seat. Refer toHeated and cooled seatsin theSeating
and Safety Restraintschapter for more information.
6.
Passenger cooled seat (if equipped):Press to control the
passenger cooled seat. Refer toHeated and cooled seatsin theSeating
and Safety Restraintschapter for more information.
7.
Recirculated air:Press to activate/deactivate air recirculation in
the vehicle. Recirculated air may reduce the amount of time needed to
cool down the interior of the vehicle and may also help reduce undesired
odors from reaching the interior of the vehicle. Recirculated air engages
automatically when MAX A/C is selected or can be engaged manually in
any airflow mode except
(defrost). Recirculated air may turn off
automatically in all airflow selections except MAX A/C. When the ignition
switch is turned off and back on, the climate system will return to the
recirculated air mode only if the A/C button LED is illuminated and the
air distribution selection is either
(panel) or(floor/panel).
Recirculation may turn off automatically in some airflow modes to reduce
fog potential.
8. –
+Fan speed control:Press to decrease/increase the fan speed.
Manual fan speed will appear in the touch screen.
9.AUTO:Press to engage full automatic operation. The system will
automatically determine fan speed, airflow distribution, A/C on or off,
and outside or recirculated air, to heat or cool the vehicle to reach the
desired temperature.
Climate Controls
54
2010 Taurus(500)
Owners Guide(own2002), 1st Printing
USA(fus)
Page 61 of 378

Operation -The high beam switch can be used to turn the high beams
on. They will then remain on until the switch has been returned to the
neutral position and the auto high beam system has turned the high
beams off.
Scenario 3:
Conditions -The automatic high beam system is set to ON in the
message center. The headlamp switch is in
(off),(park lamps),
or
(on).
Operation -The high beam switch can be used to turn the high beams
on and off.
Scenario 4:
Conditions -The automatic high beam system is set to OFF in the
message center. The headlamp switch is
in
(autolamps),(off),(park lamps), or(on).
Operation -The high beam switch can be used to turn the high beams
on and off.
Enabling/disabling auto high beams
Enabling/disabling and/or checking the status of the automatic high beam
system can be performed using the message center. SeeMessage center
in theInstrument clusterchapter.
Activating high beams
If there is no traffic in front of the vehicle, the high beams will come on
automatically and the
light will display in the instrument panel if
the following are true:
•The headlamp control is in auto lamp
mode.
•The ambient light level is low enough that high beams are needed.
•Vehicle speed must be greater than 32 mph (51 km/h).
•Severe weather is not detected.
Deactivating high beams
The automatic high beams will deactivate if any of the following events
occur:
•An approaching vehicle’s headlights or a preceding vehicle’s tail lamps
are detected.
•The headlamp control is moved out of the autolamps position.
Lights
61
2010 Taurus(500)
Owners Guide(own2002), 1st Printing
USA(fus)
Page 64 of 378
PANEL DIMMER CONTROL
Use to adjust the brightness of the
instrument panel and all applicable
lit components in the vehicle during
headlamp and parking lamp
operation.
•Tapthetoporbottomofthe
control to brighten/dim all interior
lit components incrementally, or
•Press and hold the top or bottom of the control until the desired
lighting level is reached.
•Press and hold the top of the control to the full on position to activate
the “dome on” feature. This will turn on the interior courtesy lights.
The lights will remain on until the bottom of the control is pressed.
Note:If the battery is disconnected, discharged, or a new battery is
installed, the dimmer control requires re-calibration. Press the dimmer
control from the full dim position to the full on position to reset. This
will ensure that your displays are visible under all lighting conditions.
AIMING THE HEADLAMPS
The headlamps on your vehicle are properly aimed at the assembly plant.
If your vehicle has been in an accident, the alignment of your headlamps
should be checked by your authorized dealer.
Vertical aim adjustment
1. Park the vehicle directly in front of a wall or screen on a level surface,
approximately 25 feet (7.6 meters) away.
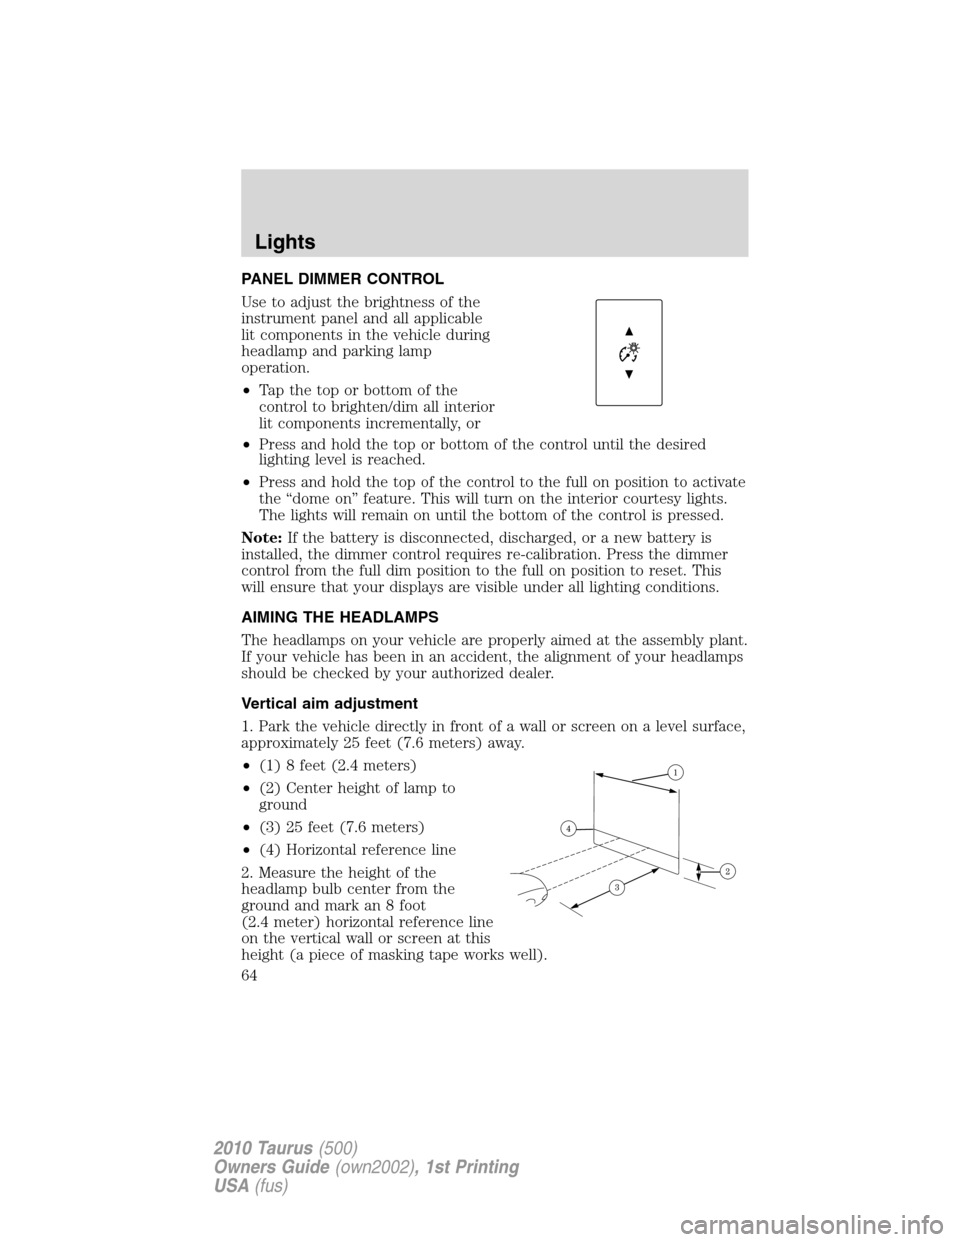
•(1) 8 feet (2.4 meters)
•(2) Center height of lamp to
ground
•(3) 25 feet (7.6 meters)
•(4) Horizontal reference line
2. Measure the height of the
headlamp bulb center from the
ground and mark an 8 foot
(2.4 meter) horizontal reference line
on the vertical wall or screen at this
height (a piece of masking tape works well).
Lights
64
2010 Taurus(500)
Owners Guide(own2002), 1st Printing
USA(fus)
Page 76 of 378
ELECTRONIC COMPASS (IF EQUIPPED)
The compass heading is displayed in the center stack display.
The compass reading may be affected when you drive near large
buildings, bridges, power lines and powerful broadcast antenna. Magnetic
or metallic objects placed in, on or near the vehicle may also affect
compass accuracy.
Usually, when something affects the compass readings, the compass will
correct itself after a few days of operating your vehicle in normal
conditions. If the compass still appears to be inaccurate, a manual
calibration may be necessary. Refer toCompass calibration
adjustment.
Most geographic areas (zones) have a magnetic north compass point that
varies slightly from the northerly direction on maps. This variation is four
degrees between adjacent zones and will become noticeable as the
vehicle crosses multiple zones. A correct zone setting will eliminate this
error. Refer toCompass zone adjustment.
Compass zone adjustment
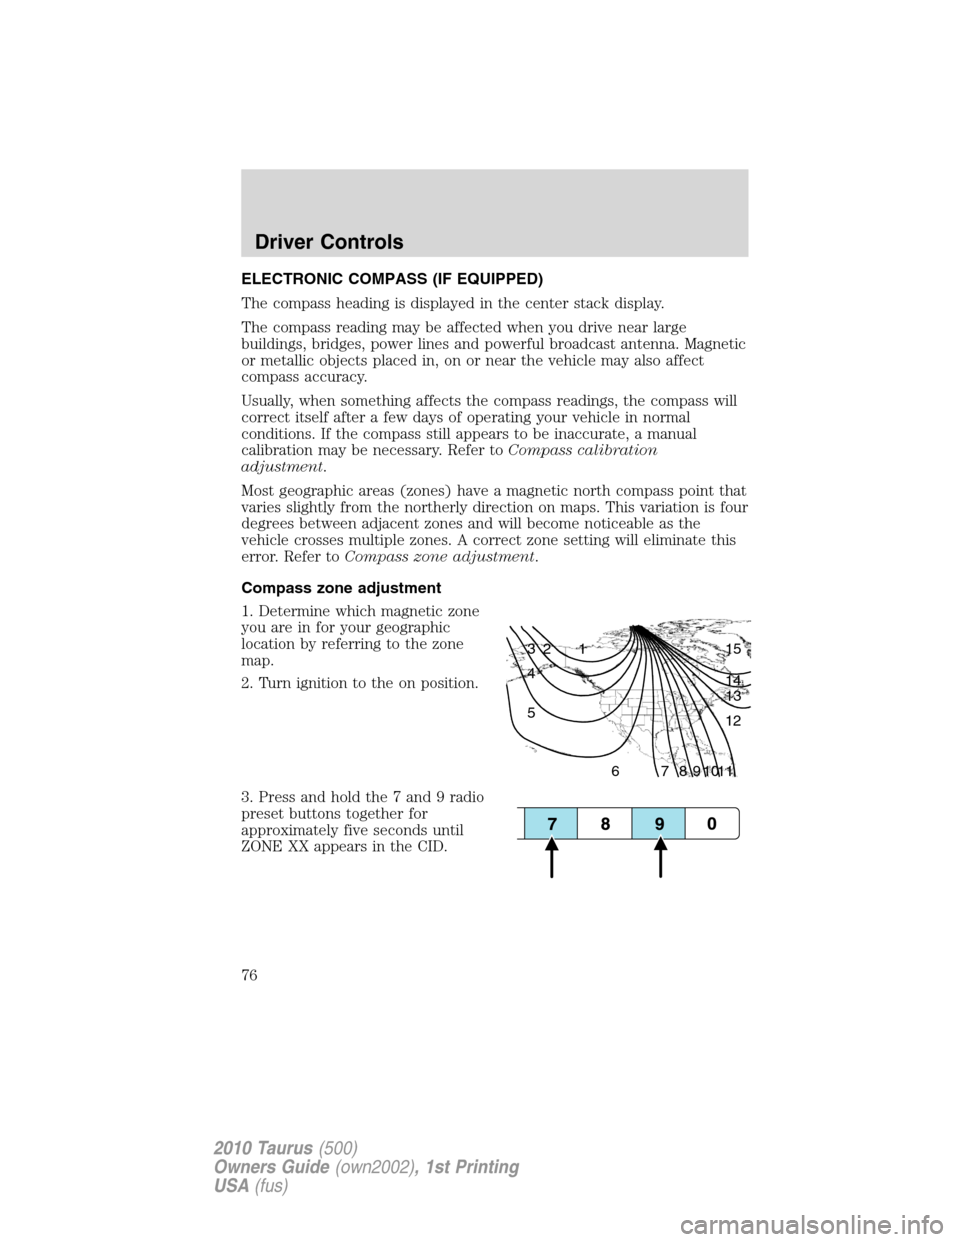
1. Determine which magnetic zone
you are in for your geographic
location by referring to the zone
map.
2. Turn ignition to the on position.
3. Press and hold the 7 and 9 radio
preset buttons together for
approximately five seconds until
ZONE XX appears in the CID.
1 2 3
4
5
6 7 8 9 101112 13 14 15
Driver Controls
76
2010 Taurus(500)
Owners Guide(own2002), 1st Printing
USA(fus)
Page 77 of 378
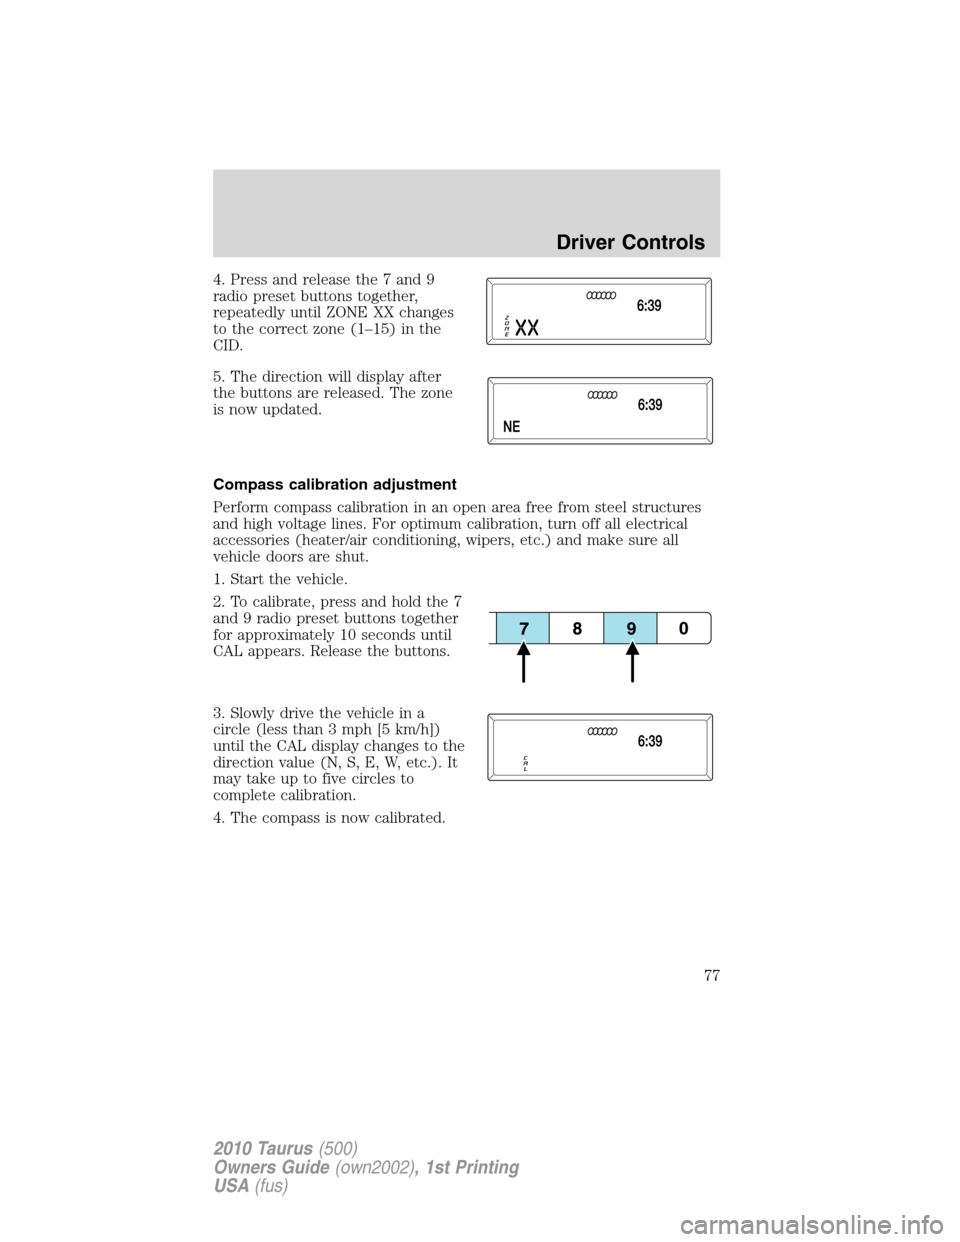
4. Press and release the 7 and 9
radio preset buttons together,
repeatedly until ZONE XX changes
to the correct zone (1–15) in the
CID.
5. The direction will display after
the buttons are released. The zone
is now updated.
Compass calibration adjustment
Perform compass calibration in an open area free from steel structures
and high voltage lines. For optimum calibration, turn off all electrical
accessories (heater/air conditioning, wipers, etc.) and make sure all
vehicle doors are shut.
1. Start the vehicle.
2. To calibrate, press and hold the 7
and 9 radio preset buttons together
for approximately 10 seconds until
CAL appears. Release the buttons.
3. Slowly drive the vehicle in a
circle (less than 3 mph [5 km/h])
until the CAL display changes to the
direction value (N, S, E, W, etc.). It
may take up to five circles to
complete calibration.
4. The compass is now calibrated.
Driver Controls
77
2010 Taurus(500)
Owners Guide(own2002), 1st Printing
USA(fus)
Page 83 of 378

Automatic dimming interior rear view mirror (if equipped)
Your vehicle may be equipped with an interior rear view mirror that has
an auto-dimming function. The electronic day/night mirror will change
from the normal (high reflective) state to the non-glare (darkened) state
when bright lights (glare) reach the mirror. When the mirror detects
bright light from behind the vehicle, it will automatically adjust (darken)
to minimize glare.
The mirror will automatically return to the normal state whenever the
vehicle is placed in R (Reverse) to ensure a bright clear view when
backing up.
Do not block the sensors on the front and back of the interior
rear view mirror since this may impair proper mirror
performance.
Do not clean the housing or glass of any mirror with harsh
abrasives, fuel or other petroleum-based cleaning products.
Note:If equipped with a rear view camera system, a video image will be
displayed in the mirror or the navigation system display (if equipped)
when the vehicle is put in R (Reverse). Refer toRearview camera
systemin theDrivingchapter.
EXTERIOR MIRRORS
Power side view mirrors
WARNING:Do not adjust the mirror while the vehicle is in
motion.
To adjust your mirrors:
1. Rotate the control clockwise to
adjust the right mirror and rotate
the control counterclockwise to
adjust the left mirror.
2. Move the control in the direction
you wish to tilt the mirror.
3. Return to the center position to lock mirrors in place.
Heated mirrors (if equipped)
Both mirrors are heated automatically to remove ice, mist and fog when
the rear window defrost is activated.
Do not remove ice from the mirrors with a scraper or attempt to
readjust the mirror glass if it is frozen in place. These actions
could cause damage to the glass and mirrors.
Driver Controls
83
2010 Taurus(500)
Owners Guide(own2002), 1st Printing
USA(fus)
Page 87 of 378
WARNING:Always pay close attention to changing road
conditions, especially when using Adaptive Cruise Control.
Adaptive Cruise Control cannot replace attentive driving. Failing to
follow any of the warnings below or failing to pay attention to the road
may result in a collision, serious injury or death.
WARNING:Adaptive cruise control is not a collision warning or
avoidance system. Additionally, adaptive cruise control will not
detect:
•Stationary or slow moving vehicles below 6 mph (10 km/h).
•Pedestrians or objects in the roadway.
•Oncoming vehicles in the same lane.
WARNING:Do not use the adaptive cruise control when
entering or leaving a highway, in heavy traffic or on roads that
are winding, slippery or unpaved.
WARNING:Do not use in poor visibility, specifically fog, rain,
spray or snow.
Setting adaptive cruise control
Note:It is the drivers responsibility to stay alert, drive safely and be in
control of the vehicle at all times.
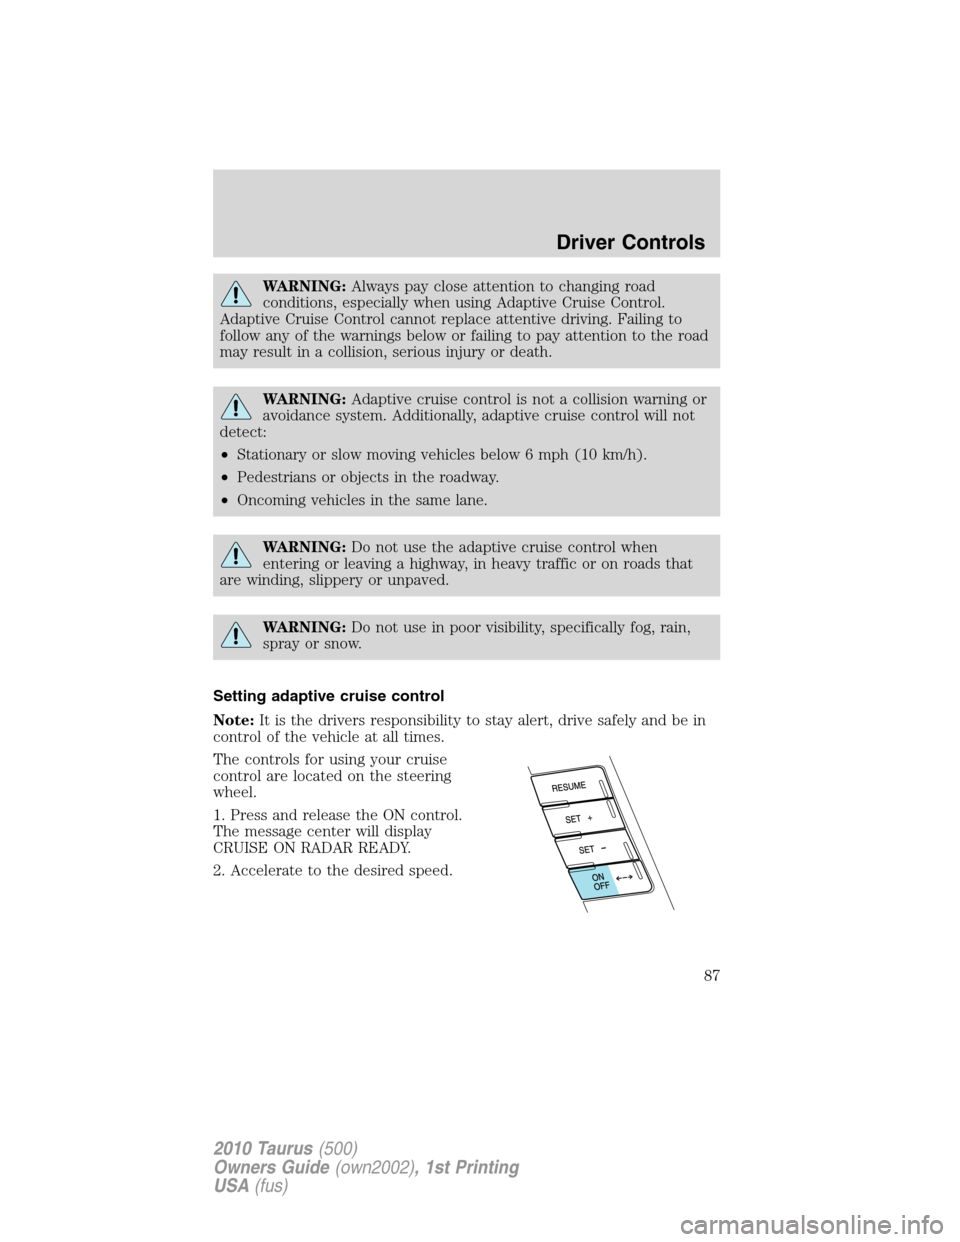
The controls for using your cruise
control are located on the steering
wheel.
1. Press and release the ON control.
The message center will display
CRUISE ON RADAR READY.
2. Accelerate to the desired speed.
Driver Controls
87
2010 Taurus(500)
Owners Guide(own2002), 1st Printing
USA(fus)