2010 FORD F750 wheel
[x] Cancel search: wheelPage 155 of 274

4. Remove the jumper cable from the positive (+) terminal of the
disabled vehicle’s battery.
After the disabled vehicle has been started and the jumper cables
removed, allow it to idle for several minutes so the engine computer can
relearnits idle conditions.
WRECKER TOWING INSTRUCTIONS
Before moving the disabled vehicle, check for adequate road clearance of
vehicle components. It is recommended the disabled vehicle be unloaded
prior to being towed to reduce any abnormal load to the vehicle
components resulting from the towing procedures. Before towing, be
sure to fully release the parking brake. The spring-actuated type parking
brake can be reset by recharging the air system with at least 64 psi
(441 kPa) of air. If the brake system will not retain air pressure, then the
spring brakes must be released manually. Refer toParking brakein the
Drivingchapter
Note:For towing, make sure the vehicle is securely connected to the
tow vehicle and the tow vehicle parking brakes are applied before
releasing the disabled vehicle’s spring brakes.
WARNING:To reduce the risk of personal injury or property
damage when manually releasing the spring brakes, be sure to
block the wheels so the vehicle cannot move once the brakes are
released.
Towing the vehicle with the front wheels suspended
When it is necessary to tow a vehicle with the front wheels suspended,
extra precautions must be taken to avoid transmission or differential
damage. Proceed as follows:
•Remove the axle shafts from the axle assembly to prevent the wheels
from driving the differential and the transmission.
+–+–
Roadside Emergencies
155
2010 F-650/750(f67)
Supplement(supplement), 1st Printing
USA(fus)
Page 156 of 274

•The wheel hub ends must be covered to prevent loss of axle lubricant
and entrance of other contaminants. If the axle shafts are not
removed, removal of the driveshaft is required.
Note:To avoid transmission damage, vehicles should not be towed even
a short distance without suspending rear wheels or removing the axle
shaft or driveshaft.
Note:In the event the chassis is equipped with a tandem axle and the
vehicle is to be towed from the front, the forward rear axle may be
raised to clear the road surface and secured to the frame by chains or
U-bolts, allowing only the rear rear axle to contact the road surface. Axle
shafts must be removed from the rear rear axle assembly. The wheel hub
ends must be covered to prevent loss of axle lubricant and entrance of
contaminants. Use extreme care in securing the chains or U-bolts to
avoid possible damage to the brake lines, hoses or other components.
Towing vehicles equipped with a driver-controlled differential lock
Note:If the vehicle must be towed to a service facility with the drive
axle wheels on the ground, it is necessary to remove the axle shafts
before the vehicle is towed.
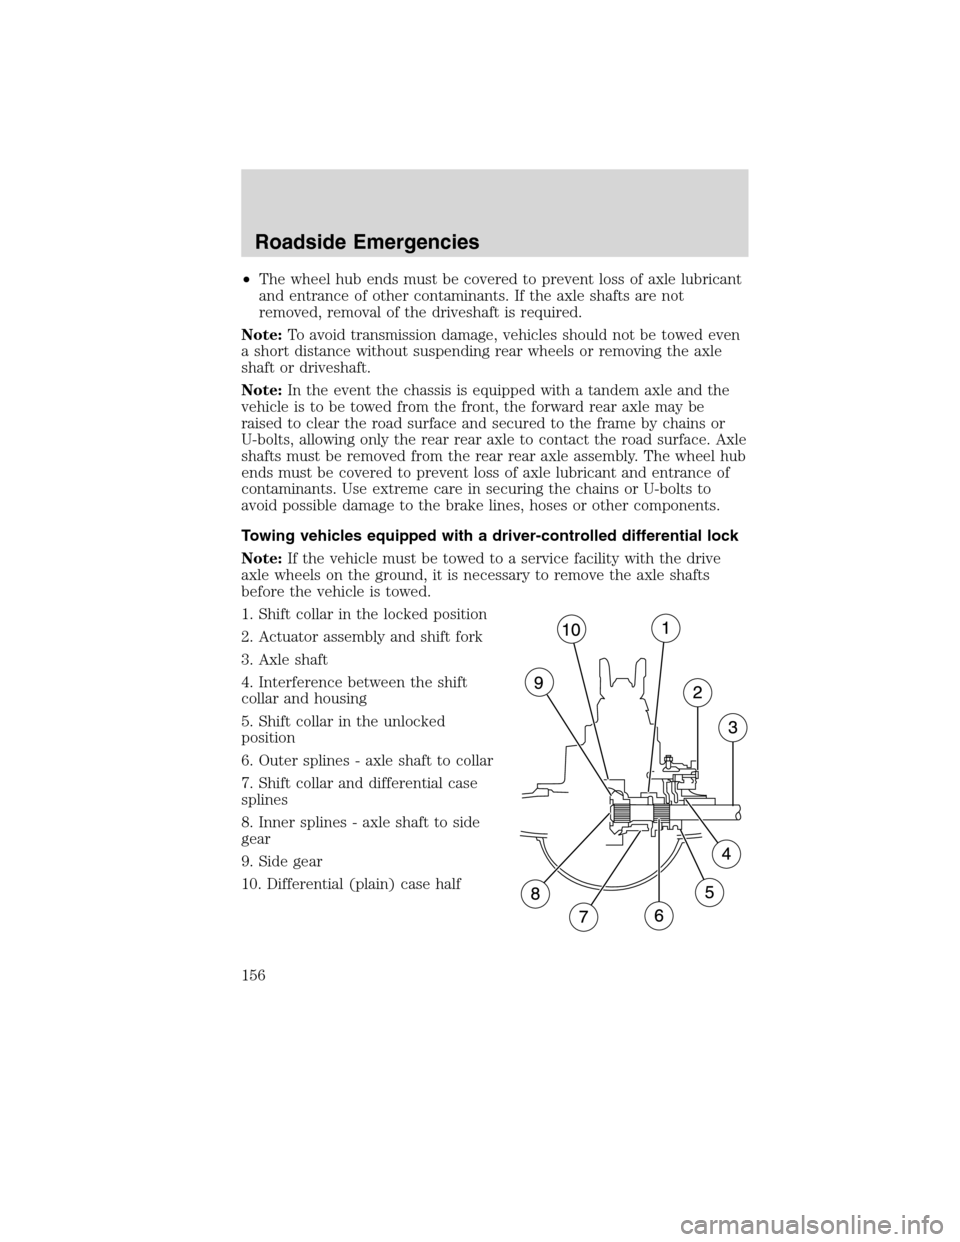
1. Shift collar in the locked position
2. Actuator assembly and shift fork
3. Axle shaft
4. Interference between the shift
collar and housing
5. Shift collar in the unlocked
position
6. Outer splines - axle shaft to collar
7. Shift collar and differential case
splines
8. Inner splines - axle shaft to side
gear
9. Side gear
10. Differential (plain) case half
Roadside Emergencies
156
2010 F-650/750(f67)
Supplement(supplement), 1st Printing
USA(fus)
Page 157 of 274

Removing axle shafts before towing
1. Shift the main differential to the unlocked (disengaged) position. The
differential lock light will turn off.
2. Remove the capscrews and washers or stud nuts and washers from
flanges of both axle shafts.
3. Loosen the tapered dowels in the flanges of both axle shafts by
holding a 1
1�2inch diameter brass drift or hammer against the axle shaft
center and hitting it with a five or six pound hammer.Note:Do not use
a chisel or wedge to loosen the axle shafts and dowels. Use of a chisel or
wedge can damage the hub, axle shafts and oil seals.
4. Remove the tapered dowels and both axle shafts from the axle
assembly.
5. Assemble a cover over openings of both wheels ends to prevent loss of
lubricant and keep dirt away from the wheel bearing cavities.
Note:One of the axle shafts has two sets of splines. One set to engage
with the differential side gear and one set to engage with the shift collar
for the differential lock. It may be necessary to rotate the shaft slightly
to align the gear spline teeth with the shift collar teeth in order to
remove the axle shaft.
Installing the axle shafts
1. Remove the covers from the wheel ends.
2. Shift the differential lock to the unlocked position (disengaged)
position.
3. Install the axle shafts.
•Place the gaskets on the wheel hub studs.
•Push the right-hand axle shaft and gasket into the wheel end and
housing until the shaft stops against the differential shift collar.
•Push down and in on the axle shaft flange and rotate the shaft until
the splines of the shaft and shift collar are engaged.
•Push the axle shaft further into the housing until the shaft stops
against the differential side gear.
•Push down on the axle shaft flange and rotate the shaft until the
splines of the shaft and side gear are engaged.
•Push the axle shaft completely into the housing until the axle shaft
flange and the gasket are flush against the wheel hub.
•Install the left-hand axle shaft and gasket into the wheel end.
Roadside Emergencies
157
2010 F-650/750(f67)
Supplement(supplement), 1st Printing
USA(fus)
Page 158 of 274

4. If tapered dowels are required, install them at each stud and into the
flange of the axle shaft. Use a punch or drift and hammer, if needed.
5. Install the fasteners and tighten to correct torque value. Refer to the
Service Manual.
Towing the vehicle with the rear wheels suspended
Note:To avoid damage to the cab roof or air deflector when towing the
vehicle backward (rear wheels suspended) the air deflector must be
removed.
Whenever possible, it is preferable to tow a disabled vehicle from the
rear by raising the rear of the chassis. When towing a vehicle with the
rear of the chassis suspended, the front wheels must be locked in the
straight-ahead position.
Vehicles equipped with a manual transmission must have at least 1.0 pint
(0.5L) of transmission fluid drained from the case. This will prevent the
transmission fluid from entering the clutch housing and fluid saturating
the clutch discs. Make sure that the transmission fluid is replaced before
the vehicle is returned to service.
Roadside Emergencies
158
2010 F-650/750(f67)
Supplement(supplement), 1st Printing
USA(fus)
Page 165 of 274

•Remove particles such as bird droppings, tree sap, insect deposits, tar
spots, road salt and industrial fallout before repairing paint chips.
•Always read the instructions before using the products.
ALUMINUM WHEELS AND COVERS
•Clean with Motorcraft Wheel and Tire Cleaner (ZC-37–A), which is
available from your dealer.
•Never apply any cleaning chemical to hot or warm wheel rims or
covers.
•Some automatic car washes may cause damage to the finish on your
wheel rims or covers. Chemical-strength cleaners, or cleaning
chemicals, in combination with brush agitation to remove brake dust
and dirt, could wear away the clearcoat finish over time.
•Do not use hydrofluoric acid-based or high caustic-based wheel
cleaners, steel wool, fuels or strong household detergent.
•To remove tar and grease, use Motorcraft Bug and Tar Remover
(ZC-42), available from your dealer.
ENGINE
Engines are more efficient when they are clean because grease and dirt
buildup keep the engine warmer than normal. When washing:
•Take care when using a power washer to clean the engine. The
high-pressure fluid could penetrate the sealed parts and cause
damage.
Note:To prevent damage to the engine control module, never
spray-wash it directly. Never spray any connector.
•Do not spray a hot engine with cold water to avoid cracking the
engine block or other engine components.
•Spray Motorcraft Engine Shampoo and Degreaser (ZC-20) on all parts
that require cleaning and pressure rinse clean.
•Never wash or rinse the engine while it is running; water in the
running engine may cause internal damage.
PLASTIC (NON-PAINTED) EXTERIOR PARTS
Use only approved products to clean plastic parts. These products are
available from your dealer.
•For routine cleaning, use Motorcraft Detail Wash (ZC-3–A).
•If tar or grease spots are present, use Motorcraft Bug and Tar
Remover (ZC-42).
Cleaning
165
2010 F-650/750(f67)
Supplement(supplement), 1st Printing
USA(fus)
Page 168 of 274

Motorcraft Dash and Vinyl Cleaner (ZC-38–A)
Motorcraft Deluxe Leather and Vinyl Cleaner (U.S. only) (ZC-11–A)
Motorcraft Detail Wash (ZC-3–A)
Motorcraft Dusting Cloth (ZC-24)
Motorcraft Engine Shampoo and Degreaser (U.S only) (ZC-20)
Motorcraft Engine Shampoo (Canada only) (CXC-66-A)
Motorcraft One Step Wash and Wax Concentrate (ZC-6-A)
Motorcraft Premium Car Wash Concentrate (U.S. only) (ZC-17-B)
Motorcraft Premium Glass Cleaner (Canada only) (CXC-100)
Motorcraft Premium Liquid Wax (ZC-53–A)
Motorcraft Professional Strength Carpet & Upholstery Cleaner (ZC-54)
Motorcraft Spot and Stain Remover (U.S. only) (ZC-14)
Motorcraft Tire Clean and Shine (ZC-28)
Motorcraft Triple Clean (U.S. only) (ZC-13)
Motorcraft Ultra-Clear Spray Glass Cleaner (ZC-23)
Motorcraft Vinyl Cleaner (Canada only) (CXC-93)
Motorcraft Wheel and Tire Cleaner (ZC-37–A)
Cleaning
168
2010 F-650/750(f67)
Supplement(supplement), 1st Printing
USA(fus)
Page 169 of 274

GENERAL SERVICING GUIDELINES AND PRECAUTIONS
As with any machine, care should be taken to avoid being injured when
performing maintenance, repairs or system checks. Improper or
incomplete service could result in the vehicle not working properly
which, in turn, may result in personal injury or damage to the vehicle or
equipment. It is the operator’s responsibility to see that the vehicle
receives proper care and maintenance. If you have any questions about
performing some service, have the service done by a qualified technician.
Servicing guidelines
When servicing your vehicle, always:
•turn off the ignition unless the particular procedure calls for the
engine to be running.
•set the parking brake or chock the wheels.
•use support stands, not a jack, whenever you must be under a raised
vehicle.
•do not smoke.
•wear safety glasses for eye protection.
•operate the engine in a well-ventilated area
•do not work on the brakes or the clutch unless the proper precautions
are taken to avoid inhaling friction material dust.
•do not wear loose-fitting clothing, hanging jewelry, watches or rings.
•avoid contact with hot metal parts. Allow the hot components to cool
before working with, or around them.
Quality service parts are available through your dealer. If dealer parts are
not used, the owner must make sure that the parts that are being used
are equivalent quality to dealer parts.
WARNING:The use of inferior parts can adversely affect the
quality and reliability of your vehicle which, in turn, can result in
property damage, personal injury or death.
Note:To avoid damage to the vehicle’s electrical components, disconnect
the positive (+) and negative (-) battery cables prior to electric welding.
Attach the welder ground cable as close as possible to the part being
welded. If it is necessary to weld close to an electrical component, it is
recommended that the electronic component be temporarily removed.
Follow the periodic lubrication procedures and regular inspection
intervals as outlined. Have your dealer or service center inspect your
Maintenance and Specifications
169
2010 F-650/750(f67)
Supplement(supplement), 1st Printing
USA(fus)
Page 171 of 274

Check to make sure that the axle mounting U-bolt nuts, attaching or
mounting bolts and nuts are securely tightened. Regularly check front
axle for damage, binding, worn parts and adequate lubrication.
At regular intervals, or during other scheduled maintenance, (tire
rotation/service, wheel bearing service, alignment, etc.) the kingpins
should be checked for excessive wear. Refer to the service manual for
proper procedures.
Toe-in setting - general inspection
Inspecting steer axle tires in the first 3,000–10,000 service miles
(4,800–16,000 service km) will generally show if tires are wearing
normally.
Rapid outside shoulder wear on both tires indicates too much toe-in.
Rapid inside shoulder wear on both tires indicates too much toe-out. In
P&D-type service, left-to-right steer tire tread life differentials up to 40%
can be observed depending on routes and other variables.
Follow the tire manufacturer’s recommended cold inflation pressure for
the tire size, load range (ply rating) and steer axle loading typical for
their operation (each steer axle tire will equal
1�2steer axle loading).
Special applications may warrant a setting based on past experience with
the type of tire operating loads and conditions. Radial tires are more
sensitive to toe-in setting than bias ply tires. While not insensitive to
vehicle alignment, fine tuning school bus alignment to line-haul truck
standards will not drastically improve tire tread life.
It is essential that correct toe-in and tire pressure be maintained for
optimum tire wear.
Rear axle - general inspection
Check to make sure that the axle mounting U-bolts, attaching or
mounting bolts and nuts are securely tightened. Refer toU-bolt nut
torquein this chapter. Regularly check the rear axle for damaged,
binding or worn parts.
NoSpin Detroit Locker positive locking differential
Vehicles equipped with this type differential have the operator’s manual
supplied with the vehicle. Refer to this manual for maintenance checks.
Maintenance and Specifications
171
2010 F-650/750(f67)
Supplement(supplement), 1st Printing
USA(fus)