2010 FORD F550 ECO mode
[x] Cancel search: ECO modePage 286 of 408
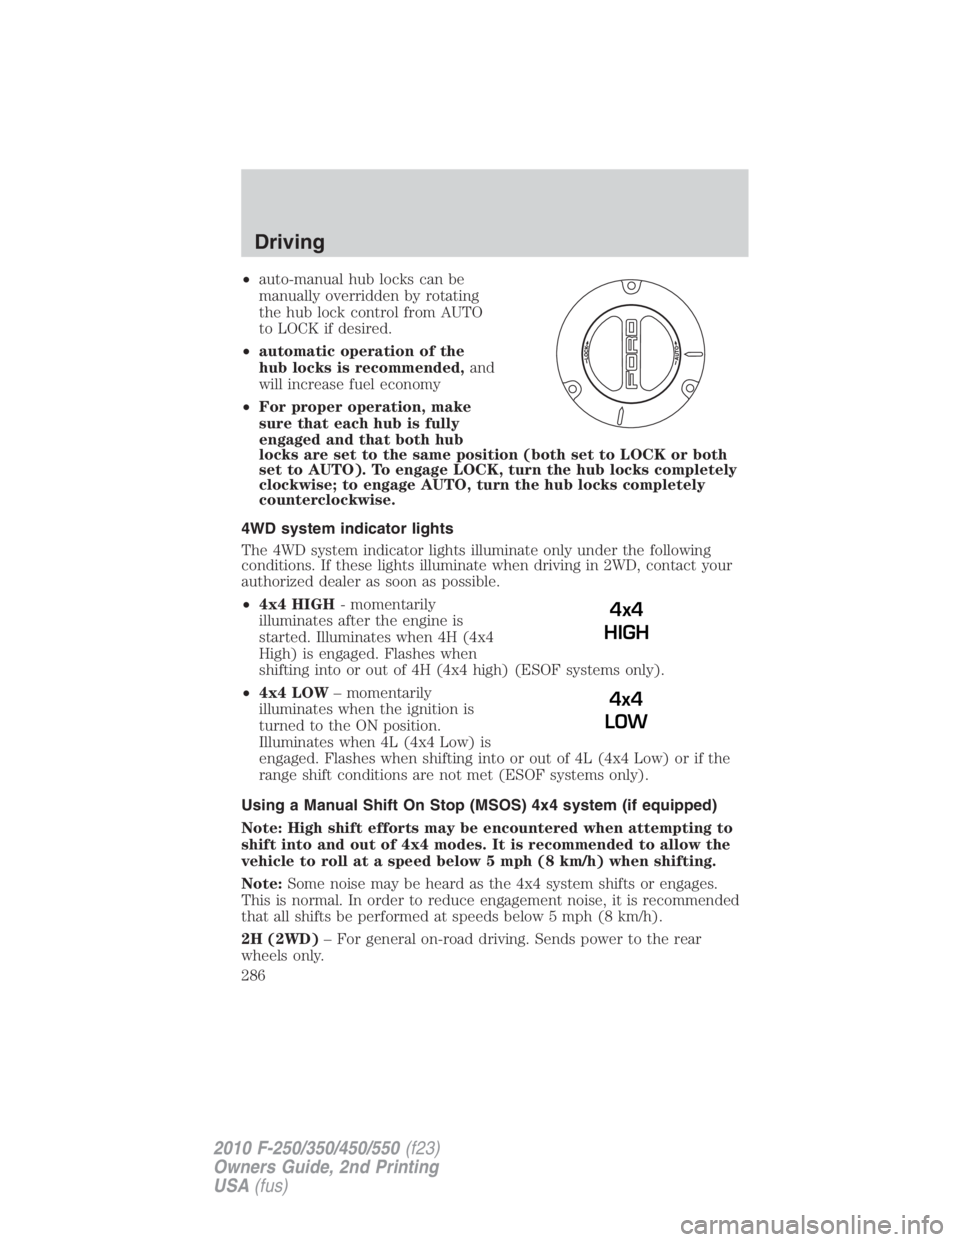
• auto-manual hub locks can be
manually overridden by rotating
the hub lock control from AUTO
to LOCK if desired.
• automatic operation of the
hub locks is recommended, and
will increase fuel economy
• For proper operation, make
sure that each hub is fully
engaged and that both hub
locks are set to the same position (both set to LOCK or both
set to AUTO). To engage LOCK, turn the hub locks completely
clockwise; to engage AUTO, turn the hub locks completely
counterclockwise.
4WD system indicator lights
The 4WD system indicator lights illuminate only under the following
conditions. If these lights illuminate when driving in 2WD, contact your
authorized dealer as soon as possible.
• 4x4 HIGH - momentarily
illuminates after the engine is
started. Illuminates when 4H (4x4
High) is engaged. Flashes when
shifting into or out of 4H (4x4 high) (ESOF systems only).
• 4x4 LOW – momentarily
illuminates when the ignition is
turned to the ON position.
Illuminates when 4L (4x4 Low) is
engaged. Flashes when shifting into or out of 4L (4x4 Low) or if the
range shift conditions are not met (ESOF systems only).
Using a Manual Shift On Stop (MSOS) 4x4 system (if equipped)
Note: High shift efforts may be encountered when attempting to
shift into and out of 4x4 modes. It is recommended to allow the
vehicle to roll at a speed below 5 mph (8 km/h) when shifting.
Note: Some noise may be heard as the 4x4 system shifts or engages.
This is normal. In order to reduce engagement noise, it is recommended
that all shifts be performed at speeds below 5 mph (8 km/h).
2H (2WD) – For general on-road driving. Sends power to the rear
wheels only. 4x4
HIGH
4x4
LOWDriving
286
2010 F-250/350/450/550 (f23)
Owners Guide, 2nd Printing
USA (fus)
Page 291 of 408
Shifting from 4x4 HIGH to 2WD
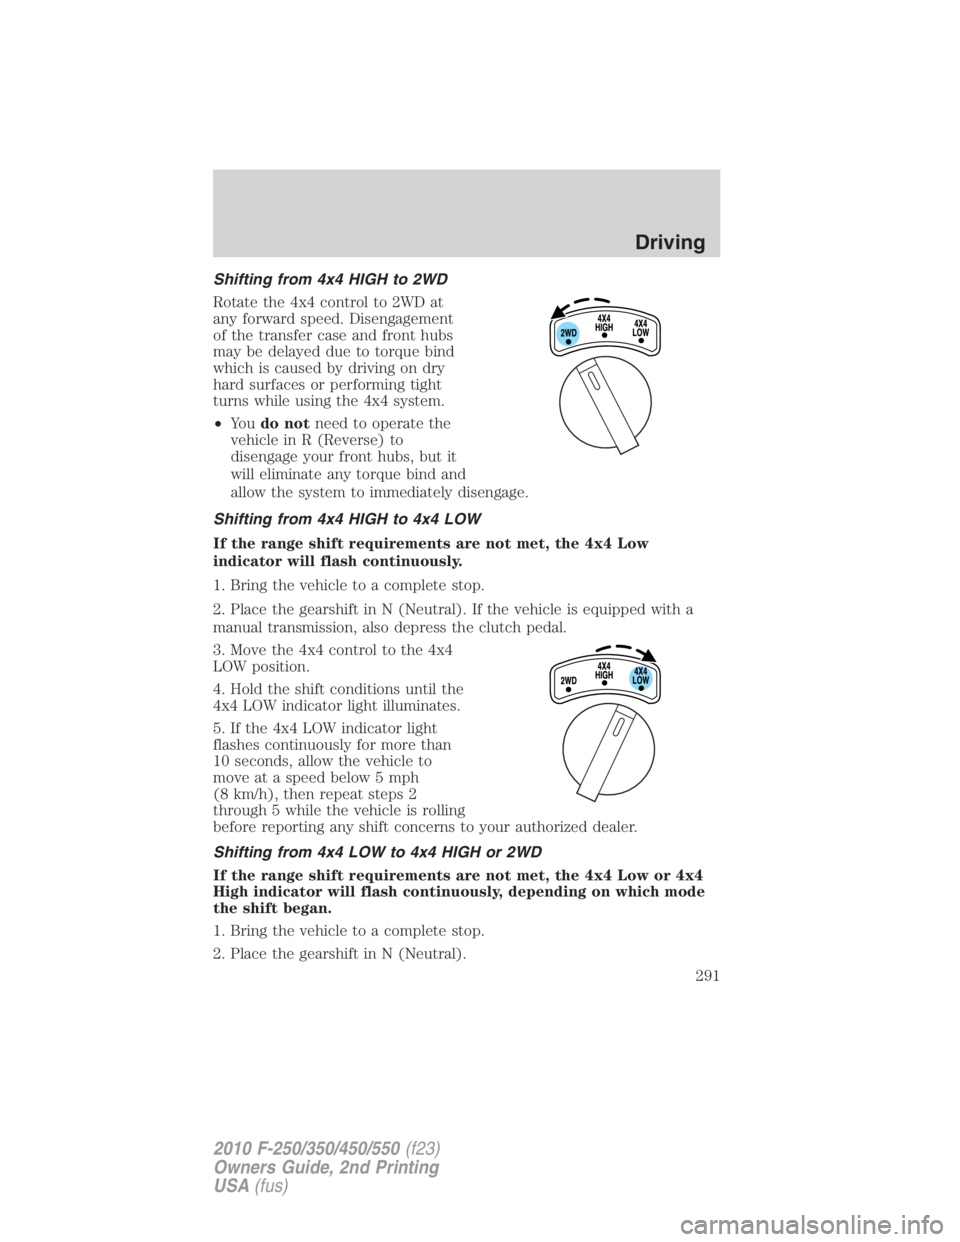
Rotate the 4x4 control to 2WD at
any forward speed. Disengagement
of the transfer case and front hubs
may be delayed due to torque bind
which is caused by driving on dry
hard surfaces or performing tight
turns while using the 4x4 system.
• Yo u do not need to operate the
vehicle in R (Reverse) to
disengage your front hubs, but it
will eliminate any torque bind and
allow the system to immediately disengage.
Shifting from 4x4 HIGH to 4x4 LOW
If the range shift requirements are not met, the 4x4 Low
indicator will flash continuously.
1. Bring the vehicle to a complete stop.
2. Place the gearshift in N (Neutral). If the vehicle is equipped with a
manual transmission, also depress the clutch pedal.
3. Move the 4x4 control to the 4x4
LOW position.
4. Hold the shift conditions until the
4x4 LOW indicator light illuminates.
5. If the 4x4 LOW indicator light
flashes continuously for more than
10 seconds, allow the vehicle to
move at a speed below 5 mph
(8 km/h), then repeat steps 2
through 5 while the vehicle is rolling
before reporting any shift concerns to your authorized dealer.
Shifting from 4x4 LOW to 4x4 HIGH or 2WD
If the range shift requirements are not met, the 4x4 Low or 4x4
High indicator will flash continuously, depending on which mode
the shift began.
1. Bring the vehicle to a complete stop.
2. Place the gearshift in N (Neutral). Driving
291
2010 F-250/350/450/550 (f23)
Owners Guide, 2nd Printing
USA (fus)
Page 295 of 408
the driveline. Therefore, the vehicle is free to roll even if the automatic
transmission is in P (Park) or the manual transmission is in gear. Do not
leave the vehicle unattended with the transfer case in the N (Neutral)
position. Always set the parking brake fully and turn off the ignition
when leaving the vehicle.
WARNING: Always set the parking brake fully and make sure
the gearshift is latched in P (Park). Turn the ignition to the off
position and remove the key whenever you leave your vehicle.
WARNING: If the parking brake is fully released, but the brake
warning lamp remains illuminated, the brakes may not be
working properly. See your authorized dealer.
4WD Systems
4WD (when you select a 4WD mode), uses all four wheels to power the
vehicle. This increases traction, enabling you to drive over terrain and
road conditions that a conventional two-wheel drive vehicle cannot.
Power is supplied to all four wheels through a transfer case. On 4WD
vehicles, the transfer case allows you to select 4WD when necessary.
Information on transfer case operation and shifting procedures can be
found in the Driving chapter. Information on transfer case maintenance
can be found in the Maintenance and Specifications chapter. You
should become thoroughly familiar with this information before you
operate your vehicle.
Normal characteristics
On some 4WD models, the initial shift from two-wheel drive to 4x4 while
the vehicle is moving can cause some momentary clunk and ratcheting
sounds. This is the front drivetrain coming up to speed and the
automatic locking hubs engaging and is not cause for concern.
Sand
When driving over sand, try to keep all four wheels on the most solid
area of the trail. Avoid reducing the tire pressures but shift to a lower
gear and drive steadily through the terrain. Apply the accelerator slowly
and avoid spinning the wheels.
Avoid excessive speed because vehicle momentum can work against you
and cause the vehicle to become stuck to the point that assistance may
be required from another vehicle. Remember, you may be able to back
out the way you came if you proceed with caution. Driving
295
2010 F-250/350/450/550 (f23)
Owners Guide, 2nd Printing
USA (fus)
Page 316 of 408
Dissimilar spare tire/wheel information
WARNING: Failure to follow these guidelines could result in an
increased risk of loss of vehicle control, injury or death.
If you have a dissimilar spare tire/wheel, then it is intended for
temporary use only. This means that if you need to use it, you should
replace it as soon as possible with a road tire/wheel that is the same size
and type as the road tires and wheels that were originally provided by
Ford. If the dissimilar spare tire or wheel is damaged, it should be
replaced rather than repaired.
A dissimilar spare tire/wheel is defined as a spare tire and/or wheel that
is different in brand, size or appearance from the road tires and wheels
and can be one of three types:
1. T-type mini-spare: This spare tire begins with the letter “T” for tire
size and may have “Temporary Use Only” molded in the sidewall
2. Full-size dissimilar spare with label on wheel: This spare tire has
a label on the wheel that states: “THIS TIRE AND WHEEL FOR
TEMPORARY USE ONLY”
When driving with one of the dissimilar spare tires listed above, do not:
• Exceed 50 mph (80 km/h)
• Load the vehicle beyond maximum vehicle load rating listed on the
Safety Compliance Label
• Use snow chains on the end of the vehicle with the dissimilar spare
tire
• Use more than one dissimilar spare tire at a time
• Use commercial car washing equipment
• Try to repair the dissimilar spare tire
Use of one of the dissimilar spare tires listed above at any one wheel
location can lead to impairment of the following:
• Handling, stability and braking performance
• Comfort and noise
• Ground clearance and parking at curbs
• Winter weather driving capability
• Wet weather driving capability
It is not recommended that the vehicle be operated in 4WD modes with
a temporary emergency spare tire. If 4WD operation is necessary, do not
operate above speeds of 10 mph (16 km/h) or for distances above
50 miles (80 km).Roadside Emergencies
316
2010 F-250/350/450/550 (f23)
Owners Guide, 2nd Printing
USA (fus)
Page 377 of 408
• Use the same filling rate setting (low — medium — high) each time
the tank is filled.
• Allow no more than two automatic click-offs when filling.
• Always use fuel with the recommended octane rating.
• Use a known quality gasoline, preferably a national brand.
• Use the same side of the same pump and have the vehicle facing the
same direction each time you fill up.
• Have the vehicle loading and distribution the same every time.
Your results will be most accurate if your filling method is consistent.
Calculating fuel economy
1. Fill the fuel tank completely and record the initial odometer reading
(in miles or kilometers).
2. Each time you fill the tank, record the amount of fuel added (in
gallons or liters).
3. After at least three to five tank fill-ups, fill the fuel tank and record
the current odometer reading.
4. Subtract your initial odometer reading from the current odometer
reading.
5. Follow one of the simple calculations in order to determine fuel
economy:
Calculation 1: Divide total miles traveled by total gallons used.
Calculation 2: Multiply liters used by 100, then divide by total
kilometers traveled.
Keep a record for at least one month and record the type of driving (city
or highway). This will provide an accurate estimate of the vehicle’s fuel
economy under current driving conditions. Additionally, keeping records
during summer and winter will show how temperature impacts fuel
economy. In general, lower temperatures give lower fuel economy.
Driving style — good driving and fuel economy habits
Give consideration to the lists that follow and you may be able to change
a number of variables and improve your fuel economy.
Habits
• Smooth, moderate operation can yield up to 10% savings in fuel.
• Steady speeds without stopping will usually give the best fuel
economy. Maintenance and Specifications
377
2010 F-250/350/450/550 (f23)
Owners Guide, 2nd Printing
USA (fus)
Page 399 of 408

Lifestyle
Ash cup / smoker’s package
Bedliners and bedmats
Cargo organization and management
Towing mirrors
Trailer hitches, wiring harnesses and accessories
Peace of mind
Keyless entry keypad
Remote start
Vehicle security systems
Wheel locks
Not all accessories are available for all models.
For maximum vehicle performance, keep the following information in
mind when adding accessories or equipment to your vehicle:
• When adding accessories, equipment, passengers and luggage to your
vehicle, do not exceed the total weight capacity of the vehicle or of
the front or rear axle (GVWR or GAWR as indicated on the Safety
Compliance Certification Label). Consult your authorized dealer for
specific weight information.
• The Federal Communications Commission (FCC) and Canadian Radio
Telecommunications Commission (CRTC) regulate the use of mobile
communications systems — such as two-way radios, telephones and
theft alarms - that are equipped with radio transmitters. Any such
equipment installed in your vehicle should comply with FCC or CRTC
regulations and should be installed only by your authorized dealer.
• Mobile communications systems may harm the operation of your
vehicle, particularly if they are not properly designed for automotive
use.
• To avoid interference with other vehicle functions, such as anti-lock
braking systems, amateur radio users who install radios and antennas
onto their vehicle should not locate the Amateur Radio Antennas in
the area of the driver’s side hood.
• Electrical or electronic accessories or components that are added to
the vehicle by the authorized dealer or the owner may adversely affect
battery performance and durability. Accessories
399
2010 F-250/350/450/550 (f23)
Owners Guide, 2nd Printing
USA (fus)