2010 FORD F250 lock
[x] Cancel search: lockPage 178 of 408

WARNING:Position the safety belt height adjusters so that the
belt rests across the middle of your shoulder. Failure to adjust
the safety belt properly could reduce the effectiveness of the seat belt
and increase the risk of injury in a collision.
To adjust the shoulder belt height,
push the button and slide the height
adjuster up or down. Release the
button and pull down on the height
adjuster to make sure it is locked in
place.
Safety belt with cinch tongue (Regular cab center seating position
and Super Cab/Crew Cab rear center seating positions)
The cinch tongue will slide up and down the belt webbing when the belt
is stowed or while putting safety belts on. When the lap/shoulder safety
belt is buckled, the cinch tongue will allow the lap portion to be
shortened, but pinches the webbing to keep the lap portion from getting
longer. The cinch tongue is designed to slip during a crash, so always
wear the shoulder belt properly and don’t allow any slack in either the
lap or shoulder portions.
Before you can reach and latch a combination lap and shoulder belt
having a cinch tongue into the buckle, you may have to lengthen the lap
belt portion of it.
1. To lengthen the lap belt, pull
some webbing out of the shoulder
belt retractor.
2. While holding the webbing below
the tongue, grasp the tip (metal
portion) of the tongue so that it is
parallel to the webbing and slide the
tongue upward.
3. Provide enough lap belt length so that the tongue can reach the
buckle.
Seating and Safety Restraints
178
2010 F-250/350/450/550(f23)
Owners Guide, 2nd Printing
USA(fus)
Page 179 of 408

How to fasten the cinch tongue (Regular cab center seating
position and Super Cab/Crew Cab rear center seating positions)
1. Pull the combination lap and shoulder belt from the retractor so that
the shoulder belt portion of the safety belt crosses your shoulder and
chest.
2. Be sure the belt is not twisted. If the belt is twisted, remove the twist.
3. Insert the belt tongue into the proper buckle for your seating position
until you hear a snap and feel it latch.
4. Make sure the tongue is securely fastened to the buckle by pulling on
the tongue.
WARNING:The lap belt should fit snugly and as low as possible
around the hips, not across the waist.
While you are fastened in the safety belt, the combination lap/shoulder
belt with a cinch tongue adjusts to your movement. However, if you
brake hard, turn hard, or if your vehicle receives an impact of 5 mph
(8 km/h) or more, the safety belt will become locked and help reduce
your forward movement.
Lap belts
Adjusting the lap belt
WARNING:The lap belt should fit snugly and as low as possible
around the hips, not across the waist.
•1st row center seating position on SuperCab and Crew Cab
The lap belt does not adjust automatically.
Seating and Safety Restraints
179
2010 F-250/350/450/550(f23)
Owners Guide, 2nd Printing
USA(fus)
Page 200 of 408

Children 12 and under should be properly restrained in a rear seating
position whenever possible. If all children cannot be seated and
restrained properly in a rear seating position, properly restrain the
largest child in the front seat.
Installing child safety seats with automatic locking mode
combination lap and shoulder belts
(front passenger and rear outboard seating positions)
Check to make sure the child seat is properly secured before each use.
Children 12 and under should be properly restrained in a rear seating
position whenever possible. If all children cannot be seated and
restrained properly in a rear seating position, properly restrain the
largest child in the front seat.
When installing a child safety seat with combination lap/shoulder belts:
•Use the correct safety belt buckle for that seating position.
•Insert the belt tongue into the proper buckle until you hear a snap
and feel it latch. Make sure the tongue is securely fastened in the
buckle.
•Keep the buckle release button pointing up and away from the safety
seat, with the tongue between the child seat and the release button,
to prevent accidental unbuckling.
•Place vehicle seat back in upright position.
•This vehicle does not require the use of a locking clip.
WARNING:Depending on where you secure a child restraint,
and depending on the child restraint design, you may block
access to certain safety belt buckle assemblies and/or LATCH lower
anchors, rendering those features potentially unusable. To avoid risk of
injury, occupants should only use seating positions where they are able
to be properly restrained.
Seating and Safety Restraints
200
2010 F-250/350/450/550(f23)
Owners Guide, 2nd Printing
USA(fus)
Page 202 of 408

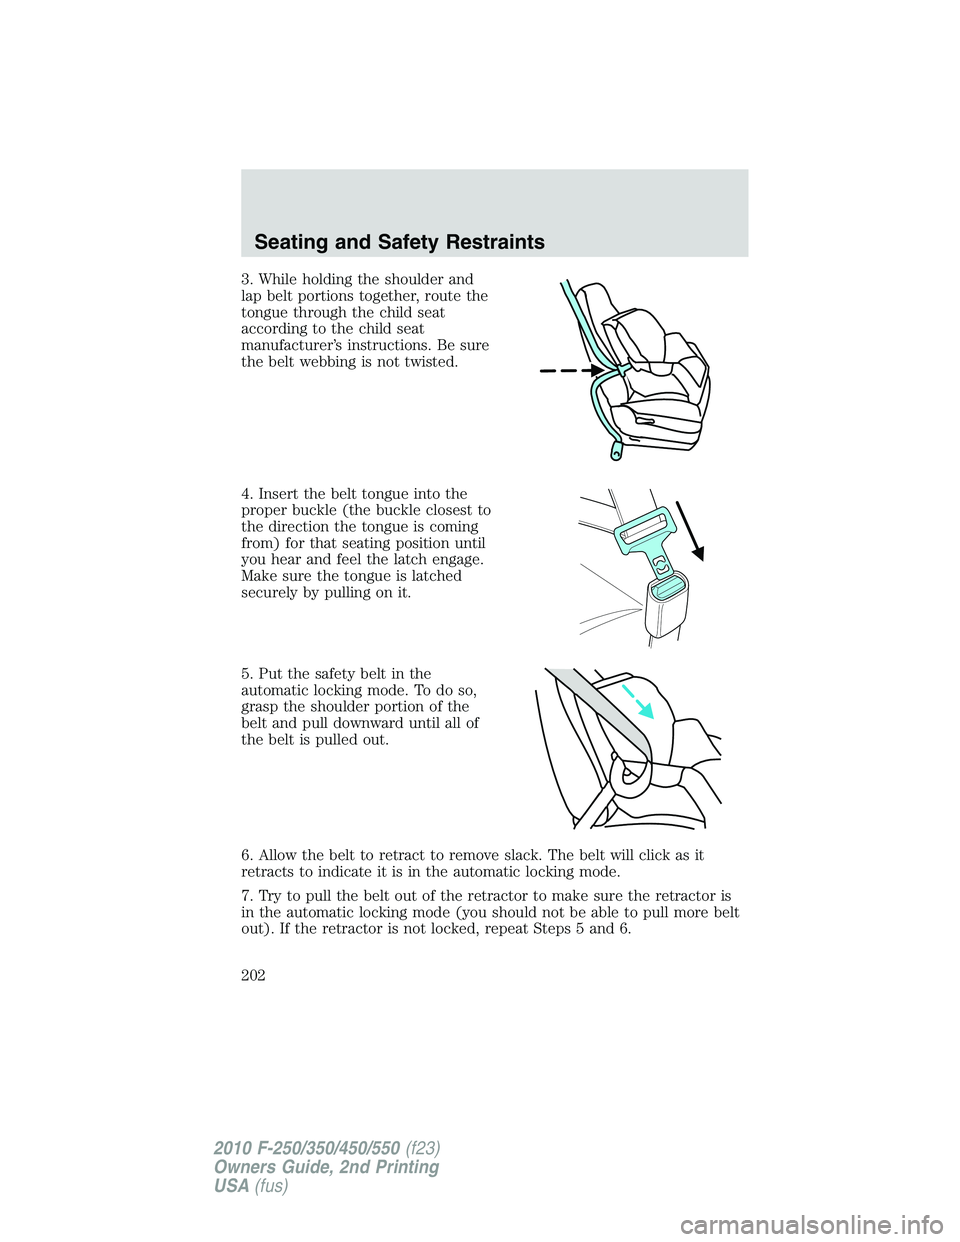
3. While holding the shoulder and
lap belt portions together, route the
tongue through the child seat
according to the child seat
manufacturer’s instructions. Be sure
the belt webbing is not twisted.
4. Insert the belt tongue into the
proper buckle (the buckle closest to
the direction the tongue is coming
from) for that seating position until
you hear and feel the latch engage.
Make sure the tongue is latched
securely by pulling on it.
5. Put the safety belt in the
automatic locking mode. To do so,
grasp the shoulder portion of the
belt and pull downward until all of
the belt is pulled out.
6. Allow the belt to retract to remove slack. The belt will click as it
retracts to indicate it is in the automatic locking mode.
7. Try to pull the belt out of the retractor to make sure the retractor is
in the automatic locking mode (you should not be able to pull more belt
out). If the retractor is not locked, repeat Steps 5 and 6.
Seating and Safety Restraints
202
2010 F-250/350/450/550(f23)
Owners Guide, 2nd Printing
USA(fus)
Page 209 of 408

Tether strap attachment
1. Route the child safety seat tether strap over the back of the seat.
For vehicles with adjustable head restraints, route the tether strap under
the head restraint and between the head restraint posts, other wise route
the tether strap over the top of the seatback. If the top of the safety seat
hits the head restraint, raise the head restraint to let the child seat fit
further rearward.
2. Locate the correct anchor for the selected seating position.
3. You may need to pull the seatback forward to access the tether
anchors. Make sure the seat is locked in the upright position before
installing the child seat. Refer to theRear folding seat system with load
floorsection in this chapter for information on how to operate the rear
seats.
4. Remove tether cover.
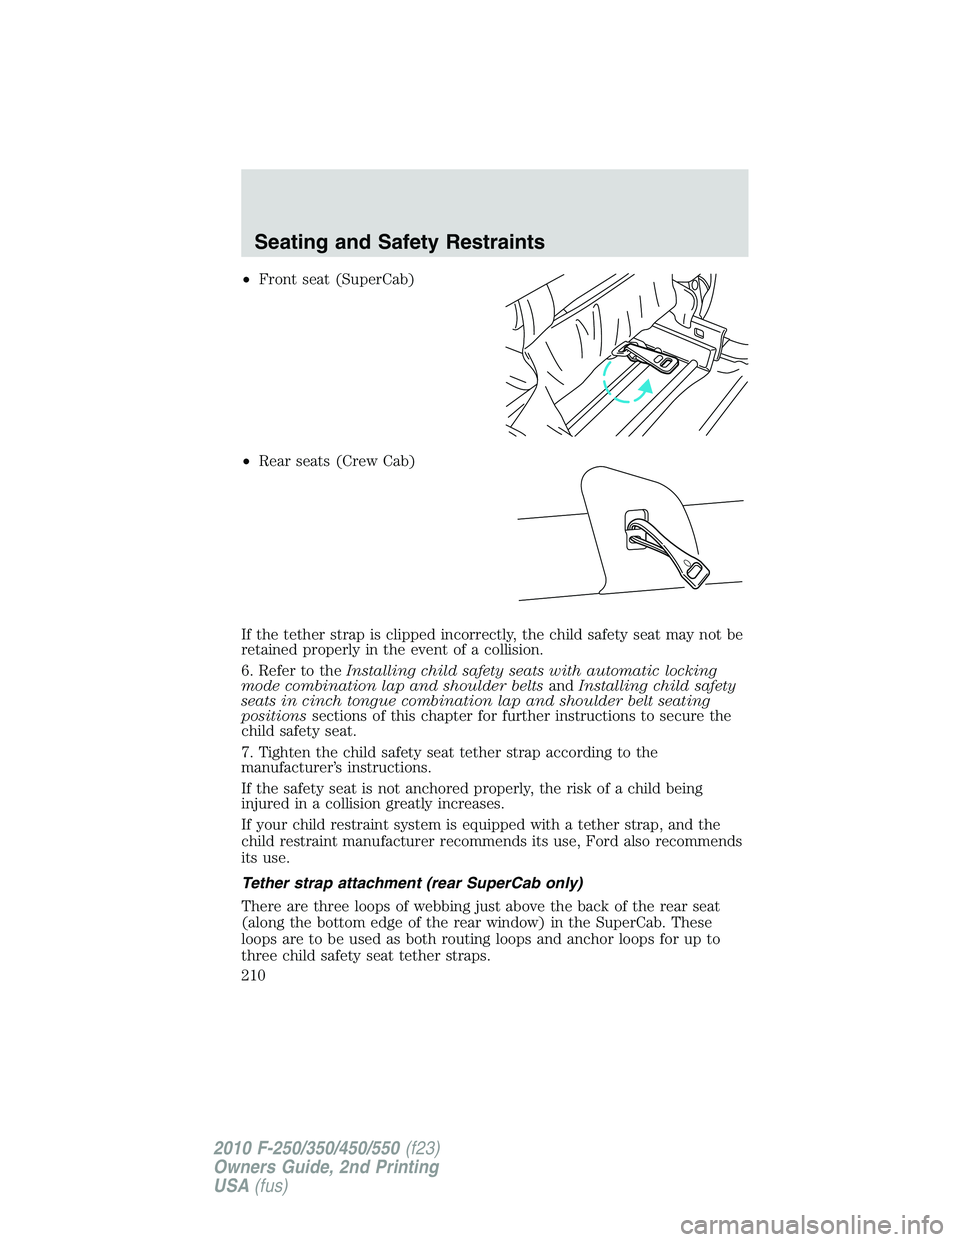
5. Clip the tether strap to the anchor as shown.
•Front seats (Regular Cab)
Seating and Safety Restraints
209
2010 F-250/350/450/550(f23)
Owners Guide, 2nd Printing
USA(fus)
Page 210 of 408

•Front seat (SuperCab)
•Rear seats (Crew Cab)
If the tether strap is clipped incorrectly, the child safety seat may not be
retained properly in the event of a collision.
6. Refer to theInstalling child safety seats with automatic locking
mode combination lap and shoulder beltsandInstalling child safety
seats in cinch tongue combination lap and shoulder belt seating
positionssections of this chapter for further instructions to secure the
child safety seat.
7. Tighten the child safety seat tether strap according to the
manufacturer’s instructions.
If the safety seat is not anchored properly, the risk of a child being
injured in a collision greatly increases.
If your child restraint system is equipped with a tether strap, and the
child restraint manufacturer recommends its use, Ford also recommends
its use.
Tether strap attachment (rear SuperCab only)
There are three loops of webbing just above the back of the rear seat
(along the bottom edge of the rear window) in the SuperCab. These
loops are to be used as both routing loops and anchor loops for up to
three child safety seat tether straps.
Seating and Safety Restraints
210
2010 F-250/350/450/550(f23)
Owners Guide, 2nd Printing
USA(fus)
Page 242 of 408

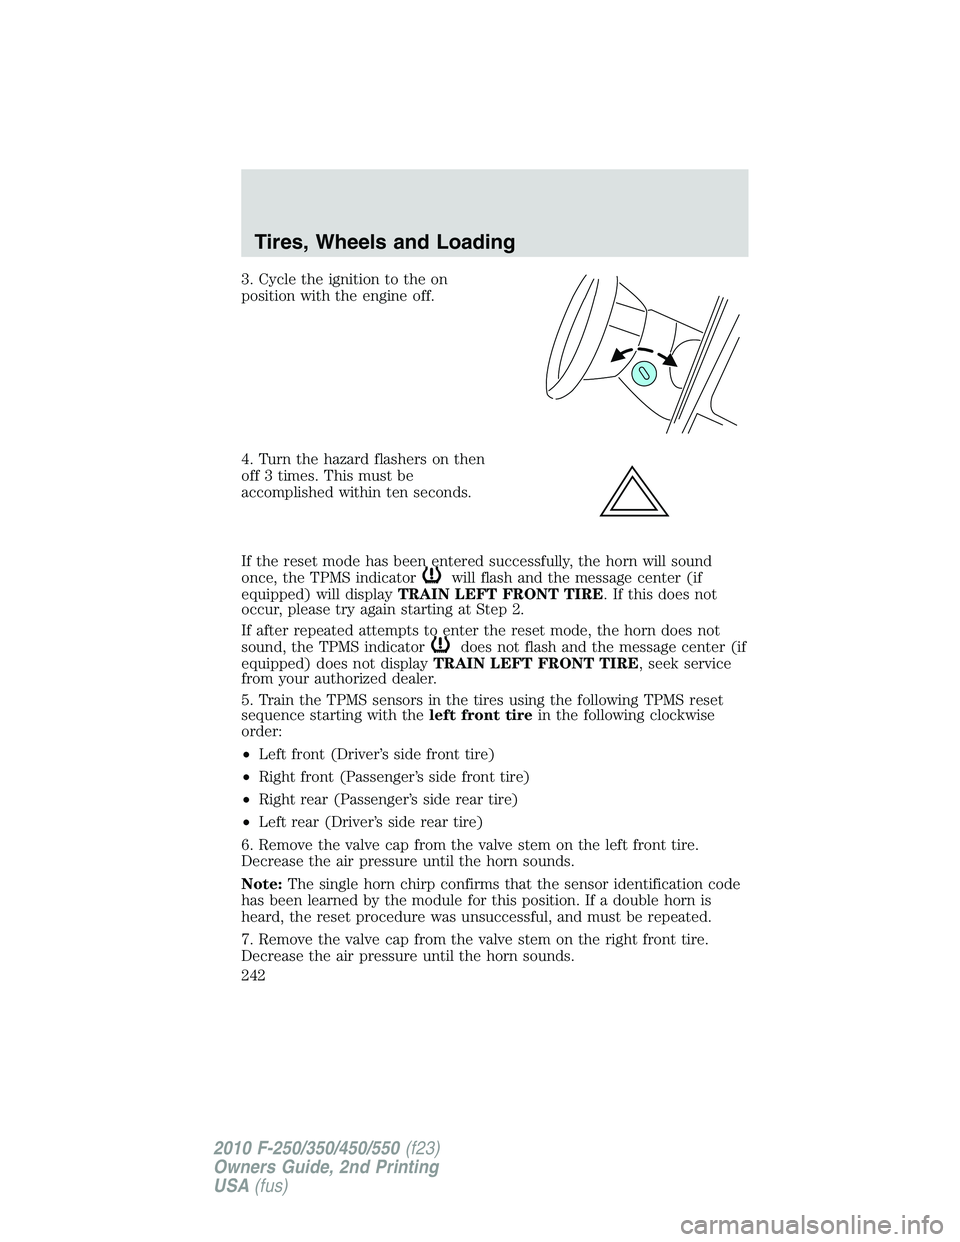
3. Cycle the ignition to the on
position with the engine off.
4. Turn the hazard flashers on then
off 3 times. This must be
accomplished within ten seconds.
If the reset mode has been entered successfully, the horn will sound
once, the TPMS indicator
will flash and the message center (if
equipped) will displayTRAIN LEFT FRONT TIRE. If this does not
occur, please try again starting at Step 2.
If after repeated attempts to enter the reset mode, the horn does not
sound, the TPMS indicator
does not flash and the message center (if
equipped) does not displayTRAIN LEFT FRONT TIRE, seek service
from your authorized dealer.
5. Train the TPMS sensors in the tires using the following TPMS reset
sequence starting with theleft front tirein the following clockwise
order:
•Left front (Driver’s side front tire)
•Right front (Passenger’s side front tire)
•Right rear (Passenger’s side rear tire)
•Left rear (Driver’s side rear tire)
6. Remove the valve cap from the valve stem on the left front tire.
Decrease the air pressure until the horn sounds.
Note:The single horn chirp confirms that the sensor identification code
has been learned by the module for this position. If a double horn is
heard, the reset procedure was unsuccessful, and must be repeated.
7. Remove the valve cap from the valve stem on the right front tire.
Decrease the air pressure until the horn sounds.
Tires, Wheels and Loading
242
2010 F-250/350/450/550(f23)
Owners Guide, 2nd Printing
USA(fus)
Page 257 of 408

cycle and when adjusting the gain. This message is also displayed
during manual activation without a trailer connected or when gain
adjustments are made with no trailer connected.
•TBC GAIN = XX.X OUTPUT = //////: When the vehicle’s brake pedal
is pushed, or when the manual control is activated, bar indicators will
illuminate in the instrument cluster message center to indicate the
amount of power going to the trailer brakes relative to the brake pedal
or manual control input. One bar indicates the least amount of output
with six bars indicating maximum output.
•TRAILER CONNECTED:This message is displayed when a correct
trailer wiring connection (a trailer with electric trailer brakes) has
been sensed during a given ignition cycle.
•TRAILER DISCONNECTED:This message is displayed and
accompanied by a single chime, when a trailer connection was
determined and then a disconnection, either intentionally or
unintentionally, has been sensed during a given ignition cycle. It is also
displayed if a truck or trailer wiring fault occurs causing the trailer to
appear disconnected. This message is also displayed during manual
activation without a trailer connected.
2.Manual control lever:Slide the control lever to the left to activate
power to the trailer’s electric brakes independent of the tow vehicle’s
brakes (see the followingProcedure for adjusting GAINsection for
instructions on proper use of this feature). If the manual control is
activated while the brake is also applied, the greater of the two inputs
determines the power sent to the trailer brakes.
•Stop Lamps:Activating the TBC manual control lever will illuminate
both the trailer brake lamps and the tow vehicle brake lamps except
the center high-mount stop lamp (presuming proper trailer electrical
connection). Pressing the vehicle brake pedal will also illuminate both
trailer and vehicle brake lamps.
Procedure for adjusting GAIN:
The GAIN setting is used to set the TBC for the specific towing
condition and should be changed as towing conditions change. Changes
to towing conditions include trailer load, vehicle load, road conditions
and weather.
The GAIN should be set to provide the maximum trailer braking
assistance while ensuring the trailer wheels do not lock when braking.
Locked trailer wheels may lead to trailer instability.
Note:This should only be performed in a traffic free environment at
speeds of approximately 20–25 mph (30–40 km/h).
Tires, Wheels and Loading
257
2010 F-250/350/450/550(f23)
Owners Guide, 2nd Printing
USA(fus)