2010 FORD EXPLORER check oil
[x] Cancel search: check oilPage 11 of 404

Vehicle Symbol Glossary
Power Windows
Front/Rear
Power Window Lockout
Child Safety Door
Lock/UnlockInterior Luggage
Compartment Release
Panic AlarmEngine Oil
Engine CoolantEngine Coolant
Temperature
Do Not Open When HotBattery
Avoid Smoking, Flames,
or SparksBattery Acid
Explosive GasFan Warning
Power Steering FluidMaintain Correct Fluid
LevelMAX
MIN
Service Engine SoonEngine Air Filter
Passenger Compartment
Air FilterJack
Check Fuel CapLow Tire Pressure
Warning
Introduction
11
2010 Explorer(exp)
Owners Guide(own2002), 1st Printing
USA(fus)
Page 15 of 404

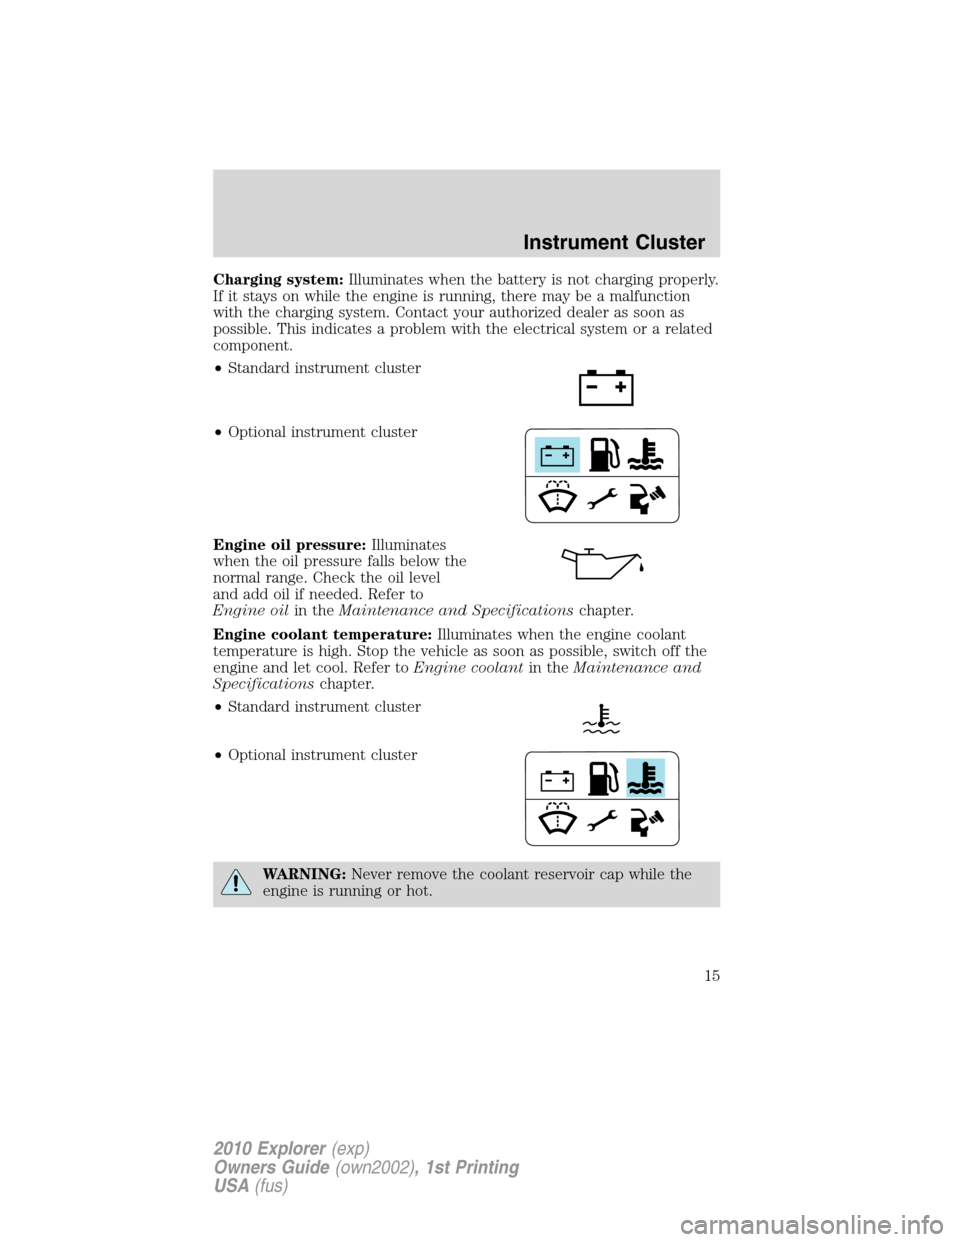
Charging system:Illuminates when the battery is not charging properly.
If it stays on while the engine is running, there may be a malfunction
with the charging system. Contact your authorized dealer as soon as
possible. This indicates a problem with the electrical system or a related
component.
•Standard instrument cluster
•Optional instrument cluster
Engine oil pressure:Illuminates
when the oil pressure falls below the
normal range. Check the oil level
and add oil if needed. Refer to
Engine oilin theMaintenance and Specificationschapter.
Engine coolant temperature:Illuminates when the engine coolant
temperature is high. Stop the vehicle as soon as possible, switch off the
engine and let cool. Refer toEngine coolantin theMaintenance and
Specificationschapter.
•Standard instrument cluster
•Optional instrument cluster
WARNING:Never remove the coolant reservoir cap while the
engine is running or hot.
Instrument Cluster
15
2010 Explorer(exp)
Owners Guide(own2002), 1st Printing
USA(fus)
Page 22 of 404

AVERAGE FUEL XX.X MPG / (L/100km)
Average fuel economy displays your average fuel economy in miles/gallon
or liters/100 km.
If you calculate your average fuel economy by dividing miles traveled by
gallons of fuel used (liters of fuel used by 100 kilometers traveled), your
figure may be different than displayed for the following reasons:
•Your vehicle was not perfectly level during fill-up
•Differences in the automatic shut-off points on the fuel pumps at
service stations
•Variations in top-off procedure from one fill-up to another
•Rounding of the displayed values to the nearest 0.1 gallon (liter)
1. Drive the vehicle at least 5 miles (8 km) with the speed control
system engaged to display a stabilized average.
2. Record the highway fuel economy for future reference.
It is important to press the SELECT/RESET stem (press and hold for
two seconds in order to reset the function) after setting the speed
control to get accurate highway fuel economy readings.
SETUP MENU HOLD RESET
When this appears, press and hold the SELECT/RESET stem to reach
the setup menu.
Briefly press the SELECT/RESET stem to scroll through the setup menu
items. If the SELECT/RESET stem is not pressed within four seconds,
the message center returns to the info menu.
•System Check
•AWD Lock (4.6L engine vehicles only)
•Units (English/Metric)
•Language
•Autolamp
•Autolock
•Autounlock
•Park Aid (if equipped)
•Trailer sway control
•Oil Life Reset and Start Value
•Compass display
Instrument Cluster
22
2010 Explorer(exp)
Owners Guide(own2002), 1st Printing
USA(fus)
Page 23 of 404

•Compass zone adjustment
•Compass calibration adjustment
SYSTEM CHECK HOLD RESET
Press and hold the SELECT/RESET stem to select system check when
this is displayed in the message center. The message center will cycle
through each of the systems being monitored. For each of the monitored
systems, the message center will indicate either an OK message or a
warning message for two seconds.
Pressing the SELECT/RESET stem cycles the message center through
each of the systems being monitored.
The sequence of the system check report and how it appears in the
message center is as follows:
1. OIL LIFE
2. CHARGING SYSTEM
3. WASHER FLUID
4. DOOR AJAR
5. EXTERIOR LAMP
6. BRAKE FLUID LEVEL
7. PARK BRAKE
8. MILES TO EMPTY
9. FUEL LEVEL LOW (will only display if 50 miles [80 km] or less to
empty)
AWD AUTO / LOCKED (4.6L engine vehicles only)
This displays the AWD locked function.
1. Press and hold the SELECT/RESET stem within four seconds to turn
the AWD system to the auto / locked mode.
2. Press the SELECT/RESET stem for the next setup menu item or wait
for more than four seconds to return to the info menu.
Note:When the AWD system is in the LOCKED mode, the 4X4 indicator
will be illuminated.
UNITS
Displays the current units English or Metric.
1. Press and hold the SELECT/RESET stem to change from English to
Metric.
Instrument Cluster
23
2010 Explorer(exp)
Owners Guide(own2002), 1st Printing
USA(fus)
Page 29 of 404

TIRE PRESSURE SENSOR FAULT— Displayed when a tire pressure
sensor is malfunctioning, or your spare tire is in use. For more
information on how the system operates under these conditions, refer to
Understanding your Tire Pressure Monitoring System (TPMS)in the
Tires, Wheels and Loadingchapter. If the warning stays on or
continues to come on, contact your authorized dealer as soon as
possible.
BRAKE FLUID LEVEL LOW— Indicates the brake fluid level is low
and the brake system should be inspected immediately. Refer toBrake
fluidin theMaintenance and Specificationschapter.
WASHER FLUID LEVEL LOW— Indicates the washer fluid reservoir
is less than one quarter full. Check the washer fluid level. Refer to
Windshield washer fluidin theMaintenance and Specifications
chapter.
OIL LIFE CHANGE SOON— Displayed when the engine oil life
remaining is 10% or less.
OIL CHANGE REQUIRED— Displayed when the oil life left reaches
0%.
LIFTGATE / GLASS AJAR— Displayed when the liftgate or the
liftgate glass is not completely closed.
TRAILER SWAY REDUCE SPEED— Displayed when your trailer
starts to sway when towing. Refer toTrailer sway controlin the
Drivingchapter for more information.
FOR 4X4 LOW STOP VEHICLE (if equipped)— Displayed when
4X4 LOW is selected while the vehicle is moving. For more information,
refer toUsing the Control Trac 4WD systemin theDrivingchapter.
FOR 4X4 LOW SHIFT TO N (if equipped)— Displayed when 4X4
LOW is selected and the vehicle is stopped. For more information, refer
toUsing the Control Trac 4WD systemin theDrivingchapter.
TO EXIT 4X4 LOW STOP VEHICLE (if equipped)— Displayed
when 2WD is selected while the vehicle is operating in 4X4 LOW. For
more information, refer toUsing the Control Trac 4WD systemin the
Drivingchapter.
TO EXIT 4X4 LOW SHIFT TO N (if equipped)— Displayed when
2WD is selected while the vehicle has been stopped in 4X4 LOW. For
more information, refer toUsing the Control Trac 4WD systemin the
Drivingchapter.
Instrument Cluster
29
2010 Explorer(exp)
Owners Guide(own2002), 1st Printing
USA(fus)
Page 32 of 404

FUEL ECONOMY MPG (L/km)
This displays instantaneous fuel economy as a bar graph ranging from↓
poor economy to↑excellent economy.
Your vehicle must be moving to calculate instantaneous fuel economy.
When your vehicle is not moving, this function shows↓, one or no bars
illuminated. Instantaneous fuel economy cannot be reset.
FUEL USED XX.X GAL (L)
This displays the fuel used since last reset. The information displayed
will be in gallons or liters, depending on English/Metric mode state.
DRIVE TIME
Timer displays the trip elapsed drive time.
To operate, do the following:
1. Press and release RESET in order to start the timer.
2. Press and release RESET to pause the timer.
3. Press and hold RESET until the timer resets.
Blank display
Select this function from the info menu to turn the upper two lines of
the message center display off.
System check and vehicle feature customization
Press the SETUP button repeatedly
to cycle the message center through
the following features:
PRESS RESET TO BEGIN SYSTEM CHECK
When this message appears, press the RESET button and the message
center will begin to cycle through the following systems and provide a
status of the item if needed.
Note:Some systems show a message only if a condition is present.
1. OIL LIFE
2. CHARGING SYSTEM
3. WASHER FLUID
INFOSETUP
RESET
Instrument Cluster
32
2010 Explorer(exp)
Owners Guide(own2002), 1st Printing
USA(fus)
Page 38 of 404

BRAKE FLUID LEVEL LOW— Indicates the brake fluid level is low
and the brake system should be inspected immediately. Refer toBrake
fluidin theMaintenance and Specificationschapter.
WASHER FLUID LEVEL LOW— Indicates the washer fluid reservoir
is less than one quarter full. Check the washer fluid level. Refer to
Windshield washer fluidin theMaintenance and Specifications
chapter.
OIL LIFE CHANGE SOON— Displayed when the engine oil life
remaining is 10% or less.
OIL CHANGE REQUIRED— Displayed when the oil life left reaches
0%.
LIFTGATE / GLASS AJAR— Displayed when the liftgate or the
liftgate glass is not completely closed.
TRAILER SWAY REDUCE SPEED— Displayed when your trailer
starts to sway when towing. Refer toTrailer sway controlin the
Drivingchapter for more information.
FOR 4X4 LOW STOP VEHICLE (if equipped)— Displayed when
4X4 LOW is selected while the vehicle is moving. For more information,
refer toUsing the Control Trac 4WD systemin theDrivingchapter.
FOR 4X4 LOW SHIFT TO N (if equipped)— Displayed when 4X4
LOW is selected and the vehicle is stopped. For more information, refer
toUsing the Control Trac 4WD systemin theDrivingchapter.
TO EXIT 4X4 LOW STOP VEHICLE (if equipped)— Displayed
when 2WD is selected while the vehicle is operating in 4X4 LOW. For
more information, refer toUsing the Control Trac 4WD systemin the
Drivingchapter.
TO EXIT 4X4 LOW SHIFT TO N (if equipped)— Displayed when
2WD is selected while the vehicle has been stopped in 4X4 LOW. For
more information, refer toUsing the Control Trac 4WD systemin the
Drivingchapter.
Instrument Cluster
38
2010 Explorer(exp)
Owners Guide(own2002), 1st Printing
USA(fus)
Page 113 of 404

Replacing exterior bulbs
Check the operation of all the bulbs frequently.
Replacing headlamp bulbs
Do not touch the glass of a halogen bulb.
1. Turn off the headlamps and open
the hood.
2. Remove three screws from the
headlamp assembly and pull
headlamp forward.
3. Disconnect the electrical
connector.
4. Remove the old bulb by turning
counterclockwise and pull it out.
WARNING:Handle a halogen headlamp bulb carefully and keep
out of children’s reach. Grasp the bulb only by its plastic base
and do not touch the glass. The oil from your hand could cause the
bulb to break the next time the headlamps are operated.
Reverse steps to reinstall bulb(s).
Lights
113
2010 Explorer(exp)
Owners Guide(own2002), 1st Printing
USA(fus)