Page 10 of 404
These are some of the symbols you may see on your vehicle.
Vehicle Symbol Glossary
Safety Alert
See Owner’s Guide
Fasten Safety BeltAirbag - Front
Airbag - SideChild Seat Lower
Anchor
Child Seat Tether
AnchorBrake System
Anti-Lock Brake SystemParking Brake System
Brake Fluid -
Non-Petroleum BasedParking Aid System
Stability Control SystemSpeed Control
Master Lighting SwitchHazard Warning Flasher
Fog Lamps-FrontFuse Compartment
Fuel Pump ResetWindshield Wash/Wipe
Windshield
Defrost/DemistRear Window
Defrost/Demist
Introduction
10
2010 Explorer(exp)
Owners Guide(own2002), 1st Printing
USA(fus)
Page 14 of 404

Brake system warning light:To
confirm the brake system warning
light is functional, it will
momentarily illuminate when the
ignition is turned to the on position
when the engine is not running, or in a position between on and start, or
by applying the parking brake when the ignition is turned to the on
position. If the brake system warning light does not illuminate at this
time, contact your authorized dealer as soon as possible. Illumination
after releasing the parking brake indicates low brake fluid level. Contact
your authorized dealer as soon as possible.
WARNING:Driving a vehicle with the brake system warning
light on is dangerous. A significant decrease in braking
performance may occur. It will take you longer to stop the vehicle.
Contact your authorized dealer as soon as possible. Driving extended
distances with the parking brake engaged can cause brake failure and
the risk of personal injury.
Anti-lock brake system:If the
ABS light stays illuminated or
continues to flash, a malfunction has
been detected. Contact your
authorized dealer as soon as
possible. Normal braking is still functional unless the brake warning light
also is illuminated.
Airbag readiness:If this light fails
to illuminate when the ignition is
turned to on, continues to flash or
remains on, contact your authorized
dealer as soon as possible. A chime will sound when there is a
malfunction in the indicator light.
Safety belt:Reminds you to fasten
your safety belt. A Belt-Minder�
chime will also sound to remind you
to fasten your safety belt. Refer to
theSeating and Safety Restraints
chapter to activate/deactivate the Belt-Minder�chime feature.
P!
BRAKE
ABS
Instrument Cluster
14
2010 Explorer(exp)
Owners Guide(own2002), 1st Printing
USA(fus)
Page 33 of 404

4. DOOR AJAR
5. EXTERIOR LAMP
6. BRAKE FLUID LEVEL
7. PARK BRAKE
8. FUEL LEVEL AND DISTANCE TO EMPTY
AWD AUTO / LOCKED (if equipped)
This feature disables/enables the AWD feature.
Press the RESET button to select the AUTO or LOCKED mode.
Note:When the AWD system is in the locked mode, the 4X4 indicator
will be illuminated.
UNITS
Displays the current units in English or Metric.
Press the RESET button to change from English to Metric.
LANGUAGE ENGLISH / SPANISH / FRENCH / JAPANESE /
ARABIC
Note:When entering the SETUP MENU and a non-English language has
been selected, PRESS RESET FOR ENGLISH will be displayed to change
back to English.
Allows you to choose which language the message center will display in.
Selectable languages are English, Spanish, French, Japanese, or Arabic
Waiting four seconds or pressing the RESET button cycles the message
center through each of the language choices.
Press the RESET button to set the language choice.
AUTOLAMP
This feature keeps your headlights on for up to three minutes after the
ignition is switched off.
Press the RESET button to select the new Autolamp delay values of 0,
10, 20, 30, 60, 90, 120 or 180 seconds.
AUTOLOCK
This feature automatically locks all vehicle doors when the vehicle is
shifted into any gear, putting the vehicle in motion.
Press the RESET button to turn autolock on or off.
AUTOUNLOCK
This feature automatically unlocks all vehicle doors when the driver’s
door is opened within 10 minutes of the ignition being turned off.
Instrument Cluster
33
2010 Explorer(exp)
Owners Guide(own2002), 1st Printing
USA(fus)
Page 114 of 404
Replacing front parking lamp/turn signal/sidemarker bulbs
1. Turn off the headlamps and open
the hood.
2. Remove three screws from the
headlamp assembly and pull
headlamp forward.
3. Rotate the bulb socket
counterclockwise and remove it
from the lamp assembly.
4. Pull the bulb straight out of the
socket.
Reverse steps to reinstall bulb(s).
Replacing tail/brake/turn/backup lamp bulbs
1. Turn the headlamps off and open
the liftgate.
2. Remove the two bolts from the
lamp assembly.
3. Remove the lamp assembly by
pulling it away from the vehicle at
an angle to disengage the two snap
attachments.
Lights
114
2010 Explorer(exp)
Owners Guide(own2002), 1st Printing
USA(fus)
Page 116 of 404
Replacing high-mount brakelamp bulb
1. Remove the two screws and lamp
assembly away from the vehicle.
2. Remove the bulb holder from the
lamp assembly by pressing the
snaps.
3. Pull the bulb straight out of the
socket and push in the new bulb.
Reverse steps to reinstall bulb(s).
Lights
116
2010 Explorer(exp)
Owners Guide(own2002), 1st Printing
USA(fus)
Page 128 of 404

SPEED CONTROL (IF EQUIPPED)
With speed control set, you can maintain a set speed without keeping
your foot on the accelerator pedal.
WARNING:Do not use the speed control in heavy traffic or on
roads that are winding, slippery or unpaved.
Setting speed control
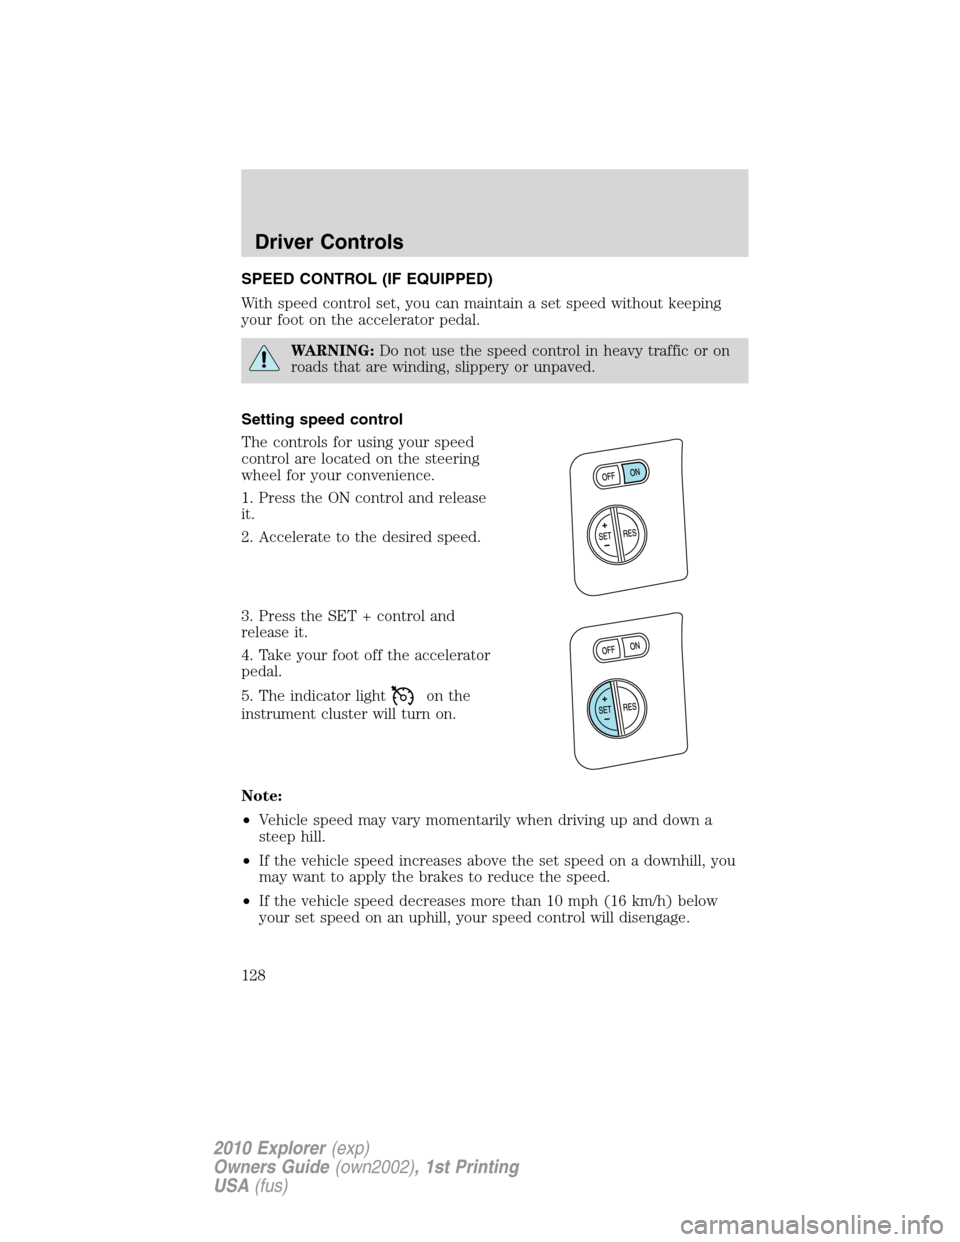
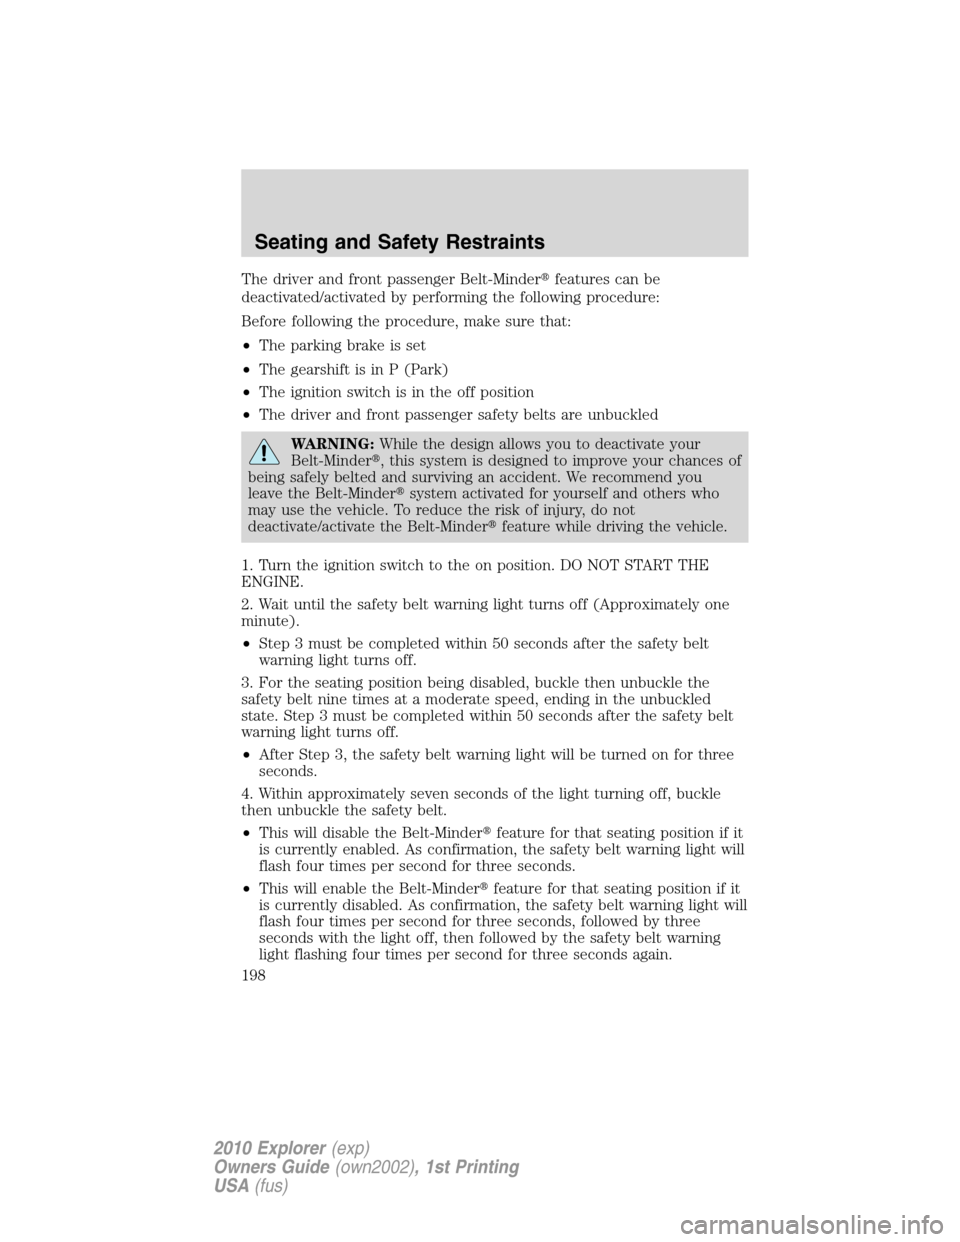
The controls for using your speed
control are located on the steering
wheel for your convenience.
1. Press the ON control and release
it.
2. Accelerate to the desired speed.
3. Press the SET + control and
release it.
4. Take your foot off the accelerator
pedal.
5. The indicator light
on the
instrument cluster will turn on.
Note:
•Vehicle speed may vary momentarily when driving up and down a
steep hill.
•If the vehicle speed increases above the set speed on a downhill, you
may want to apply the brakes to reduce the speed.
•If the vehicle speed decreases more than 10 mph (16 km/h) below
your set speed on an uphill, your speed control will disengage.
Driver Controls
128
2010 Explorer(exp)
Owners Guide(own2002), 1st Printing
USA(fus)
Page 198 of 404

The driver and front passenger Belt-Minder�features can be
deactivated/activated by performing the following procedure:
Before following the procedure, make sure that:
•The parking brake is set
•The gearshift is in P (Park)
•The ignition switch is in the off position
•The driver and front passenger safety belts are unbuckled
WARNING:While the design allows you to deactivate your
Belt-Minder�, this system is designed to improve your chances of
being safely belted and surviving an accident. We recommend you
leave the Belt-Minder�system activated for yourself and others who
may use the vehicle. To reduce the risk of injury, do not
deactivate/activate the Belt-Minder�feature while driving the vehicle.
1. Turn the ignition switch to the on position. DO NOT START THE
ENGINE.
2. Wait until the safety belt warning light turns off (Approximately one
minute).
•Step 3 must be completed within 50 seconds after the safety belt
warning light turns off.
3. For the seating position being disabled, buckle then unbuckle the
safety belt nine times at a moderate speed, ending in the unbuckled
state. Step 3 must be completed within 50 seconds after the safety belt
warning light turns off.
•After Step 3, the safety belt warning light will be turned on for three
seconds.
4. Within approximately seven seconds of the light turning off, buckle
then unbuckle the safety belt.
•This will disable the Belt-Minder�feature for that seating position if it
is currently enabled. As confirmation, the safety belt warning light will
flash four times per second for three seconds.
•This will enable the Belt-Minder�feature for that seating position if it
is currently disabled. As confirmation, the safety belt warning light will
flash four times per second for three seconds, followed by three
seconds with the light off, then followed by the safety belt warning
light flashing four times per second for three seconds again.
Seating and Safety Restraints
198
2010 Explorer(exp)
Owners Guide(own2002), 1st Printing
USA(fus)
Page 266 of 404

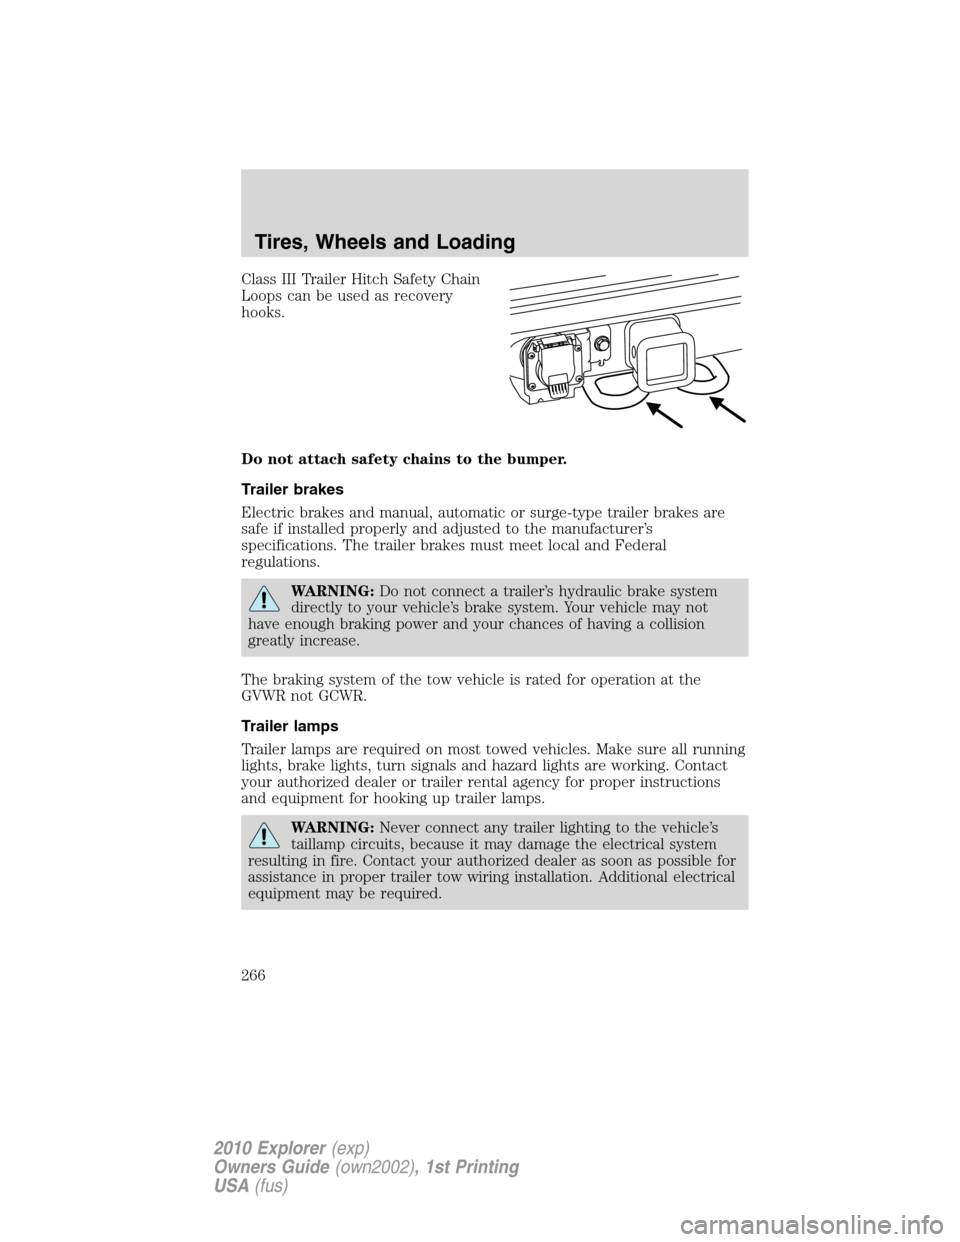
Class III Trailer Hitch Safety Chain
Loops can be used as recovery
hooks.
Do not attach safety chains to the bumper.
Trailer brakes
Electric brakes and manual, automatic or surge-type trailer brakes are
safe if installed properly and adjusted to the manufacturer’s
specifications. The trailer brakes must meet local and Federal
regulations.
WARNING:Do not connect a trailer’s hydraulic brake system
directly to your vehicle’s brake system. Your vehicle may not
have enough braking power and your chances of having a collision
greatly increase.
The braking system of the tow vehicle is rated for operation at the
GVWR not GCWR.
Trailer lamps
Trailer lamps are required on most towed vehicles. Make sure all running
lights, brake lights, turn signals and hazard lights are working. Contact
your authorized dealer or trailer rental agency for proper instructions
and equipment for hooking up trailer lamps.
WARNING:Never connect any trailer lighting to the vehicle’s
taillamp circuits, because it may damage the electrical system
resulting in fire. Contact your authorized dealer as soon as possible for
assistance in proper trailer tow wiring installation. Additional electrical
equipment may be required.
Tires, Wheels and Loading
266
2010 Explorer(exp)
Owners Guide(own2002), 1st Printing
USA(fus)