Page 16 of 420

4X2 (RTT) (if equipped):
Displays momentarily when
two-wheel drive high is selected. If
the light fails to display when the
ignition is turned on, or remains on,
have the system serviced immediately by your authorized dealer.
Four wheel drive low (RTT)
(if equipped):Displays when
four-wheel drive low is engaged. If
the light fails to display when the
ignition is turned on, or remains on, have the system serviced
immediately by your authorized dealer.
Four wheel drive (RTT)
(if equipped):Displays when
four-wheel drive is engaged. If the
light fails to display when the ignition is turned on, or remains on, have
the system serviced immediately by your authorized dealer.
Four wheel drive auto (RTT)
(if equipped):Displays when
four-wheel drive automatic mode is
engaged. If the light fails to display
when the ignition is turned on, or
remains on, have the system serviced immediately by your authorized
dealer.
Door ajar (RTT) (if equipped):
Displays when the ignition is in the
on position and any door, liftgate or
the liftgate glass is open.
Turn signal:Illuminates when the
left or right turn signal or the
hazard lights are turned on. If the
indicators stay on or flash faster, check for a burned out bulb.
High beams:Illuminates when the
high beam headlamps are turned on.
Key-in-ignition warning chime (if equipped):Sounds when the key
is left in the ignition in the off or accessory position and the driver’s door
is opened.
4x2
4x4
LOW
4x4
4x4
AUTO
Instrument Cluster
16
2010 Expedition(exd)
Owners Guide(own2002), 1st Printing
USA(fus)
Page 117 of 420

1. Park the vehicle directly in front of a wall or screen on a level surface,
approximately 25 feet (7.6 meters)
away.
•(1) 8 feet (2.4 meters)
•(2) Center height of lamp to
ground
•(3) 25 feet (7.6 meters)
•(4) Horizontal reference line
2. Measure the height from the
center of your headlamp (indicated
by a 3.0 mm circle on the lens) to the ground and mark an 8 foot
(2.4 meter) horizontal reference line on the vertical wall or screen at this
height (a piece of masking tape works well).
3. Turn on the low beam headlamps to illuminate the wall or screen and
open the hood. Cover one of the headlamps so no light from that lamp
hits the wall.
4. On the wall or screen you will
observe a light pattern with a
distinct horizontal edge towards the
right. If this edge is not at the
horizontal reference line, the beam will need to be adjusted so the edge
is at the same height as the horizontal reference line.
5. Locate the vertical adjuster on
each headlamp, then use a Phillips
#2 screwdriver to turn the adjuster
either counterclockwise (to adjust
down) or clockwise (to adjust up)
aligning the upper edge of the light
pattern up to the horizontal line.
6. HORIZONTAL AIM IS NOT
REQUIRED FOR THIS VEHICLE
AND IS NON-ADJUSTABLE.
7. Repeat Steps 3–5 for the other headlamp.
8. Close the hood and turn off the lamps.
Lights
117
2010 Expedition(exd)
Owners Guide(own2002), 1st Printing
USA(fus)
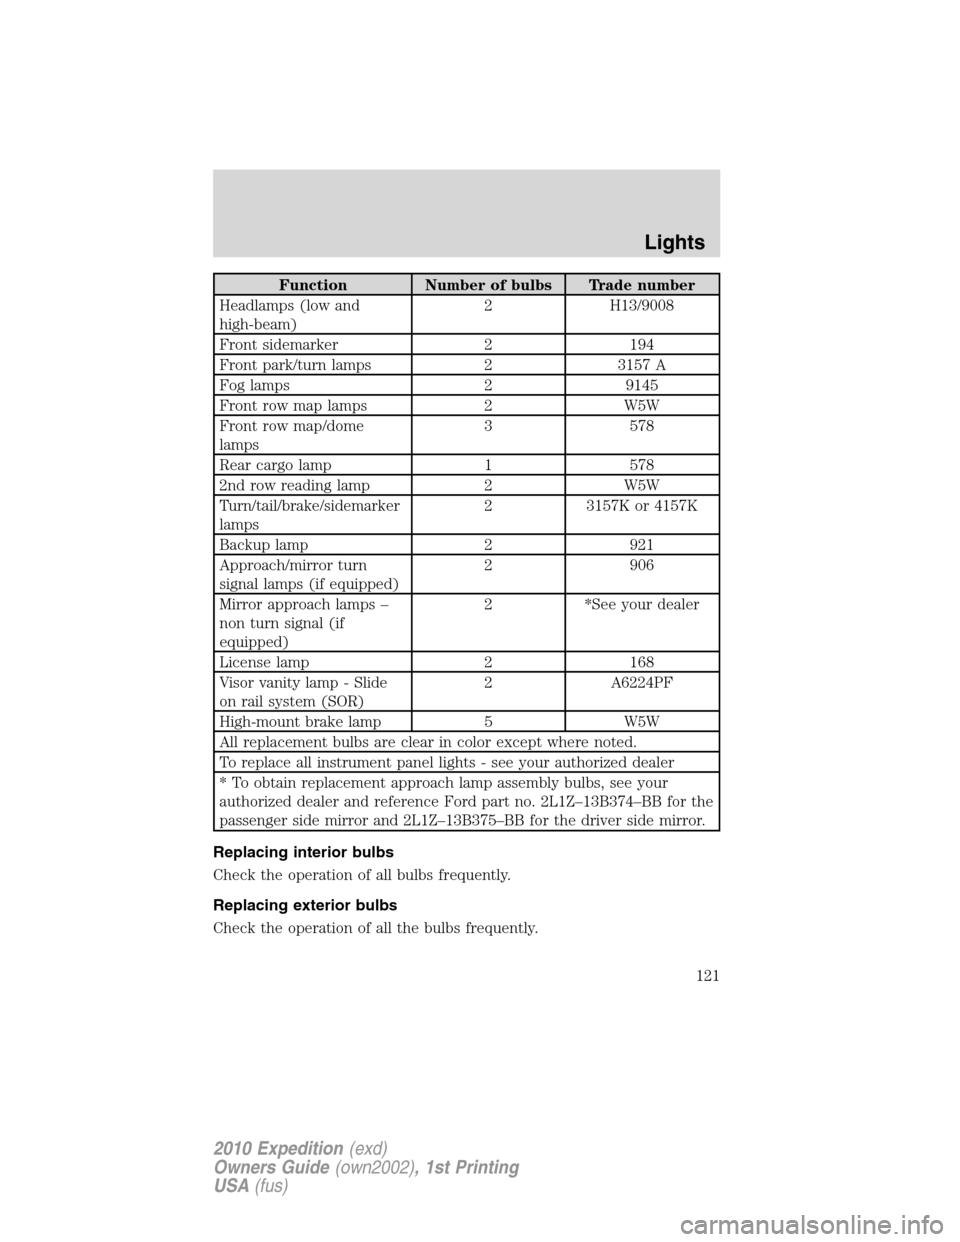
Page 121 of 420

Function Number of bulbs Trade number
Headlamps (low and
high-beam)2 H13/9008
Front sidemarker 2 194
Front park/turn lamps 2 3157 A
Fog lamps 2 9145
Front row map lamps 2 W5W
Front row map/dome
lamps3 578
Rear cargo lamp 1 578
2nd row reading lamp 2 W5W
Turn/tail/brake/sidemarker
lamps2 3157K or 4157K
Backup lamp 2 921
Approach/mirror turn
signal lamps (if equipped)2 906
Mirror approach lamps –
non turn signal (if
equipped)2 *See your dealer
License lamp 2 168
Visor vanity lamp - Slide
on rail system (SOR)2 A6224PF
High-mount brake lamp 5 W5W
All replacement bulbs are clear in color except where noted.
To replace all instrument panel lights - see your authorized dealer
* To obtain replacement approach lamp assembly bulbs, see your
authorized dealer and reference Ford part no. 2L1Z–13B374–BB for the
passenger side mirror and 2L1Z–13B375–BB for the driver side mirror.
Replacing interior bulbs
Check the operation of all bulbs frequently.
Replacing exterior bulbs
Check the operation of all the bulbs frequently.
Lights
121
2010 Expedition(exd)
Owners Guide(own2002), 1st Printing
USA(fus)
Page 329 of 420

The fuses are coded as follows:
Fuse/Relay
LocationFuse Amp
RatingProtected Circuits
1 30A Smart window #1
2 15A Driver side memory module
3 15A Family entertainment system,
Audio rear seat controls, Satellite
radio, SYNC�
4 30A Smart window #2
5 10A Keypad illumination, 3rd row seat
enable, Brake shift interlock
(BSI), Passenger compartment
fuse panel
6 20A Turn signals
7 10A Low beam headlamps (left)
8 10A Low beam headlamps (right)
9 15A Interior lights
10 15A Switch backlighting, Puddle lamps
11 10A Not used (spare)
12 7.5A Power mirrors, Driver seat
memory switch
13 5A Not used (spare)
14 10A Power liftgate module – keep-alive
power
15 10A Climate control, Global positioning
satellite module
16 15A Not used (spare)
17 20A Door locks, Liftgate release,
Liftglass release
18 20A Second row heated seats
19 25A Rear wiper
20 15A Adjustable pedals, Datalink
21 15A Fog lamps
22 15A Park lamps
Roadside Emergencies
329
2010 Expedition(exd)
Owners Guide(own2002), 1st Printing
USA(fus)