2010 FIAT PUNTO EVO seal
[x] Cancel search: sealPage 127 of 270
126
KNOWING
YOUR
VEHICLE
SAFETY
STARTING
AND DRIVING
WARNING LIGHTS
AND MESSAGES
IN AN
EMERGENCY
SERVICING
AND CARE
TECHNICAL
SPECIFICATIONS
CONTENTS
REFUELLING THE CAR
PETROL ENGINES
Use only unleaded petrol.
To avoid mistakes, the diameter of the fuel tank opening is
too small to insert the nozzle of a leaded petrol pump. The
petrol octane rating (RON) must not be lower than 95.
IMPORTANT An inefficient catalytic converter leads to
harmful exhaust emissions, thus contributing to air pol-
lution.
IMPORTANT Never use leaded petrol, even in small
amounts or in an emergency, as this would damage the
catalytic converter beyond repair.
DIESEL ENGINES
If the outside temperature is very low, the diesel thick-
ens due to the formation of paraffin clots and could clog
the diesel filter. In order to avoid these problems, differ-
ent types of diesel are distributed according to the season:
summer type, winter type and arctic type (cold, moun-
tainous areas).
If refuelling with diesel fuel whose specifications are not
suitable for the usage temperature, it is advisable to mix
TUTELA DIESEL ART additive in the proportions shown
on the container with the fuel. Pour the additive into the
tank before the fuel.When using or parking the vehicle for a long time in the
mountains or cold areas, it is advisable to refuel using lo-
cally available diesel.
In this case, it is also advisable to keep the tank over
50% full.
For diesel engines, use only diesel fuel for
motor vehicles in accordance with EN590
European specifications. The use of other
products or mixtures may damage the engine be-
yond repair and consequently invalidate the war-
ranty, depending on the damage caused. If you ac-
cidentally introduce other types of fuel into the
tank, do not start the engine. Empty the tank. If the
engine has run, even for a very short time, you will
need to have the entire fuel system emptied in ad-
dition to the tank.
FUEL TANK CAP fig. 128
To carry out refuelling, open lid A and unscrew cap B;
the cap is fitted with a device C which fastens it to the lid
so it cannot be mislaid.
In some versions, cap B have a lock and key: open lid A,
insert the ignition key then turn it anti-clockwise and un-
screw the cap itself.
The hermetic seal may cause a slight increase in pressure
in the tank. A suction noise when you release the cap is
therefore entirely normal.
When refuelling, attach the cap to the device inside the
flap as shown in fig. 128.
082-128 PUNTO FL EN 4ed 20-01-2010 15:07 Pagina 126
Page 159 of 270

158
KNOWING
YOUR
VEHICLE
SAFETY
STARTING
AND DRIVING
WARNING LIGHTS
AND MESSAGES
IN AN
EMERGENCY
SERVICING
AND CARE
TECHNICAL
SPECIFICATIONS
CONTENTS
Assembly diagram fig. 149
The tow hook structure must be fas-
tened at the points marked by
Øus-
ing a total of 6 M10 screws.
The internal back plates should be at
least 6 mm thick.
The hook should be fastened to the
body avoiding any type of drilling of
the rear bumper that remains visible
when the hook is removed.
IMPORTANT It is compulsory to at-
tach a label (plainly visible) of suitable
size and material at the same level as
the hitch ball, with the following
wording:
MAX LOAD ON BALL 60 kg
After assembly, the screw
holes should be sealed to
prevent exhaust gases getting in.
WARNING
fig. 149F0U0132m
Existing
hole
Existing
screw
Existing screw
Existing
holeExisting
hole
Existing hole
Standard ball
Laden
149-160 PUNTO FL EN 4ed 20-01-2010 14:37 Pagina 158
Page 182 of 270

F0U0139mfig. 156
QUICK TYRE REPAIR KIT -
FIX & GO automatic
The Fix & Go automatic quick tyre repair kit is located in
the boot.
The kit fig. 156 includes:
❒a canister A, containing sealant, which is fitted with:
– filler tube B;
– an adhesive label C with the message “max. 80 km/h”
to be placed where the driver can easily see it (on
the dashboard) after repairing the tyre;
❒instruction brochure (see fig. 157), to be used for
prompt and proper use of the quick repair kit and then
presented to the personnel charged with handling the
treated tyre;
❒compressor D-fig. 156 including gauge and connections;
❒a pair of protective gloves located in the side part of the
compressor;
❒ adapters for inflating different elements.
You can also find the screwdriver and tow hitch in the
quick repair kit container (stored in the boot under the
carpet).
F0U0140mfig. 157
Hand over the instruction booklet to the
personnel charged with treating the tyre
repaired with the kit.
WARNING
181
KNOWING
YOUR
VEHICLE
SAFETY
STARTING
AND DRIVING
WARNING LIGHTS
AND MESSAGES
IN AN
EMERGENCY
SERVICING
AND CARE
TECHNICAL
SPECIFICATIONS
CONTENTS
175-210 PUNTO FL EN 4ed 20-01-2010 15:09 Pagina 181
Page 183 of 270

In the event of a puncture caused by for-
eign bodies, it is possible to repair tyres
showing holes on the track or shoulder of
up to 4 mm in diameter.
It is not possible to repair damage to the
tyre sidewall. Do not use the quick repair kit
if the tyre is damaged as a result of travelling on a
flat tyre.
WARNING
If the wheel rim is damaged (the channel
is so deformed as to cause an air leakage)
it cannot be repaired. Do not remove foreign bod-
ies (screws or nails) from the tyre.
WARNING
IMPORTANT INFORMATION:
The sealing fluid of the quick tyre repair kit is effective at
external temperatures of between –20 °C and +50 °C.
The sealant has an expiry date.
Do not operate the compressor for longer
than 20 minutes at a time. Risk of over-
heating. The quick repair kit is not suitable for de-
finitive repairs, so you can only temporarily repair
the tyres.
WARNING
The canister contains ethylene glycol. It
contains latex, which may cause an aller-
gic reaction. Harmful if swallowed. Irritates the
eyes. There could be a reaction in case of inhala-
tion or contact. Avoid contact with your eyes, skin
and clothes. In the event of contact, wash imme-
diately with plenty of water. Do not induce vom-
iting if swallowed. Rinse your mouth out and drink
plenty of water. Call a doctor immediately. Keep
out of the reach of children. The product must not
be used by asthmatics. Do not breathe in the
vapours during insertion and suction. Call a doc-
tor immediately if allergic reactions are noted.
Store the canister in its proper compartment,
away from sources of heat. The sealant fluid has
an expiry date.
WARNING
182
KNOWING
YOUR
VEHICLE
SAFETY
STARTING
AND DRIVING
WARNING LIGHTS
AND MESSAGES
IN AN
EMERGENCY
SERVICING
AND CARE
TECHNICAL
SPECIFICATIONS
CONTENTS
175-210 PUNTO FL EN 4ed 20-01-2010 15:09 Pagina 182
Page 184 of 270
Replace the cylinder containing out-of-
date sealant fluid. Dispose of the cylinder
and the sealant liquid properly. Dispose ac-
cording to the national and local laws in force.
F0U0142mfig. 159F0U0141mfig. 158
INFLATION PROCEDURE
Put on the protective gloves provided
with the quick tyre repair kit.
WARNING
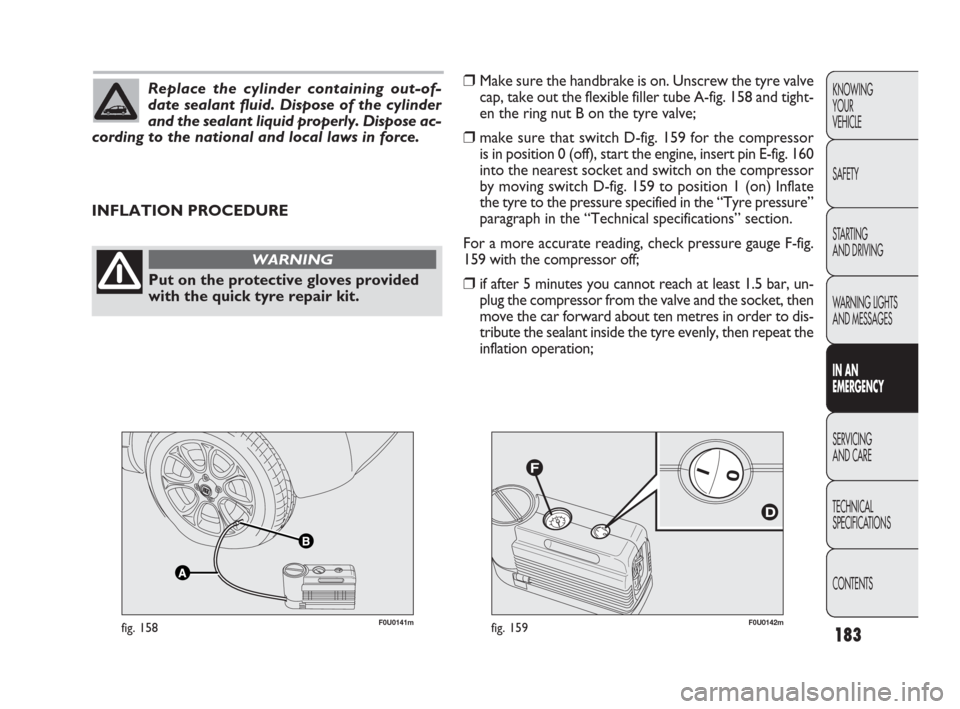
❒Make sure the handbrake is on. Unscrew the tyre valve
cap, take out the flexible filler tube A-fig. 158 and tight-
en the ring nut B on the tyre valve;
❒make sure that switch D-fig. 159 for the compressor
is in position 0 (off), start the engine, insert pin E-fig. 160
into the nearest socket and switch on the compressor
by moving switch D-fig. 159 to position 1 (on) Inflate
the tyre to the pressure specified in the “Tyre pressure”
paragraph in the “Technical specifications” section.
For a more accurate reading, check pressure gauge F-fig.
159 with the compressor off;
❒if after 5 minutes you cannot reach at least 1.5 bar, un-
plug the compressor from the valve and the socket, then
move the car forward about ten metres in order to dis-
tribute the sealant inside the tyre evenly, then repeat the
inflation operation;
183
KNOWING
YOUR
VEHICLE
SAFETY
STARTING
AND DRIVING
WARNING LIGHTS
AND MESSAGES
IN AN
EMERGENCY
SERVICING
AND CARE
TECHNICAL
SPECIFICATIONS
CONTENTS
175-210 PUNTO FL EN 4ed 20-01-2010 15:09 Pagina 183
Page 185 of 270

F0U0144mfig. 161F0U0143mfig. 160
❒if after this operation you still cannot reach at least 1.8
bar after 5 minutes, do not resume driving because the
tyre is too damaged and the quick tyre repair kit cannot
guarantee suitable sealing. Contact a Fiat Dealership;
❒if you do reach the tyre pressure specified in the “Tyre
pressure” paragraph in the “Technical specifications” sec-
tion, start driving immediately;
184
KNOWING
YOUR
VEHICLE
SAFETY
STARTING
AND DRIVING
WARNING LIGHTS
AND MESSAGES
IN AN
EMERGENCY
SERVICING
AND CARE
TECHNICAL
SPECIFICATIONS
CONTENTS
Apply the adhesive label where it can be
easily seen by the driver as a reminder that
the tyre has been treated with the quick repair kit.
Drive carefully, particularly on bends. Do not ex-
ceed 80 km/h. Do not accelerate or brake sud-
denly.
WARNING
❒after driving for about 10 minutes, stop and check the
tyre pressure again; remember to put the handbrake on;
If the pressure has fallen below 1.8 bar, do
not drive any further: the Fix & Go automatic
quick tyre repair kit cannot guarantee proper hold
because the tyre is too damaged. Contact a Fiat
Dealership.
WARNING
❒If you get a pressure reading of at least 1.8 bar, restore
the proper pressure (with engine running and handbrake
on) and restart.
❒drive with the utmost care to the nearest Fiat Dealer-
ship.
175-210 PUNTO FL EN 4ed 20-01-2010 15:09 Pagina 184
Page 186 of 270

185
KNOWING
YOUR
VEHICLE
SAFETY
STARTING
AND DRIVING
WARNING LIGHTS
AND MESSAGES
IN AN
EMERGENCY
SERVICING
AND CARE
TECHNICAL
SPECIFICATIONS
CONTENTS
Remember to inform the workshop that
the tyre has been treated with a quick re-
pair kit. Give the instruction booklet to the per-
sonnel charged with handling the treated tyre.
WARNING
FOR CHECKING AND RESTORING
PRESSURE ONLY
The compressor may also be used for restoring pressure
only. Release the quick coupling and connect directly to
the tyre valve fig. 162; in this way, the canister will not
be connected to the compressor and no sealing fluid will
be injected.
F0U0145mfig. 162F0U0146mfig. 163
CYLINDER REPLACEMENT PROCEDURE
To replace the cylinder, proceed as follows:
❒disconnect A-fig. 163;
❒turn the canister anticlockwise to lift it out;
❒insert the new canister and turn it clockwise;
❒connect connection A to the canister and fit the trans-
parent tube B in its proper place.
175-210 PUNTO FL EN 4ed 20-01-2010 15:09 Pagina 185
Page 225 of 270

224
F0U0288mfig. 210
IMPORTANT Brake fluid absorbs moisture. For this rea-
son, if the car is mainly used in areas with a high degree
of atmospheric humidity, the fluid should be replaced at
more frequent intervals than specified in the “Scheduled
Servicing Plan”. BRAKE FLUID fig. 210
Undo the cap A and check that the liquid contained in the
reservoir is at the maximum level.
Fluid level in the reservoir must not exceed the MAX
mark.
If you do need to top up, use the brake fluid shown in the
“Fluids and lubricants” table (see “Technical Specifica-
tions”).
NB Carefully clean the reservoir cap A and the sur-
rounding surfaces.
When opening the cap, make sure that no dirt gets into
the reservoir.
For topping up, always use a funnel with integrated filter
that has a mesh inferior or equal to 0.12 mm.KNOWING
YOUR
VEHICLE
SAFETY
STARTING
AND DRIVING
WARNING LIGHTS
AND MESSAGES
IN AN
EMERGENCY
SERVICING
AND CARE
TECHNICAL
SPECIFICATIONS
CONTENTS
Prevent brake fluid, which is highly corro-
sive, from coming into contact with paint-
ed parts. Should this occur, immediately
wash with water.
Brake fluid is poisonous and highly corro-
sive. In the event of accidental contact,
wash the parts immediately with water and mild
soap, then rinse with plenty of water. In case of
swallowing, immediately call a doctor.
WARNING
The symbol πon the container indicates
a synthetic brake fluid, which is different
from a mineral fluid. Using a mineral-type fluid
will damage the special rubber seals of the brak-
ing system beyond repair.
WARNING
211-234 PUNTO FL EN 4ed 18-01-2010 12:27 Pagina 224