2010 FIAT PUNTO EVO S button
[x] Cancel search: S buttonPage 34 of 270

33
KNOWING
YOUR
VEHICLE
SAFETY
STARTING
AND DRIVING
WARNING LIGHTS
AND MESSAGES
IN AN
EMERGENCY
SERVICING
AND CARE
TECHNICAL
SPECIFICATIONS
CONTENTS
If the distance unit set is “mi” the fuel consumption unit
will be displayed in “mpg”.
– press +or –to make your choice;
– if selecting “Temperature”: briefly press MENU ESC and
the display will show “°C” or “°F” (depending on the pre-
vious setting);
– press +or –to make your choice.
When you have made the required adjustments, briefly
press MENU ESC to go back to the submenu screen or
hold the button down to go back to the main menu screen
without saving.
– hold down MENU ESC again to go back to the standard
screen or main menu, depending on which point in the
menu you have reached. MEASUREMENT UNITS
(Setting measurement units)
With this function it is possible to set the measurement
units through three sub-menus: “Distance”, “Consump-
tion” and “Temperature”.
To set the desired measurement unit, proceed as follows:
– briefly press MENU ESC to display the three submenus;
– press +or –to switch between the three sub-menus;
– once the submenu to be modified has been selected, briefly
press the MENU ESC button;
– if selecting “Distance”: briefly press MENU ESC and the
display will show “km” or “mi” (depending on the previ-
ous setting);
– press +or –to make your choice;
– if selecting “Consumption”: briefly press MENU ESC and
the display will show “km/l”, “l/100km” or “mpg” (de-
pending on the previous setting);
If the set distance unit is “km”, you can set the fuel con-
sumption unit to km/l or l/100km depending on the
amount of fuel consumed.
001-036 PUNTO FL EN 4ed 18-01-2010 12:22 Pagina 33
Page 35 of 270

34
KNOWING
YOUR
VEHICLE
SAFETY
STARTING
AND DRIVING
WARNING LIGHTS
AND MESSAGES
IN AN
EMERGENCY
SERVICING
AND CARE
TECHNICAL
SPECIFICATIONS
CONTENTS
LANGUAGE
(Selecting language)
Display messages can be shown in different languages: Ital-
ian, German, English, Spanish, French, Portuguese, Polish,
Dutch and Turkish.
To set the required language, proceed as follows:
– briefly press MENU ESC: the previously set language will
flash on the display;
– press +or –to make your choice;
– briefly press the MENU ESC button to go back to the
menu screen or hold the button down to go back to the
standard screen without saving.WARNING VOLUME
(Adjusting the failure/warning buzzer volume)
This function allows the volume of the buzzer which ac-
companies the display of failures/warnings to be adjusted
(over 8 levels).
To set the desired volume, proceed as follows:
– briefly press MENU ESC: the previously set volume lev-
el will flash on the display;
– press +or –to set the value;
– briefly press the MENU ESC button to go back to the
menu screen or hold the button down to go back to the
standard screen without saving.
001-036 PUNTO FL EN 4ed 18-01-2010 12:22 Pagina 34
Page 36 of 270

35
KNOWING
YOUR
VEHICLE
SAFETY
STARTING
AND DRIVING
WARNING LIGHTS
AND MESSAGES
IN AN
EMERGENCY
SERVICING
AND CARE
TECHNICAL
SPECIFICATIONS
CONTENTS
BUTTON VOLUME
(Adjusting the button volume)
This function may be used to adjust (over 8 levels) the vol-
ume of the noise made when the MENU ESC, +e –but-
tons are pressed.
To set the desired volume, proceed as follows:
– briefly press MENU ESC: the previously set volume lev-
el will flash on the display;
– press +or –to set the value;
– briefly press the MENU ESC button to go back to the
menu screen or hold the button down to go back to the
standard screen without saving.
SEAT BELT BUZZ
(SBR buzzer reactivation
(for versions/markets where provided)
This function can be displayed only after a Fiat Dealer-
ship has deactivated the SBR system (see “SBR system”
in the “Safety” section).SERVICE
(Scheduled servicing)
Through this function it is possible to display information
related to regular scheduling intervals.
This information can be consulted as follows:
– briefly press MENU ESC: service intervals in km or mi,
depending on the previous setting, will be displayed (see
“Measurement units”);
– press the MENU ESC button briefly to return to the
menu screen or hold the button down to return to the
standard screen.
NBThe “Scheduled Servicing Plan” requires the vehicle
to be serviced every 30,000 km (or 18,000 mi). This indi-
cation will appear automatically, with the key at MAR, start-
ing from 2,000 km (or 1,240 mi) and will be displayed every
200 km (or 124 mi). Below 200 km the signals become
more frequent. The indication will appear in kilometres or
miles depending on the unit of measurement settings.
When the next scheduled service is approaching, the mes-
sage “Service” will appear on the display, followed by the
number of kilometres or miles left, when the key is turned
to MAR. Go to a Fiat Dealership, where the “Scheduled
Servicing Plan” operations will be performed and the mes-
sage will be reset.
001-036 PUNTO FL EN 4ed 18-01-2010 12:22 Pagina 35
Page 37 of 270

36
KNOWING
YOUR
VEHICLE
SAFETY
STARTING
AND DRIVING
WARNING LIGHTS
AND MESSAGES
IN AN
EMERGENCY
SERVICING
AND CARE
TECHNICAL
SPECIFICATIONS
CONTENTS
AIRBAG/PASSENGER BAG
(Passenger front and side airbag activation/
deactivation)
(for versions/markets where available)
This function is used to activate/deactivate the front pas-
senger’s air bag.
Proceed as follows:
❒press MENU ESC and, after the message BAG P OFF
(to deactivate) or BAG P On (to activate) is displayed
by pressing buttons +or –, press MENU ESC again;
❒the display will show the confirmation request message;
❒press +or –to select either Yes (to confirm activa-
tion/deactivation) or No (to abort);
❒briefly press MENU ESC to confirm setting and go back
to the menu screen or hold the button down to go back
to the standard screen without saving.DAYTIME RUNNING LIGHTS (D.R.L.)
(for versions/markets where provided)
This function allows you to activate/deactivate the daytime
running lights.
Proceed as follows to switch this function on or off:
– press the MENU ESC button briefly: the display will show
a submenu;
– press the MENU ESC button briefly, the display will show
On or Off flashing depending on the previous setting;
– press +or –to change the setting;
– briefly press the MENU ESC button to go back to the
submenu screen or hold the button down to go back to
the main menu screen without saving;
– hold down MENU ESC again to go back to the standard
screen or main menu, depending on which point in the
menu you have reached.
EXIT MENU
This function closes the cycle of settings listed in the menu
screen.
Briefly press MENU ESC to go back to the standard screen
without saving.
Press –to return to the first menu option (Speed Beep).
001-036 PUNTO FL EN 4ed 18-01-2010 12:22 Pagina 36
Page 39 of 270

38
F0U0022mfig. 28
New journey
The new journey begins after:
– “manual” resetting by the user, by pressing the relevant
button;
– “automatic” resetting, when the distance travelled reach-
es 99,999.9 km or when the journey time reaches 99.59
(99 hours and 59 minutes);
– disconnection and subsequent reconnection of the bat-
tery.
IMPORTANT The reset operation when “Trip A” details
are being displayed resets only the information associat-
ed with this function.
IMPORTANT The reset operation when “Trip B” details
are being displayed resets only the information associat-
ed with this function.
Start trip procedure
With the ignition key in the MAR position, reset by press-
ing the TRIP button and keeping it pressed for more than
2 seconds.
Trip Exit
To quit the Trip function: keep MENU ESC pressed for
over 2 seconds. Journey time
This value shows the time elapsed since the start of the
new journey.
IMPORTANT If information is not available, the message
“----” will appear instead of the Trip Computer values.
Counting of the different values will resume regularly when
normal operation is restored. This will not reset any of the
values displayed before the failure nor start a new jour-
ney.
TRIP control button fig. 28
The TRIP button, located on the top of the right steering
column stalk, is used (with ignition at MAR) to display and
reset the previous values to start a new journey:
– press briefly to display the different values;
– hold down to reset and then start a new journey.KNOWING
YOUR
VEHICLE
SAFETY
STARTING
AND DRIVING
WARNING LIGHTS
AND MESSAGES
IN AN
EMERGENCY
SERVICING
AND CARE
TECHNICAL
SPECIFICATIONS
CONTENTS
037-081 PUNTO FL EN 4ed 18-01-2010 12:23 Pagina 38
Page 42 of 270

The fabric upholstery of your car is designed
to withstand normal wear and tear for
a long time. Some precautions are howev-
er needed. Avoid prolonged rubbing against cloth-
ing accessories, such as metal buckles, bosses,
Velcro strips and the like, which by applying a high
pressure on the fabric in a small area could cause
the breakage of some threads and damage the up-
holstery.
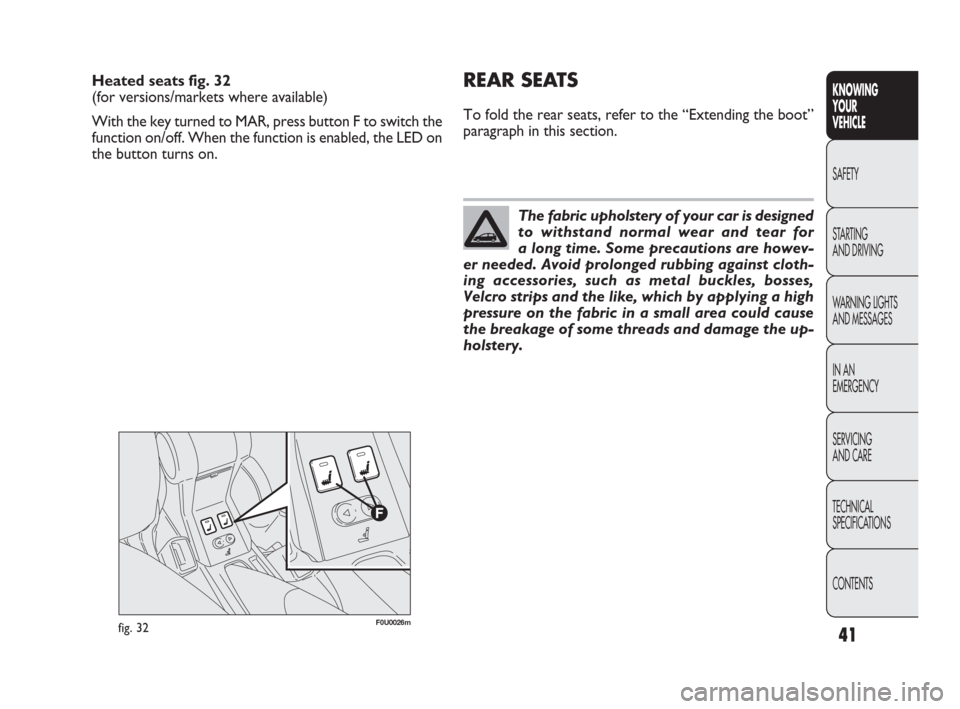
Heated seats fig. 32
(for versions/markets where available)
With the key turned to MAR, press button F to switch the
function on/off. When the function is enabled, the LED on
the button turns on.REAR SEATS
To fold the rear seats, refer to the “Extending the boot”
paragraph in this section.
fig. 32F0U0026m
41
KNOWING
YOUR
VEHICLE
SAFETY
STARTING
AND DRIVING
WARNING LIGHTS
AND MESSAGES
IN AN
EMERGENCY
SERVICING
AND CARE
TECHNICAL
SPECIFICATIONS
CONTENTS
037-081 PUNTO FL EN 4ed 18-01-2010 12:23 Pagina 41
Page 43 of 270

Head restraints must be adjusted so that
the head, rather than the neck, rests on
them. Only then can they protect your head cor-
rectly.
WARNING
To make the best use of the head restraint protection, ad-
just the backrest to keep a straight back, with the head
as close as possible to its restraint. HEAD RESTRAINTS
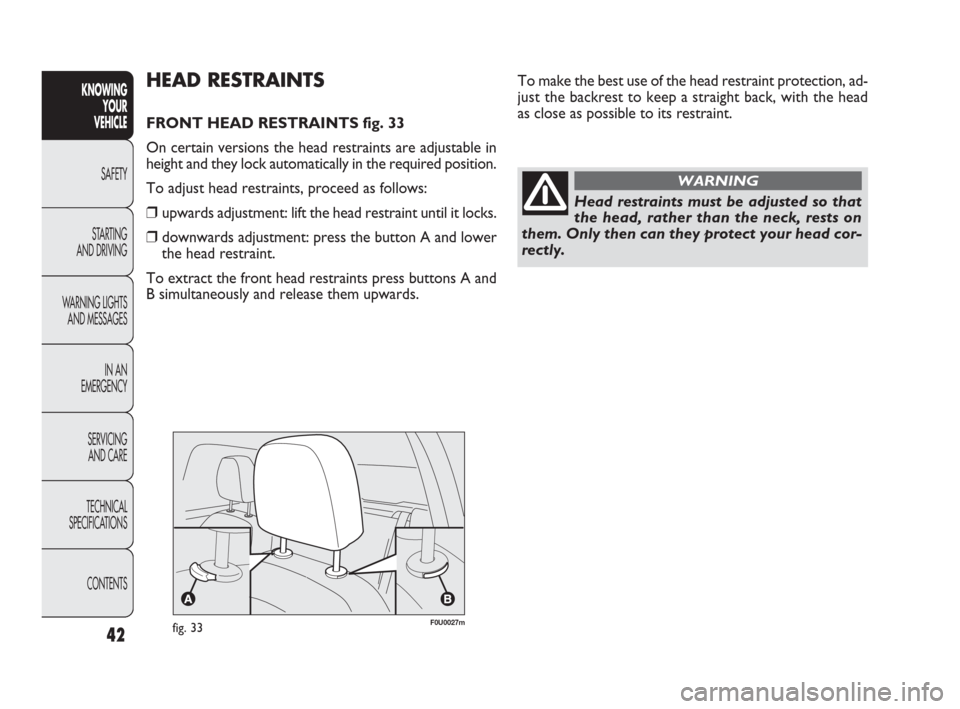
FRONT HEAD RESTRAINTS fig. 33
On certain versions the head restraints are adjustable in
height and they lock automatically in the required position.
To adjust head restraints, proceed as follows:
❒upwards adjustment: lift the head restraint until it locks.
❒downwards adjustment: press the button A and lower
the head restraint.
To extract the front head restraints press buttons A and
B simultaneously and release them upwards.
fig. 33F0U0027m
42
KNOWING
YOUR
VEHICLE
SAFETY
STARTING
AND DRIVING
WARNING LIGHTS
AND MESSAGES
IN AN
EMERGENCY
SERVICING
AND CARE
TECHNICAL
SPECIFICATIONS
CONTENTS
037-081 PUNTO FL EN 4ed 18-01-2010 12:23 Pagina 42
Page 44 of 270

REAR HEAD RESTRAINTS fig. 34
(for versions/markets where provided)
To move the head restraint upwards, raise it until hear-
ing the click (position of use).
To bring it back to the position of non-use, press button
A and push the head restraint down into the back rest.
To extract the rear head restraints press buttons A and
B simultaneously and release them upwards.
IMPORTANT When the rear seats are in use, the head
restraints must always be in the position of use.
Any adjustment of the steering wheel po-
sition must be carried out only with the car
stationary and the engine turned off.
WARNING
STEERING WHEEL
The driver can adjust the height and axial position of the
steering wheel.
To carry out the adjustment, proceed as follows:
❒release lever A-fig. 35 by pushing it forwards (position 1);
❒adjust the steering wheel;
❒lock lever A by pulling it towards the steering wheel (po-
sition 2).
fig. 35F0U0029mfig. 34F0U0028m
43
KNOWING
YOUR
VEHICLE
SAFETY
STARTING
AND DRIVING
WARNING LIGHTS
AND MESSAGES
IN AN
EMERGENCY
SERVICING
AND CARE
TECHNICAL
SPECIFICATIONS
CONTENTS
037-081 PUNTO FL EN 4ed 18-01-2010 12:23 Pagina 43