2010 DODGE JOURNEY ECU
[x] Cancel search: ECUPage 9 of 88

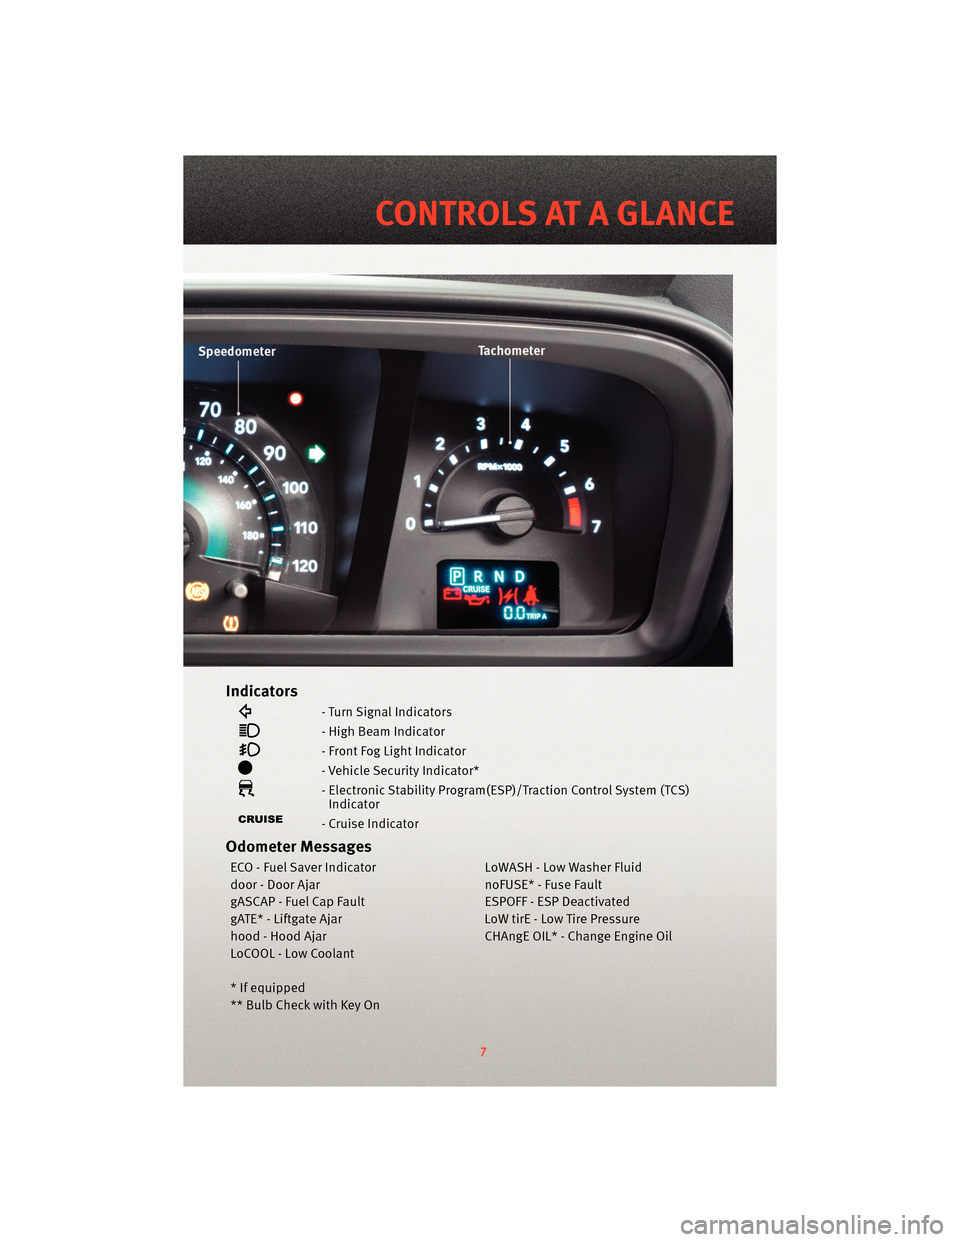
Indicators
- Turn Signal Indicators
- High Beam Indicator
- Front Fog Light Indicator
- Vehicle Security Indicator*
- Electronic Stability Program(ESP)/Traction Control System (TCS)Indicator
- Cruise Indicator
Odometer Messages
ECO - Fuel Saver Indicator LoWASH - Low Washer Fluid
door - Door Ajar noFUSE* - Fuse Fault
gASCAP - Fuel Cap Fault ESPOFF - ESP Deactivated
gATE* - Liftgate Ajar LoW tirE - Low Tire Pressure
hood - Hood Ajar CHAngE OIL* - Change Engine Oil
LoCOOL - Low Coolant
* If equipped
** Bulb Check with Key On
7
CONTROLS AT A GLANCE
Page 10 of 88

KEY FOB
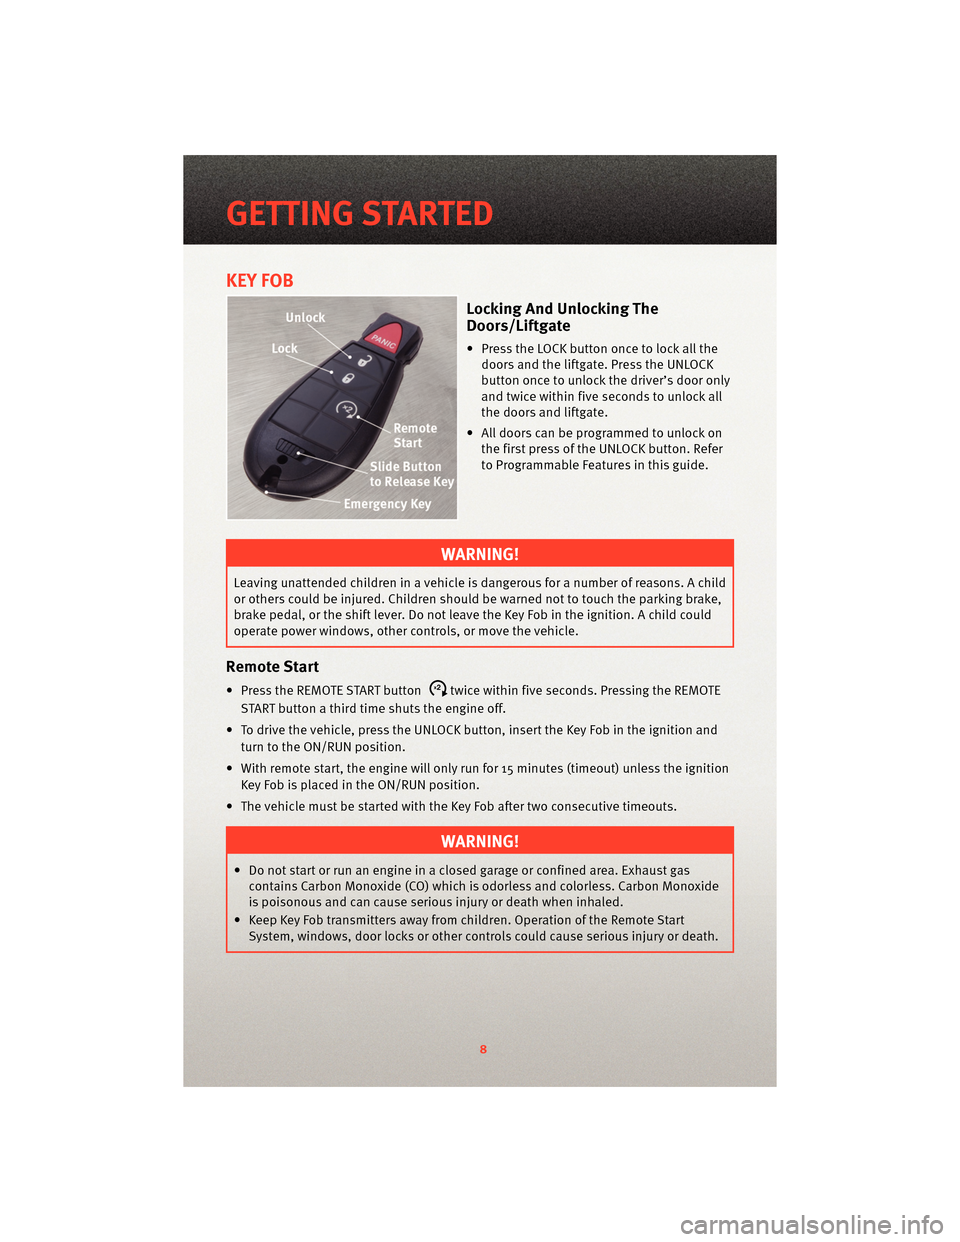
Locking And Unlocking The
Doors/Liftgate
• Press the LOCK button once to lock all thedoors and the liftgate. Press the UNLOCK
button once to unlock the driver’s door only
and twice within five seconds to unlock all
the doors and liftgate.
• All doors can be programmed to unlock on the first press of the UNLOCK button. Refer
to Programmable Features in this guide.
WARNING!
Leaving unattended children in a vehicle is dangerous for a number of reasons. A child
or others could be injured. Children should be warned not to touch the parking brake,
brake pedal, or the shift lever. Do not leave the Key Fob in the ignition. A child could
operate power windows, other controls, or move the vehicle.
Remote Start
• Press the REMOTE START buttonx2twice within five seconds. Pressing the REMOTE
START button a third time shuts the engine off.
• To drive the vehicle, press the UNLOCK button, insert the Key Fob in the ignition and turn to the ON/RUN position.
• With remote start, the engine will only run for 15 minutes (timeout) unless the ignition Key Fob is placed in the ON/RUN position.
• The vehicle must be started with the Key Fob after two consecutive timeouts.
WARNING!
• Do not start or run an engine in a closed garage or confined area. Exhaust gas contains Carbon Monoxide (CO) which is odorless and colorless. Carbon Monoxide
is poisonous and can cause serious injury or death when inhaled.
• Keep Key Fob transmitters away from children. Operation of the Remote Start System, windows, door locks or other controls could cause serious injury or death.
GETTING STARTED
8
Page 12 of 88

CHILD RESTRAINTS
• Children 12 years and under should ride properly buckled up in a rear seat, ifavailable. According to crash statistics, children are safer when properly restrained in
the rear seats rather than in the front.
• Every state in the United States and all Canadian provinces require that small children ride in proper restraint systems. This is the law, and you can be prosecuted for
ignoring it.
WARNING!
In a collision, an unrestrained child, even a tiny baby, can become a projectile inside
the vehicle. The force required to hold even an infant on your lap could become so
great that you could not hold the child, no matter how strong you are. The child and
others could be badly injured. Any child riding in your vehicle should be in a proper
restraint for the child's size.
Integrated Child Booster Seat
• The Integrated Child Booster Seat is located in each outboard second-row passengerseat, is designed for children weighing between 48 and 85 lbs (22 and 39 kg) and
between 47 in (119 cm) and 57 in (145 cm) tall.
• To position a child into the Integrated Child Booster Seat follow these steps: • Slide the second row seat to the full rear position to use the Integrated ChildBooster Seat.
NOTE: The second row bench with Integrated Child Booster Seat must remain in the full
rear position during use.
• Pull the release loop forward to release the latch and seat cushion. • Grasp the latch plate and pull out theseat belt.
• Lift the seat cushion up and push back to lock it in the booster seat position.
GETTING STARTED
10
Page 14 of 88

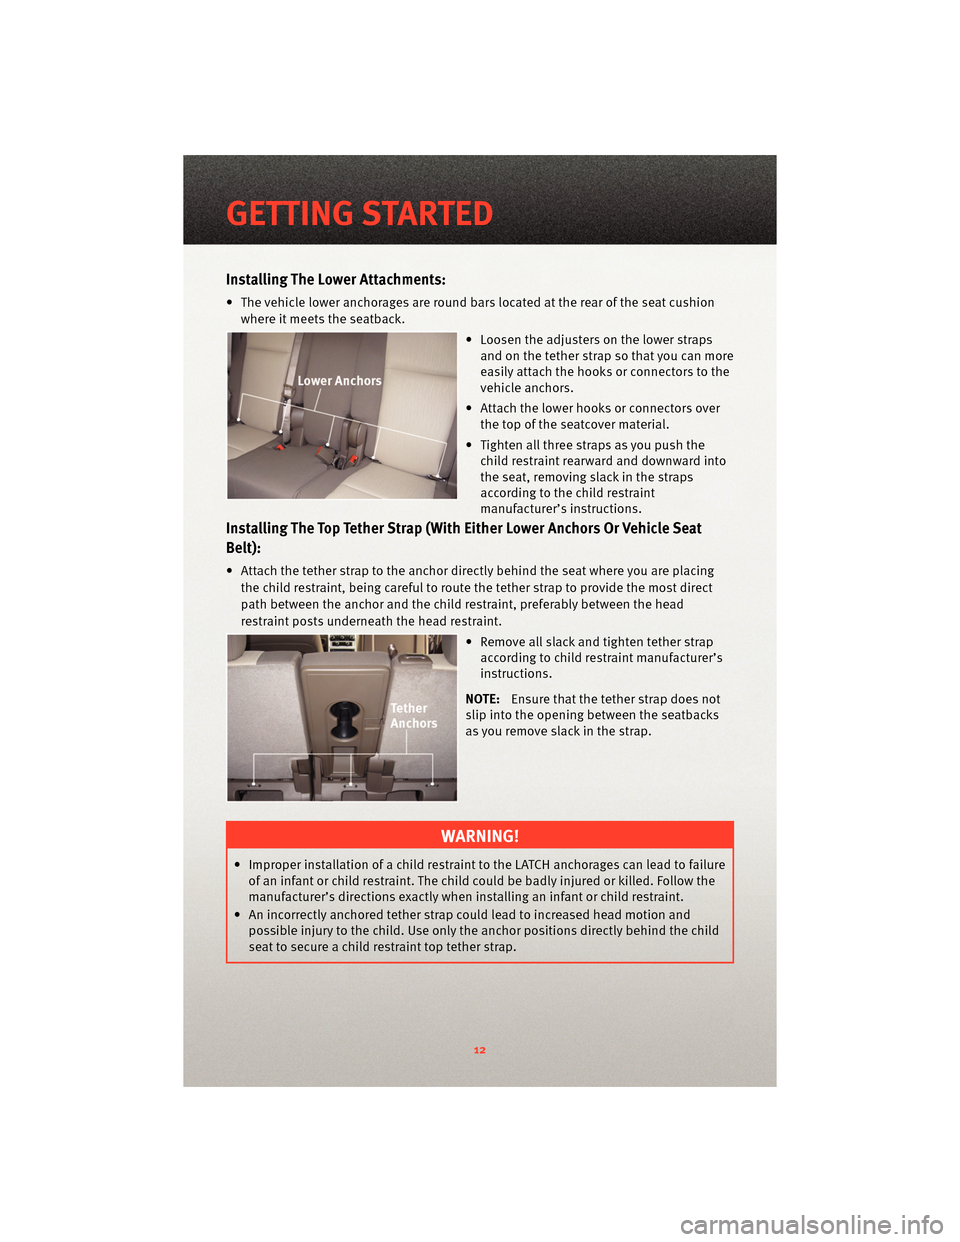
Installing The Lower Attachments:
• The vehicle lower anchorages are round bars located at the rear of the seat cushionwhere it meets the seatback.
• Loosen the adjusters on the lower strapsand on the tether strap so that you can more
easily attach the hooks o r connectors to the
vehicle anchors.
• Attach the lower hooks or connectors over the top of the seatcover material.
• Tighten all three straps as you push the child restraint rearward and downward into
the seat, removing slack in the straps
according to the child restraint
manufacturer’s instructions.
Installing The Top Tether Strap (With Either Lower Anchors Or Vehicle Seat
Belt):
• Attach the tether strap to the anchor directly behind the seat where you are placing
the child restraint, being careful to route the tether strap to provide the most direct
path between the anchor and the child restraint, preferably between the head
restraint posts underneath the head restraint.
• Remove all slack and tighten tether strapaccording to child restraint manufacturer’s
instructions.
NOTE: Ensure that the tether strap does not
slip into the opening between the seatbacks
as you remove slack in the strap.
WARNING!
• Improper installation of a child restraint to the LATCH anchorages can lead to failure of an infant or child restraint. The child could be badly injured or killed. Follow the
manufacturer’s directions exactly when installing an infant or child restraint.
• An incorrectly anchored tether strap could lead to increased head motion and possible injury to the child. Use only the anchor positions directly behind the child
seat to secure a child restraint top tether strap.
GETTING STARTED
12
Page 18 of 88

REAR SEATS
60/40 Split Second-Row Passenger Seats
To Lower The Seatback
• Locate the seatback release lever on the lower outboard side of the seat.
• Place one hand on the seatback and apply a gentle pressure.
• Lift the seatback release lever with the other hand, allowing the seatback to moveforward slightly, and then release the lever.
• Gently guide the seatback into the folded position.
To Raise The Seatback
• Raise the seatback and lock it in place.
WARNING!
Be certain that the seatback is locked securely into position. Otherwise, the seat will
not provide the proper stability for child seats and/or passengers. An improperly
latched seat could cause serious injury.
Forward And Rearward Adjustment
• The control lever is on the outboard side of the seat. Lift the lever to move the seat
forward or rearward. Release the lever once
the seat is in the position desired.
Recliner Adjustment
• The seatback release lever is on theoutboard side of the seat. To recline the
seat, lean back, lift the lever, position the
seatback as desired, and then release the
lever. To return the seatback to its normal
upright position, lean back, lift the lever,
lean forward, and then release the lever
once the seatback is in the upright position.
GETTING STARTED
16
Page 19 of 88

Stadium Tip ’n Slide™ (Easy Entry/ExitSeat) — Seven Passenger Models
To Move The Second-Row Passenger Seat
Forward
NOTE:Raise the 20% seatback/armrest
before moving the 60% seat to allow for full
seat travel.
• To allow passengers to easily enter or exit the third-row passenger seats move the Tip
’n Slide™ control lever on the upper
outboard side of the seatback forward, and
in one fluid motion, the seat cushion flips
upward and the seat moves forward on its
tracks.
To Unfold And Move The Second-Row Passenger Seat Rearward
• Move the seatback rearward until it locks in place and then continue sliding the seat rearward on its tracks until it locks in place.
• Push the seat cushion downward to lock it in place.
• Adjust the seat track position as desired.
WARNING!
• Do not drive the vehicle with the seat in this position, as it is only intended for entering and exiting the third row seats. Failure to follow this warning may result in
personal injury.
• Be certain that the seatback and seat are locked securely into position. Otherwise, the seat will not provide the proper stability for child seats and/or passengers. An
improperly latched seat could cause serious injury.
17
GETTING STARTED
Page 20 of 88

50/50 Split Third-Row Passenger Seats With Fold-Flat Feature
To Fold The Seat
• With the second-row passenger seat fullyupright, pull the latch release-loop located
at the top of the seatback upward, push the
seat forward slightly, and release the
release-loop. Then, continue to push the
seat forward. The head restraints will fold
automatically as the seat moves forward.
To Unfold The Seat
• Grasp the assist s trap loop on the seatback and pull it tow ard you to raise the
seatback. Continue to raise the seatback until it locks in place. Then, raise the head
restraint to lock it in place.
• To lock the seatback in a reclined position, pull the latch release-loop located at the top of the seatback upward, allow the seatback to recline, then release the
release-loop.
WARNING!
• Be certain that the seatback is locked securely into position. Otherwise, the seatwill not provide the proper stability for passengers. An improperly latched seat
could cause serious injury.
• Do not allow a passenger to sit in a third row seat without having the head restraint unfolded and locked in place. Failure to follow this warning may result in personal
injury to the passenger in the event of an accident.
• Do not allow a passenger to sit in a third row seat with the second row seatback(s) folded flat. In a collision, the passenger could slide underneath the seat belt and
be seriously or even fatally injured.
GETTING STARTED
18
Page 22 of 88

WARNING!
Do not adjust the steering wheel while driving. The tilt/telescoping adjustment must
be locked while driving. Adjusting the steering wheel while driving or driving without
the tilt/telescoping adjustment locked could cause the driver to lose control of the
vehicle. Failure to follow this warning may result in serious injury or death.
PROGRAMMABLE FEATURES
Electronic Vehicle Information Center (EVIC) – If Equipped
• The EVIC can be used to program the following Personal Settings. Press and release the MENU button
until Personal Settings displays, then press the SCROLL
button
to scroll through the settings. Press the FUNCTION SELECT buttonto
change the setting.
• Language • Headlamps With Wipers
• Auto UNLK On Exit • ILLUMIN Approach
• RKE Unlock • Key-Off Power Delay
• Sound Horn With Lock • NAV Turn By Turn
• Flash Lamp Lock • Display ECO Message
• Headlamp Off Delay • Display Units of Measure In
Key Fob Programmable Features
• The following features may also be programmed by using the Key Fob transmitter or the ignition switch and driver's door lock switch.
NOTE: Pressing the LOCK button while you are inside the vehicle will activate the
Vehicle Security Alarm. Opening a door with the Vehicle Security Alarm activated will
cause the alarm to sound. Press the UNLOCK button to deactivate the Vehicle Security
Alarm.
Unlock On First Press
• To unlock either the driver's side, or all doors, on the first press of the UNLOCK button:
• Press and hold the LOCK button for at least 4 seconds, but no longer than10 seconds. Then, press and hold the UNLOCK button while still holding the LOCK
button.
• Release both buttons at the same time.
GETTING STARTED
20