2010 DODGE GRAND CARAVAN steering
[x] Cancel search: steeringPage 3 of 88

INTRODUCTION/WELCOME
WELCOME FROM CHRYSLER GROUP LLC.. 2
CONTROLS AT A GLANCE
DRIVER COCKPIT.............. 4
INSTRUMENT CLUSTER ..........6
GETTING STARTED
KEYFOB...................8
THEFT ALARM................ 9
SEATBELT ................. 9
CHILD RESTRAINTS .............10
FRONTSEATS................13
HEATEDSEATS...............15
TILT STEERING COLUMN ..........17
ADJUSTABLEPEDALS ...........17
PROGRAMMABLEFEATURES .......18
OPERATING YOUR VEHICLE
TURN SIGNAL/WIPER/WASHER/HIGH
BEAMLEVER ............... 20
HEADLIGHT SWITCH AND HALO LIGHT
SWITCH...................21
SPEED CONTROL LEVER ......... 22
ELECTRONIC RANGE SELECTION (ERS)...23
MANUAL CLIMATE CONTROLS .......23
FRONT THREE ZONE MANUAL CLIMATE
CONTROLS ................ 24
FRONT THREE ZONE AUTOMATIC
TEMPERATURE CONTROLS (ATC) .....25
PARKSENSE
®REAR PARK ASSIST .....27
PARKVIEW®REAR BACK-UP CAMERA . . .27
REAR CROSS PATH WITH BLIND SPOT
MONITORING ............... 28
POWER SLIDING SIDE DOORS ...... 28
STOW 'N GO
®SEATING ......... 29
SWIVEL N’ GO™ SEATING WITH TABLE . 30
THIRD ROW POWER RECLINER .......31
POWERLIFTGATE..............32
POWERSUNROOF .............32
WIND BUFFETING ..............33
ELECTRONICS
NON-TOUCH-SCREENRADIOS.......34
TOUCH-SCREENRADIOS......... 36
REMOTE AUDIO CONTROLS ....... 40
VIDEO ENTERTAINMENT
SYSTEM(VES)™ ............. 40
UNIVERSAL CONSUMER INTERFACE . . . 42
ELECTRONIC VEHICLE INFORMATION
CENTER (EVIC) ...............43 UNIVERSAL GARAGE DOOR OPENER
(HOMELINK
®) ...............43
POWERINVERTER .............45
POWER OUTLETS ..............45
Uconnect™ Phone ............ 46
VOICECOMMAND ............ 48
UTILITY
IN-FLOOR STORAGE – STOW N’ GO®.. 49
TRAILER TOWING WEIGHTS (MAXIMUM
TRAILER WEIGHT RATINGS) ........50
RECREATIONAL TOWING (BEHIND
MOTORHOME, ETC.) ............51
BRAKE/TRANSMISSION INTERLOCK
MANUAL OVERRIDE ............51
WHAT TO DO IN EMERGENCIES
24-HOUR TOWINGASSISTANCE -
U.S. ONLY .................52
INSTRUMENT CLUSTER WARNING
LIGHTS ...................52
IF YOUR ENGINE OVERHEATS .......55
JACKINGANDTIRECHANGING.......56
JUMP-STARTING ..............61
TOWINGADISABLEDVEHICLE...... 64
FREEING A STUCK VEHICLE ........65
EVENT DATA RECORDER (EDR) ......65
MAINTAINING YOUR VEHICLE
OPENING THE HOOD............67
ADDINGFUEL................67
ENGINE COMPARTMENT ......... 69
FLUIDS AND CAPACITIES ..........71
MAINTENANCE CHART ...........72
FUSES....................74
TIREPRESSURES..............77
WHEEL AND WHEEL TRIM CARE ......78
EXTERIOR BULBS ..............78
CONSUMER ASSISTANCE
CHRYSLER GROUP LLC CUSTOMER
CENTER...................79
CHRYSLER CANADA INC. CUSTOMER
CENTER...................79
ASSISTANCE FOR THE HEARING
IMPAIRED..................79
PUBLICATIONS ORDERING .........79
REPORTING SAFETY DEFECTS IN
THE 50 UNITED STATES AND
WASHINGTON, D.C. ........... 80
TIRE WARRANTY ............. 80
MOPAR ACCESSORIES
MOPAR®ACCESSORIES..........83
TABLE OF CONTENTS
Page 19 of 88

TILT STEERING COLUMN
• The tilt steering column tilt lever is locatedbelow the steering wheel.
• Push down on the tilt lever to unlock the steering column.
• With one hand firmly on the steering wheel, move the steering column upward or
downward as desired.
• Pull upward on the tilt lever to lock the column firmly in place.
WARNING!
Do not adjust the steering wheel while driving. The tilt adjustment must be locked
while driving. Adjusting the steering wheel while driving or driving without the tilt
adjustment locked could cause the driver to lose control of the vehicle. Failure to
follow this warning may result in severe injury or death.
ADJUSTABLE PEDALS
• Press the switch located on the left side of the steering column forward to move the
brake and accelerator pedals away from the
driver and press the switch rearward to
move the pedals closer to the driver.
NOTE: The pedals cannot be adjusted when
the vehicle is in REVERSE or when the
Electronic Speed Control is set.
WARNING!
Do not adjust the pedals while the vehicle is moving. You could lose control and have
an accident. Always adjust the pedals while the vehicle is parked.
17
GETTING STARTED
Page 23 of 88

High Beams
• Push the lever away from you to activate the high beams.
• A high beam symbol will illuminate in the cluster to indicate the high beams are on.
NOTE:For safe driving, turn off high beams when oncoming traffic is present to prevent
headlight glare and as a courtesy to other motorists.
HEADLIGHT SWITCH AND HALO LIGHT SWITCH
Automatic Headlights/Parking
Lights/Headlights
• Rotate the headlight switch, located on the instrument panel to the left of the steering
wheel, to the first detent for parking
lights
and to the second detent for
headlights
.
• Rotate the headlight switch to “A” for AUTO headlights.
• When set to “A” (AUTO), the system automatically turns the headlights on or off
based on ambient light levels.
SmartBeams™
• This system automatically controls the use of the headlight high beams. Refer to
Programmable Features in Getting Started for further details.
Instrument Panel Dimmer
• Rotate the dimmer control to the extreme bottom position to fully dim the instrument
panel lights and prevent the interior lights from illuminating when a door is opened.
• Rotate the dimmer control up to increase the brightness of the instrument panel when the parking lights or headlights are on.
• Rotate the dimmer control up to the next detent position to fully brighten the odometer and radio when the parking lights or he adlights are on. Refer to your Media
Center/Radio User Manual on the DVD for display dimming.
• Rotate the dimmer control up to the last detent position to turn on the interior lighting.
Overhead (Halo) Light
• Halo lights are strategically placed soft lighting that help illuminate specific areas while driving at night.
• Push the button to turn ON/OFF the overhead (halo) lighting.
21
OPERATING YOUR VEHICLE
Page 42 of 88

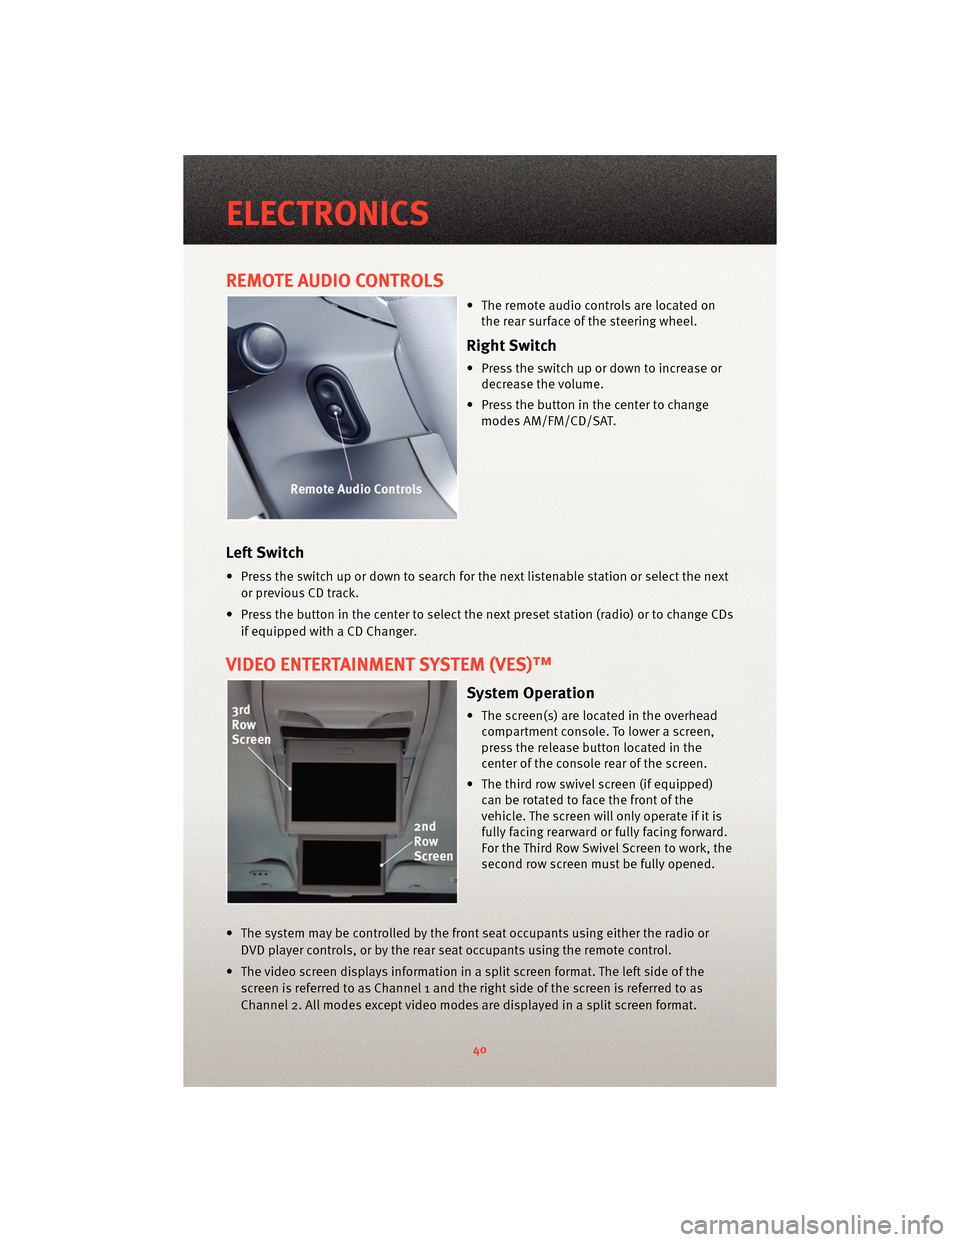
REMOTE AUDIO CONTROLS
• The remote audio controls are located onthe rear surface of the steering wheel.
Right Switch
• Press the switch up or down to increase ordecrease the volume.
• Press the button in the center to change modes AM/FM/CD/SAT.
Left Switch
• Press the switch up or down to search for the next listenable station or select the next
or previous CD track.
• Press the button in the center to select the next preset station (radio) or to change CDs if equipped with a CD Changer.
VIDEO ENTERTAINMENT SYSTEM (VES)™
System Operation
• The screen(s) are located in the overheadcompartment console. To lower a screen,
press the release button located in the
center of the console rear of the screen.
• The third row swivel screen (if equipped) can be rotated to face the front of the
vehicle. The screen will only operate if it is
fully facing rearward or fully facing forward.
For the Third Row Swivel Screen to work, the
second row screen must be fully opened.
• The system may be controlled by the front seat occupants using either the radio or DVD player controls, or by the rear seat occupants using the remote control.
• The video screen displays information in a split screen format. The left side of the screen is referred to as Channel 1 and the right side of the screen is referred to as
Channel 2. All modes except video modes are displayed in a split screen format.
ELECTRONICS
40
Page 45 of 88

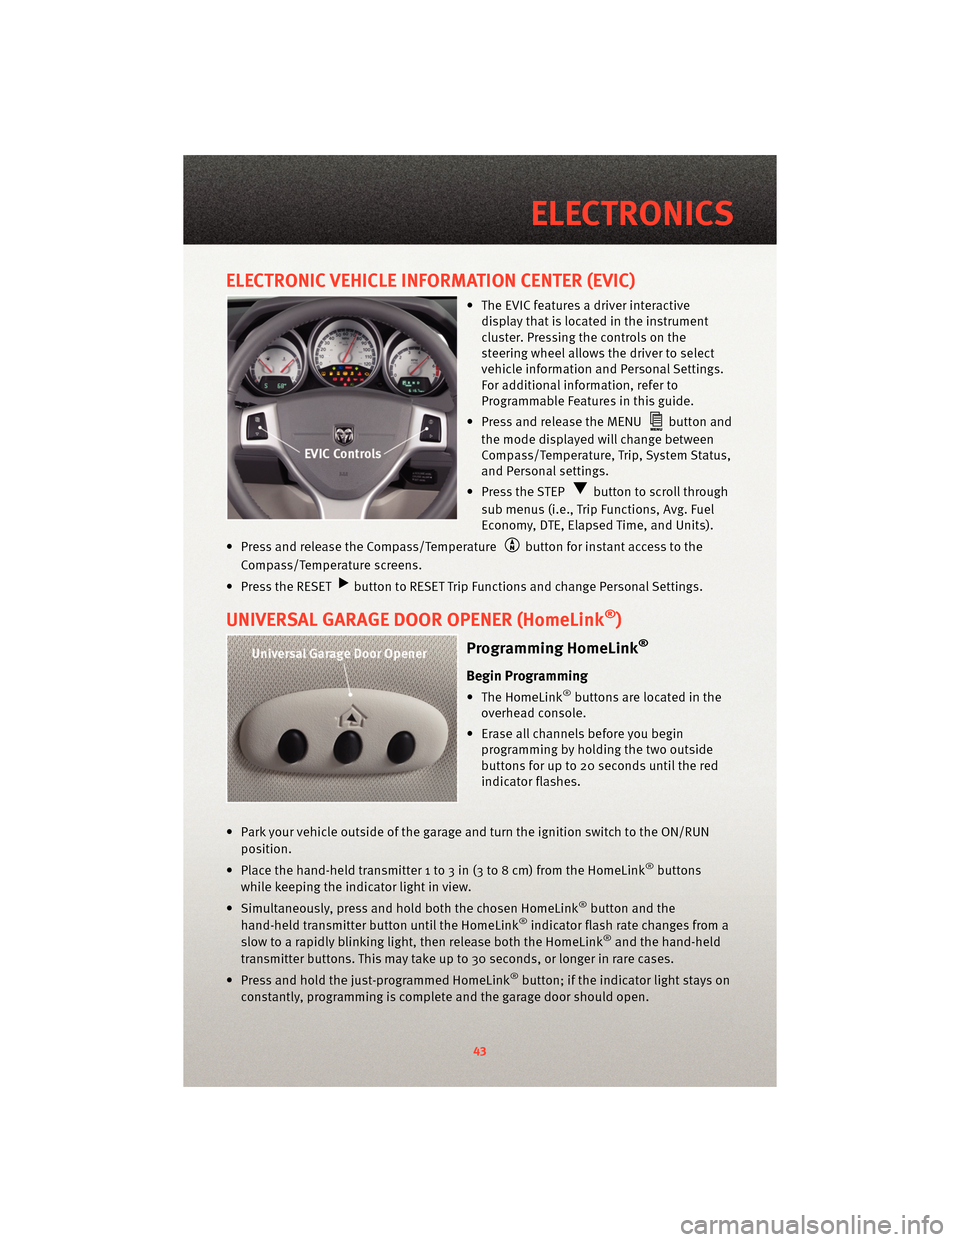
ELECTRONIC VEHICLE INFORMATION CENTER (EVIC)
• The EVIC features a driver interactivedisplay that is located in the instrument
cluster. Pressing the controls on the
steering wheel allows the driver to select
vehicle information and Personal Settings.
For additional information, refer to
Programmable Features in this guide.
• Press and release the MENU
button and
the mode displayed will change between
Compass/Temperature, Trip, System Status,
and Personal settings.
• Press the STEP
button to scroll through
sub menus (i.e., Trip Functions, Avg. Fuel
Economy, DTE, Elapsed Time, and Units).
• Press and release the Compass/Temperature
button for instant access to the
Compass/Temperature screens.
• Press the RESET
button to RESET Trip Functions and change Personal Settings.
UNIVERSAL GARAGE DOOR OPENER (HomeLink®)
Programming HomeLink®
Begin Programming
• The HomeLink®buttons are located in the
overhead console.
• Erase all channels before you begin programming by holding the two outside
buttons for up to 20 seconds until the red
indicator flashes.
• Park your vehicle outside of the garage and turn the ignition switch to the ON/RUN position.
• Place the hand-held transmitter 1 to 3 in (3 to 8 cm) from the HomeLink
®buttons
while keeping the indicator light in view.
• Simultaneously, press and hold both the chosen HomeLink
®button and the
hand-held transmitter button until the HomeLink®indicator flash rate changes from a
slow to a rapidly blinking light, then release both the HomeLink®and the hand-held
transmitter buttons. This may take up to 30 seconds, or longer in rare cases.
• Press and hold the just-programmed HomeLink
®button; if the indicator light stays on
constantly, programming is complete and the garage door should open.
43
ELECTRONICS
Page 50 of 88

VOICE COMMAND
• The Voice Command system allows you to control your AM, FM radio, satellite radio,disc player, Uconnect™ Phone and a memo recorder.
• When you press the Voice Command button
located on the radio face plate or
steering wheel, you will hear a beep. The beep is your signal to give a command. If you
do not say a command within a few seconds, the system will present you with a list of
options. If you ever wish to interrupt the system while it lists options, press the Voice
Command button
, listen for the BEEP, and say your command.
• For vehicles equipped with Video Entertainment System (VES)™, refer to the Voice Command section of the Uconnect™ User's Manual on the DVD for further details.
• For vehicles not equipped with VES™, refer to your vehicle Owner's Manual on the DVD for Voice Command information.
Changing The Volume
• Start a dialogue by pressing the Voice Command button, then say a command
(for example, “tutorial”).
• Use the radio ON/OFF VOLUME rotary knob to adjust the volume to a comfortable level while the Voice Command system is speaking. The volume setting for Voice Command
is different than the audio system.
WARNING!
Any voice commanded system should be used only in safe driving conditions
following local laws and phone use. All attention should be kept on the roadway
ahead. Failure to do so may result in an accident causing you and others to be
severely injured or killed.
NOTE: To access the tutorial, press the Voice Command button
. After the BEEP,
say “tutorial”. Press any hard-key or touch the display to cancel the tutorial.
ELECTRONICS
48
Page 67 of 88

FREEING A STUCK VEHICLE
• If your vehicle becomes stuck in mud, sand or snow, it can often be moved by arocking motion. Turn your steering wheel right and left to clear the area around the
front wheels. Then, move the shift lever back and forth between REVERSE and 1st gear.
Using minimal accelerator pedal pressure to maintain the rocking motion, without
spinning the wheels, is most effective.
NOTE: If your vehicle is equipped with Electronic Stability Program (ESP) or Traction
Control
, turn the system off before attempting to “rock” the vehicle.
WARNING!
Fast spinning tires can be dangerous. Forces generated by excessive wheel speeds
may cause tire damage or failure. A tire could explode and injure someone. Do not
spin your vehicle's wheels faster than 30 mph (48 km/h) when you are stuck. Do not
let anyone near a spinning wheel, no matter what the speed.
CAUTION!
• When “rocking” a stuck vehicle by moving between 1st and REVERSE, do not spin the wheels faster than 15 mph (24 km/h), or drivetrain damage may result.
• Revving the engine or s pinning the wheels too fast ma y lead to transmission
overheating and failure. It can also damage the tires. Do not spin the wheels above
30 mph (48 km/h) while in gear (no transmission shifting occurring).
EVENT DATA RECORDER (EDR)
• This vehicle is equipped with an event data recorder (EDR). The main purpose of an
EDR is to record, in certain crash or near crash-like situations, such as an air bag
deployment or hitting a road obst acle, data that willassist in understanding how a
vehicle’s systems performed. The EDR is designed to record data related to vehicle
dynamics and safety systems for a short period of time, typically 30 seconds or less.
The EDR in this vehicle is designed to record such data as:
• How various systems in your vehicle were operating;
• Whether or not the driver and passenger s afety belts were buckled/fastened;
• How far (if at all) the driver was depressing the accelerator and/or brake pedal; and,
• How fast the vehicle was traveling.
• These data can help provide a better u nderstanding of the circumstances in which
crashes and injuries occur.
65
WHAT TO DO IN EMERGENCIES
Page 69 of 88

OPENING THE HOOD
• Pull the hood release lever locatedon the instrument panel, below the steering
column.
• Raise the hood and locate the safety catc h lever, in the middle of the hood opening.
• Move the safety latch while lifting the hood at the same time.
• Insert the support rod into the slot on the hood.
• To close the hood, remove the support rod and place it in the retaining clip, then lower the hood slowly.
WARNING!
Be sure the hood is fully latched before driving your vehicle. If the hood is not fully
latched, it could open when the vehicle is in motion and block your vision. Failure to
follow this warning could result in serious injury or death.
ADDING FUEL
Fuel Filler Cap (Gas Cap)
• The gas cap is located behind the fuel filler door on the left side of the vehicle. If the
gas cap is lost or damaged, be sure the
replacement cap is for use with this vehicle.
• When the fuel nozzle “clicks” or shuts off, the fuel tank is full.
• Tighten the gas cap until you hear a “clicking” sound. This is an indication that
the gas cap is properly tightened. If not
properly tightened, the MIL (Malfunction
Indicator Light) may come on.
NOTE: The driver’s side sliding door cannot be opened while the fuel door is open.
CAUTION!
• Damage to the fuel system or emissions control sy stem could result from using an
improper gas cap. A poorly fitting cap could le t impurities into the fuel system and
may cause the MIL to turn on, due to fuel vapors escaping from the system.
• To avoid fuel spillage and overfilling, do not “top off” the fuel tank after filling.
67
MAINTAINING YOUR VEHICLE