Page 450 of 530

Cooling System
WARNING!
•When working near the radiator cooling fan, dis-
connect the fan motor lead or turn the ignition
switch to the OFF position. The fan is temperature
controlled and can start at anytime the ignition
switch is in the ON position.
•You or others can be badly burned by hot engine
coolant (antifreeze) or steam from your radiator. If
you see or hear steam coming from under the
hood, do not open the hood until the radiator has
had time to cool. Never try to open a cooling
system pressure cap when the radiator is hot.
Coolant Checks
Check the engine coolant (antifreeze) protection every
12 months (before the onset of freezing weather, where
applicable). If the engine coolant (antifreeze) is dirty orrusty in appearance, the system should be drained,
flushed and refilled with fresh coolant. Check the front of
the A/C condenser for any accumulation of bugs, leaves,
etc. If dirty, clean by gently spraying water from a garden
hose vertically down the face of the condenser.
Check the coolant recovery bottle tubing for brittle rub-
ber, cracking, tears, cuts and tightness of the connection
at the bottle and radiator. Inspect the entire system for
leaks.
With the engine at normal operating temperature (but
not running), check the cooling system pressure cap for
proper vacuum sealing by draining a small amount of
engine coolant (antifreeze) from the radiator drain cock.
If the cap is sealing properly, the engine coolant (anti-
freeze) will begin to drain from the coolant recovery
bottle. DO NOT REMOVE THE COOLANT PRESSURE
CAP WHEN THE COOLING SYSTEM IS HOT.
7
MAINTAINING YOUR VEHICLE 449
Page 451 of 530
 is dirty or contains a
considerable amount of sediment, clean and flush with a
reliable cooling system cleaner. Follow wi")
Cooling System – Drain, Flush and Refill
If the engine coolant (antifreeze) is dirty or contains a
considerable amount of sediment, clean and flush with a
reliable cooling system cleaner. Follow with a thorough
rinsing to remove all deposits and chemicals. Properly
dispose of the old engine coolant (antifreeze) solution.
Refer to “Maintenance Schedule” for the proper mainte-
nance intervals.
Selection of Coolant
Use only the manufacturer’s recommended engine cool-
ant (antifreeze). Refer “Fluids, Lubricants and Genuine
Parts” in “Maintaining Your Vehicle” for further informa-
tion.
CAUTION!
•Mixing of engine coolant (antifreeze) other than
specified Hybrid Organic Additive Technology
(HOAT) engine coolant (antifreeze), may result in
engine damage and may decrease corrosion pro-
tection. If a non-HOAT engine coolant (antifreeze)
is introduced into the cooling system in an emer-
gency, it should be replaced with the specified
engine coolant (antifreeze) as soon as possible.
•Do not use water alone or alcohol based engine
coolant (antifreeze) products. Do not use addi-
tional rust inhibitors or anti-rust products, as they
may not be compatible with the radiator engine
coolant (antifreeze) and may plug the radiator.
•This vehicle has not been designed for use with
Propylene Glycol-based engine coolant (anti-
freeze). Use of Propylene Glycol-based engine
coolant (antifreeze) is not recommended.
450 MAINTAINING YOUR VEHICLE
Page 452 of 530
 that allows extended maintenance
intervals. This engine coolant (antifreeze) can be used up
to five years or 10")
Adding Coolant
Your vehicle has been built with an improved engine
coolant (antifreeze) that allows extended maintenance
intervals. This engine coolant (antifreeze) can be used up
to five years or 102,000 miles (170 000 km) before replace-
ment. To prevent reducing this extended maintenance
period, it is important that you use the same engine
coolant (antifreeze) throughout the life of your vehicle.
Please review these recommendations for using Hybrid
Organic Additive Technology (HOAT) engine coolant
(antifreeze). When adding engine coolant (antifreeze):
•The manufacturer recommends using MOPAR�
Antifreeze/Coolant 5 Year/100,000 Mile Formula HOAT
(Hybrid Organic Additive Technology) or equivalent.
•Mix a minimum solution of 50% HOAT engine coolant
and distilled water. Use higher concentrations (not to
exceed 70%) if temperatures below�34°F (�37°C) are
anticipated.
•Use only high purity water such as distilled or deion-
ized water when mixing the water/engine coolant
(antifreeze) solution. The use of lower quality water
will reduce the amount of corrosion protection in the
engine cooling system.
Please note that it is the owner’s responsibility to main-
tain the proper level of protection against freezing ac-
cording to the temperatures occurring in the area where
the vehicle is operated.
NOTE: Mixing engine coolant (antifreeze) types will
decrease the life of the engine coolant (antifreeze) and
will require more frequent coolant changes.
Cooling System Pressure Cap
The cap must be fully tightened to prevent the loss of
engine coolant (antifreeze), and to ensure that engine
coolant (antifreeze) will return to the radiator from the
coolant recovery bottle.
7
MAINTAINING YOUR VEHICLE 451
Page 453 of 530

The cap should be inspected and cleaned if there is any
accumulation of foreign material on the sealing surfaces.
WARNING!
•The warning words “DO NOT OPEN HOT” on
the cooling system pressure cap are a safety pre-
caution. Never add engine coolant (antifreeze)
when the engine is overheated. Do not loosen or
remove the cap to cool an overheated engine. Heat
causes pressure to build up in the cooling system.
To prevent scalding or injury, do not remove the
pressure cap while the system is hot or under
pressure.
•Do not use a pressure cap other than the one
specified for your vehicle. Personal injury or en-
gine damage may result.
Disposal of Used Coolant
Used ethylene glycol-based engine coolant (antifreeze) is
a regulated substance requiring proper disposal. Check
with your local authorities to determine the disposal
rules for your community. To prevent ingestion by ani-
mals or children, do not store ethylene glycol-based
engine coolant (antifreeze) in open containers or allow it
to remain in puddles on the ground. If ingested by a child
or pet, seek emergency assistance immediately. Clean up
any ground spills immediately.
Coolant Level
The coolant bottle provides a quick visual method for
determining that the coolant level is adequate. With the
engine cold, the level of the engine coolant (antifreeze) in
the coolant recovery bottle should be between the ranges
indicated on the bottle.
The radiator normally remains completely full, so there is
no need to remove the radiator cap unless checking for
452 MAINTAINING YOUR VEHICLE
Page 454 of 530
 freeze point or replacing the
engine coolant (antifreeze). Advise your service atten-
dant of this. As long as the engine operating temperature
is satisfactory, the coolan")
engine coolant (antifreeze) freeze point or replacing the
engine coolant (antifreeze). Advise your service atten-
dant of this. As long as the engine operating temperature
is satisfactory, the coolant bottle only needs to be checked
once a month.
When additional engine coolant (antifreeze) is needed to
maintain the proper level, it should be added to the
coolant bottle. Do not overfill.
Points to Remember
NOTE:When the vehicle is stopped after a few miles (a
few kilometers) of operation, you may observe vapor
coming from the front of the engine compartment. This is
normally a result of moisture from rain, snow, or high
humidity accumulating on the radiator and being vapor-
ized when the thermostat opens, allowing hot engine
coolant (antifreeze) to enter the radiator. If an examination of your engine compartment shows no
evidence of radiator or hose leaks, the vehicle may be
safely driven. The vapor will soon dissipate.
•Do not overfill the coolant recovery bottle.
•Check the engine coolant (antifreeze) freeze point in
the radiator and in the coolant recovery bottle. If
engine coolant (antifreeze) needs to be added, contents
of the coolant recovery bottle must also be protected
against freezing.
•If frequent engine coolant (antifreeze) additions are
required, or if the level in the coolant recovery bottle
does not drop when the engine cools, the cooling
system should be pressure tested for leaks.
•Maintain engine coolant (antifreeze) concentration at
50% HOAT engine coolant (antifreeze) (minimum)
and distilled water for proper corrosion protection of
your engine, which contains aluminum components.
7
MAINTAINING YOUR VEHICLE 453
Page 478 of 530
2. Twist and remove the socket from the lamp assembly
and pull the bulb out to remove.3. Push the bulb into the socket, twist the socket into the
lamp assembly and reinstall the lamp assembly into place
ensuring the locking tab is secure.
FLUID CAPACITIES
U.S.
Metric
Fuel (Approximate) 20 Gallons76 Liters
Engine Oil with Filter
3.3L and 3.8L Engine (SAE 5W-20, API Certified) 5 Quarts4.7 Liters
4.0L Engine (SAE 10W-30, API Certified) 5.5 Quarts5.2 Liters
Cooling System *
3.3L, 3.8L, and 4.0L Engine (MOPAR� Engine Coolant/
Antifreeze 5 Year/100,000 Mile Formula or equivalent) 13.4 Quarts
12.6 Liters
* Includes heater and coolant recovery bottle filled to MAX level. Add 2.9 Qts (2.8 L) if equipped with a rear
heater.
7
MAINTAINING YOUR VEHICLE 477
Page 479 of 530
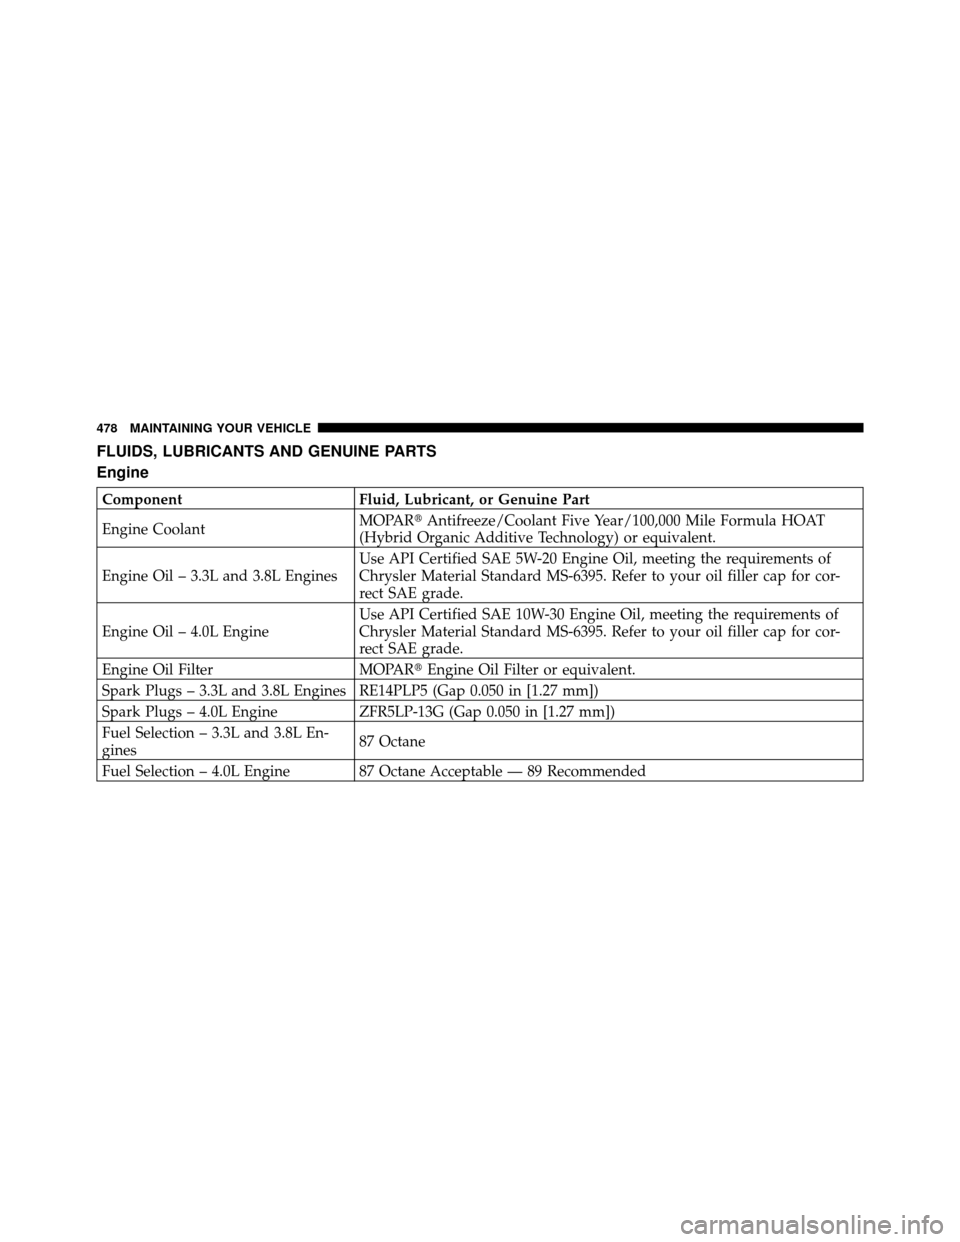
FLUIDS, LUBRICANTS AND GENUINE PARTS
Engine
ComponentFluid, Lubricant, or Genuine Part
Engine Coolant MOPAR�
Antifreeze/Coolant Five Year/100,000 Mile Formula HOAT
(Hybrid Organic Additive Technology) or equivalent.
Engine Oil – 3.3L and 3.8L Engines Use API Certified SAE 5W-20 Engine Oil, meeting the requirements of
Chrysler Material Standard MS-6395. Refer to your oil filler cap for cor-
rect SAE grade.
Engine Oil – 4.0L Engine Use API Certified SAE 10W-30 Engine Oil, meeting the requirements of
Chrysler Material Standard MS-6395. Refer to your oil filler cap for cor-
rect SAE grade.
Engine Oil Filter MOPAR�Engine Oil Filter or equivalent.
Spark Plugs – 3.3L and 3.8L Engines RE14PLP5 (Gap 0.050 in [1.27 mm])
Spark Plugs – 4.0L Engine ZFR5LP-13G (Gap 0.050 in [1.27 mm])
Fuel Selection – 3.3L and 3.8L En-
gines 87 Octane
Fuel Selection – 4.0L Engine 87 Octane Acceptable — 89 Recommended
478 MAINTAINING YOUR VEHICLE
Page 485 of 530
Once A Month
•Check tire pressure and look for unusual wear or
damage.
•Inspect the battery and clean and tighten the terminals
as required.
•Check the fluid levels of the coolant reservoir, the
brake master cylinder, the power steering and the
transmission and add as needed.
•Check all lights and other electrical items for correct
operation.At Each Oil Change
•Change the engine oil filter.
•Inspect the brake hoses and lines.
CAUTION!
Failure to perform the required maintenance items
may result in damage to the vehicle.
Required Maintenance Intervals
Refer to the Maintenance Schedules on the following
pages for the required maintenance intervals.
8
M
A I
N T
E
N A
N CE
S
C
H E
D
U L
E
S484 MAINTENANCE SCHEDULES