2010 DODGE DAKOTA steering
[x] Cancel search: steeringPage 3 of 76

INTRODUCTION/WELCOME
WELCOME FROM CHRYSLER GROUP
LLC ..................... 2
CONTROLS AT A GLANCE
DRIVER COCKPIT.............. 4
INSTRUMENT CLUSTER ..........6
GETTING STARTED
KEYFOB...................8
THEFT ALARM................ 9
SEATBELT ................. 9
CHILD RESTRAINTS ............. 9
FRONTSEATS................13
HEATEDSEATS...............14
TILT STEERING COLUMN ..........15
PROGRAMMABLEFEATURES .......15
OPERATING YOUR VEHICLE
TURN SIGNALS/WIPER/WASHER/HIGH
BEAMSLEVER ...............17
HEADLIGHT SWITCH ............18
SPEED CONTROL ..............19
CLIMATE CONTROLS ........... 20
POWERSUNROOF ............ 20
WIND BUFFETING ..............21
ELECTRONICS
NON-TOUCH-SCREENRADIOS...... 22
NAVIGATION TOUCH-SCREEN RADIO . . .25
STEERING WHEEL AUDIO CONTROLS . . 28
UNIVERSAL GARAGE DOOR OPENER
(HOMELINK
®) .............. 28
POWER OUTLET ............. 30
Uconnect™ Phone ........... 30
VOICECOMMAND .............32
OFF-ROAD CAPABILITIES
FOUR-WHEEL DRIVE OPERATION .....33
UTILITY
REAR CRATE 'N GO®STORAGE ......34
REAR CARGO AREA UTILITY RAILS .....34
TAILGATE ..................34 TRAILER TOWING WEIGHTS (MAXIMUM
TRAILER WEIGHT RATINGS)
........35
RECREATIONAL TOWING (BEHIND
MOTORHOME, ETC.) ............35
BRAKE/TRANSMISSION INTERLOCK
SYSTEM...................37
WHAT TO DO IN EMERGENCIES
24-HOUR TOWING ASSISTANCE
- U.S. ONLY ................ 38
INSTRUMENT CLUSTER WARNING
LIGHTS .................. 38
IF YOUR ENGINE OVERHEATS .......41
JACKINGANDTIRECHANGING...... 42
JUMP-STARTING ............. 48
EMERGENCY TOW HOOKS .........51
TOWINGADISABLEDVEHICLE.......52
FREEING A STUCK VEHICLE ........53
EVENT DATA RECORDER (EDR) ......54
MAINTAINING YOUR VEHICLE
OPENING THE HOOD............55
ENGINE COMPARTMENT ..........56
FLUIDS AND CAPACITIES ..........58
MAINTENANCE CHART .......... 60
FUSES................... 62
TIREPRESSURES..............65
WHEEL AND WHEEL TRIM CARE ......65
EXTERIOR BULBS ............. 66
CONSUMER ASSISTANCE
CHRYSLER GROUP LLC CUSTOMER
CENTER...................67
CHRYSLER CANADA INC. CUSTOMER
CENTER...................67
ASSISTANCE FOR THE HEARING
IMPAIRED..................67
PUBLICATIONS ORDERING .........67
REPORTING SAFETY DEFECTS IN
THE 50 UNITED STATES AND
WASHINGTON, D.C. ........... 68
TIRE WARRANTY ............. 68
MOPAR ACCESSORIES
MOPAR®ACCESSORIES..........71
TABLE OF CONTENTS
Page 17 of 76

CAUTION!
Repeated overheating of the seat could damage the heating element and/or degrade
the material of the seat.
TILT STEERING COLUMN
• The tilt lever is located on the steeringcolumn, below the turn signal lever.
• Pull the lever toward the steering wheel to unlock the steering column.
• With one hand firmly on the steering wheel, move the steering column up or down as
desired.
• Push the lever away from the steering wheel to lock the column firmly in place.
WARNING!
Tilting the steering column while the vehicle is moving is dangerous. Without a stable
steering column, you could lose control of the vehicle and have an accident. Adjust
the column only while the vehicle is stopped. Be sure it is locked before driving.
PROGRAMMABLE FEATURES
• The following features may be programmed using the Key Fob transmitter or the
ignition switch and driver's door lock switch.
NOTE: Pressing the LOCK button while you are inside the vehicle will activate the
Vehicle Security Alarm. Opening a door with the Vehicle Security Alarm activated will
cause the alarm to sound. Press the UNLOCK button to deactivate the Vehicle Security
Alarm.
Unlock On First Press
• To unlock either the driver's side, or all doors, on the first press of the UNLOCK button:
• Press and hold the LOCK button for at least 4 seconds, but no longer than10 seconds. Then, press and hold the UNLOCK button while still holding the LOCK
button.
• Release both buttons at the same time.
15
GETTING STARTED
Page 20 of 76

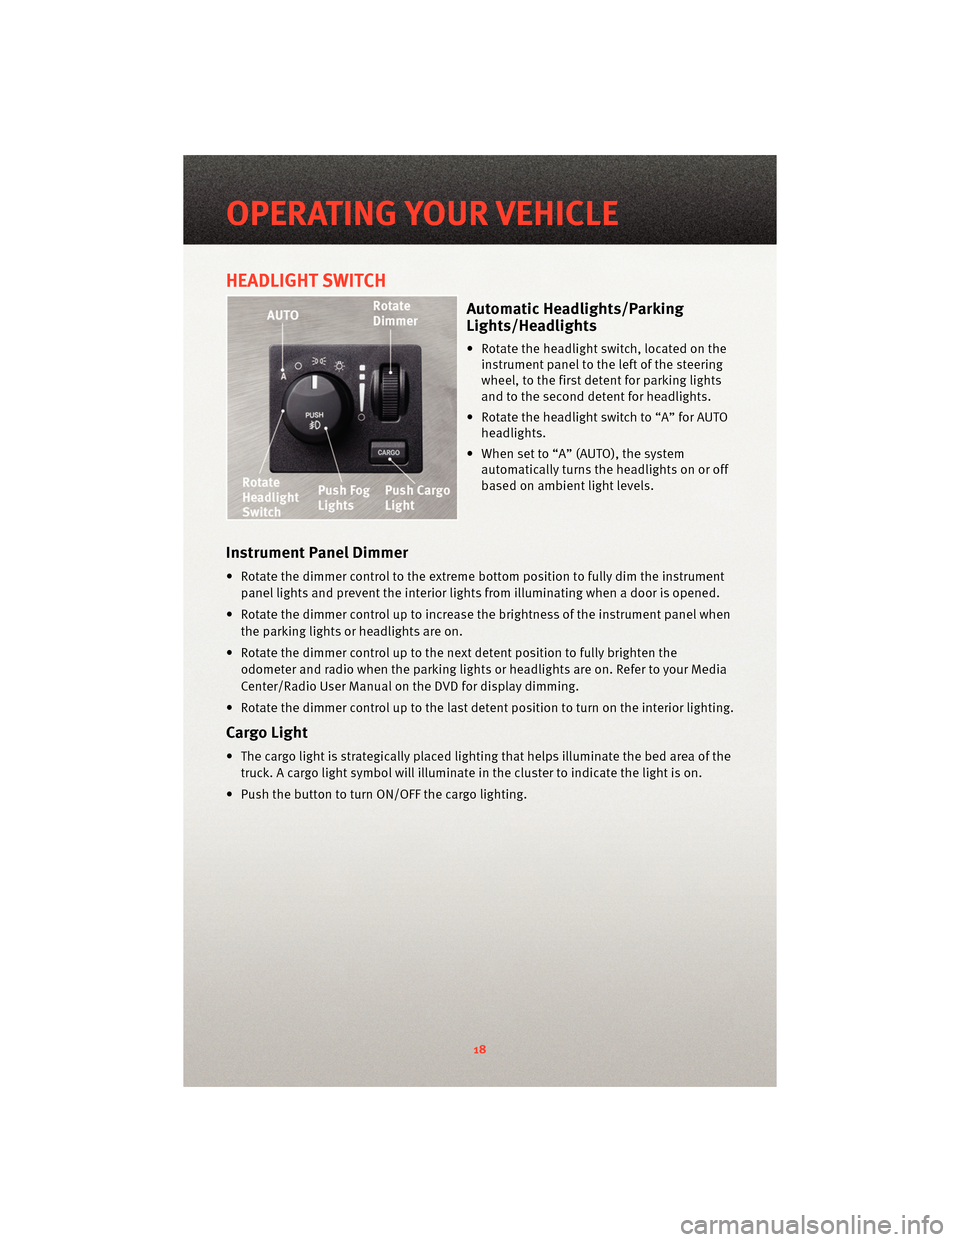
HEADLIGHT SWITCH
Automatic Headlights/Parking
Lights/Headlights
• Rotate the headlight switch, located on theinstrument panel to the left of the steering
wheel, to the first detent for parking lights
and to the second detent for headlights.
• Rotate the headlight switch to “A” for AUTO headlights.
• When set to “A” (AUTO), the system automatically turns the headlights on or off
based on ambient light levels.
Instrument Panel Dimmer
• Rotate the dimmer control to the extreme bottom position to fully dim the instrument
panel lights and prevent the interior lights from illuminating when a door is opened.
• Rotate the dimmer control up to increase the brightness of the instrument panel when the parking lights or headlights are on.
• Rotate the dimmer control up to the next detent position to fully brighten the odometer and radio when the parking lights or he adlights are on. Refer to your Media
Center/Radio User Manual on the DVD for display dimming.
• Rotate the dimmer control up to the last detent position to turn on the interior lighting.
Cargo Light
• The cargo light is strategically placed lighting that helps illuminate the bed area of the truck. A cargo light symbol will illuminate in the cluster to indicate the light is on.
• Push the button to turn ON/OFF the cargo lighting.
OPERATING YOUR VEHICLE
18
Page 30 of 76

Guide Me Home
• Press the NAV hard-key to access the Navigation Main Menu.
• Touch the GUIDE ME HOME soft-key to route you back to your home destination fromyour current location. Touch the GO soft-key to start your trip.
Map
• Press the NAV hard-key to access the Navigation Main Menu.
• Touch the MAP soft-key to display a map of your current position.
STEERING WHEEL AUDIO CONTROLS
• The steering wheel audio controls arelocated on the rear surface of the steering
wheel.
Right Switch
• Press the switch up or down to increase ordecrease the volume.
• Press the button in the center to change modes AM/FM/CD/SAT.
Left Switch
• Press the switch up or down to search forthe next listenable station or select the next
or previous CD track.
• Press the button in the center to select the next preset station (radio) or to change CDs if equipped with a CD Changer.
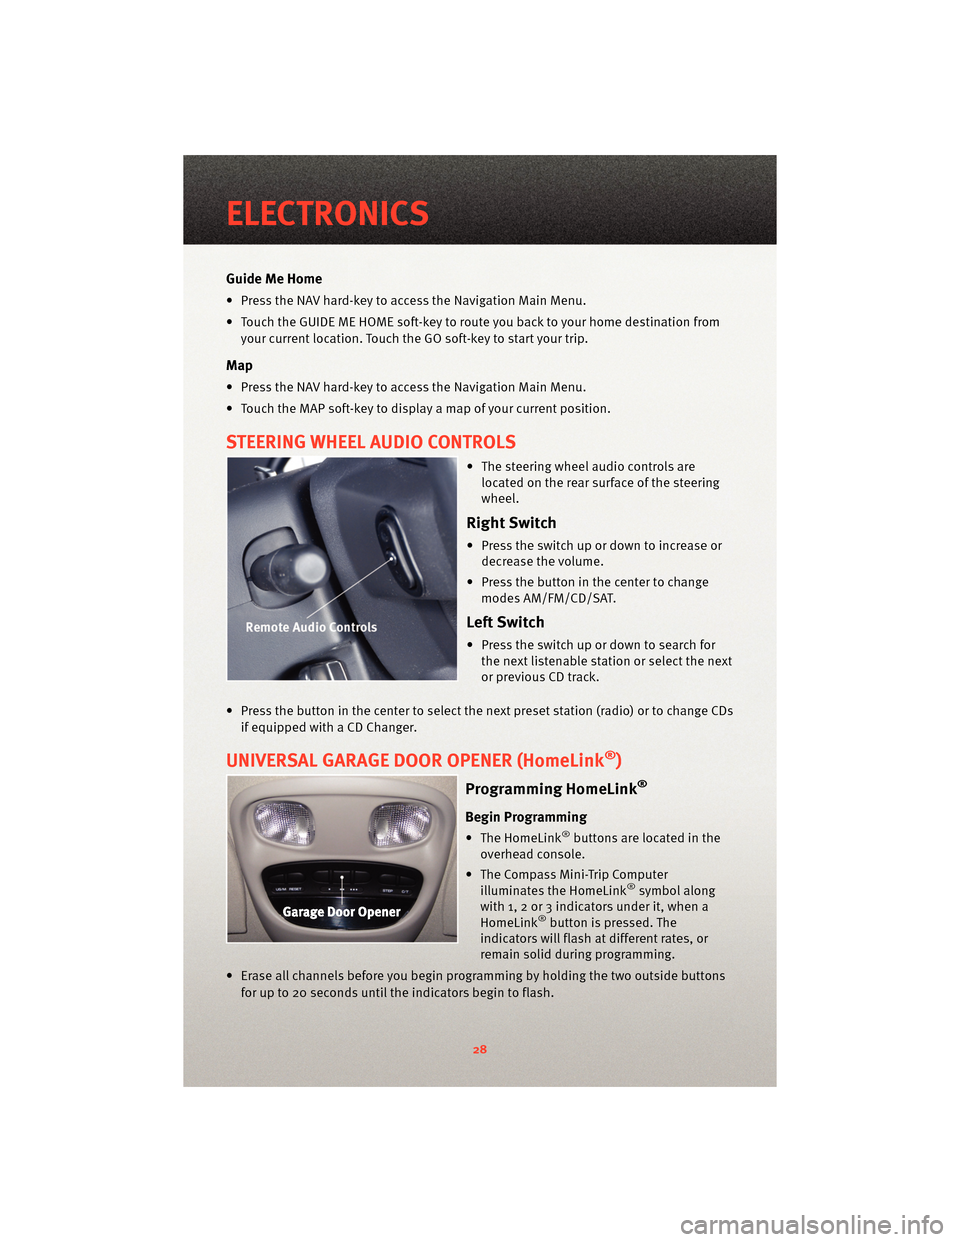
UNIVERSAL GARAGE DOOR OPENER (HomeLink®)
Programming HomeLink®
Begin Programming
• The HomeLink®buttons are located in the
overhead console.
• The Compass Mini-Trip Computer illuminates the HomeLink
®symbol along
with 1, 2 or 3 indicators under it, when a
HomeLink
®button is pressed. The
indicators will flash at different rates, or
remain solid during programming.
• Erase all channels before you begin progr amming by holding the two outside buttons
for up to 20 seconds until the indicators begin to flash.
ELECTRONICS
28
Page 34 of 76

Changing The Volume
• Start a dialogue by pressing the Phone button, then adjust the volume during a
normal call.
• Use the radio ON/OFF VOLUME rotary knob to adjust the volume to a comfortable level while the Uconnect™ system is speaking. Please note the volume setting for
Uconnect™ is different than the audio system.
NOTE: To access the tutorial, press the Uconnect™ hard-key. After the BEEP, say
“tutorial”. Press any hard-key or touch the display to cancel the tutorial.
VOICE COMMAND
• The Voice Command system allows you to control your AM, FM radio, satellite radio, disc player, Uconnect™ Phone and a memo recorder.
• When you press the Voice Command button
located on the radio face plate or
steering wheel, you will hear a beep. The beep is your signal to give a command. If you
do not say a command within a few seconds, the system will present you with a list of
options. If you ever wish to interrupt the system while it lists options, press the Voice
Command button
, listen for the BEEP, and say your command.
• For vehicles equipped with Video Entertainment System (VES)™, refer to the Voice Command section of the Uconnect™ User's Manual on the DVD for further details.
• For vehicles not equipped with VES™, refer to your vehicle Owner's Manual on the DVD for Voice Command information.
Changing The Volume
• Start a dialogue by pressing the Voice Command button, then say a command
(for example, “tutorial”).
• Use the radio ON/OFF VOLUME rotary knob to adjust the volume to a comfortable level while the Voice Command system is speaking. The volume setting for Voice Command
is different than the audio system.
WARNING!
Any voice commanded system should be used only in safe driving conditions
following local laws and phone use. All attention should be kept on the roadway
ahead. Failure to do so may result in an accident causing you and others to be
severely injured or killed.
NOTE: To access the tutorial, press the Voice Command button
. After the BEEP,
say “tutorial”. Press any hard-key or touch the display to cancel the tutorial.
ELECTRONICS
32
Page 55 of 76

FREEING A STUCK VEHICLE
• If your vehicle becomes stuck in mud, sand or snow, it can often be moved by arocking motion. Turn your steering wheel right and left to clear the area around the
front wheels. Then move the shift lever back and forth between REVERSE and 1st gear.
Using minimal accelerator pedal pressure to maintain the rocking motion, without
spinning the wheels, is most effective.
• Allow the engine to idle with the shift lever in NEUTRAL for at least one minute after every five rocking-motion cycles. This wil l minimize overheating and reduce the risk of
transmission failure during prolonge d efforts to free a stuck vehicle.
WARNING!
Fast spinning tires can be dangerous. Forces generated by excessive wheel speeds
may cause tire damage or failure. Atire could explode and injure someone. Do not
spin your vehicle's wheels faster than 30 mph (48 km/h) when you are stuck. Do not
let anyone near a spinning wheel, no matter what the speed.
WARNING!
• Chains are not recommended for freeing a stuck vehicle. Chains may break, causing serious injury or death.
• Stand clear of vehicles when pulling with tow hooks. Tow straps and chains may break, causing serious injury.
CAUTION!
• When “rocking” a stuck vehicle by moving between 1st and REVERSE, do not spinthe wheels faster than 15 mph (24 km/h), or drivetrain damage may result.
• Revving the engine or s pinning the wheels too fast ma y lead to transmission
overheating and failure. It can also damage the tires. Do not spin the wheels above
30 mph (48 km/h) while in gear (no transmission shifting occurring).
53
WHAT TO DO IN EMERGENCIES
Page 57 of 76

OPENING THE HOOD
• Pull the hood release lever locatedbelow the steering wheel at the base of the
instrument panel.
• Reach into the opening beneath the center of the hood and move the safety latch lever
while lifting the hood at the same time.
WARNING!
Be sure the hood is fully latched before driving your vehicle. If the hood is not fully
latched, it could open when the vehicle is in motion and block your vision. Failure to
follow this warning could result in serious injury or death.
55
MAINTAINING YOUR VEHICLE
Page 61 of 76

Brake Master Cylinder MOPAR®DOT 3 and SAE
J1703 should be used or
equivalent. If DOT 3 is not
available, then DOT 4 is
acceptable. Use only
recommended Brake
Fluids. —
Power Steering Reservoir MOPAR
®Power Steering
Fluid +4 or MOPAR®ATF+4®
Automatic Tr ansmission
Fluid or equivalent licensed
ATF+4
®product. —
59
MAINTAINING YOUR VEHICLE