Page 16 of 76

Six-Way Power Seat Adjuster — Driver's Side Only
• The power seat controls are located on theoutboard side of the driver's seat cushion.
• The power seat switch controls the forward, backward, up, or down adjustment.
• The two tilt switches control the tilt up or down adjustment.
CAUTION!
DO NOT place any article under a power seat or impede its ability to move as it may
cause damage to the seat controls. Seat travel may become limited if movement is
stopped by an obstruction in the seat’s path.
HEATED SEATS
Front Heated Seats
• The heated seat switches are located on thecenter of the instrument panel.
• After turning the ignition ON, press the switch once to select High-level heating.
Press the switch a second time to select
Low-level heating. Press the switch a third
time to shut the heating elements Off.
WARNING!
• Persons who are unable to feel pain to the skin because of advanced age, chronicillness, diabetes, spinal cord injury, medication, alcohol use, exhaustion or other
physical conditions must exercise care when using the seat heater. It may cause
burns even at low temperatures, especially if used for long periods of time.
• Do not place anything on the seat that insulates against heat, such as a blanket or cushion. This may cause the seat heater to overheat. Sitting in a seat that has been
overheated could cause serious burns due to the increased surface temperature of
the seat.
GETTING STARTED
14
Page 20 of 76

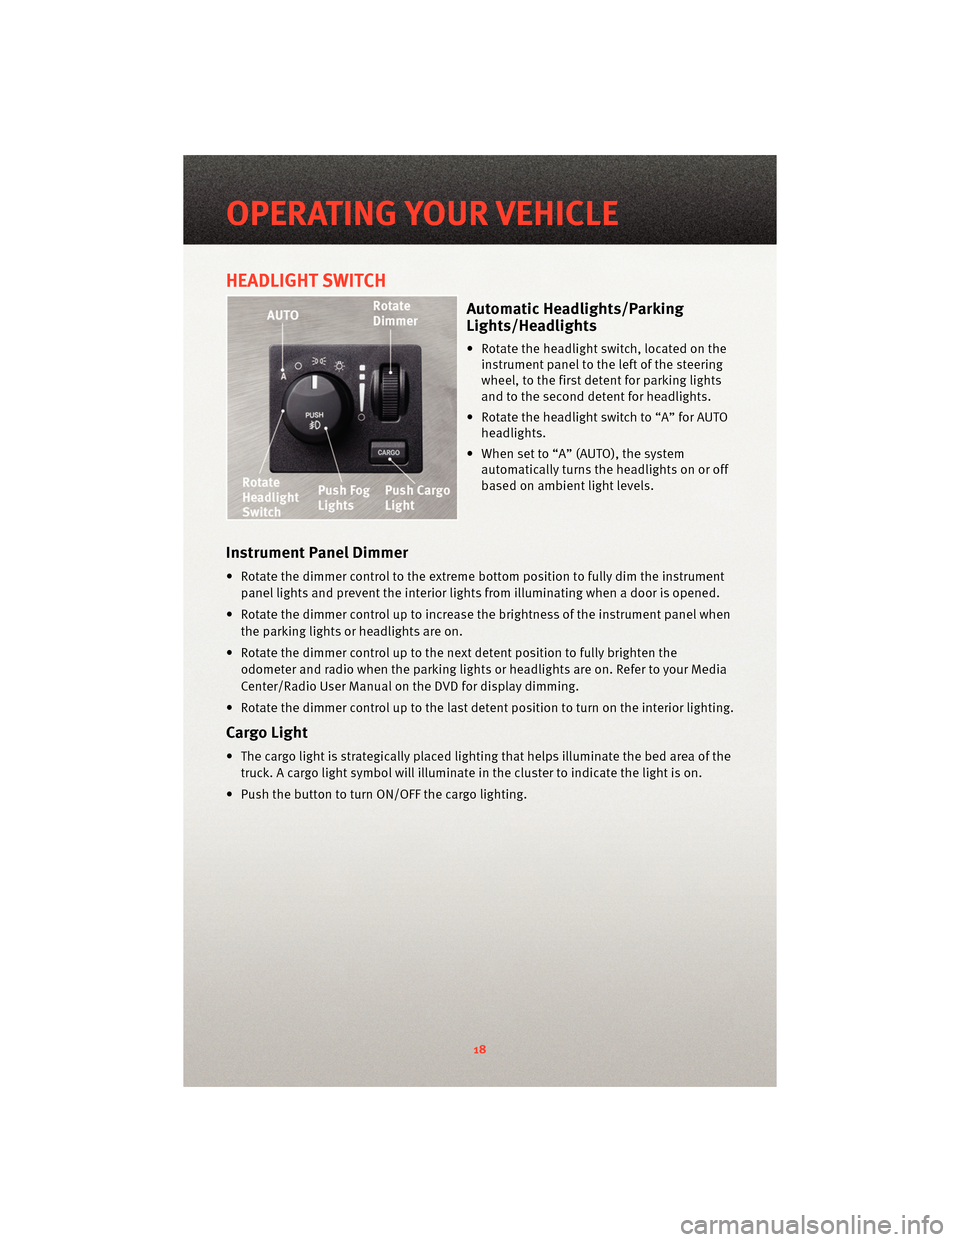
HEADLIGHT SWITCH
Automatic Headlights/Parking
Lights/Headlights
• Rotate the headlight switch, located on theinstrument panel to the left of the steering
wheel, to the first detent for parking lights
and to the second detent for headlights.
• Rotate the headlight switch to “A” for AUTO headlights.
• When set to “A” (AUTO), the system automatically turns the headlights on or off
based on ambient light levels.
Instrument Panel Dimmer
• Rotate the dimmer control to the extreme bottom position to fully dim the instrument
panel lights and prevent the interior lights from illuminating when a door is opened.
• Rotate the dimmer control up to increase the brightness of the instrument panel when the parking lights or headlights are on.
• Rotate the dimmer control up to the next detent position to fully brighten the odometer and radio when the parking lights or he adlights are on. Refer to your Media
Center/Radio User Manual on the DVD for display dimming.
• Rotate the dimmer control up to the last detent position to turn on the interior lighting.
Cargo Light
• The cargo light is strategically placed lighting that helps illuminate the bed area of the truck. A cargo light symbol will illuminate in the cluster to indicate the light is on.
• Push the button to turn ON/OFF the cargo lighting.
OPERATING YOUR VEHICLE
18
Page 35 of 76

FOUR-WHEEL DRIVE
OPERATION
• This is an electric-shift transfer caseand is operated by the 4WD Control
Switch (Transfer Case Switch), which
is located on the instrument panel.
• The transfer case provides four mode positions:
• Two-wheel drive high range (2WD)
• Four-wheel drive lock range (4WD LOCK)
• Four-wheel drive low range (4WD LOW)
• NEUTRAL (N)
• This transfer case is designed to be driven in the two-wheel drive position
(2WD) for normal street and highway
conditions on dry, hard-surfaced
roads.
• When additional traction is required, the transfer case 4WD LOCK and 4WD
LOW positions can be used to lock the
front and rear driveshafts together
and force the front and rear wheels to
rotate at the same speed. This is
accomplished by rotating the 4WD
Control Switch to the desired
position. The 4WD LOCK and 4WD
LOW positions are designed for loose
or slippery road surfaces only.
• Driving in the 4WD LOCK and 4WD LOW positions on dry hard-surfaced
roads may cause increased tire wear
and damage to the driveline
components. NOTE:
The transfer case NEUTRAL
position is selected by pressing the
recessed button located on the lower
left-hand corner of the 4WD Control
Switch. The transfer case NEUTRAL
position is to be used for recreational
towing only.
NOTE: Do not attempt to make a shift
while only the front or rear wheels are
spinning. The NV233/243 transfer case
is not equipped with a synchronizer and,
therefore, the front and rear driveshaft
speeds must be equal for the shift to
take place. Shifting while only the front
or rear wheels are spinning can cause
damage to the transfer case.
WARNING!
You or others could be injured if you
leave the vehicle unattended with the
transfer case in the NEUTRAL position
without first fully engaging the
parking brake. The transfer case
NEUTRAL position disengages both
the front and rear driveshafts from
the powertrain and will allow the
vehicle to move reg ardless of the
transmission position. The parking
brake should always be applied when
the driver is not in the vehicle.
33
OFF-ROAD CAPABILITIES
Page 57 of 76
OPENING THE HOOD
• Pull the hood release lever locatedbelow the steering wheel at the base of the
instrument panel.
• Reach into the opening beneath the center of the hood and move the safety latch lever
while lifting the hood at the same time.
WARNING!
Be sure the hood is fully latched before driving your vehicle. If the hood is not fully
latched, it could open when the vehicle is in motion and block your vision. Failure to
follow this warning could result in serious injury or death.
55
MAINTAINING YOUR VEHICLE