Page 134 of 450
Cargo Light — If Equipped
The cargo lights are turned on by pressing on cargo
button. The cargo lights will also turn on for 30 seconds
when the Remote Keyless Entry (RKE) transmitter UN-
LOCK button is pressed, as part of the Illuminated Entry
feature.
Multifunction Lever
The multifunction lever is located on the left side of the
steering column.
Turn Signals
Move the multifunction lever up or down and the arrows
on each side of the instrument cluster flash to show
proper operation of the front and rear turn signal lights.
Cargo Light SwitchSignaling Turns
3
UNDERSTANDING THE FEATURES OF YOUR VEHICLE 133
Page 135 of 450
NOTE:
•If either light remains on and does not flash, or there is
a very fast flash rate, check for a defective outside light
bulb. If an indicator fails to light when the lever is
moved, it would suggest that the indicator bulb is
defective.
•If a turn signal has been left on for a minimum of
1 mile (1.6 km), a continuous chime will sound.
Lane Change Assist
Tap the lever up or down once, without moving beyond
the detent, and the turn signal (right or left) will flash
three times then automatically turn off.
Flash-To-Pass
You can signal another vehicle with your headlights by
partially pulling the multifunction lever toward the steer-
ing wheel. This will turn on the high beam headlights
until the lever is released.
High/Low Beam Switch
Pull the multifunction lever fully toward the steering
wheel to switch the headlights from high or low beam.
High/Low Beam
134 UNDERSTANDING THE FEATURES OF YOUR VEHICLE
Page 142 of 450
WARNING!
Electronic Speed Control can be dangerous where the
system cannot maintain a constant speed. Your ve-
hicle could go too fast for the conditions, and you
could lose control. An accident could be the result.
Do not use Electronic Speed Control in heavy traffic
or on roads that are winding, icy, snow-covered, or
slippery.
OVERHEAD CONSOLE
The overhead console has the following features:
•Courtesy Lights
•Garage Door Opener — If Equipped
•Compass/Temperature Mini-Trip Computer — If
Equipped
Overhead Console
3
UNDERSTANDING THE FEATURES OF YOUR VEHICLE 141
Page 143 of 450

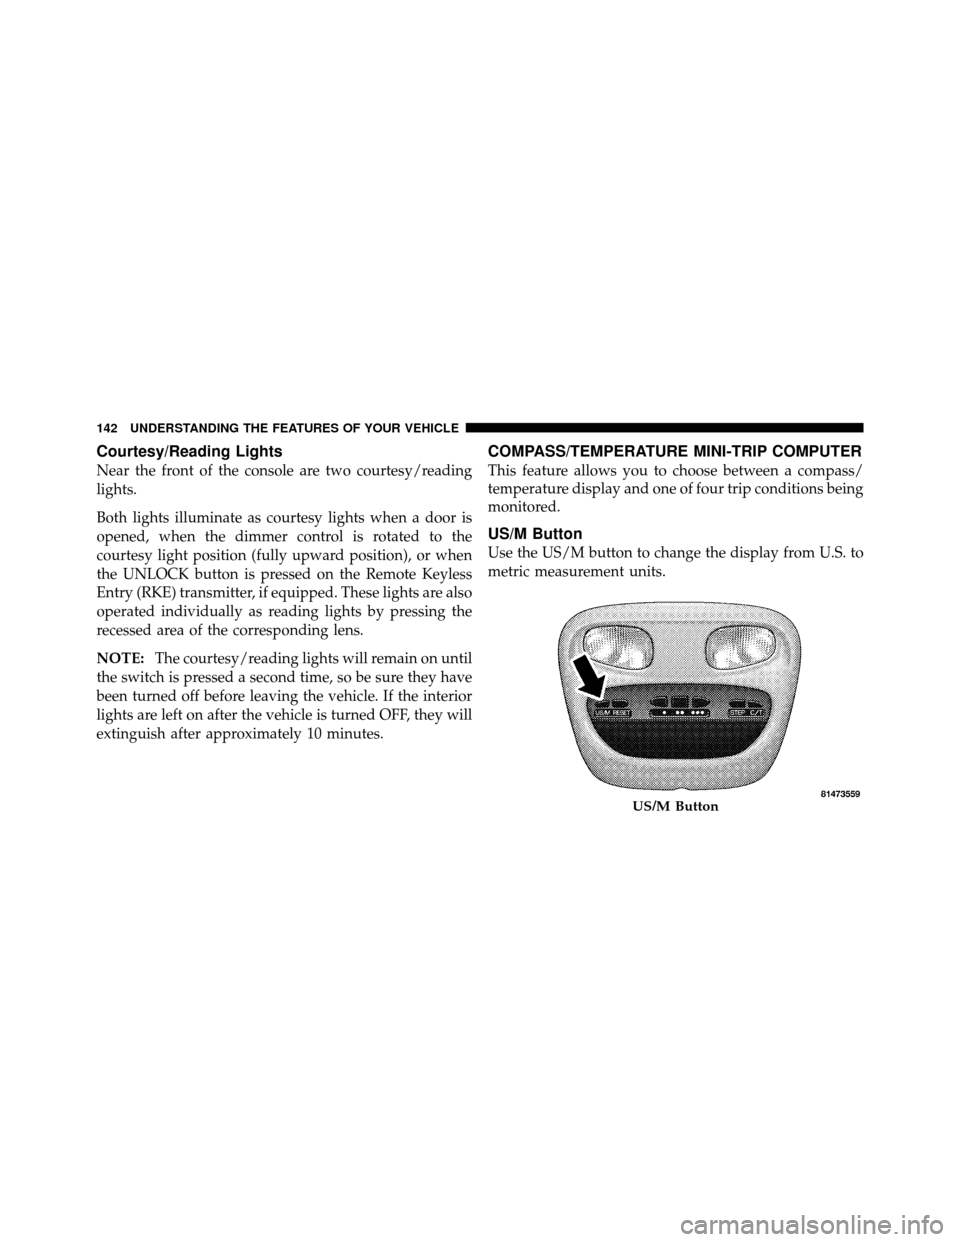
Courtesy/Reading Lights
Near the front of the console are two courtesy/reading
lights.
Both lights illuminate as courtesy lights when a door is
opened, when the dimmer control is rotated to the
courtesy light position (fully upward position), or when
the UNLOCK button is pressed on the Remote Keyless
Entry (RKE) transmitter, if equipped. These lights are also
operated individually as reading lights by pressing the
recessed area of the corresponding lens.
NOTE:The courtesy/reading lights will remain on until
the switch is pressed a second time, so be sure they have
been turned off before leaving the vehicle. If the interior
lights are left on after the vehicle is turned OFF, they will
extinguish after approximately 10 minutes.
COMPASS/TEMPERATURE MINI-TRIP COMPUTER
This feature allows you to choose between a compass/
temperature display and one of four trip conditions being
monitored.
US/M Button
Use the US/M button to change the display from U.S. to
metric measurement units.
US/M Button
142 UNDERSTANDING THE FEATURES OF YOUR VEHICLE
Page 157 of 450
CAUTION!
•Many accessories that can be plugged in, draw
power from the vehicle’s battery, even when not in
use (i.e., cellular phones, etc.). Eventually, if
plugged in long enough, the vehicle’s battery will
discharge sufficiently to degrade battery life
and/or prevent the engine from starting.
•Accessories that draw higher power (i.e., coolers,
vacuum cleaners, lights, etc.), will discharge the
battery even more quickly. Use these only inter-
mittently and with greater caution.
•After the use of high power draw accessories, or
long periods of the vehicle not being started (with
accessories still plugged in), the vehicle must be
driven a sufficient length of time to allow the
generator to recharge the vehicle’s battery.
CUPHOLDERS
If your vehicle has bucket seats with a center console,
there are three cupholders located on the console.
Front Cup Holders — Crew Cab
156 UNDERSTANDING THE FEATURES OF YOUR VEHICLE
Page 168 of 450
4. Snap the tailgate support cable between the cable
guide and the tailgate bumper. Do this on both sides of
the tailgate.
To return the tailgate to the full-open position:
1. Lift up on the tailgate.2. Remove both cables from between the cable guides
and the tailgate bumpers, and lower the tailgate.
CAUTION!
•Care should always be exercised when operating a
vehicle with cargo. Vehicle speeds may need to be
reduced. Severe turns or rough roads may cause
shifting or bouncing of the cargo that may result in
vehicle damage.
•Ensure the load is securely tied down and is
properly identified according to local laws if it
extends beyond the tail lights.
•Loading should not exceed 400 lbs (181 kg) of
material suspended above the wheelhouse and
partially open tailgate or vehicle damage may
result.
Tailgate Guide
3
UNDERSTANDING THE FEATURES OF YOUR VEHICLE 167
Page 175 of 450

INSTRUMENT CLUSTER DESCRIPTIONS
1. Fuel Gauge
The fuel gauge shows the level of fuel in the fuel tank
when ignition switch is in the ON position.
2. Temperature Gauge
The temperature gauge shows engine coolant tempera-
ture. Any reading within the normal range indicates that
the engine cooling system is operating satisfactorily. The
gauge pointer will likely indicate a higher temperature
when driving in hot weather, up mountain grades, or
when towing a trailer. It should not be allowed to exceed
the upper limits of the normal operating range.
CAUTION!
Do not leave your vehicle unattended with the en-
gine running as you would not be able to react to the
temperature gauge if the engine overheats.3. Turn Signal Indicators
When a turn signal is activated, a right-pointing or
left-pointing arrow lights up and flashes to indicate the
direction of the turn. These indicators also indicate
proper operation of the front and rear turn signal lights.
If either indicator flashes at a faster rate than normal,
check for a defective bulb. If either indicator fails to light
up when the lever is moved, check for a defective fuse or
turn signal LED. A single chime is activated when the
left/right turn signal is left on, with the vehicle speed
greater than 15 mph (24 km/h) for more than 1 mile
(1.6 km).
4. Low Fuel Warning Light
The low fuel warning light will illuminate when the
fuel gauge reads 1/8 of a tank or less. There is a
pointer on the side of this symbol that indicates the
side that your fuel filler door is located.
174 UNDERSTANDING YOUR INSTRUMENT PANEL
Page 176 of 450

5. High Beam IndicatorThe high beam indicator will illuminate if the
headlights are on high beam.
6. Seat Belt Reminder Light The seat belt reminder light will illuminate for
several seconds after the ignition is turned ON as
a reminder to “buckle up.” This light will remain
on as long as the seat belt remains unbuckled. If this light
flashes, it indicates a fault in the seat belt system. Have
the system checked by an authorized dealer. Refer to
“Occupant Restraints” in “Things To Know Before Start-
ing Your Vehicle” for further information.
7. Engine Temperature Warning Light This light warns of an overheated engine condi-
tion. As temperatures rise and the gauge ap-
proaches H(Hot), this indicator will illuminate
and a single chime will sound after reaching a set threshold. Further overheating will cause the tempera-
ture gauge to pass
H(Hot), the indicator will continu-
ously flash and a continuous chime will occur until the
engine is allowed to cool.
CAUTION!
Driving with a hot engine cooling system could
damage your vehicle. If the temperature light is on,
safely pull over and stop the vehicle. Idle the vehicle
in neutral with the air conditioner turned off until
the light turns off. If the light remains on, turn the
engine off immediately, and call for service.4
UNDERSTANDING YOUR INSTRUMENT PANEL 175