Page 81 of 450

▫Voice Training ...................... 120
� Seats .............................. 120
▫ Manual Seat Adjustment ............... 121
▫ Front Seats Manual Seat Recliners ........ 121
▫ Manual Lumbar Support Adjustment —
If Equipped ........................ 122
▫ Adjustable Head Restraints —
Front Seating Positions ................ 123
▫ Six-Way Power Seat Adjuster
(Driver’s Side Only) .................. 124
▫ Extended Cab/Crew Cab Rear Seat ....... 126
▫ Heated Seats — If Equipped ............ 126
� To Open And Close The Hood ............ 127
� Lights ............................. 129 ▫
Interior Lights ...................... 129
▫ Battery Saver ....................... 130
▫ Headlight Delay ..................... 131
▫
Headlights, Parking Lights And Panel Lights. . 131
▫ Daytime Running Lights — If Equipped .... 132
▫ Lights-On Reminder .................. 132
▫ Fog Lights — If Equipped .............. 132
▫ Cargo Light — If Equipped ............. 133
▫ Multifunction Lever .................. 133
� Windshield Wipers And Washers .......... 135
▫ Windshield Wipers ................... 135
▫ Windshield Washers .................. 136
� Tilt Steering Column ................... 137
80 UNDERSTANDING THE FEATURES OF YOUR VEHICLE
Page 121 of 450

NOTE:Keep in mind that you have to press the Voice
Command
button first and wait for the beep
before speaking the “Barge In” commands.
Voice Training
For users experiencing difficulty with the system recog-
nizing their voice commands or numbers the Uconnect™
Voice “Voice Training” feature may be used.
1. Press the Voice Command
button, say “System
Setup” and once you are in that menu then say “Voice
Training.” This will train your own voice to the system
and will improve recognition.
2. Repeat the words and phrases when prompted by
Uconnect™ Voice. For best results, the “Voice Training”
session should be completed when the vehicle is parked,
engine running, all windows closed, and the blower fan
switched off. This procedure may be repeated with a new
user. The system will adapt to the last trained voice only.
SEATS
Seats are a primary part of the Occupant Restraint System
of the vehicle. Proper use of the seats is needed for safe
operation of the vehicle.
WARNING!
•It is extremely dangerous to ride in a cargo area,
inside or outside of a vehicle. In a collision, people
riding in these areas are more likely to be seri-
ously injured or killed.
•Do not allow people to ride in any area of your
vehicle that is not equipped with seats and seat
belts.
•Be sure everyone in your vehicle is in a seat and
using a seat belt properly.
120 UNDERSTANDING THE FEATURES OF YOUR VEHICLE
Page 122 of 450

Manual Seat Adjustment
The adjusting lever is at the front of the seat, near the
floor. Lift the lever and move the seat to the desired
position. Release the bar to lock the seat into position.
Using body pressure, move forward and rearward on the
seat to be sure the seat adjusters have latched.WARNING!
Adjusting a seat while the vehicle is moving is
dangerous. The sudden movement of the seat could
cause you to lose control. The seat belt might not be
properly adjusted and you could be injured. Adjust
any seat only while the vehicle is parked.
Front Seats Manual Seat Recliners
The front seats are equipped with recliners. The reclining
mechanism is operated by a lever located on the right
side of the passenger’s seat and the left side of the
driver’s seat. To recline, lean forward slightly before
lifting the lever, then push back to the desired position
and release the lever. Lean forward and lift the lever to
Adjusting Lever
3
UNDERSTANDING THE FEATURES OF YOUR VEHICLE 121
Page 127 of 450

Extended Cab/Crew Cab Rear Seat
More cargo space is available by lifting up on the rear
seat cushion.
The Crew Cab Rear Seat is a 60/40 split cushion and full
back. Either cushion can be raised, independently.
Heated Seats — If Equipped
The heated seat switches are located on the center of the
instrument panel.
After turning the ignition ON, you can choose from High,
Low or Off heat settings. Amber indicator lights in each
switch indicate the level of heat in use. Two indicator
lights will illuminate for High, one for Low and none for
Off.Press the switch once to select High-level heat-
ing. Press the switch a second time to select
Low-level heating. Press the switch a third time
to shut the heating elements Off. If the High-level heating is selected, the system will
automatically switch to Low-level heating after approxi-
mately 30 minutes of continuous operation. At that time,
the number of indicators illuminated changes from two
to one, indicating the change. Operation on the Low-level
setting also turns Off automatically after approximately
30 minutes.
WARNING!
•Persons who are unable to feel pain to the skin
because of advanced age, chronic illness, diabetes,
spinal cord injury, medication, alcohol use, ex-
haustion or other physical condition must exercise
care when using the seat heater. It may cause burns
even at low temperatures, especially if used for
long periods of time.
(Continued)
126 UNDERSTANDING THE FEATURES OF YOUR VEHICLE
Page 157 of 450
CAUTION!
•Many accessories that can be plugged in, draw
power from the vehicle’s battery, even when not in
use (i.e., cellular phones, etc.). Eventually, if
plugged in long enough, the vehicle’s battery will
discharge sufficiently to degrade battery life
and/or prevent the engine from starting.
•Accessories that draw higher power (i.e., coolers,
vacuum cleaners, lights, etc.), will discharge the
battery even more quickly. Use these only inter-
mittently and with greater caution.
•After the use of high power draw accessories, or
long periods of the vehicle not being started (with
accessories still plugged in), the vehicle must be
driven a sufficient length of time to allow the
generator to recharge the vehicle’s battery.
CUPHOLDERS
If your vehicle has bucket seats with a center console,
there are three cupholders located on the console.
Front Cup Holders — Crew Cab
156 UNDERSTANDING THE FEATURES OF YOUR VEHICLE
Page 158 of 450
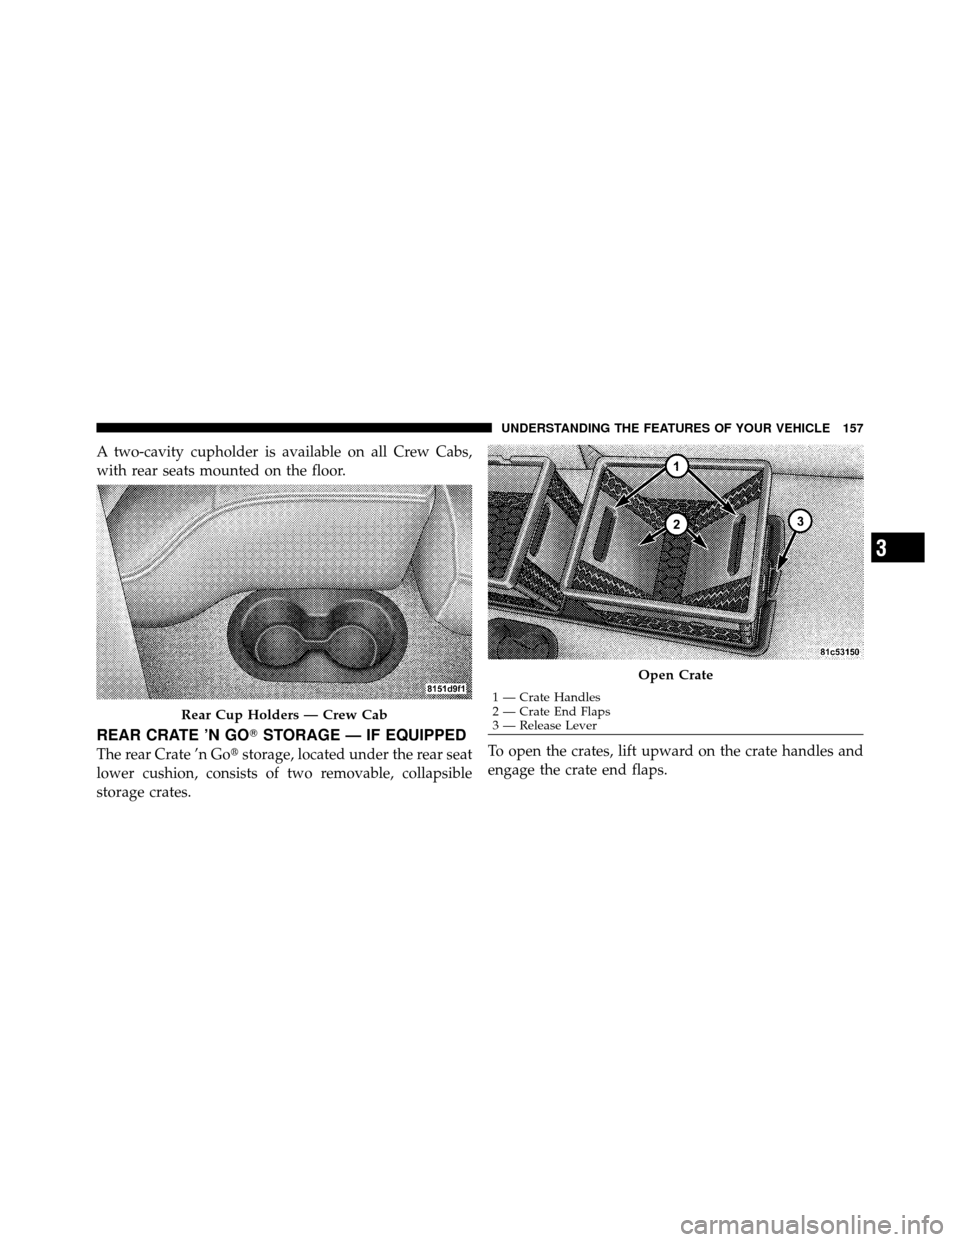
A two-cavity cupholder is available on all Crew Cabs,
with rear seats mounted on the floor.
REAR CRATE ’N GO�STORAGE — IF EQUIPPED
The rear Crate ’n Go�storage, located under the rear seat
lower cushion, consists of two removable, collapsible
storage crates. To open the crates, lift upward on the crate handles and
engage the crate end flaps.
Rear Cup Holders — Crew Cab
Open Crate
1 — Crate Handles
2 — Crate End Flaps
3 — Release Lever
3
UNDERSTANDING THE FEATURES OF YOUR VEHICLE 157
Page 383 of 450

•If your vehicle is damaged due to an accident or
similar cause, which destroys the paint and protective
coating, have your vehicle repaired as soon as pos-
sible. The cost of such repairs is considered the respon-
sibility of the owner.
•If you carry special cargo such as chemicals, fertilizers,
de-icer salt, etc., be sure that such materials are well
packaged and sealed.
•If a lot of driving is done on gravel roads, consider
mud or stone shields behind each wheel.
•Use MOPAR�Touch Up Paint or equivalent on
scratches as soon as possible. Your authorized dealer
has touch up-paint to match the color of your vehicle.
Wheel and Wheel Trim Care
All wheels and wheel trim, especially aluminum and
chrome-plated wheels, should be cleaned regularly with
a mild soap and water to prevent corrosion. To remove heavy soil, use MOPAR�
Wheel Cleaner or equivalent, or
select a nonabrasive, non-acidic cleaner. Do not use
scouring pads, steel wool, a bristle brush or metal pol-
ishes. Only MOPAR� cleaners or equivalent are recom-
mended. Do not use oven cleaner. Avoid automatic car
washes that use acidic solutions or harsh brushes that
may damage the wheels’ protective finish.
Stain Repel Fabric Cleaning Procedure – If Equipped
Stain Repel seats may be cleaned in the following man-
ner:
•Remove as much of the stain as possible by blotting
with a clean, dry towel.
•Blot any remaining stain with a clean, damp towel.
•For tough stains, apply MOPAR� Total Clean or
equivalent or a mild soap solution to a clean, damp
cloth and remove the stain. Use a fresh, damp towel to
remove soap residue.
382 MAINTAINING YOUR VEHICLE
Page 390 of 450
CavityCartridge
Fuse Mini-
Fuse Description
47 Spare
48 20 Amp Blue Sunroof/Sound Box
49 30 Amp Pink Trailer Tow B+
50 40 Amp Green Anti-Lock Brake Sys-
tem (ABS) Module
(Pump)
51 40 Amp Green Park Lamps
52 Spare
53 40 Amp Green Rear Defogger
54 Spare
55 SpareCavityCartridge
Fuse Mini-
Fuse Description
56 10 Amp
RedHeated Seats
57 20 Amp
YellowAirbag System # 2
58 20 Amp
YellowHeated Seats
59 10 Amp
RedHVAC Module
60 10 Amp
RedABS Module
61 20 Amp
YellowFront Control Module
(FCM) 3 (Reverse
Lamps)
7
MAINTAINING YOUR VEHICLE 389
. Eventually, if
plugged in long enough, the vehicle’s")
 Module
(Pump)
51 40 Amp Green Park La")