Page 45 of 477

When To Use The Automatic Locking Mode
Use the Automatic Locking Mode anytime a child safety
seat is installed in a seating position that has a belt with
this feature. Children 12 years old and under should
always be properly restrained in the rear seat.
How To Engage The Automatic Locking Mode
1. Buckle the combination lap and shoulder belt.
2. Grasp the shoulder portion and pull downward until
the entire belt is extracted.
3. Allow the belt to retract. As the belt retracts, you will
hear a clicking sound. This indicates the safety belt is
now in the Automatic Locking Mode.
How To Disengage The Automatic Locking Mode
Unbuckle the combination lap/shoulder belt and allow it
to retract completely to disengage the Automatic Locking
Mode and activate the vehicle sensitive (emergency)
locking mode.
Energy Management Feature
This vehicle has a safety belt system with an Energy
Management feature in the front seating positions to help
further reduce the risk of injury in the event of a head-on
accident. This safety belt system has a retractor assembly
that is designed to release webbing in a controlled
manner. This feature is designed to help reduce the belt
force acting on the occupant’s chest.
WARNING!
•The belt and retractor assembly must be replaced
if the seat belt assembly Automatic Locking Re-
tractor (ALR) feature or any other seat belt func-
tion is not working properly when checked ac-
cording to the procedures in the Service Manual.
•Failure to replace the belt and retractor assembly
could increase the risk of injury in accidents.
2
THINGS TO KNOW BEFORE STARTING YOUR VEHICLE 43
Page 53 of 477

•Being too close to the SABIC airbags during deploy-
ment could cause you to be severely injured or killed.
The system includes side impact sensors adjacent to both
front and rear seat occupants that are calibrated to deploy
the SABIC airbags during impacts that require airbag
occupant protection.
WARNING!
•If your vehicle is equipped with left and right
Supplemental Side Airbag Inflatable Curtain
(SABIC), do not stack luggage or other cargo up
high enough to block the location of the SABIC.
The area where the SABIC is located should re-
main free from any obstructions.
•Do not use accessory seat covers or place objects
between you and the side airbags; the performance
could be adversely affected and/or objects could
be pushed into you, causing serious injury.
Knee Impact Bolsters
The Knee Impact Bolsters help protect the knees of the
driver and the front passenger, and position front occu-
pants for the best interaction with the Advanced Front
Airbags.
Along with seat belts and pretensioners, Advanced Front
Airbags work with the knee bolsters to provide improved
protection for the driver and front passenger. Side airbags
also work with seat belts to improve occupant protection.
Here are some simple steps you can take to minimize the
risk of harm from a deploying airbag:
Children 12 years old and under should always ride
buckled up in a rear seat.
2
THINGS TO KNOW BEFORE STARTING YOUR VEHICLE 51
Page 59 of 477

Front and Side Impact Sensors
In front and side impacts, impact sensors can aid the
ORC in determining appropriate response to impact
events. Additional sensors in the ORC determine the
level of airbag deployment and provide verification.
Enhanced Accident Response System
In the event of an impact causing airbag deployment, if
the communication network remains intact, and the
power remains intact, depending on the nature of the
event the ORC will determine whether to have the
Enhanced Accident Response System perform the follow-
ing functions:
•Cut off fuel to the engine.
•Flash hazard lights as long as the battery has power or
until the ignition key is turned off.
•Turn on the interior lights, which remain on as long as
the battery has power or until the ignition key is
removed.
•Unlock the doors automatically.
If a Deployment Occurs
The front airbags are designed to deflate immediately
after deployment.
NOTE:Front and/or side airbags will not deploy in all
collisions. This does not mean something is wrong with
the airbag system.
If you do have a collision which deploys the airbags, any
or all of the following may occur:
•The nylon airbag material may sometimes cause abra-
sions and/or skin reddening to the driver and front
passenger as the airbags deploy and unfold. The
abrasions are similar to friction rope burns or those
you might get sliding along a carpet or gymnasium
2
THINGS TO KNOW BEFORE STARTING YOUR VEHICLE 57
Page 62 of 477

Airbag Warning Light
You will want to have the airbags ready to
inflate for your protection in a collision. The
airbag system is designed to be maintenance
free, if any of the following occurs, have an
authorized dealer service the airbag system immediately.
•The Airbag Warning Light does not come on during
the four to eight seconds when the ignition switch is
first turned to the ON/RUN position.
•The Airbag Warning Light remains on after the four to
eight-second interval.
•The Airbag Warning Light comes on intermittently or
remains on while driving.
NOTE: If the speedometer, tachometer, or any engine
related gauges are not working, the Occupant Restraint
Controller (ORC) may also be disabled. The airbags may
not be ready to inflate for your protection. Promptly check the fuse block for blown fuses. Refer to the label
located on the inside of the fuse block cover for the
proper airbag fuses. See your authorized dealer if the
fuse is good.
Event Data Recorder (EDR)
This vehicle is equipped with an event data recorder
(EDR). The main purpose of an EDR is to record, in
certain crash or near crash-like situations, such as an air
bag deployment or hitting a road obstacle, data that will
assist in understanding how a vehicle’s systems per-
formed. The EDR is designed to record data related to
vehicle dynamics and safety systems for a short period of
time, typically 30 seconds or less. The EDR in this vehicle
is designed to record such data as:
•How various systems in your vehicle were operating;
•Whether or not the driver and passenger safety belts
were buckled/fastened;
60 THINGS TO KNOW BEFORE STARTING YOUR VEHICLE
Page 70 of 477

NOTE:
•Ensure that the tether strap does not slip into the
opening between the seatbacks as you remove slack in
the strap.
•When using the LATCH attaching system to install a
child restraint, please ensure that all seat belts not
being used for occupant restraints are stowed and out
of reach of children. It is recommended that before
installing the child restraint, buckle the seat belt so the
seat belt is tucked behind the child restraint and out of
reach. If the buckled seat belt interferes with the child
restraint installation, instead of tucking the seat belt
behind the child restraint, route the seat belt through
the child restraint belt path and then buckle it. This
should stow the seat belt out of the reach of an
inquisitive child. Remind all children in the vehicle
that the seat belts are not toys and should not be
played with, and never leave your child unattended in
the vehicle.
WARNING!
Improper installation of a child restraint to the
LATCH anchorages can lead to failure of an infant or
child restraint. The child could be badly injured or
killed. Follow the manufacturer’s directions exactly
when installing an infant or child restraint.
Installing Child Restraints Using the Vehicle Seat
Belt
The seat belts in the passenger seating positions are
equipped with either an Automatic Locking Retractor
(ALR) or a cinching latch plate or both. Both types of seat
belts are designed to keep the lap portion of the seat belt
tight around the child restraint so that it is not necessary
to use a locking clip. The ALR will make a ratcheting
noise if you extract the entire belt from the retractor and
68 THINGS TO KNOW BEFORE STARTING YOUR VEHICLE
Page 71 of 477

then allow the belt to retract into the retractor. For
additional information on ALR, refer to “Automatic
Locking Mode”.
To install a child restraint, first, pull enough of the seat
belt webbing from the retractor to route it through the
belt path of the child restraint and slide the latch plate
into the buckle. Next, extract all the seat belt webbing out
of the retractor and then allow the belt to retract into the
retractor. Finally, pull on any excess webbing to tighten
the lap portion around the child restraint. Any seat belt
system will loosen with time, so check the belt occasion-
ally, and pull it tight if necessary.
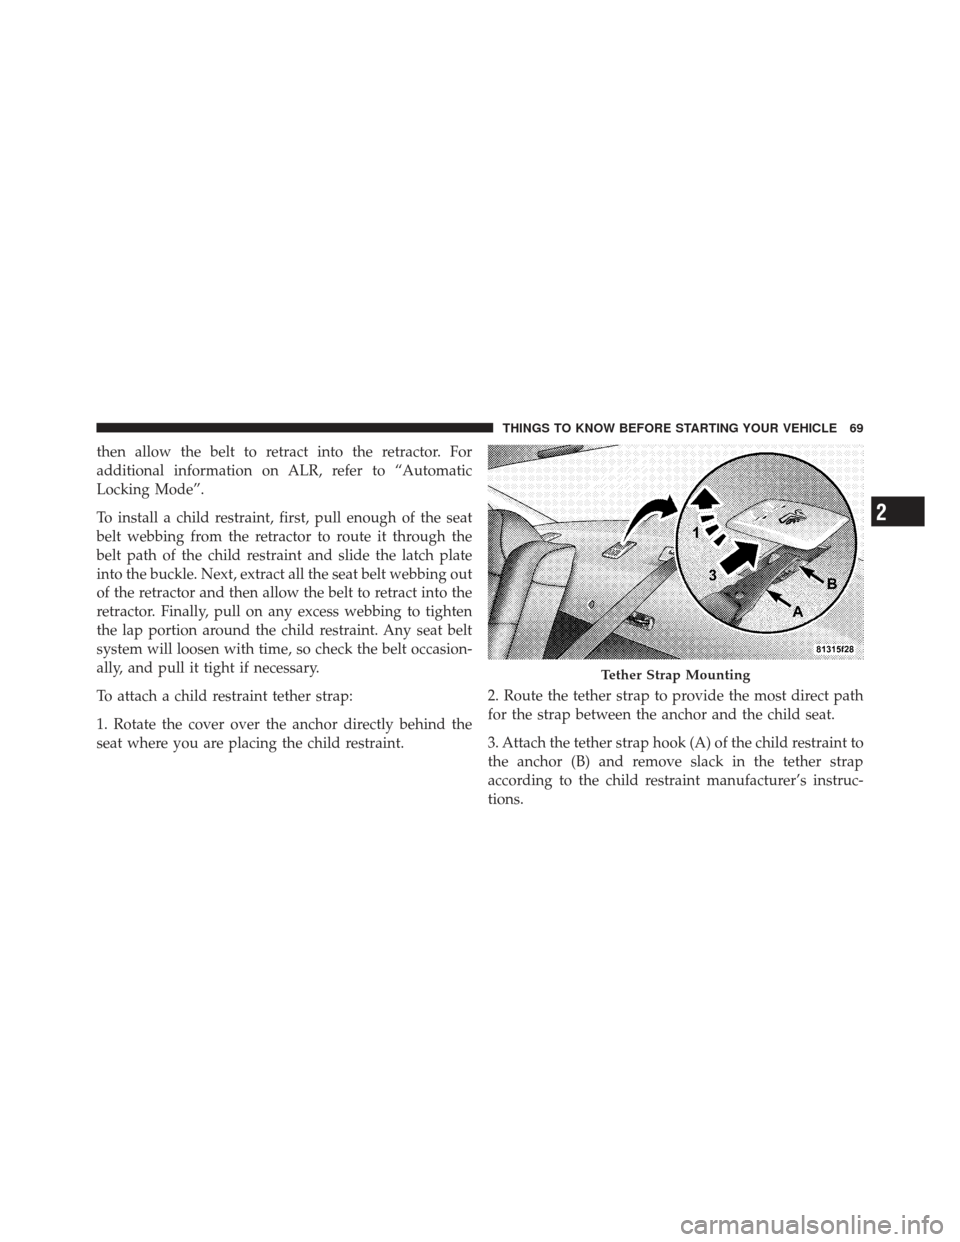
To attach a child restraint tether strap:
1. Rotate the cover over the anchor directly behind the
seat where you are placing the child restraint.2. Route the tether strap to provide the most direct path
for the strap between the anchor and the child seat.
3. Attach the tether strap hook (A) of the child restraint to
the anchor (B) and remove slack in the tether strap
according to the child restraint manufacturer’s instruc-
tions.
Tether Strap Mounting
2
THINGS TO KNOW BEFORE STARTING YOUR VEHICLE 69
Page 77 of 477
Periodic Safety Checks You Should Make Outside
the Vehicle
Tires
Examine tires for excessive tread wear and uneven wear
patterns. Check for stones, nails, glass, or other objects
lodged in the tread. Inspect the tread and sidewall for
cuts and cracks. Check the wheel nuts for tightness.
Check the tires (including spare) for proper pressure.
Lights
Have someone observe the operation of exterior lights
while you work the controls. Check turn signal and high
beam indicator lights on the instrument panel.
Door Latches
Check for positive closing, latching, and locking.
Fluid Leaks
Check area under vehicle after overnight parking for fuel,
engine coolant, oil, or other fluid leaks. Also, if gasoline
fumes are detected or if fuel, power steering fluid, or
brake fluid leaks are suspected, the cause should be
located and corrected immediately.2
THINGS TO KNOW BEFORE STARTING YOUR VEHICLE 75
Page 84 of 477
Outside Mirrors
To receive maximum benefit, adjust the outside mirror(s)
to center on the adjacent lane of traffic and a slight
overlap of the view obtained from the inside mirror.
NOTE:The passenger side convex outside mirror will
give a much wider view to the rear, and especially of the
lane next to your vehicle.
WARNING!
Vehicles and other objects seen in the passenger side
convex mirror will look smaller and farther away
than they really are. Relying too much on your
passenger side convex mirror could cause you to
collide with another vehicle or other object. Use your
inside mirror when judging the size or distance of a
vehicle seen in the passenger side convex mirror.
Outside Mirrors Folding Feature
The mirrors are equipped with a rotational hinge. The
mirrors have one detent (clockwise) towards the rear of
the vehicle and three detent’s (counterclockwise) towards
the front of the vehicle.
Folding Mirrors
82 UNDERSTANDING THE FEATURES OF YOUR VEHICLE