2010 DODGE CARAVAN brake light
[x] Cancel search: brake lightPage 45 of 530

To avoid unintentional operation of the power sliding doors
from the rear seats, press the power sliding door master
lock button, located in the overhead console, to disable the
switches and handles for the rear seat passengers.
NOTE:
•The power sliding side door switches will not open if
the shift lever is in gear or the vehicle speed is above
0 mph (0 km/h). To close the power sliding door with
the shift lever in gear and vehicle speed at 0 mph
(0 km/h), the brake must be pressed.
•If anything obstructs the power sliding side door
while it is closing or opening, the door will automati-
cally reverse to the closed or open position, provided
it meets sufficient resistance.
•If the power sliding side door is not in the full open or
close position, it will fully open when a power sliding
door switch is pressed. To close the door, wait until it
is fully open and then press the switch again.
•If the power sliding door encounters multiple obstruc-
tions within the same cycle, the system will automati-
cally stop and must be opened or closed manually.
WARNING!
You, or others, could be injured if caught in the path
of the sliding door. Make sure the door path is clear
before closing the door.
Power Sliding Side Door Open Flash
The left and right exterior hazard lights will flash for
12 seconds when either sliding door is opened. This will
alert other drivers in the area that passenger(s) could be
entering or exiting the vehicle.
The Sliding Side Door Open Flash can be enabled or
disabled by performing the following procedure:
1. Place the Key Fob in the ignition switch.
44 THINGS TO KNOW BEFORE STARTING YOUR VEHICLE
ProCarManuals.com
Page 84 of 530

4. Otherwise required by law.
Data parameters that are recorded:
•Diagnostic trouble code(s) and warning light status for
electronically-controlled safety systems, including the
airbag system
•Vehicle speed
•Engine RPM
•Brake switch status
•Pedal position
•And other parameters depending on vehicle
configuration
Integrated Child Booster Seat — If Equipped
The Integrated Child Booster Seat (if equipped) is located
in each second-row passenger seat. The booster seat is
designed for children weighing between 48 and 85 lbs (22
and 39 kg) and between 47 in (119 cm) and 57 in (145 cm)
tall.The booster seat is designed to raise the child high
enough to use the vehicle lap and shoulder belt. The
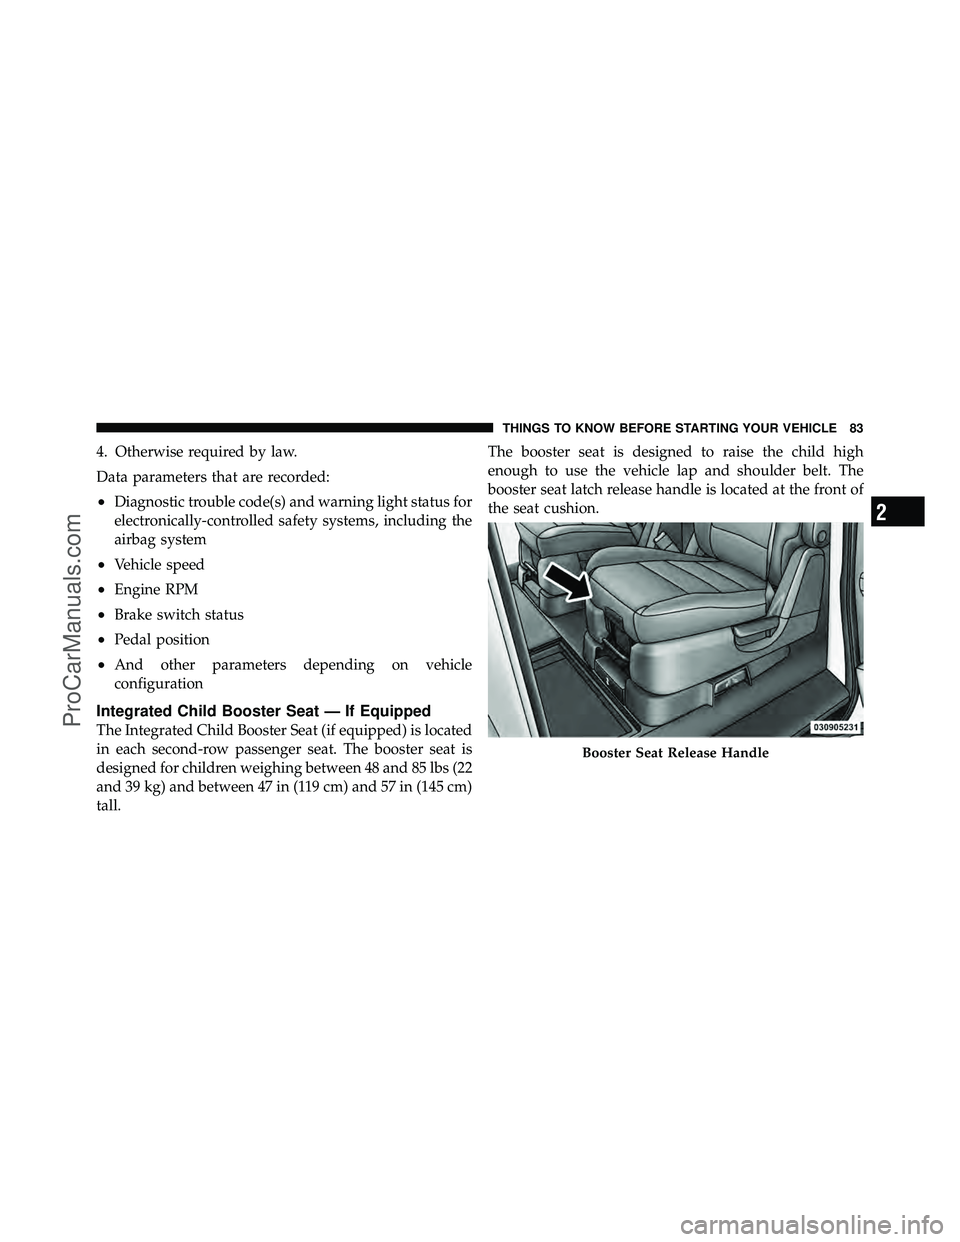
booster seat latch release handle is located at the front of
the seat cushion.
Booster Seat Release Handle
2
THINGS TO KNOW BEFORE STARTING YOUR VEHICLE 83
ProCarManuals.com
Page 105 of 530

Periodic Safety Checks You Should Make Outside
the Vehicle
Tires
Examine tires for excessive tread wear and uneven wear
patterns. Check for stones, nails, glass, or other objects
lodged in the tread. Inspect the tread and sidewall for
cuts and cracks. Check the wheel nuts for tightness.
Check the tires (including spare) for proper pressure.
Lights
Have someone observe the operation of exterior lights
while you work the controls. Check turn signal and high
beam indicator lights on the instrument panel.
Door Latches
Check for positive closing, latching, and locking.
Fluid Leaks
Check area under vehicle after overnight parking for fuel,
engine coolant, oil, or other fluid leaks. Also, if gasoline
fumes are detected or if fuel, power steering fluid, or
brake fluid leaks are suspected, the cause should be
located and corrected immediately.
104 THINGS TO KNOW BEFORE STARTING YOUR VEHICLE
ProCarManuals.com
Page 160 of 530

When exiting the vehicle the driver can choose to have
the headlights remain on for 30, 60 or 90 seconds or not
remain on. To change the timer setting, see your autho-
rized dealer.
The headlight delay time is programmable on vehicles
equipped with an EVIC. Refer to “Electronic Vehicle
Information Center (EVIC)/Customer-Programmable
Features” in “Understanding Your Instrument Panel” for
further information.
If the headlights are turned off before the ignition, they
will turn off in the normal manner.
NOTE:The headlights must be turned off within 45 sec-
onds of turning the ignition OFF to activate this feature.Lights-On Reminder
If the headlights or the parking lights are left on, or if the
dimmer control is in the extreme top position after the
ignition switch is turned OFF, a chime will sound when
the driver’s door is opened.
Daytime Running Lights — If Equipped
The headlights on your vehicle will illuminate when the
engine is started and the transmission is in any gear
except PARK. This provides a constant lights on condi-
tion until the ignition is turned OFF. The lights illuminate
at less than 50% of normal intensity. If the parking brake
is applied, the Daytime Running Lights (DRL) will turn
off. Also, if a turn signal is activated, the DRL lamp on the
same side of the vehicle will turn off for the duration of
the turn signal activation. Once the turn signal is no
longer active, the DRL lamp will illuminate.
3
UNDERSTANDING THE FEATURES OF YOUR VEHICLE 159
ProCarManuals.com
Page 170 of 530

To Activate
Push the ON/OFF button (located in the end of the lever)
once, and the cruise indicator light (located in the mes-
sage window of the odometer) will illuminate, showing
that the Electronic Speed Control system is on. To turn
the Electronic Speed Control system off, push the ON/
OFF button a second time, and both the Electronic Speed
Control system and indicator will turn off.
WARNING!
Leaving the Electronic Speed Control system on
when not in use is dangerous. You could accidently
set the system or cause it to go faster than you want.
You could lose control and have an accident. Always
leave the Electronic Speed Control system off when
you are not using it.
To Set At A Desired Speed
Turn the Electronic Speed Control ON. When the vehicle
has reached the desired speed, press the SET lever
downward and then release. Lift your foot off the accel-
erator and the vehicle will operate at the selected speed.
Deactivating Electronic Speed Control
A soft tap on the brake pedal or pulling the Electronic
Speed Control lever (CANCEL) toward you will deacti-
vate the Electronic Speed Control without erasing the set
speed memory. Pushing the ON/OFF button to the OFF
position or turning OFF the ignition erases the set speed
memory.
Resuming Speed
To resume a previously set speed, raise the Electronic
Speed Control lever (RESUME ACCEL) upward, and
release. Resume can be used at any speed above 25 mph
(40 km/h).
3
UNDERSTANDING THE FEATURES OF YOUR VEHICLE 169
ProCarManuals.com
Page 229 of 530

WARNING!
A hot engine cooling system is dangerous. You or
others could be badly burned by steam or boiling
coolant. You may want to call an authorized dealer if
your vehicle overheats. If you decide to look under
the hood yourself, see “Maintaining Your Vehicle”.
Follow the warnings under the Cooling System Pres-
sure Cap paragraph.
4. Speedometer
Indicates vehicle speed.
5. Turn Signal Indicators The arrow will flash with the exterior turn signal
when the turn signal lever is operated.
If the vehicle electronics sense that the vehicle has
traveled about 1 mile (1.6 km) with the turn signals on, a continuous chime will sound to alert you to turn the
signals off. If either indicator flashes at a rapid rate, check
for a defective outside light bulb.
6. High Beam Indicator
This indicator shows that the high beam head-
lights are on. Push the multifunction lever forward
to switch the headlights to high beam and pull toward
yourself (normal position) to return to low beam.
7. Anti-Lock Brake (ABS) Light This light monitors the Anti-Lock Brake System
(ABS). The light will turn on when the ignition
switch is turned to the ON position and may
stay on for as long as four seconds.
If the ABS light remains on or turns on while driving, it
indicates that the Anti-Lock portion of the brake system
is not functioning and that service is required. However,
the conventional brake system will continue to operate
normally if the BRAKE warning light is not on.
228 UNDERSTANDING YOUR INSTRUMENT PANEL
ProCarManuals.com
Page 230 of 530

If the ABS light is on, the brake system should be serviced
as soon as possible to restore the benefits of Anti-Lock
brakes. If the ABS light does not turn on when the
Ignition switch is turned to the ON position, have the
light inspected by an authorized dealer.
8. Brake Warning LightThis light monitors various brake functions,
including brake fluid level and parking brake
application. If the brake light turns on, it may
indicate that the parking brake is applied, that
the brake fluid level is low, or that there is a problem with
the anti-lock brake system reservoir.
If the light remains on when the parking brake has been
disengaged, and the fluid level is at the full mark on the
master cylinder reservoir, it indicates a possible brake
hydraulic system malfunction or that a problem with the
Brake Booster has been detected by the Anti-Lock Brake
System (ABS) / Electronic Stability Program (ESP) sys-
tem. In this case, the light will remain on until the condition has been corrected. If the problem is related to
the brake booster, the ABS pump will run when applying
the brake and a brake pedal pulsation may be felt during
each stop.
The dual brake system provides a reserve braking capac-
ity in the event of a failure to a portion of the hydraulic
system. A leak in either half of the dual brake system is
indicated by the Brake Warning Light which will turn on
when the brake fluid level in the master cylinder has
dropped below a specified level.
The light will remain on until the cause is corrected.
NOTE:
The light may flash momentarily during sharp
cornering maneuvers which change fluid level condi-
tions. The vehicle should have service performed, and
the brake fluid level checked.
If brake failure is indicated, immediate repair is neces-
sary.
4
UNDERSTANDING YOUR INSTRUMENT PANEL 229
ProCarManuals.com
Page 231 of 530

WARNING!
Driving a vehicle with the red brake light on is
dangerous. Part of the brake system may have failed.
It will take longer to stop the vehicle. You could have
an accident. Have the vehicle checked immediately.
Vehicles equipped with the Anti-Lock Brake System
(ABS), are also equipped with Electronic Brake Force
Distribution (EBD). In the event of an EBD failure, the
Brake Warning Light will turn on along with the ABS
Light. Immediate repair to the ABS system is required.
Operation of the Brake Warning Light can be checked by
turning the ignition switch from the OFF position to the
ON position. The light should illuminate for approxi-
mately two seconds. The light should then turn off unless
the parking brake is applied or a brake fault is detected.
If the light does not illuminate, have the light inspected
by an authorized dealer. The light also will turn on when the parking brake is
applied with the ignition switch in the ON position.
NOTE:
This light shows only that the parking brake is
applied. It does not show the degree of brake application.
9. Tachometer — Premium Instrument Cluster Only
The white area of the scale shows the permissible engine
revolutions-per-minute (RPM x 1000) for each gear range.
Before reaching the red area, ease up on the accelerator to
prevent engine damage.
10. Shift Lever Indicator
The Shift Lever Indicator is self-contained within the
instrument cluster. It displays the gear position of the
automatic transmission.
NOTE: You must apply the brakes before shifting from
PARK.
230 UNDERSTANDING YOUR INSTRUMENT PANEL
ProCarManuals.com