Page 186 of 530

An additional LED at the front of the rear console shines
down on the front foot-well area while in courtesy mode,
for added convenience.Rear Courtesy/Reading Lights — If Equipped
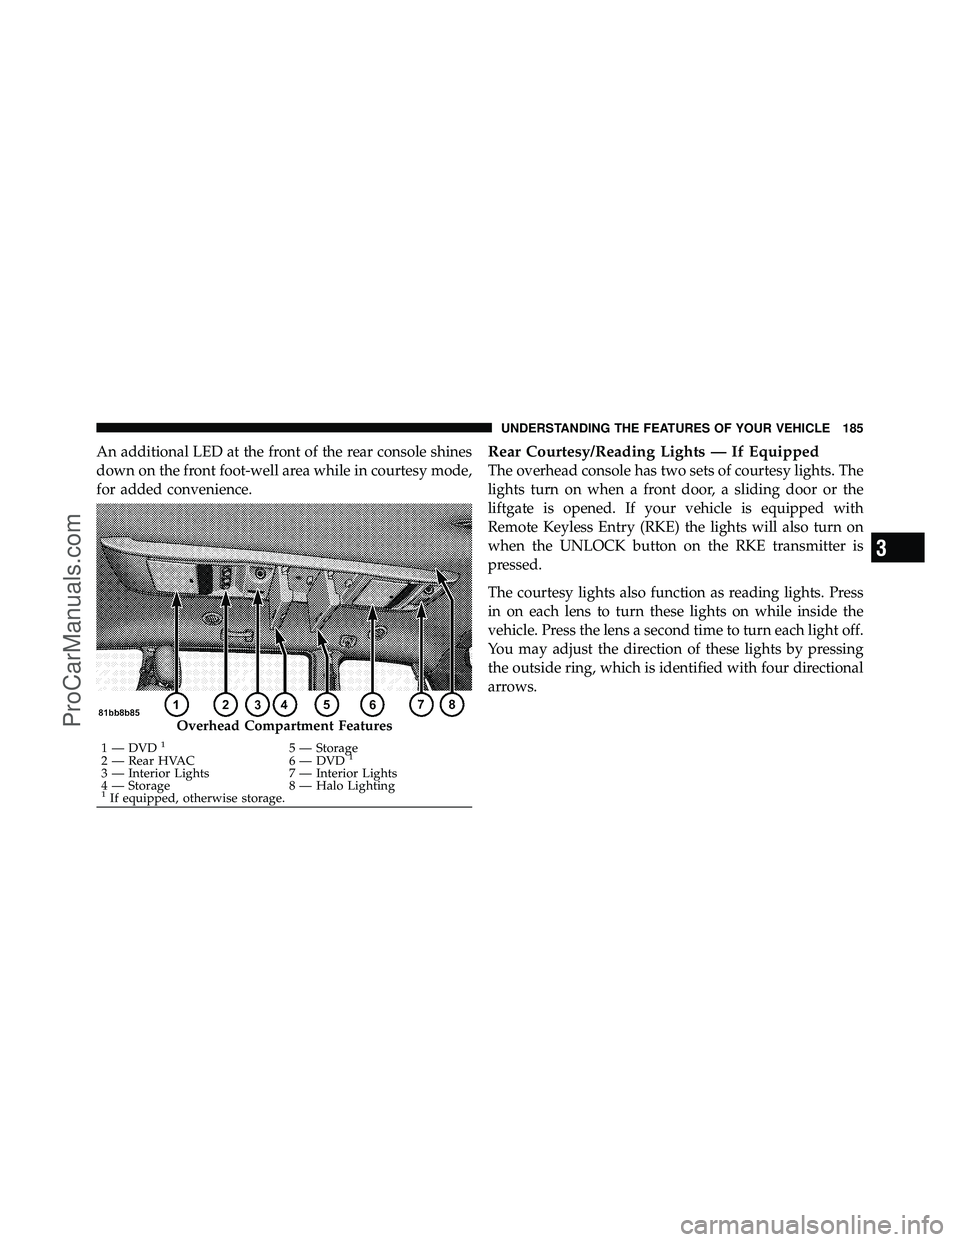
The overhead console has two sets of courtesy lights. The
lights turn on when a front door, a sliding door or the
liftgate is opened. If your vehicle is equipped with
Remote Keyless Entry (RKE) the lights will also turn on
when the UNLOCK button on the RKE transmitter is
pressed.
The courtesy lights also function as reading lights. Press
in on each lens to turn these lights on while inside the
vehicle. Press the lens a second time to turn each light off.
You may adjust the direction of these lights by pressing
the outside ring, which is identified with four directional
arrows.
Overhead Compartment Features
1 — DVD15 — Storage
2 — Rear HVAC 6 — DVD1
3 — Interior Lights 7 — Interior Lights
4 — Storage 8 — Halo Lighting
1If equipped, otherwise storage.
3
UNDERSTANDING THE FEATURES OF YOUR VEHICLE 185
ProCarManuals.com
Page 191 of 530

Using HomeLink�
To operate, press and release the programmed
HomeLink�button. Activation will now occur for the
trained device (i.e., garage door opener, gate operator,
security system, entry door lock, home/office lighting,
etc.,). The handheld transmitter of the device may also be
used at any time.
Reprogramming a Single HomeLink� Button
To reprogram a channel that has been previously trained,
follow these steps:
1. Turn the ignition switch to the ON/RUN position.
2. Press and hold the desired HomeLink� button until
the indicator light begins to flash after 20 seconds. Do not
release the button.
3. Without releasing the button, proceed with Program-
ming HomeLink� Step 2 and follow all remaining steps.
Gate Operator/Canadian Programming
Canadian radio frequency laws require transmitter sig-
nals to time-out (or quit) after several seconds of trans-
mission – which may not be long enough for HomeLink�
to pick up the signal during programming. Similar to this
Canadian law, some U.S. gate operators are designed to
time-out in the same manner.
It may be helpful to unplug the device during the cycling
process to prevent possible overheating of the garage
door or gate motor.
If you are having difficulties programming a garage door
opener or a gate operator, replace “Programming
HomeLink�” Step 3, with the following:
3. Continue to press and hold the HomeLink� button,
while you press and release (“cycle”), your handheld
transmitter every two seconds until HomeLink� has
190 UNDERSTANDING THE FEATURES OF YOUR VEHICLE
ProCarManuals.com
Page 202 of 530

of the two cupholders in the center front instrument
panel. To install the ash receiver, align the receiver so the
thumb grip on the lid is facing rearward. Press the ash
receiver into either of the cup wells to secure. Pull
upward on the ash receiver to remove for cleaning
and/or storage.
The left rear trim panel cupholder is designed to accom-
modate a second ash receiver, if desired.
STORAGE
Glove Compartments
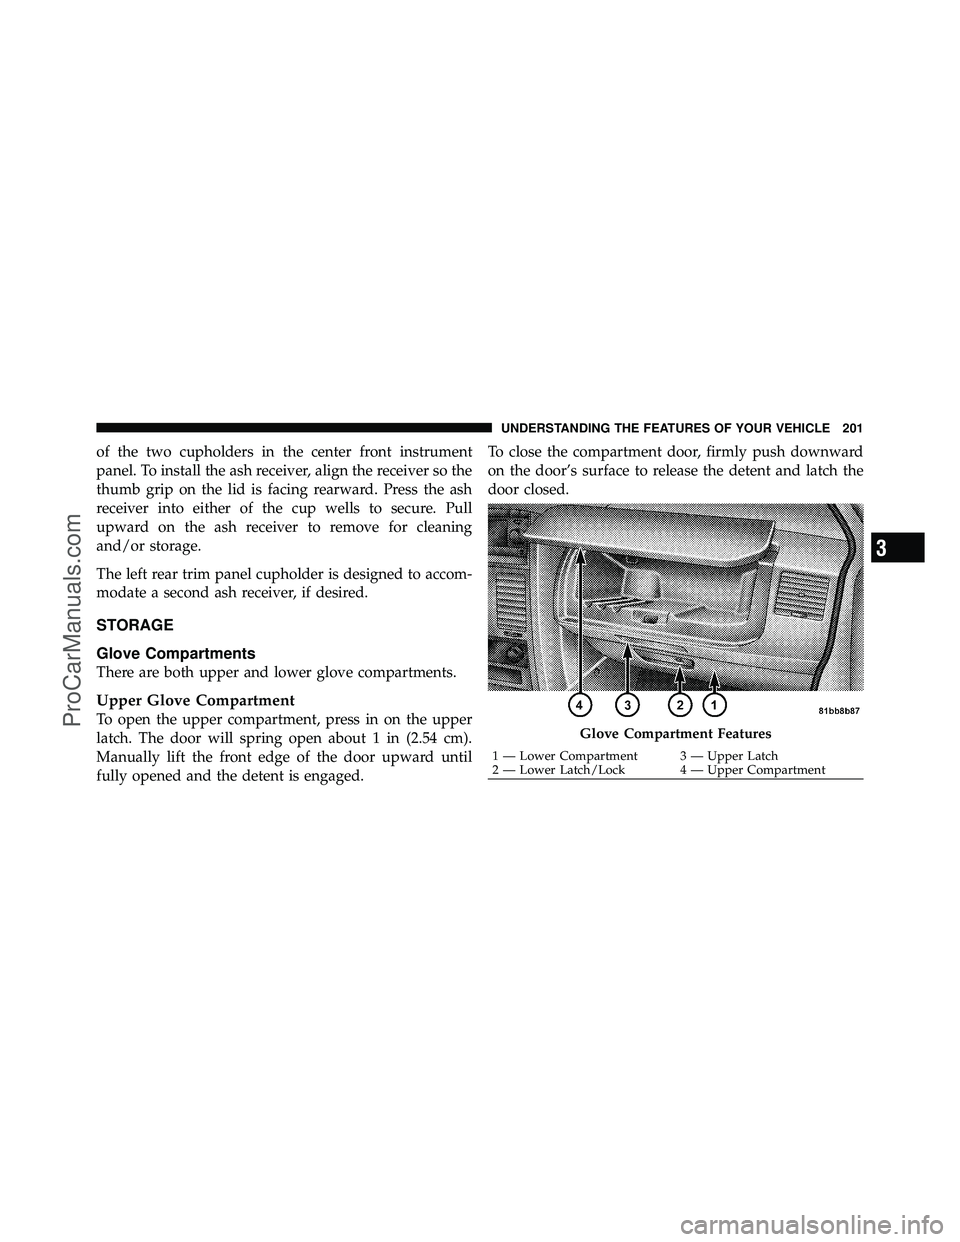
There are both upper and lower glove compartments.
Upper Glove Compartment
To open the upper compartment, press in on the upper
latch. The door will spring open about 1 in (2.54 cm).
Manually lift the front edge of the door upward until
fully opened and the detent is engaged.To close the compartment door, firmly push downward
on the door’s surface to release the detent and latch the
door closed.Glove Compartment Features
1 — Lower Compartment 3 — Upper Latch
2 — Lower Latch/Lock 4 — Upper Compartment
3
UNDERSTANDING THE FEATURES OF YOUR VEHICLE 201
ProCarManuals.com
Page 203 of 530
Lower Glove Compartment
To open the lower compartment pull out on the release
handle.
NOTE:The lower compartment is equipped with a lock
that is part of the compartment handle (2).
Door Trim Panel Storage
Front Door Storage
Both interior front door panels have multiple pockets for
storage.
Sliding Side Door Bottle Holder
Both sliding doors have a bottle holder molded right into
the trim.
Front Door Storage
1 — Rear Map Pocket 3 — Bottle Holder
2 — Storage Pocket 4 — Front Map Pocket
202 UNDERSTANDING THE FEATURES OF YOUR VEHICLE
ProCarManuals.com
Page 205 of 530
Umbrella Holder
An umbrella holder has been conveniently molded into
the left front door entry scuff molding.
Second Row Seat Storage Bins — If Equipped
The seat storage bins are located on the floor in front of
the second row seats. The area below the covers can be
used for storage when the second row seat is in the
upright position.
Pull up on the storage bin latch to open the cover. Slide
the storage bin locking mechanism to the�Lock�position
to allow greater access to the storage bin.
Umbrella Holder
204 UNDERSTANDING THE FEATURES OF YOUR VEHICLE
ProCarManuals.com
Page 254 of 530

Use the Step button to display one of the following
choices.
Language
When in this display you may select one of five lan-
guages for all display nomenclature, including the trip
functions and the navigation system (if equipped). Press
the RESET button while in this display to select English,
Spanish (Español), French (Français), Italian (Italiano),
German (Deutsch), and Dutch (Nederlands). Then, as
you continue, the information will display in the selected
language.
Auto Door Locks
When ON is selected, all doors will lock automatically
when the vehicle reaches a speed of 15 mph (24 km/h).
To make your selection, press and release the RESET
button until ON or OFF appears.
Auto UNLK On Exit
When ON is selected, all doors will unlock when the
vehicle is stopped and the transmission is in the PARK or
NEUTRAL position and the driver’s door is opened. To
make your selection, press and release the RESET button
until ON or OFF appears.
RKE Unlock
WhenDriver Door 1st Press is selected, only the driver’s
door will unlock on the first press of the Remote Keyless
Entry (RKE) transmitter UNLOCK button. When Driver
Door 1st Press is selected, you must press the RKE
transmitter UNLOCK button twice, to unlock the passen-
ger’s doors. When All Doors 1st Press is selected, all of
the doors will unlock on the first press of the RKE
transmitter UNLOCK button. To make your selection,
press and release the RESET button until “Driver Door
1st Press” or “All Doors 1st Press” appears.4
UNDERSTANDING YOUR INSTRUMENT PANEL 253
ProCarManuals.com
Page 255 of 530

RKE Linked To Memory
When this feature is selected the memory seat, mirror,
and radio settings will return to the memory set position
when the RKE transmitter UNLOCK button is pressed. If
this feature is not selected then the memory seat, mirror,
and radio settings can only return to the memory set
position using the door mounted switch. Pressing the
RESET button when in this display will select�Ye s�or
�No.�
Flash Lamp Lock
When ON is selected, the front and rear turn signals will
flash when the doors are locked or unlocked with the
RKE transmitter. This feature may be selected with or
without the sound horn on lock feature selected. To make
your selection, press and release the RESET button until
ON or OFF appears.
Headlamp Off Delay
When this feature is selected, the driver can choose to
have the headlights remain on for 0, 30, 60, or 90 seconds
when exiting the vehicle. To make your selection, press
and release the RESET button until 0, 30, 60, or 90
appears.
Easy Exit Seat
This feature provides automatic driver seat positioning to
enhance driver mobility when entering and exiting the
vehicle. To make your selection, press and release the
RESET button until YES (Y) or NO (N) appears.
NOTE: The seat will return to the memorized seat
location (if Recall Memory with Remote Key Unlock is set
to ON) when the RKE transmitter is used to unlock the
door. Refer to “Driver Memory Seat” in “Understanding
The Features Of Your Vehicle” for further information.
254 UNDERSTANDING YOUR INSTRUMENT PANEL
ProCarManuals.com
Page 256 of 530

Tilt MIRR. In Reverse
When this feature is selected and the vehicle is placed in
a reverse gear, the driver’s side mirror will tilt downward
to allow the driver to see into the previous blind spot and
avoid objects in close proximity to the rear of the vehicle.
Key-Off Power Delay
When this feature is selected, the power window
switches, radio, Uconnect™ Phone (if equipped), DVD
video system (if equipped), power sunroof (if equipped),
and power outlets will remain active for up to 10 minutes
after the ignition switch is turned OFF. Opening a vehicle
door will cancel this feature. To make your selection,
press and release the RESET button until Off, 45 sec.,
5 min., or 10 min. appears.
ILLUMIN. Approach
When this feature is selected, the headlights will activate
and remain on for up to 90 seconds when the doors areunlocked with the RKE transmitter. To make your selec-
tion, press and release the RESET button until “OFF,”
“30 sec.,” “60 sec.,” or “90 sec.” appears.
Blind Spot Alert
There are three selections when operating Blind Spot
Alert. By pressing and releasing the RESET button once,
the Blind Spot Alert feature can be activated in “Blind
Spot Alert Lights” mode. When this mode is selected the
Blind Spot Monitor (BSM) system is activated and will
only show a visual alert in the outside mirrors. By
pressing and releasing the RESET button a second time
“Blind Spot Alert Lights/CHM” mode is activated. In
this mode the Blind Spot Monitor (BSM) will show a
visual alert in the outside mirrors as well as an audible
alert when the turn signal is on. When “Blind Spot Alert
Off” is selected the Blind Spot Monitor (BSM) system is
deactivated.
4
UNDERSTANDING YOUR INSTRUMENT PANEL 255
ProCarManuals.com