Page 87 of 530
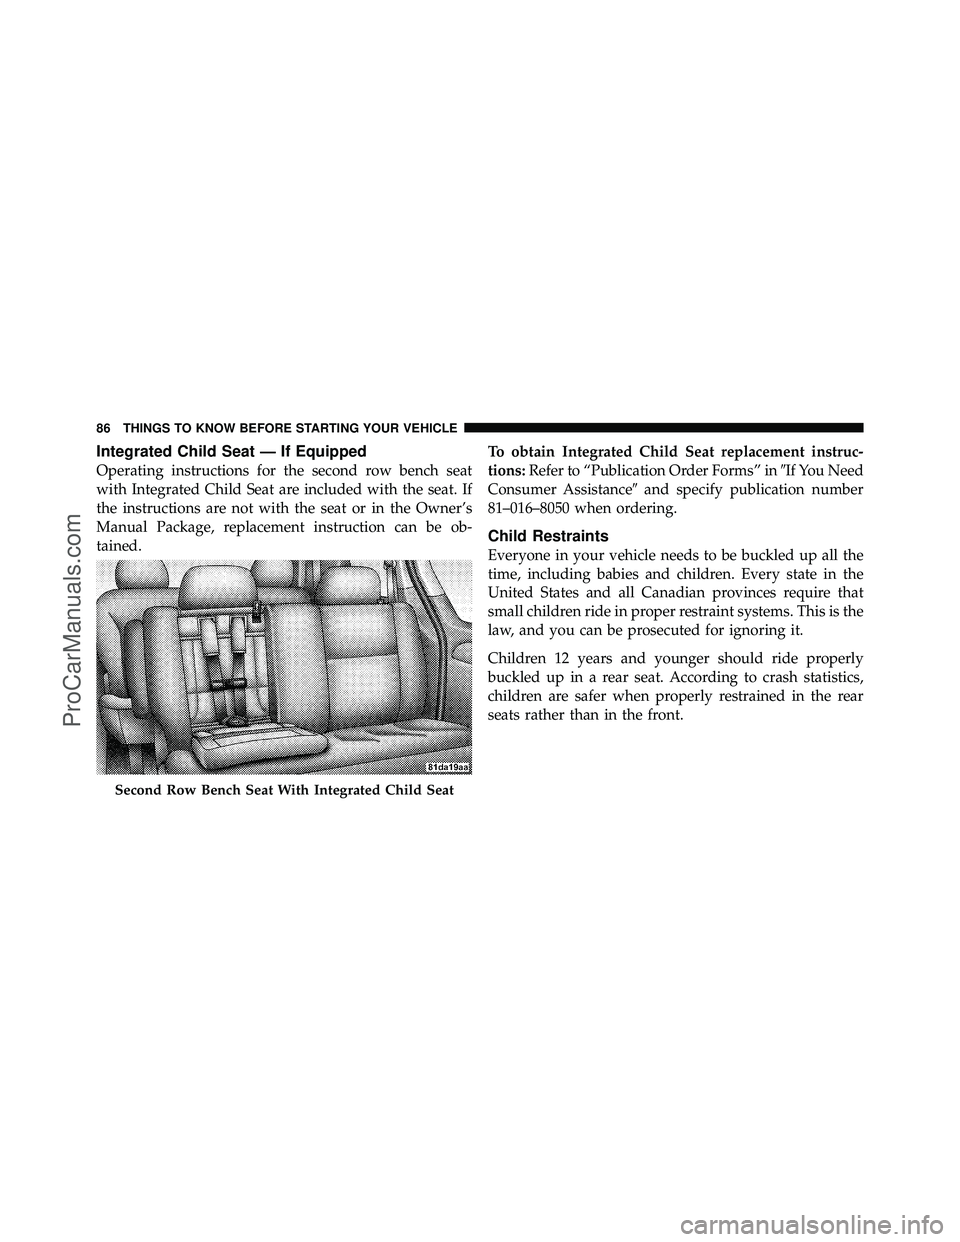
Integrated Child Seat — If Equipped
Operating instructions for the second row bench seat
with Integrated Child Seat are included with the seat. If
the instructions are not with the seat or in the Owner’s
Manual Package, replacement instruction can be ob-
tained.To obtain Integrated Child Seat replacement instruc-
tions:
Refer to “Publication Order Forms” in �If You Need
Consumer Assistance� and specify publication number
81–016–8050 when ordering.
Child Restraints
Everyone in your vehicle needs to be buckled up all the
time, including babies and children. Every state in the
United States and all Canadian provinces require that
small children ride in proper restraint systems. This is the
law, and you can be prosecuted for ignoring it.
Children 12 years and younger should ride properly
buckled up in a rear seat. According to crash statistics,
children are safer when properly restrained in the rear
seats rather than in the front.
Second Row Bench Seat With Integrated Child Seat
86 THINGS TO KNOW BEFORE STARTING YOUR VEHICLE
ProCarManuals.com
Page 92 of 530

belt several times to shorten it. Insert the latch plate
into the buckle with the release button facing out.
•If the belt still can’t be tightened, or if pulling and
pushing on the restraint loosens the belt, disconnect
the latch plate from the buckle, turn the buckle
around, and insert the latch plate into the buckle
again. If you still can’t make the child restraint secure,
try a different seating position.
•Buckle the child into the seat according to the child
restraint manufacturer’s directions.
•When your child restraint is not in use, secure it in the
vehicle with the seat belt or remove it from the vehicle.
Don’t leave it loose in the vehicle. In a sudden stop or
collision, it could strike the occupants or seatbacks and
cause serious personal injury.
Installing the Child Restraint System
We urge you to carefully follow the directions of the
manufacturer when installing your child restraint. Many,
but not all restraint systems will be equipped with
separate straps on each side, with each having a hook or
connector, and a means for adjusting the tension in the
strap. Forward-facing toddler restraints and some
rearward-facing infant restraints will also be equipped
with a tether strap, a hook and means for adjusting the
tension in the strap. Not all child restraint systems will be
installed as described here. Again, carefully follow the
installation instructions that are provided with the child
restraint system.
In general, you will first loosen the adjusters on the lower
straps and tether straps so that you can more easily attach
the hook or connector to the lower anchorages and tether
anchorages. Then tighten all three straps as you push the
child restraint rearward and downward into the seat.
2
THINGS TO KNOW BEFORE STARTING YOUR VEHICLE 91
ProCarManuals.com
Page 94 of 530
•If your child restraint seat is not LATCH-compatible,
install the restraint using the vehicle seat belts.
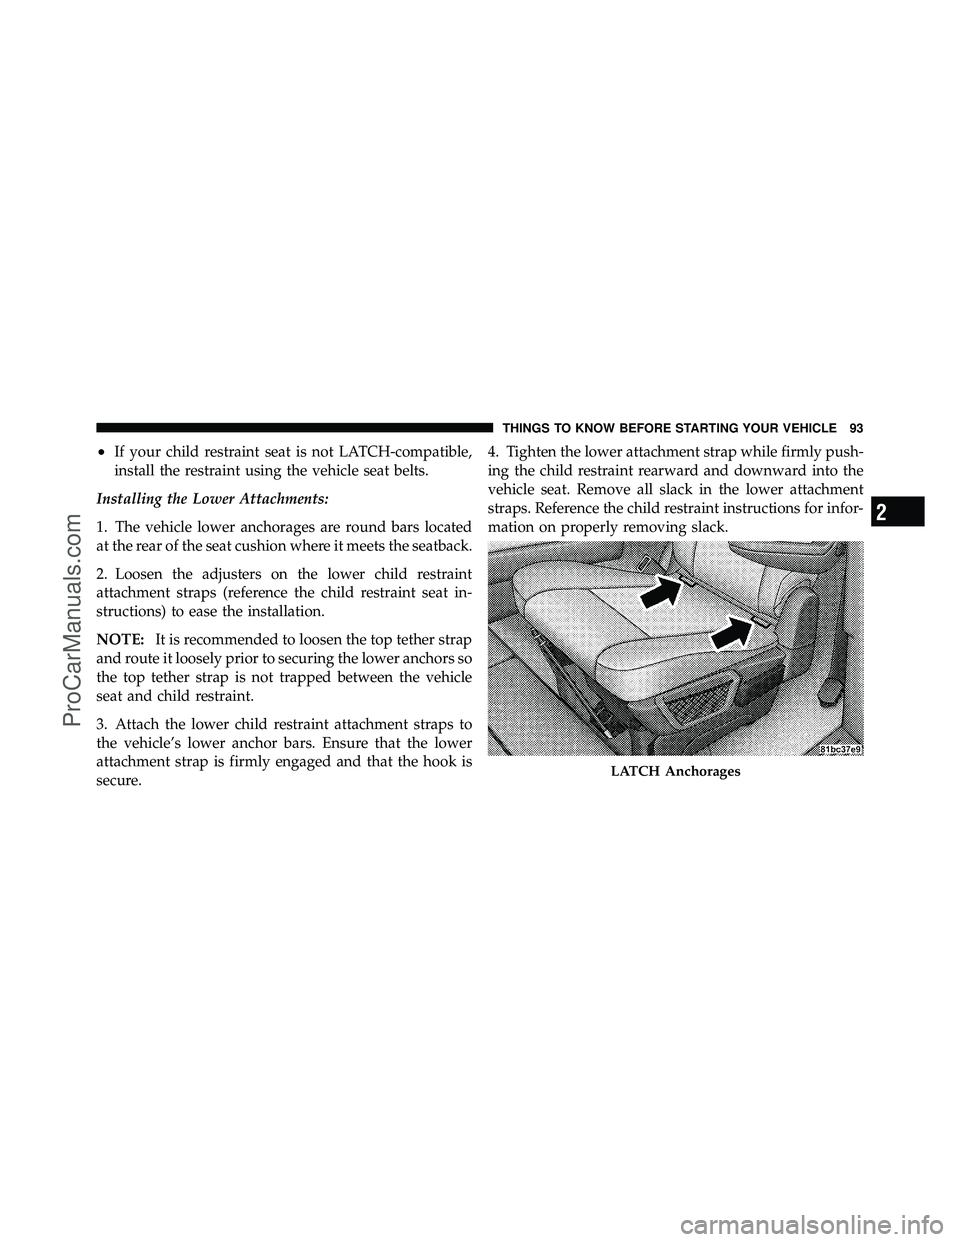
Installing the Lower Attachments:
1. The vehicle lower anchorages are round bars located
at the rear of the seat cushion where it meets the seatback.
2. Loosen the adjusters on the lower child restraint
attachment straps (reference the child restraint seat in-
structions) to ease the installation.
NOTE: It is recommended to loosen the top tether strap
and route it loosely prior to securing the lower anchors so
the top tether strap is not trapped between the vehicle
seat and child restraint.
3. Attach the lower child restraint attachment straps to
the vehicle’s lower anchor bars. Ensure that the lower
attachment strap is firmly engaged and that the hook is
secure. 4. Tighten the lower attachment strap while firmly push-
ing the child restraint rearward and downward into the
vehicle seat. Remove all slack in the lower attachment
straps. Reference the child restraint instructions for infor-
mation on properly removing slack.
LATCH Anchorages
2
THINGS TO KNOW BEFORE STARTING YOUR VEHICLE 93
ProCarManuals.com
Page 95 of 530
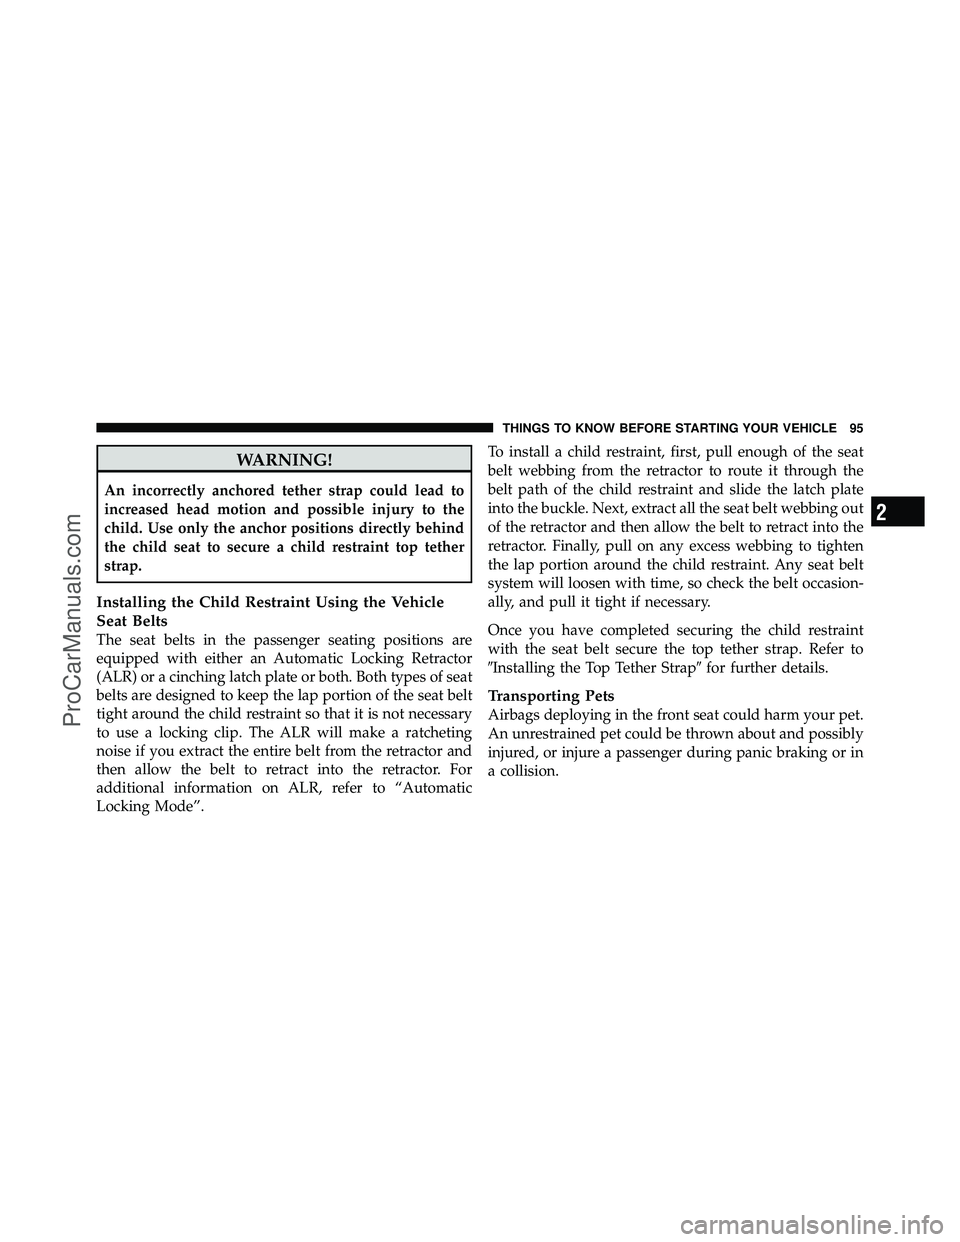
Installing the Top Tether Strap
(with either Lower Anchors or Vehicle Seat Belt):
1. Route the top tether strap under the adjustable head
restraint between the steel posts.
2. Provide enough slack (reference child restraint in-
structions) for the tether strap to reach the tether anchor
located near the bottom of the seat back.
3. Clip tether hook to tether anchor. Ensure that the hook
is firmly engaged and secure.
4. Remove all slack and tighten tether strap according to
child restraint manufacturer ’s instructions.
NOTE:The top tether strap is always to be secured,
regardless of if the child restraint is installed with the
lower anchors or the vehicle seat belt.
Rear Seat Tether Strap Mounting
94 THINGS TO KNOW BEFORE STARTING YOUR VEHICLE
ProCarManuals.com
Page 96 of 530
WARNING!
An incorrectly anchored tether strap could lead to
increased head motion and possible injury to the
child. Use only the anchor positions directly behind
the child seat to secure a child restraint top tether
strap.
Installing the Child Restraint Using the Vehicle
Seat Belts
The seat belts in the passenger seating positions are
equipped with either an Automatic Locking Retractor
(ALR) or a cinching latch plate or both. Both types of seat
belts are designed to keep the lap portion of the seat belt
tight around the child restraint so that it is not necessary
to use a locking clip. The ALR will make a ratcheting
noise if you extract the entire belt from the retractor and
then allow the belt to retract into the retractor. For
additional information on ALR, refer to “Automatic
Locking Mode”.To install a child restraint, first, pull enough of the seat
belt webbing from the retractor to route it through the
belt path of the child restraint and slide the latch plate
into the buckle. Next, extract all the seat belt webbing out
of the retractor and then allow the belt to retract into the
retractor. Finally, pull on any excess webbing to tighten
the lap portion around the child restraint. Any seat belt
system will loosen with time, so check the belt occasion-
ally, and pull it tight if necessary.
Once you have completed securing the child restraint
with the seat belt secure the top tether strap. Refer to
�Installing the Top Tether Strap�
for further details.
Transporting Pets
Airbags deploying in the front seat could harm your pet.
An unrestrained pet could be thrown about and possibly
injured, or injure a passenger during panic braking or in
a collision.
2
THINGS TO KNOW BEFORE STARTING YOUR VEHICLE 95
ProCarManuals.com
Page 97 of 530
Pets should be restrained in the rear seat in pet harnesses
or pet carriers that are secured by seat belts.
REAR SEAT DELETE FEATURE (COMMERCIAL
VEHICLES ONLY) — IF EQUIPPED
Commercial cargo vehicles are not designed for use as a
family vehicle and are not intended for carrying children
in the front passenger seat. However, if you must carry a
child in a vehicle without a rear seat, the passenger seat
should be moved to the full rearward position and the
child must be in a proper restraint system based on its
age, size and weight.
WARNING!
NEVER carry a child in a rear facing infant carrier in
a vehicle without rear seats. In an accident, serious
injury or death may occur from the deploying pas-
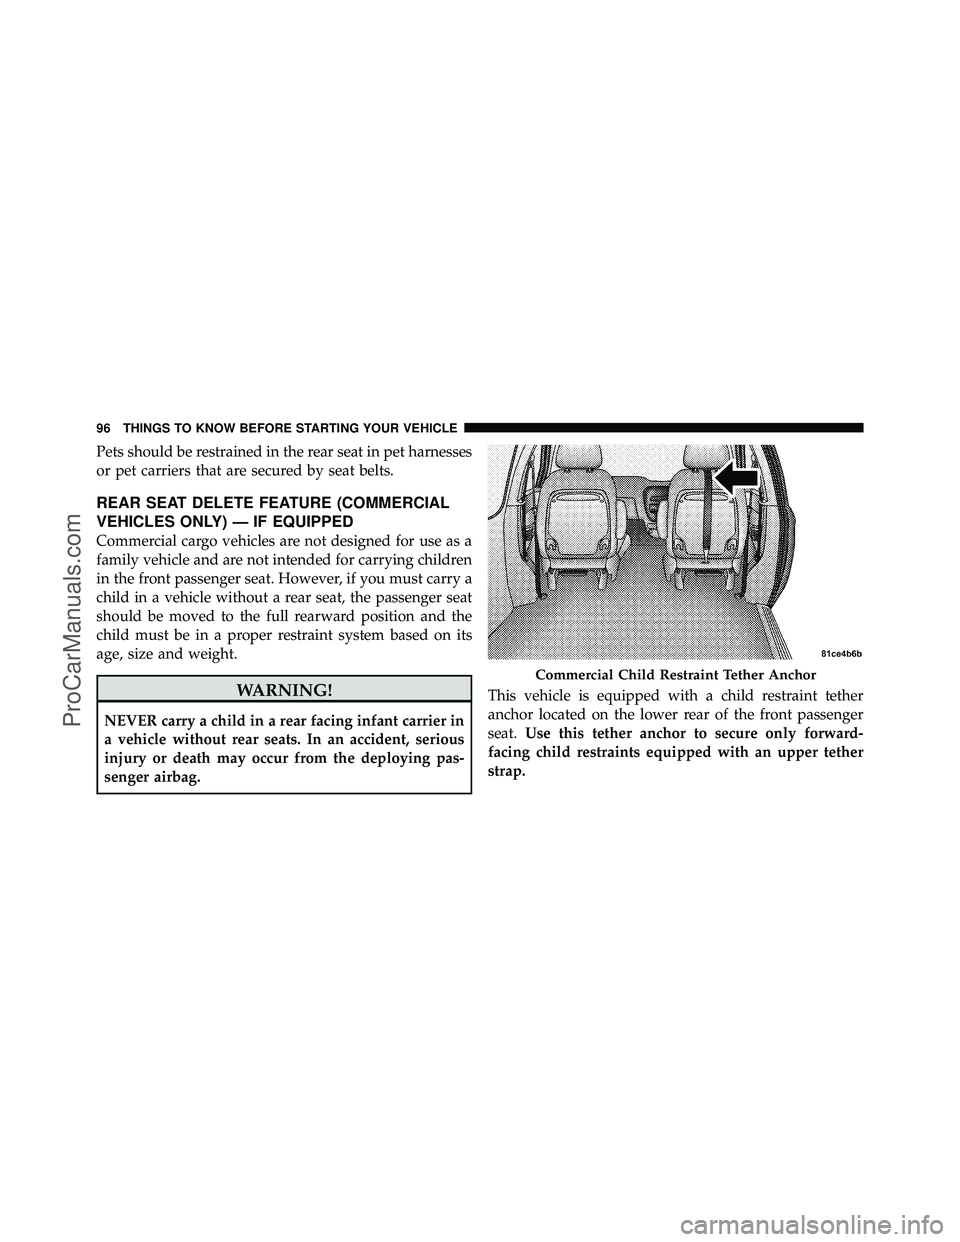
senger airbag.This vehicle is equipped with a child restraint tether
anchor located on the lower rear of the front passenger
seat.
Use this tether anchor to secure only forward-
facing child restraints equipped with an upper tether
strap.
Commercial Child Restraint Tether Anchor
96 THINGS TO KNOW BEFORE STARTING YOUR VEHICLE
ProCarManuals.com
Page 99 of 530

•Children more than 40 lbs (18 kg) should be secured in
the passenger seat in a child restraint or belt-
positioning booster seat with the seat adjusted to the
rear most position. Older children who do not use
child restraints or belt-positioning booster seats
should ride properly buckled in the passenger seat
with the seat adjusted to the rearmost position. Never
allow children to slide the shoulder belt behind them
or under their arm.
Tether Installation for Commercial Vehicles with
Rear Seat Delete
To secure the child restraint upper tether strap to the
vehicle, follow the instructions shown:
1. Locate the child restraint tether anchor on the lower
rear of the front passenger seat.
2. Follow the child restraint manufacturer’s directions
for proper use of connecting the child restraint to the
extended tether strap.3. Route the tether strap under the head rest.
NOTE:
Ensure that the child restraint tether strap is
centered between the headrest supports underneath the
head rest.
4. Using the hook attached to the child restraint tether
strap, attach the child restraint tether strap to the metal
anchor on the lower rear of the front passenger seat.
5. Following the child seat manufacturer’s instructions,
tighten the child restraint tether strap.
6. Inspect the tether anchor strap for nicks, abrasions,
discoloration, and loose threads. If these, or any other
condition that might affect the performance of the strap is
observed, DO NOT USE. Contact your authorized deal-
ership for a replacement part.
98 THINGS TO KNOW BEFORE STARTING YOUR VEHICLE
ProCarManuals.com
Page 103 of 530
Airbag Warning Light
The light should come on and remain on for four to eight
seconds as a bulb check when the ignition switch is first
turned ON. If the light is not lit during starting, see your
authorized dealer. If the light stays on, flickers, or comes
on while driving, have the system checked by an autho-
rized dealer.
Defroster
Check operation by selecting the defrost mode and place
the blower control on high speed. You should be able to
feel the air directed against the windshield. See your
authorized dealer for service if your defroster is
inoperable.
Floor Mat Safety Information
Always use floor mats designed to fit the foot well of
your vehicle. Use only floor mats that leave the pedal
area unobstructed and that are firmly secured so that
they cannot slip out of position and interfere with the
pedals or impair safe operation of your vehicle in other
ways.
WARNING!
Pedals that cannot move freely can cause loss of
vehicle control and increase the risk of serious per-
sonal injury.
•Always make sure that floor mats are properly
attached to the floor mat fasteners.(Continued)
102 THINGS TO KNOW BEFORE STARTING YOUR VEHICLE
ProCarManuals.com